Subaru Impreza 3 / Impreza WRX / Impreza WRX STI. Manual - part 169


  Index      Subaru     Subaru Impreza 3 / Impreza WRX / Impreza WRX STI - service repair manual 2008-2014 year


Search            


Content   ..  167  168  169  170   ..


Subaru Impreza 3 / Impreza WRX / Impreza WRX STI. Manual - part 169


ME(w/o STI)-57

Cam Sprocket

MECHANICAL

16.Cam Sprocket

A: REMOVAL

NOTE:

When replacing a single part, perform the work with

the engine assembly installed to body.

1) Remove the crank pulley. <Ref. to ME(w/o STI)-

45, REMOVAL, Crank Pulley.>

2) Remove the timing belt cover. <Ref. to ME(w/o

STI)-47, REMOVAL, Timing Belt Cover.>

3) Remove the timing belt. <Ref. to ME(w/o STI)-

48, REMOVAL, Timing Belt.>

4) Remove  the  actuator  cover  from  intake  cam

sprocket.

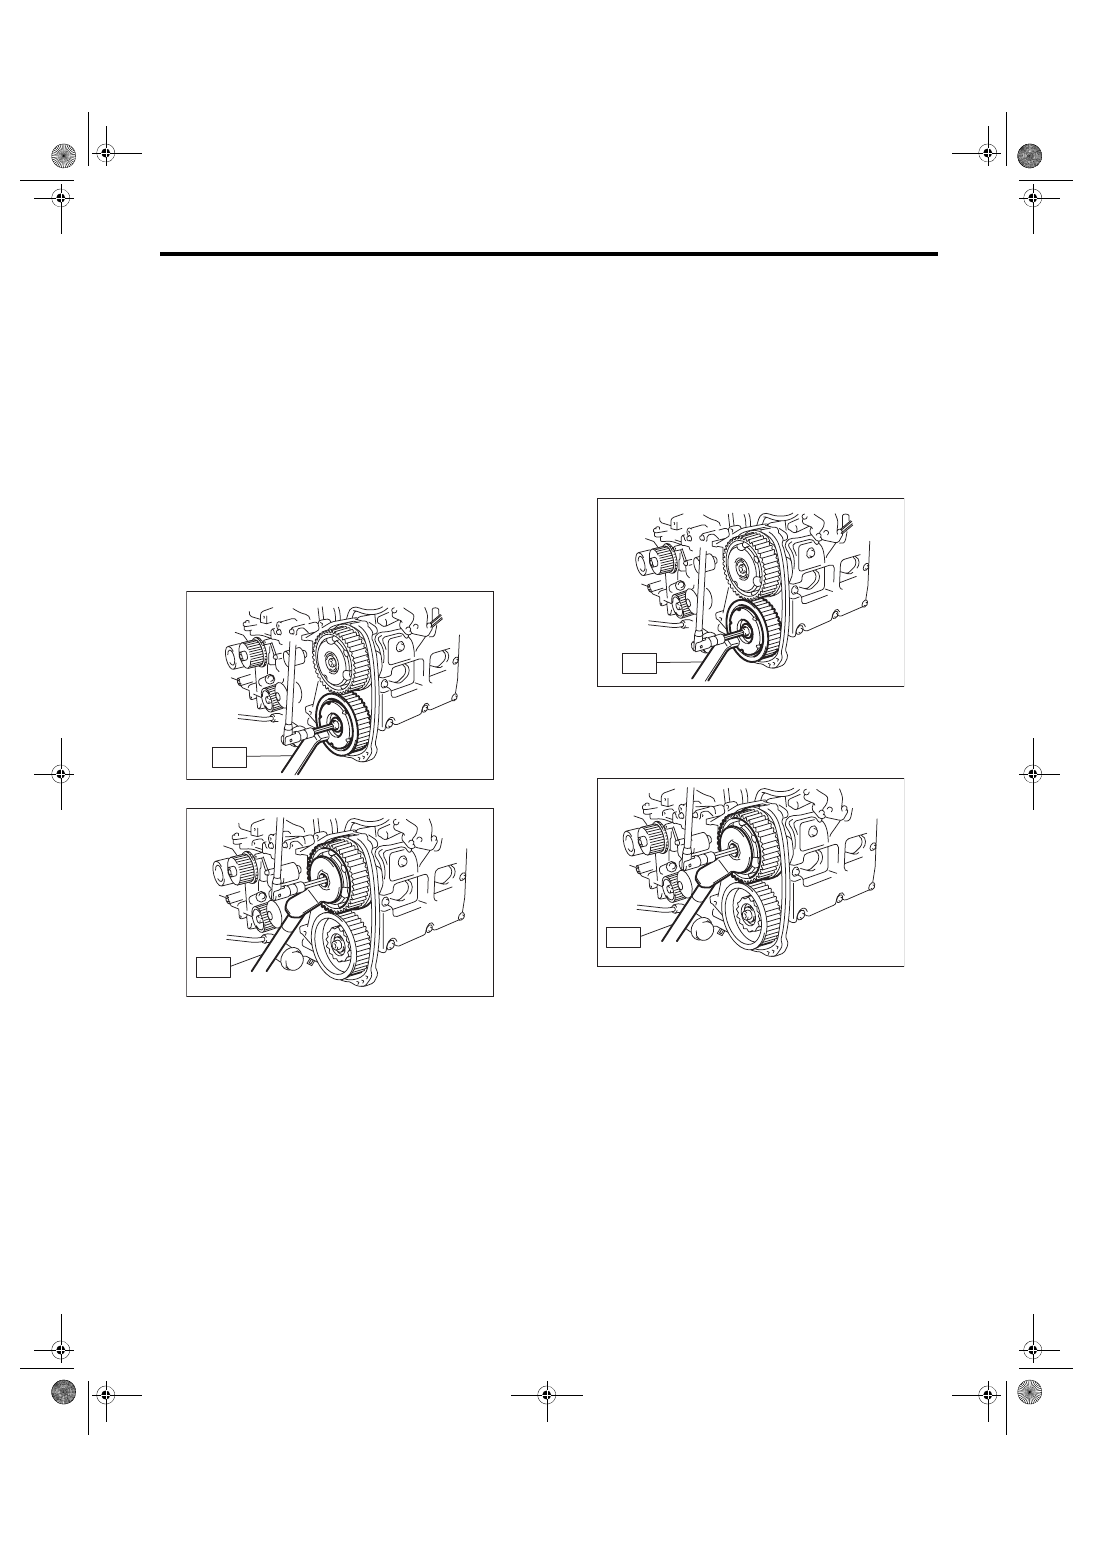
5) Use  the  ST  to  lock  the  cam  sprocket,  and  re-

move the cam sprocket bolt.

ST 499207400

CAM SPROCKET WRENCH

ST 499977500

CAM SPROCKET WRENCH

6) Remove the cam sprocket.

B: INSTALLATION

1) Install the cam sprocket.

2) Use the ST to lock the cam sprocket, and install

the cam sprocket bolt.
NOTE:

Do not confuse cam sprockets (LH) and (RH) dur-

ing installation.

ST 499207400

CAM SPROCKET WRENCH

Tightening torque:

Tighten to 30 N·m (3.1 kgf-m, 22.1 ft-lb) of 

torque, and then tighten further by 45°.

ST 499977500

CAM SPROCKET WRENCH

Tightening torque:

Tighten to 30 N·m (3.1 kgf-m, 22.1 ft-lb) of 

torque, and then tighten further by 45°.

3) Install the actuator cover to intake cam sprocket.
NOTE:

Use new O-rings.
Tightening torque:

3.4 N·m (0.3 kgf-m, 2.5 ft-lb)

4) Install the timing belt. <Ref. to ME(w/o STI)-50,

INSTALLATION, Timing Belt.>

5) Install  the  timing  belt  cover.  <Ref.  to  ME(w/o

STI)-47, INSTALLATION, Timing Belt Cover.>

6) Install the crank pulley. <Ref. to ME(w/o STI)-45,

INSTALLATION, Crank Pulley.>

C: INSPECTION

1) Check the cam sprocket teeth for abnormal wear

and scratches.

2) Make  sure  there  is  no  free  play  between  cam

sprocket and key.

ME-03282

ST

ME-03283

ST

ME-03282

ST

ME-03283

ST

ME(w/o STI)-58

Crank Sprocket

MECHANICAL

17.Crank Sprocket

A: REMOVAL

NOTE:

When replacing a single part, perform the work with

the engine assembly installed to body.

1) Remove the crank pulley. <Ref. to ME(w/o STI)-

45, REMOVAL, Crank Pulley.>

2) Remove the timing belt cover. <Ref. to ME(w/o

STI)-47, REMOVAL, Timing Belt Cover.>

3) Remove the timing belt. <Ref. to ME(w/o STI)-

48, REMOVAL, Timing Belt.>

4) Remove the crank sprocket.

B: INSTALLATION

1) Install the crank sprocket.

2) Install the timing belt. <Ref. to ME(w/o STI)-50,

INSTALLATION, Timing Belt.>

3) Install  the  timing  belt  cover.  <Ref.  to  ME(w/o

STI)-47, INSTALLATION, Timing Belt Cover.>

4) Install the crank pulley. <Ref. to ME(w/o STI)-45,

INSTALLATION, Crank Pulley.>

C: INSPECTION

1) Check  the  crank  sprocket  teeth  for  abnormal

wear and scratches.

2) Make sure there is no free play between crank

sprocket and key.

3) Check  the  crank  sprocket  protrusion  used  for

sensor  for  damage  and  contamination  of  foreign

matter.

ME-04983

ME-04983

ME(w/o STI)-59

Camshaft

MECHANICAL

18.Camshaft

A: REMOVAL

1) Remove  the  engine  from  the  vehicle.  <Ref.  to

ME(w/o STI)-29, REMOVAL, Engine Assembly.>

2) Remove the rear side belt. <Ref. to ME(w/o STI)-

38, REAR SIDE BELT, REMOVAL, V-belt.>

3) Remove the crank pulley. <Ref. to ME(w/o STI)-

45, REMOVAL, Crank Pulley.>

4) Remove the timing belt cover. <Ref. to ME(w/o

STI)-47, REMOVAL, Timing Belt Cover.>

5) Remove the timing belt. <Ref. to ME(w/o STI)-

48, REMOVAL, Timing Belt.>

6) Remove  the  cam  sprocket.  <Ref.  to  ME(w/o

STI)-57, REMOVAL, Cam Sprocket.>

7) Disconnect the connector from the oil flow con-

trol solenoid valve.

8) Remove the timing belt cover No. 2 RH (A) and

timing belt cover No. 2 LH (B).
NOTE:

When removing the timing belt cover, be careful not

to damage the seal rubber.

9) Remove the tensioner bracket.

10) Remove the clip (A) and the stay (B) which hold

the engine harness to the rocker cover RH.

11) Remove the air duct B (B) from the rocker cov-

er LH and the air duct A (A).

12) Remove the ignition coil. <Ref. to IG(w/o STI)-

8, REMOVAL, Ignition Coil.>

ME-05977

ME-04836

(B)

(A)

ME-04984

ME-04652

(A)

(B)

ME-04965

(B)

(A)

ME(w/o STI)-60

Camshaft

MECHANICAL

13) Disconnect  the  PCV  hose  (A)  and  PCV  hose

assembly (B) from the rocker cover.
NOTE:

Pinch the clamp of the PCV hose (A) by fitting the

cut out in the ST with the protrusion on the clamp as

shown in the figure, and unlock the clamp.

ST 18353AA000 CLAMP PLIERS

14) Remove the rocker cover.

15) Remove  the  union  bolt  without  filter  (without

protrusion) which secures the oil pipe to the front

camshaft cap.

16) Loosen the upper side of the front camshaft cap

and the intake camshaft cap bolts equally, a little at

a time in alphabetical sequence shown in the figure.

ME-04374

ST

ME-05768

(A)

(B)

(A)

(B)

(A) Union bolt with filter (with protrusion)
(B) Union bolt without filter (without protrusion)

(C) Oil pipe RH
(D) Oil pipe LH

(E) Gasket

ME-05030

(A)

(B)

(D)

(A)

(B)

(C)

(E)

(E)

(E)

(E)

(E)

ME-05978

(A)

(B)

(A)

(E)

(F)

(B)

(D)

(C)

(E)

(F)

(D)

(C)


Content   ..  167  168  169  170   ..