Subaru Impreza 3 / Impreza WRX / Impreza WRX STI. Manual - part 141


  Index      Subaru     Subaru Impreza 3 / Impreza WRX / Impreza WRX STI - service repair manual 2008-2014 year


Search            


Content   ..  139  140  141  142   ..


Subaru Impreza 3 / Impreza WRX / Impreza WRX STI. Manual - part 141


FU(w/o STI)-91

Fuel Delivery, Return and Evaporation Lines

FUEL INJECTION (FUEL SYSTEMS)

• When not using ST

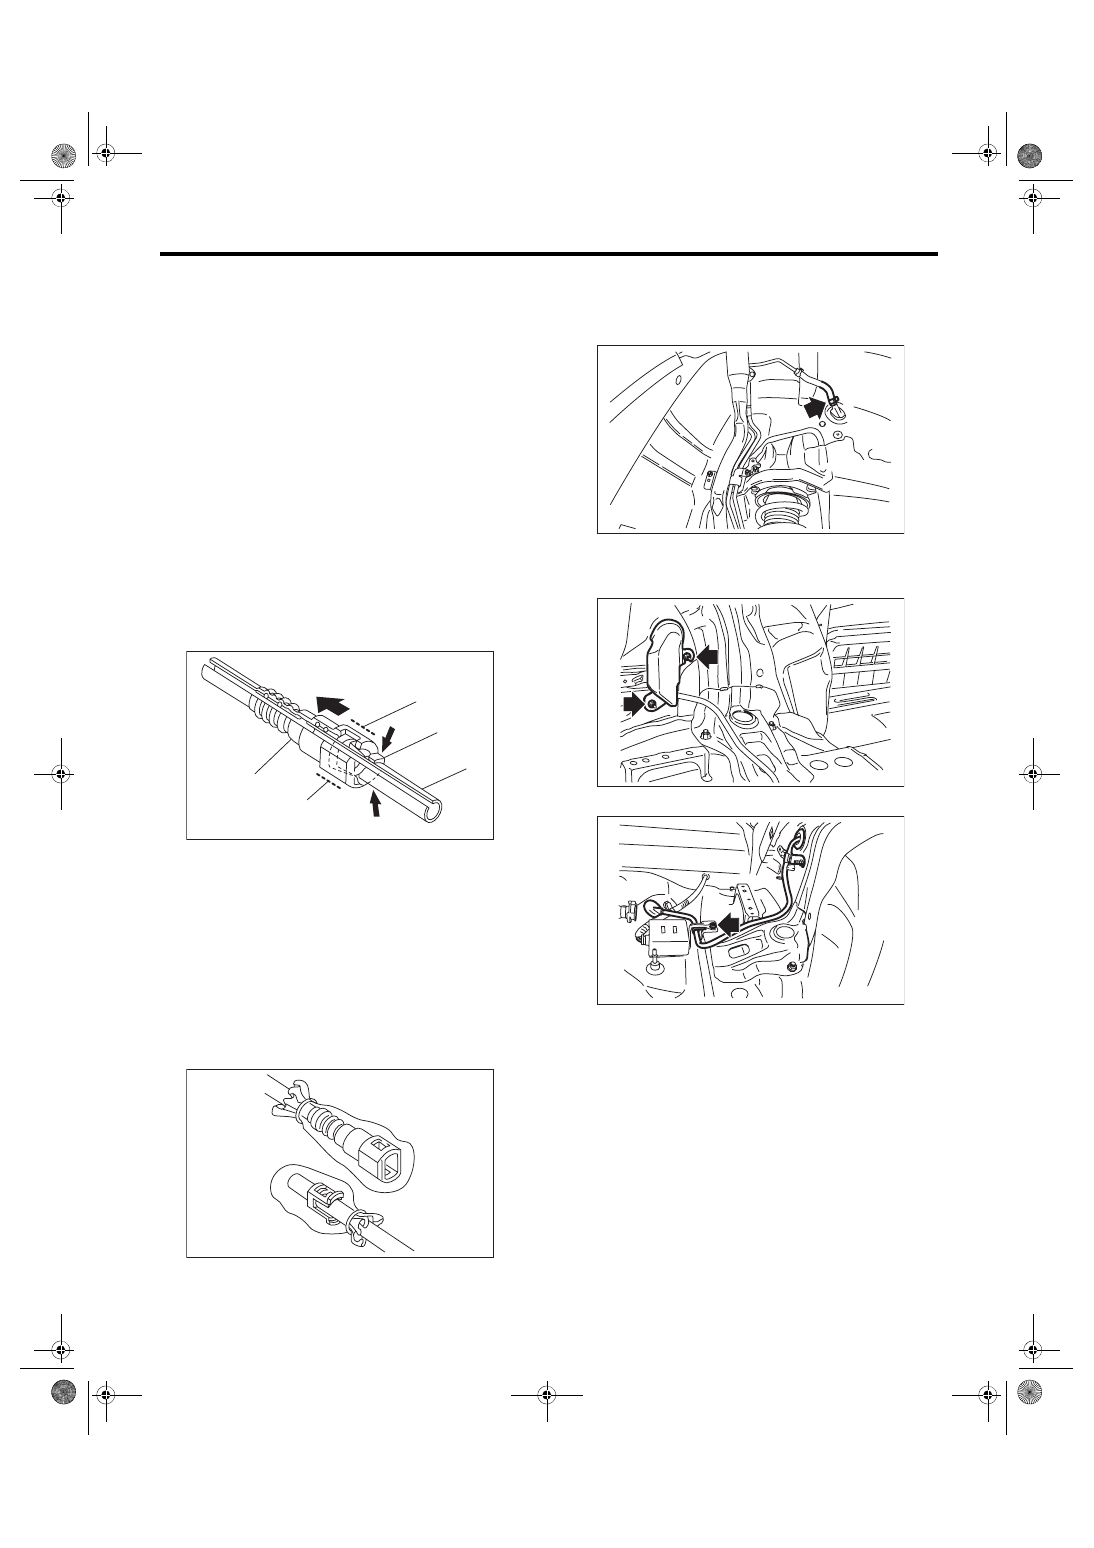
1. Push the retainer in the direction of the arrow,

disconnect the quick connector from pipe.
CAUTION:

• Be careful not to spill fuel.

• Catch the fuel from hoses using a contain-

er or cloth.

• To  disconnect  the  connector,  hold  (D)

shown in the figure and pull in axial direction.

• If  the  connector  and  pipe  are  sticking  to

each other, push and pull the connector with

the retainer pushed in the direction of the ar-

row, and then pull the connector after it starts

moving freely.

• When disconnecting the connector, do not

bend or twist the tube forcibly. If the tube is

bent, replace with a new part.

NOTE:

Clean the pipe and quick connector, if they are cov-

ered with dust.

2. To  prevent  from  damaging  or  entering  foreign

matter, wrap the pipes and quick connectors with

plastic bag etc.
CAUTION:

When  reusing  the  retainer,  do  not  disconnect

the retainer from the pipe.

9) Remove the evaporation pipe.

(1) Remove  the  rear  mud  guard  RH.  <Ref.  to

EI-30, REMOVAL, Mud Guard.>

(2) Disconnect the evaporation hose.

(3) Remove  the  right  side  rear  quarter  trim.

<Ref. to EI-60, REMOVAL, Rear Quarter Trim.>

(4) Remove the evaporation pipe protector.

(5) Remove the evaporation pipe from vehicle.

(A) Quick connector
(B) Retainer

(C) Pipe
(D) Connector holding position

FU-05510

(A)

(B)

(C)

(D)

(D)

FU-05507

FU-04305

FU-04306

FU-04307

FU(w/o STI)-92

Fuel Delivery, Return and Evaporation Lines

FUEL INJECTION (FUEL SYSTEMS)

B: INSTALLATION

Install in the reverse order of removal while being

careful of the following.

1. EVAPORATION PIPE INSTALLATION

1) Install the evaporation pipe to the vehicle.

2) Install the evaporation pipe protector.

3) Install the right side rear quarter trim. <Ref. to EI-

61, INSTALLATION, Rear Quarter Trim.>

4) Connect the evaporation hose.

5) Install the rear mud guard RH. <Ref. to EI-30, IN-

STALLATION, Mud Guard.>

2. CONNECTING THE FUEL LINE QUICK 

CONNECTOR

CAUTION:

• Make  sure  there  are  no  damage  or  dust  on

connections. If necessary, clean seal surface of

pipe.

• When  reusing  the  retainer,  make  sure  that

neither scratches nor deformation exist on the

retainer. If it is faulty, use a new part.

1) Connect the quick connector to pipe.
CAUTION:

• Make sure that the quick connector is secure-

ly connected.

FU-04307

FU-04306

FU-04305

(A) When removed using the ST
(B) When removed without using the ST

(a) Seal surface
(b) Pipe

(A) Quick connector
(B) Retainer

(C) Pipe

FU-05508

(a)

(b)

(a)

(b)

(A)

(B)

FU-05511

(A)

(B)

(C)

FU(w/o STI)-93

Fuel Delivery, Return and Evaporation Lines

FUEL INJECTION (FUEL SYSTEMS)

• Make  sure  the  two  retainer  pawls  are  en-

gaged  in  their  mating  positions  in  the  quick

connector.

• Be  sure  to  inspect  tubes  and  their  connec-

tions for any leakage of fuel.

• To connect the connector, hold (d) shown in

the figure and push in axial direction.

• When connecting the connector, do not bend

or twist the tube forcibly. If the tube is bent, re-

place with a new part.

3. CONNECTING FUEL DELIVERY HOSE, 

FUEL RETURN HOSE AND FUEL HOSE

Connect  the  fuel  delivery  hose,  fuel  return  hose,

and fuel hose as shown in the figure.
CAUTION:

• If the connection portion has a spool or stop-

per, do not allow the end of the hose to bend or

ride over by inserting the hose too deep.

• Be  sure  to  inspect  hoses  and  their  connec-

tions for any leakage of fuel.

NOTE:

Use new fuel delivery hose, fuel return hose, and

fuel hose.
Tightening torque:

1.25 N·m (0.1 kgf-m, 0.9 ft-lb)

L1: 2.5

±

1.5 mm (0.098

±

0.059 in)

L2: 22.5

±

2.5 mm (0.886

±

0.098 in)

4. EVAPORATION HOSE CONNECTION

Connect the evaporation hose to the pipe with an

overlap of 15 to 20 mm (0.59 to 0.79 in).
L = 17.5

±

2.5 mm (0.689

±

0.098 in)

C: INSPECTION

1) Check  that  the  fuel  pipe  has  no  deformation,

cracks or other damages.

2) Check that the hose and tube have no cracks,

damage or loose part.

(A) When removed using the ST
(B) When removed without using the ST

(a) Quick connector
(b) Retainer

(c) Pipe

(d) Connector holding position

FU-05509

(b)

(c)

(b)

(c)

(A)

(B)

(a)

(a) (d)

(d)

(d)

(d)

(1) When there is a spool or bump
(2) When there is no spool or bump
(3) Pipe
(4) Spool or bump
(5) Clamp
(6) Hose

(1) Hose
(2) Clip
(3) Pipe

FU-04503

(3)

(5)

(6)

L2

(1)

(2)

L1

L1

(4)

FU-04501

(1)

(2)

L/2

L

(3)

FU(w/o STI)-94

Fuel System Trouble in General

FUEL INJECTION (FUEL SYSTEMS)

33.Fuel System Trouble in General

A: INSPECTION

NOTE:

• When the vehicle is left unattended for an extended period of time, water may accumulate in the fuel tank.

Fill fuel fully to prevent the problem.

• In snow-covered areas, mountainous areas, skiing areas, etc. where ambient temperatures drop to 0°C

(32°F) or less throughout the winter season, use a water removing agent in the fuel system to prevent freez-

ing fuel system and accumulating water.

• When water is accumulated in fuel filter, fill the water removing agent in the fuel tank.

• Before using water removing agent, follow the cautions noted on the bottle.

Trouble

Possible cause

Corrective action

Insufficient fuel 
supply to fuel 
injector

a. Fuel pump does not operate.


Defective terminal contact

Inspect contact, especially ground, and tighten it 
securely.

Trouble in electromagnetic or electronic circuit parts

Replace the faulty parts.

b. Decline of fuel pump function

Replace the fuel pump.

c. Clogged fuel filter

Replace the fuel filter. Clean or replace the fuel 
tank if necessary.

d. Clogged or bent fuel line pipe, hose or tube

Clean, correct or replace the fuel line pipe, hose 
or tube.

e. Air is mixed in fuel system.

Check the fuel line connections, correct or 
replace the defective part.

f. Damaged diaphragm of pressure regulator

Replace the pressure regulator.

Leakage or blow 
out of fuel

a. Loose connections of fuel line pipe, hose or tube

Check the fuel line connections, correct or 
replace the defective part.

b. Cracked fuel line pipe, hose or tube

Replace the fuel line pipe, hose or tube.

c. Cracked fuel tank or defective welding part

Replace the fuel tank.

d. Clogged or bent fuel line pipe, hose or tube

Clean, correct or replace the fuel line pipe, hose 
or tube.

Gasoline smell 
inside of com-
partment

a. Loose connections of fuel line pipe, hose or tube

Check the fuel line connections, correct or 
replace the defective part.

b. Defective gasket of fuel saucer or fuel filler pipe assembly Correct or replace the gasket.
c. Defective canister

Replace the canister.

Defective fuel 
gauge

a. Defective operation of fuel level sensor

Replace the fuel level sensor.

b. Defective operation of combination meter

Replace the combination meter.

c. Defective operation of integrated unit

Replace the integrated unit.

Noise

a. Large operation noise or vibration of fuel pump

Replace the fuel pump.


Content   ..  139  140  141  142   ..