Skoda Karoq (2019 year). Manual - part 5


  Index      Skoda     Skoda Karoq (2019 year) - manual in english


Search            copyright infringement  


Content      ..     3      4      5      6     ..


Skoda Karoq (2019 year). Manual - part 5


Operation of the lights from the front seats

Fig. 68 

Operation of the lights from the

front seats: Variant 1

Fig. 69  Operation of the front light: Version 2/version 3

Switching on/off (by pressing the relevant switch) - version 1 

» Fig. 68

 Automatic operation

  Rear lighting

 Reading light left

 Reading light right

Positions of the rocker switch 

A

 - versions 2 and 3 

» Fig. 69

Switch on
Automatic operation (centre position)
Switch off

There is no icon available for the centre position (automatic operation) in ver-

sion 3.

A
B
C
D

Switching on/off (by pressing the relevant switch 

B

 version 2 and 3)

» Fig. 69

Reading lamp left
Reading lamp right

Automatic operation - switch or position 

The system is turned on when any of the following is present.

The vehicle is unlocked.

One of the doors is opened.

The ignition key is removed.

The system is turned off when any of the following is present.

The vehicle is locked.

The ignition is switched on.

About 30 seconds after all the doors have been closed.

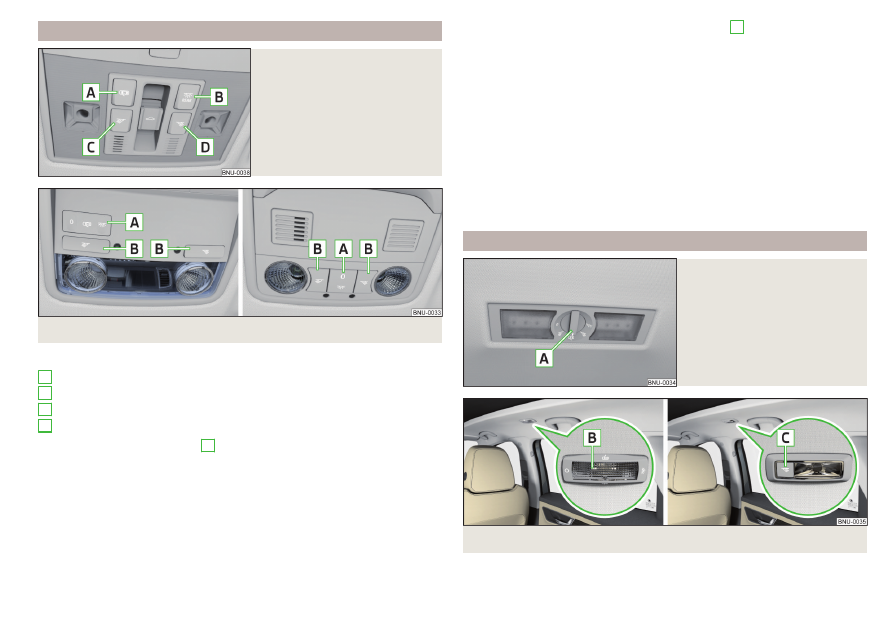
Interior light, rear

Fig. 70 

Interior lights at the rear: Variant

1

Fig. 71  Interior lights at the rear: Version 2/version 3

77

Lights and visibility

-------------------------------------------------------------------------------------------------------------------------------------------------------------

Version 1 - (turning the switch 

A

) 

» Fig. 70

Switching off
Reading lamp left
Automatic operation (the light is switched on/off automatically together

with the front light)
Reading lamp right
Switching on

Version 2: operation (by moving the spreader disc 

B

) 

» Fig. 71

Switching on
Switching off
Automatic operation (the light is switched on/off automatically together

with the front light)

Version 3 - switching on/off (by pressing the relevant switch 

B

) 

» Fig. 71

Reading lamp left
Reading lamp right

The rear light (variant 3) is switched on/off automatically together with the

front light. When the front interior lighting is switched off, the rear interior

lighting can be turned on/off as required.

Ambient lighting

Fig. 72 

Setting the ambient lighting

The ambient lighting illuminates the dashboard and front side door trim panels

in colour, and the footwell in white.
The switching on of the lighting takes place automatically after opening the

door, switching off occurs automatically after the locking of the vehicle or 30

seconds after the closing of the door with the ignition switched off.

The ambient lighting can be adjusted in Infotainment in the menu 



/  → 

→ Background lighting.
Description of the function surfaces 

» Fig. 72

Enable / disable the background lighting
Activating of the brightness setting for all areas at the same time
Enabling brightness setting for the left dashboard area
Enabling brightness setting for the right dashboard area
Activating the brightness setting for the footwell area
Enabling brightness setting for the front door area
Choice of colour options / brightness adjustment
Function surfaces for selecting lighting colour / brightness adjustment

To display 

B

C

D


E

 and 

F

, tap on the function surface .

Vehicles by selecting the driving mode

For vehicles with driving mode selection 

» page 242

 The lighting can be

switched on automatically or manually 

A


» Fig. 72

. A change in the illumination

colour occurs automatically due to the driving mode change or manually by se-

lecting one of the colour options. In individual mode, the last manually selected

colour is displayed.

Note

The adjustment of the ambient lighting is stored (depending on Infotainment

type) in the active user account personalisation 

» page 57

.

Visibility

Introduction

WARNING

No objects should be attached to the sun visors, which could limit the view

or endanger the vehicle occupants during sudden braking or should the ve-

hicle collide.

A
B
C
D

E
F

G
H

78

Operation

-------------------------------------------------------------------------------------------------------------------------------------------------------------

Windscreen and rear window heater

Fig. 73  Buttons for the front and rear window heater: Climatronic /

manual air conditioning

Read and observe   on page 78 first.

The heating for quick defrosting and ventilation of the front /and rear window.
The heating only works when the engine is running.
Buttons for the heating (depending on vehicle equipment) 

» Fig. 73

Switch the windscreen heater on/off
Switch the rear window heating on/off

When the heating is switched on, a light illuminates inside or below the button.

The heating automatically switches off after ten minutes.
If the engine is switched off when the heating is on and turned back on again

within 10 minutes, the heating is continued.

Note

If the on-board voltage decreases, the heating switches off automatically

» page 272

Automatic consumer shutdown - discharge protection of the vehi-

cle battery.

If the lighting inside or below the button flashes, the heater will not work be-

cause of the low charge of the battery.

If the Climatronic recognises that the windshield could fog up, the windshield

heating is automatically switched on. This function can be activated/deactiva-

ted on the Climatronic control panel in the menu 



 → 

Front sun visors

Fig. 74  Fold down flap / flip up flap / make-up mirror and parking permit

holder

Read and observe   on page 78 first.

Operation and description of the sun visor 

» Fig. 74

Swivel the visor towards the windscreen
Swivel cover towards the door
Make-up mirror with cover (the cover can be pushed in the direction of

the arrow)
Light (turns on when the cover of the make-up mirror is pushed to one

side)
Parking ticket holder

Windscreen wipers and washers

Introduction

The windscreen wipers and the wash system operate if the ignition is switched

on and the bonnet and boot are closed.

WARNING

Do not use the windscreen washer system at low temperatures, without

heating the windscreen beforehand. The window washer fluid could other-

wise freeze on the windscreen and restrict the view to the front.

1

2

A

B

C

79

Lights and visibility

-------------------------------------------------------------------------------------------------------------------------------------------------------------

CAUTION

If the windscreen wipers are in rest position, they cannot be folded out from

the windscreen. The wipers must be set to the service position to raise them

off the windscreen 

» page 290

.

In cold temperatures and during the winter, check before switching on the

ignition that the wiper blades are not frozen to the windscreen. If the wind-

screen wipers are switched on when the blades are frozen to the windscreen,

this may damage both the blades and windscreen wiper motor.

Carefully release the frozen-on windscreen wiper blades from the wind-

screen and remove snow and ice.

Handle the windscreen wipers with care - there is the risk of damaging the

windscreen with the windscreen wiper arms.

Do not switch on the ignition when the front windscreen wiper arms are fol-

ded down - there is the danger of damaging the bonnet by the windscreen

wiper arms.

Note

The windscreen washer nozzles for the windscreen are heated when the en-

gine is running and the outside temperature is less than +10 °C.

Front wipers and washers

Fig. 75 

Operating the windscreen wip-

ers and washing system at the

front

Read and observe   and   on page 79 first.

Fast disk wiping

Slow disk wiping

Depending on equipment fitted:

Intermittent wipe of the windscreen

Automatic windscreen wiping in the rain

Wipers and washers off









Single windscreen wipe (sprung position)

 Setting of windscreen wiper interval for the position  - by setting the

switch in the direction of the arrow, the windscreen wipers will wipe more

often
Spraying and wiping the screen (spring-loaded position) – after releasing

the operating lever the wipers continue for another 2 to 3 strokes

Automatic windscreen wiping in the rain can be used in Infotainment in the

menu 



/  →  → Mirrors and wipers (activated/deactivated).

WARNING

Automatic wiping during rain is only a support. The driver is not released

from the responsibility to set the function of the windscreen wipers man-

ually depending on the visibility conditions.

Note

If the wiping is carried out without interruption, the wiping speed varies de-

pending on the vehicle speed.

The setting (activation/deactivation) of the automatic windscreen wiping in

the rain is stored (depending on the Infotainment type) in the active user ac-

count personalisation 

» page 57

.

Rear window wipers and washers

Fig. 76 

Operating the windscreen wip-

ers and washing system

Read and observe   and   on page 79 first.

Spraying and wiping the windscreen (sprung position) - after releasing the

control stalk, the wipers perform another 2 to 3 wiper strokes
Windscreen wiping
Wipers and washers off



A



80

Operation

-------------------------------------------------------------------------------------------------------------------------------------------------------------

Automatic rear wiper

If the windscreen wiping is performed without interruption, then the automat-

ic regular intermittent wiping of the rear window takes place.
This function can be used in Infotainment in the menu 



/  →  → Mirrors and

wipers (activated/deactivated).

Note

The rear window is wiped automatically if the windscreen wipers are on

when reverse gear is selected.

The setting (activation/deactivation) of the automatic rear window wiping in

the rain is stored (depending on the Infotainment type) in the active user ac-

count personalisation 

» page 57

.

Headlight cleaning system

Read and observe   and   on page 79 first.

Headlights are cleaned under the following conditions.

The low beam is switched on.
The outside temperature is about -12° C to +39° C.

To clean the headlights, the headlamp is also sprayed after spraying the wind-

screen every first and tenth time. Setting the spray interval can be carried out

by a specialist garage.
To ensure the correct functioning of the system, even in winter, this needs to

be regularly cleared of snow and ice (e.g. using the de-icing spray).

Rear view mirror

Introduction

WARNING

Exterior mirrors increase the field of view, however, make objects appear

smaller and further away. Therefore, use the rear-view mirror to determine

the distances to the following vehicles.

WARNING

The mirrors with automatic dimming contain electrolyte fluid which may

leak if the mirror glass is broken - this can irritate skin, eyes and the respira-

tory system.

If your eyes or skin come into contact with the electrolytic fluid, immedi-

ately wash the affected area for a few minutes long with a lot of water.

Seek medical assistance if required.

Interior mirror dimming

Fig. 77  Interior rear-view mirror: with manual dimming/auto-darkening

Read and observe   on page 81 first.

Mirrors with manual dimming 

» Fig. 77

Basic position of the mirror (not dimmed)
Mirror blackout

Mirror with automatic dimming

The mirror dimming 

» Fig. 77

 is automatically controlled after the engine start.

When the interior lights are switched on or the reverse gear is engaged, the

mirror moves back into the basic position (not dimmed).

1

2

81

Lights and visibility

-------------------------------------------------------------------------------------------------------------------------------------------------------------

WARNING

Attach external devices (e.g. navigation system) not in the vicinity of the

mirror with automatic dimming. The illuminated display of an external de-

vice can affect the function of the rear-view mirror - it could cause an acci-

dent.

Automatic mirror dimming only operates correctly if the light striking the

sensor is not affected by other objects. The sensors are located on the

front and back of the mirror.

Exterior mirrors

Fig. 78 

Exterior mirror operation

Read and observe   on page 81 first.

The exterior mirrors can (depending on vehicle equipment) have a manual or

electric fold-in function, automatic dimming and memory function.
The rotary knob can be moved into the following positions (depending on

vehicle equipment)

Adjusting the left-hand mirror area
Switch off mirror control
Adjusting the right-hand mirror area
Mirror heating (only works when the engine is running)
Folding in the mirrors electrically (to fold back, move the rotary knob to

another position) 

» 

Setting the mirror area

Move the rotary knob in the direction of arrows 

» Fig. 78

.

If the mirror setting fails at any time, the mirrors can be adjusted manually by

pressing on the edge of the mirror area.

Setting the mirror surfaces synchronously

This function allows the simultaneous adjustment of the two mirror areas. The

function can be activated/deactivated in Infotainment in the menu 



/  → 

→ Mirrors and wipers (activated/deactivated).

Turn the knob for the mirror control to the position for the driver mirror ad-

justment.

Adjust the mirror areas to the desired position.

Manual folding mirrors

The mirror can be manually folded towards the side windows. To put it back to

its original position, it should be folded back from the side window until it audi-

bly clicks into place.

Automatic folding in/back of both mirrors

The exterior mirrors are automatically collapsed after locking the vehicle in the

park position. After unlocking the vehicle, the mirrors are folded back to the

driving position 

» 

.

This function can be used in Infotainment in the menu 



/  →  → Mirrors and

wipers (activated/deactivated).

Mirror with automatic dimming

The exterior mirror dimming is controlled together with the automatic rear-

view mirror dimming 

» page 81

.

Memory function for mirror (vehicles with electrically adjustable driver's

seat)

It is possible to save the current setting of the exterior mirror when saving the

driver's seat position with 

» page 84

Memory Function of the electrically ad-

justable seat or 

» page 85

Memory function of the remote control key.

Tilting the mirror area of the front passenger mirror (vehicles with

electrically adjustable driver's seat)

The front passenger mirror area can be tilted to the stored position to improve

the view to the curb when reversing.
Operating conditions

The function can be activated in Infotainment in the menu 



/  →  →

Mirrors and wipers.
The setting of the mirror area has been previously stored 

» page 84

,

Memory Function of the electrically adjustable seat or. 

» page 85

Memo-

ry function of the remote control key.

82

Operation

-------------------------------------------------------------------------------------------------------------------------------------------------------------

The reverse gear is engaged.
The knob for the mirror control is in the position for the passenger mirror

adjustment.

The mirror area returns to its initial position after the rotary knob is set to an-

other position or if the speed is greater than 15 km/h.

WARNING

Do not touch the exterior mirror surfaces, if the exterior mirror heating is

switched on - hazard of burning.

CAUTION

Never manually fold in/out the electrically folding exterior mirrors - there is a

risk of damage to the mirror!

When the mirror is swung by external influences (due to impact during ma-

noeuvring, for example), then first fold-in the mirror by turning the knob and

wait for a loud clapping noise.

Note

The setting of the mirror functions is stored in Infotainment (depending on the

Infotainment type) in the active user account personalisation 

» page 57

.

Seats and head restraints

Front seats

Introduction

WARNING

Only adjust the driver's seat when the vehicle is stationary – risk of acci-

dent!

Caution when adjusting the seat! You may suffer injuries or bruises as a

result of adjusting the seat without paying proper attention.

Manual adjustment

Fig. 79 

Control elements on the seat

Read and observe   on page 83 first.

Adjusting the seat in the longitudinal direction (after releasing the control

lever must lock audibly)
Adjusting height of seat
Adjust the tilt of the backrest (do not lean on the backrest when adjusting)
Setting the extent of the curvature of the lumbar support

Note

After a certain time, play can develop within the adjustment mechanism of the

backrest angle.

A

B
C
D

83

Seats and head restraints

-------------------------------------------------------------------------------------------------------------------------------------------------------------

Electrical adjustment

Fig. 80  Control elements on the seat

Read and observe   on page 83 first.

seat adjustment

1 - Move in the longitudinal direction

2 - Change in inclination

3 - Change in height

Adjusting the seat backrest

4 - Change in inclination

Adjusting lumbar support

5 - Change curvature

6 - The degree of curvature change

WARNING

The electric front seat adjustment is functional even with the ignition off.

Therefore, when leaving the vehicle, never leave people who are not com-

pletely independent, such as children, unattended in the vehicle - there is a

danger of injury!

Note

If the inclination angle of the seat backrest relative to the seat surface is

greater than approx. 110°, then it is not possible for safety reasons to save this

setting in the memory of the electrically adjustable seats or the remote control

key.

On vehicles with personalisation, the driver's seat setting is stored in the ac-

tive user account personalisation 

» page 57

.

A

B

C

Memory Function of the electrically adjustable seat

Fig. 81 

SET button and memory but-

tons

Read and observe   on page 83 first.

Among the memory buttons 

B

 on the driver's seat, a setting for the driver´s

seat and exterior mirror position can be saved 

» Fig. 81

.

Storing driver's seat and exterior mirror settings for the forwards drive

Switch on the ignition, adjust the seat and the exterior mirrors, as required.

Press the  

A


» Fig. 81

 button and then, within 10 seconds, press the de-

sired memory button 

B

. Storing is confirmed by an acoustic signal.

Storing front passenger´s exterior mirror settings for reversing

The function for lowering the front passenger's mirror area during reversing

can be activated in Infotainment in the menu 



/  →  → Mirrors and wipers.

Turn on the ignition and press the desired memory button 

B


» Fig. 81

.

Turn the rotary knob for the exterior mirror control to the position for the

front passenger mirror area 

» page 82

.

Engage reverse gear.

Adjust the front passenger's mirror to the desired position.

Disengage reverse gear. The set position of the exterior mirror is stored.

Retrieving the saved setting

With the ignition off and the driver’s door open-press- the desired memory

button B.

In other cases (e.g. if the ignition is switched on or the driver's door closed),

hold the button.

Stopping the ongoing adjustment

Press any button on the driver's seat or the  button on the remote control

key.

84

Operation

-------------------------------------------------------------------------------------------------------------------------------------------------------------

Note

Every time you save new seat and exterior mirror settings for driving forwards,

you must also save the front passenger mirror setting for reversing again.

Memory function of the remote control key

Applies to vehicles that do not have the personalisation function.

Read and observe   on page 83 first.

Every time the vehicle is locked, the driver´s seat and exterior mirror settings

are saved and assigned to the key with which the vehicle was locked.
After the following unlocking of the vehicle with the same key and opening the

driver’s door, the driver´s seat and exterior mirrors that are saved to this key

will be adopted.
This function can be used in Infotainment in the menu 



/  →  → Seats acti-

vated/deactivated.

Storing front passenger´s exterior mirror settings for reversing

The function for lowering the front passenger's mirror area during reversing

can be activated in Infotainment in the menu 



/  →  → Mirrors and wipers.

Unlock the vehicle with the remote control key and switch on the ignition.

Turn the rotary knob for the exterior mirror control to the position for the

front passenger mirror area 

» page 82

.

Engage reverse gear.

Adjust the front passenger's mirror to the desired position.

Disengage reverse gear. The adjusted position of the exterior mirror is stored

in the remote control key memory.

Stopping the ongoing adjustment

Press any button on the driver's seat or the  button on the remote control

key.

Folding front passenger seat

Fig. 82 

Folding the front passenger seat

forward

Read and observe   on page 83 first.

The front passenger seat can, (depending on equipment fitted), be folded for-

ward into a horizontal position.

To fold down, pull the lever in direction of arrow 

1

, fold the seat backrest in

the direction of arrow 

2


» Fig. 82

. The locking mechanism must audibly snap

into place.

To fold up, pull the lever in direction of arrow 

1

, fold back the seat backrest

against the direction of arrow 

2

. The locking mechanism must audibly snap

into place.

Check this by pulling on the seat and on the backrest.

WARNING

If the seat backrest is folded down, only the seat behind the driver´s seat

can be used to transport passengers.

When transporting objects on the folded seat backrest, the front passen-

ger airbag should be deactivated 

» page 28

.

Do not adjust the seat backrest while driving - it can cause injury and ac-

cidents!

When moving the seat backrest, keep limbs out of the area between the

seat and seat backrest – risk of injury!

Never transport the following items on the seat backrest when folded

forwards.

Objects that could restrict the driver's view.

Objects which make it impossible for the driver to control the vehicle,

e.g. if they roll under the pedals, or could protrude into the driver's zone.

Objects which could lead to injury to passengers due to a change of di-

rection or braking manoeuvre when accelerating sharply.

85

Seats and head restraints

-------------------------------------------------------------------------------------------------------------------------------------------------------------

Armrest setting

Fig. 83 

Adjust armrest

Read and observe   on page 83 first.

To adjust the height, lift the armrest in the direction of the arrow

A

 into one

of the locking positions 

» Fig. 83

.

To close, lift the armrest in the direction of arrow 

A

past the stop and then

fold down again.

To Set the armrest lengthways in the direction of arrow 

B

 Move to the de-

sired position.

Rear seats

Seat backrests

Fig. 84  Fold down seat backrest / pull on belt for side trim panel

Fig. 85 

Fold the backrest forward from

the luggage compartment

Before folding the seat backrests forwards, adjust the position of the front

seats in such a way that they are not damaged by the seat backrests. Remove

the rear headrests if required 

» page 91

.

Folding forwards from the passenger compartment

Push the release lever 

A

 in the direction of arrow 

1

 and fold down the seat

backrest in the direction of arrow 

2

» Fig. 84

.

Fold forward from the luggage compartment

Pull the corresponding lever in the direction of the arrow 

» Fig. 85

. The re-

spective seat backrest is unlocked or folded forward.

Folding backwards

Pull the seat belt 

C

 for the side panel in the direction of arrow 

3


» Fig. 84

.

Raise the seat backrest against the direction of arrow 

2

 until the release

handle 

A

 audibly locks. Check this by pulling on the seat backrest.

Make sure that the red pin 

B

 is hidden.

WARNING

The seat backrests in the occupied rear seats must be properly engaged.

When transporting objects in the luggage compartment that has been en-

larged by folding the backrest forward, ensure the safety of the passengers

transported on the rear seat.

The seat backrests must be securely latched in position so that no objects

from the luggage compartment can slip into the passenger compartment

under sudden braking – risk of injury.

CAUTION

When operating the seat backrests, the seat belts must not be pinched - there

is a risk of damage to the seat belts.

86

Operation

-------------------------------------------------------------------------------------------------------------------------------------------------------------

Fold down armrest

Fig. 86 

Fold down armrest

The armrest can be folded down by pulling on the loop 

A

 in the direction of

arrow 

» Fig. 86

.

The folded-down armrest can be used as a side table.

VarioFlex rear seats

Adjusting the seats

Fig. 87 

Adjusting seats in forward/back

direction

Fig. 88  Adjusting the angle of the seat backrest

Move in the longitudinal direction

Pull lever 

A

in the direction of arrow 

1

and move the seat to the desired po-

sition in the direction of arrow 

2


» Fig. 87

. After releasing the control lever

the latch must engage audibly.

Adjusting the angle of the seat backrest

Pull on the loop 

B

 in the direction of arrow 

1


» Fig. 88

 and press the seat

backrest in direction of arrow 

2

. The locking mechanism must audibly snap

into place.

To adjust the seat backrest to upright position, pull on the loop in the direc-

tion of arrow 

1

 and hold the arm in the forward movement until the lock

clicks.

Folding the seat backrest forwards

Fig. 89  Position the safety position of the belt / seat backrest

87

Seats and head restraints

-------------------------------------------------------------------------------------------------------------------------------------------------------------

Fold forward outer seat backrest

Insert the belt buckle 

A

of the seat belt into the opening in the side pan-

el

» Fig. 89

.

Slide the seat backwards up to the stop 

» Fig. 87

 on page 87.

Pull on the loop 

B

 in the direction of the arrow 

1


» Fig. 89

 and hold it.

Fold the backrest forwards in the direction of the arrow 

2

 and let go of the

loop.

Fold forward middle seat backrest

Removing the headrest.

Pull on the loop 

B

 next to the centre seat in the direction of arrow 

1

 and

fold the seat backrest forwards in direction of arrow 

2


» Fig. 89

. The seat

backrest can be used as an armrest.

WARNING

When transporting objects in the luggage compartment that has been en-

larged by folding the backrest forward, ensure the safety of the passengers

transported on the remaining rear seats.

The seat backrests must be securely latched in position so that no objects

from the luggage compartment can slip into the passenger compartment

under sudden braking – risk of injury.

CAUTION

When operating the seat backrests, the seat belts must not be pinched - there

is a risk of damage to the seat belts.

Fold up the outer seats

Fig. 90 

Fold up the outer seat

Before folding up

Switch the seat heating off - there is a risk of damage to the contacts in the

socket under the seat!

Move the seat back as far as it will go and fold the seat back.

Folding up

Pull the lever 

A


» Fig. 90

 in the direction of the arrow 

1

 and fold the seat

up in the direction of arrow 

2

.

Note

If the seat is folded up when the seat is heated, the heater is interrupted. The

heating can be switched on again after switching the ignition on and off.

Folding up the middle seat

Fig. 91  Folding up the middle seat

Before folding up

Remove the headrest and fold the seat backrest forwards.

Folding up

Pull on the loop 

D

 and push the seat backrest in position 

C

 about 4 cm

deep into the seat 

» Fig. 91

.

Let go off the loop 

D

.

Pull the lever 

E

 in the direction of the arrow 

1

 and carefully fold the seat

up in the direction of arrow 

2


» 

.

CAUTION

If the seat touches the center console when the lift is raised, the seat backrest

is in position 

A

 or 

B

 - there is a risk of damage to the centre console. The

seat must be folded back and the seat backrest pressed into position 

C

.

88

Operation

-------------------------------------------------------------------------------------------------------------------------------------------------------------

Fold up the upholstered seats

Fig. 92  Fold up the upholstered seats

Fold up the upholstered seats with the fastening strap on the headrest guide

bar 

» Fig. 92

 - .

For seats with an integrated head restraint, fasten the strap to the loop at

the back of the seat backrest 

» Fig. 92

 - .

WARNING

If one of the rear seats is folded up, no persons may be carried on the re-

maining seats - there is a risk of injury!

CAUTION

Leave the seats in the raised position for as long as required - there is a risk of

damage to the front seat backrests.

Unlocking and removing the seat

Fig. 93  Unlocking the seat / closing the cover

Before unlocking

Move the outer seat backwards as far as it will go and fold up 

» 

.

On the centre seat, remove the headrest and fold up the seat 

» page 88

.

Unlock and remove

Unlock the seat by pressing the seat locks 

A

 in direction of arrow 

1

» Fig. 93

.

Remove the seat on the carrying handle 

B

 or 

C

.

When the middle seat has been removed, close the cover for the socket in

the floor in the direction of arrow 

2

.

CAUTION

The outer seat must be at the back of the unit before it is folded up - there is

a risk of damage to the locking mechanism when the seat is unlocked and re-

moved.

The socket in the floor must be protected with the cover after removing the

middle seat - there is the risk of damage to the socket.

Note

The outer seats are not mutually interchangeable. The left seat in the rear area

is marked with the letter L and the right seat with the letter R.

Adjusting seats in crosswise direction

Fig. 94 

Locking seats

Remove the middle seat and close the cover for the socket in the floor

» Fig. 93

 on page 89.

Fold the outer seat up and unlock.

Move seat on the guide rods towards the middle of the vehicle up to the

stop.

Lock the seat at the end of the guide rods by pressing the seat locks 

A

 in

the direction of arrow 

» Fig. 94

.

89

Seats and head restraints

-------------------------------------------------------------------------------------------------------------------------------------------------------------

Folding back into the starting position is accomplished in the reverse order.

Folding back seats

Fig. 95 

Folding the seat backrest back

into position

If the seat has been removed, first position it on the guide rods and lock it in

place with the seat locks 

A


» Fig. 94

 on page 89. Pull the seat upwards to

ensure that the seat is locked correctly.

Before inserting the middle seat, open the cap for the socket in the ground

opposite the direction of the arrow 

2


» Fig. 93

 on page 89.

Fold the seat in the horizontal position until it audibly click in place. Check

that the seat can no longer be lifted by pulling it up.

Pull on the loop in the direction of arrow 

1


» Fig. 95

 and fold back the seat

backrest in direction of arrow 

2

. Check this by pulling on the seat backrest.

WARNING

The seat backrests in the occupied rear seats must be properly engaged.

CAUTION

Be sure to check the plugs on the bottom of the seats and the plugs under

the seats for soiling before inserting or folding the seats forwards - there is a

risk of functions being restricted 

» page 90

.

Before tilting the centre seat forwards, the cover for the socket in the floor

must be opened - there is a risk of damage to the plug on the underside of the

seat.

Plugs and sockets under the seats

On vehicles with seat belt heating or seat heating, there are plugs on the un-

derside of the seats and sockets under the seats.

The plugs and sockets can be soiled with upholstered or removed seats. This

can lead to functions being restricted.

Cleaning

Clean the connectors with a cloth moistened with spirits.

Carefully remove dirt from the sockets with a vacuum cleaner.

Clean the contacts in the sockets with a cloth moistened with spirits.

CAUTION

If the seats are folded up or removed, store them carefully in the luggage com-

partment and do not load the sockets punctiform - there is a risk of damage to

the sockets.

Headrests

Introduction

Note

In sports seats, the headrests are integrated into the seat backrests and can-

not be adjusted in height.

Adjust height of front head restraint

Fig. 96 

Setting the height of the back

headrest

To adjust the height, hold the locking button 

A

 and move the rest in the de-

sired direction 

» Fig. 96

.

CAUTION

If the tablet holder adapter is secured to the guide rods of the headrests

» page 105

, do not push the headrests down to the stop - risk of damaging the

headrests.

90

Operation

-------------------------------------------------------------------------------------------------------------------------------------------------------------

Adjusting the rear headrests

Fig. 97  Setting the height of the rear headrest

Setting the height

Grasp the headrest and move upwards in the direction of 

1


» Fig. 97

.

To move the restraint down, hold the locking button 

A

 in the direction of

arrow 

2

 and push the rest in the direction of arrow 

3

.

Removing/inserting the rear headrests

Fig. 98  Removing/inserting the rear headrest

To remove, pull the rest out of the seat backrest up to the stop.

Hold the locking button 

A

 in the direction of arrow 

1

, at the same time us-

ing a flat screwdriver with a max. width of 5 mm to press the locking button

in the opening 

B

 in the direction of arrow 

2

 and pull out the rest in the di-

rection of arrow 

3

» Fig. 98

.

To insert, push the rest into the seat backrest in the direction of arrow 

4

until the locking button clicks into place.

Note

For VarioFlex, the extended headrest can only be removed from the middle

seat only when the safety button 

A


» Fig. 98

 is held.

Seat heaters

Fig. 99  Buttons for heating the front seats/rear seats

The seat backrests and surfaces of the front seats and the outer rear seats can

be heated electrically.
Buttons for the seat heating 

» Fig. 99

Left seat heating
Right seat heating

To turn on the heating to max, press button  or .

With repeated pressing of the button, the level is down-regulated until it

switches off . The level of the seat heating is indicated by the number of illu-

minated warning lights underneath / in the button.
The seat heating only operates when the engine is running.
When the ignition is switched off, the seat heating / ventilation is also switch-

ed off. if the engine is started again within 10 minutes, then the driver's seat

heating / ventilation is switched on again automatically according to the set-

ting before switching off the ignition.

91

Seats and head restraints

-------------------------------------------------------------------------------------------------------------------------------------------------------------

WARNING

If you have a limited pain and / or temperature sensitivity, e.g. due to medi-

cation, paralysis or because of chronic illness (e.g. diabetes), we recom-

mend that you do not use the seat heating. If the seat heating is used, we

recommend to make regular breaks in your journey when driving long dis-

tances, so that the body can recuperate from the stress of the journey.

Please consult your doctor, who can evaluate your specific condition.

CAUTION

The following instructions must be observed to avoid damage to the seats.

Do not kneel on the seats or otherwise apply concentrated pressure to them.

Do not heat seats that do not contain occupants.

Do not heat seats in which objects are secured or resting (e.g. children´s

seat, a bag etc.).

Do not heat seats on which additional slipcovers or protective covers are fit-

ted.

Note

If the on-board voltage decreases, the seat heating switches off automatically

» page 272

Automatic consumer shutdown - discharge protection of the vehi-

cle battery.

Heated steering wheel

Fig. 100  Steering wheel heating: Manual air conditioning/Climatronic

Switching heating on/off (applies to the manual air conditioning)

In the Infotainment system, in menu 



/  tap the function surface 

A

» Fig. 100

.

Switching heating on/off (applies to Climatronic)

Press the button  on the Climatronic, then tap the function surface 

B

» Fig. 100

.

When the heating is switched on, the symbol in the function surface

B

 is or-

ange.
The heated steering wheel only works when the engine is running.

Setting the heating power (applies to the Climatronic)

Press the button  on the Climatronic, then tap the function surface  →

Steering wheel heating on the Infotainment screen.

Setting the heating power.

The heating power is displayed by the number of segments in the indicator

light 

C


» Fig. 100

.

Steering wheel heating together with the driver's seat heating (applies to

the Climatronic)

To activate / deactivate the heated steering wheel with the driver's seat

heating, press the button  on the Climatronic, then tap the function sur-

face  → Link seat/steering wheel heating in the Infotainment screen.

To switch on / off the heated steering wheel, press the button for the driver

seat heating.

If the heated steering wheel is turned on together with the driver's seat heat-

ing, then the function surface  is displayed on the Infotainment screen. This

can be used to switch the heated steering wheel off/on.

92

Operation

-------------------------------------------------------------------------------------------------------------------------------------------------------------


Content      ..     3      4      5      6     ..