Scania Central gear RP832-RBP832. Manual - part 11


  Главная      Scania     Scania Central gear RP832-RBP832 - Work Description


поиск по сайту           правообладателям


содержание   ..  9  10  11  12   ..


Scania Central gear RP832-RBP832. Manual - part 11


08:04-02

©

41

10 Lubricate the drive shaft splines with 

grease.

11 Lubricate the sealing surface of the end 

yoke with oil and fit it on the splined journal 
according to the markings made earlier. 
Align the yoke accurately.

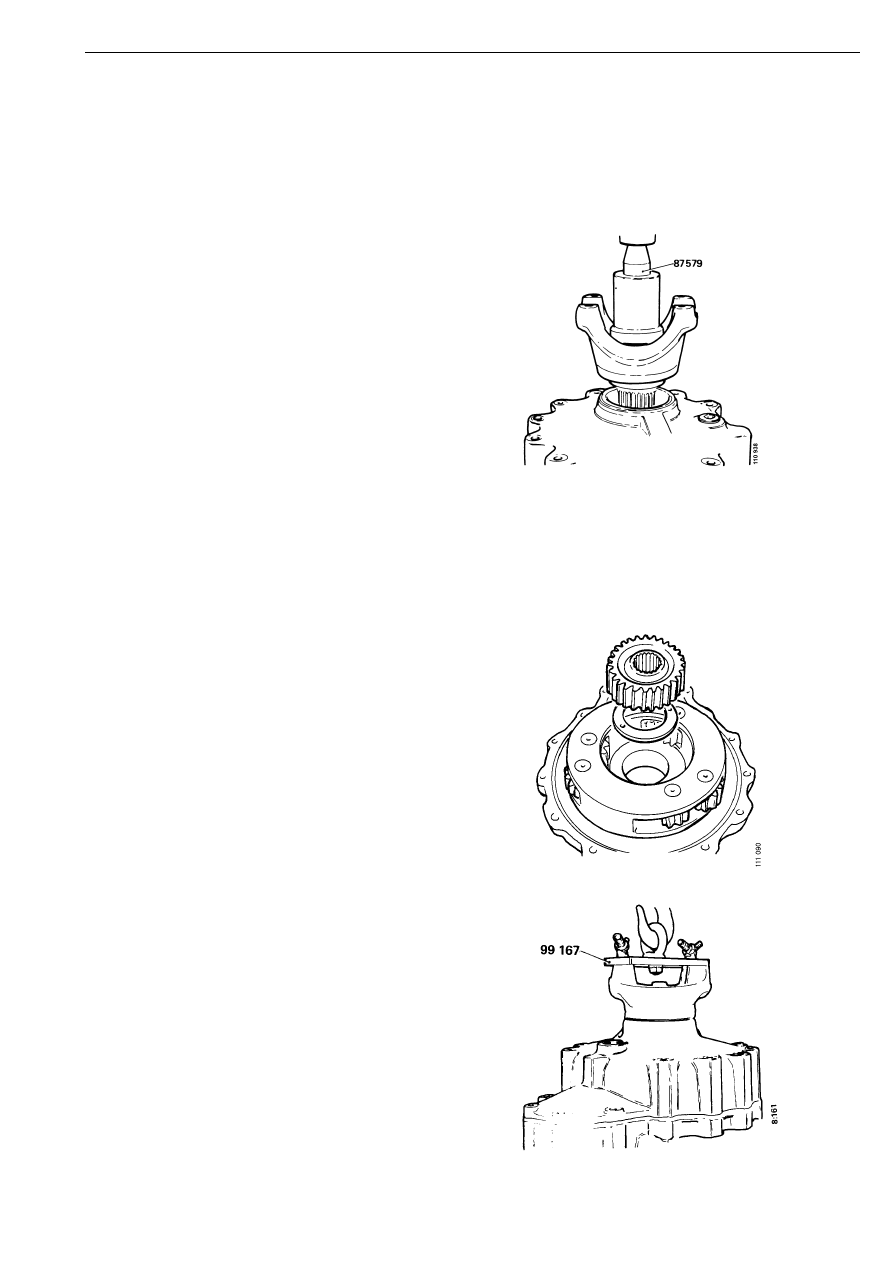
12 Press the end yoke in place with drift 

87 579. The end yoke must not be heated, as 
this will damage the seal.

13 Lubricate the threads of a new end yoke nut 

and the nut plane, and screw on the nut 
using socket 98 765. Tighten the nut after 
the cover has been fitted on the gear 
housing.

14 Position and lubricate the rear thrust washer 

31 for the sun wheel 30. Fit the sun wheel. 
Apply grease to the front thrust washer and 
press it towards the input shaft 14. Fit the 
gasket 8 onto the front cover 9. Secure it with 
grease.

15 Using lifting tool 99 167, lift the front cover 

onto the gear housing. Tighten the bolts. 
Tightening torque 84 Nm.

Front cover RBP832

42

©

08:04-02

16 Remove the lifting tool and fit counterhold 

99 129 and pull rod 88 292 onto the end 
yoke. Let the pullrod rest on the floor.

17 Tighten the end yoke nut using sleeve 

98 675. Tightening torque 600 Nm

88 292

99 129

98 765

600 Nm

111 493

Alternative tightening

Alternative tightening method

First tighten the nut to 300 Nm using socket 
98 765. Mark the socket and yoke as 
illustrated and then tighten a further 11 mm 
to attain 600 Nm.

88 292

99 129

1

2

98 765

111 316

18 Stake the nut flange in two places towards 

the recesses in the end yoke to lock the nut.

Front cover RBP832

08:04-02

©

43

Differential housing and 
crownwheel

Special tools

Removal

1

Remove the differential lock sleeve 43. If 
the lock sleeve has to be dismantled, remove 
the retaining ring 46 and bearing washers 45 
and separate the lock sleeve from the thrust 
ring 44.

Number

Description

Illustration

98 075

Dial gauge

10

20

30

40

50

60

70

80

90

0

10

20

30

40

50

60

70

80

90

15

10

5

00_1637

98 075

43 Differential lock sleeve

44 Thrust ring

45 Bearing washer

46 Retaining ring

2

Remove the bolts 36 for the support bracket 
35 and take out the lever 34 with associated 
support bracket.

3

Remove the split pins from both bearing 
caps and remove the bearing caps.

4

Lift out the differential housing and crown 
wheel with a lifting strap and shaft through 
the differential housing.

5

Remove the loose adjusting rings, outer 
bearing rings and washer.

Differential housing and crownwheel

44

©

08:04-02

Fitting

1

Clean the threads on the adjusting rings and 
the threads in the gear housing and bearing 
caps.

2

Lubricate the roller bearings, adjusting rings 
and bearing cap bolts with oil.

3

Lift the differential housing with crown 
wheel and outer bearing rings into the gear 
housing.

4

Fit the bearing caps and make sure the caps 
are resting against the gear housing. Tighten 
using the socket, loosen and then tighten 
again by hand.

5

Place the protection washer on the planet 
wheel side and screw in the adjusting rings a 
few turns.

6

Screw in the adjusting ring on the 
differential housing side so that there is 
clearance between the pinion and the 
crownwheel


1

Crownwheel side

2

Differential housing side

7

Tighten the adjusting ring on the 
crownwheel side until it abuts while rotating 
the differential housing.

8

Then tighten another 1-2 notches.

Differential housing and crownwheel


содержание   ..  9  10  11  12   ..