Seat Leon (2022 year). Manual in english - page 10
 

  Index      Manuals     Seat Leon (2022 year). Manual in english


Search            copyright infringement  


Content      ..     8      9      10      11     ..


Seat Leon (2022 year). Manual in english - page 10


Operation

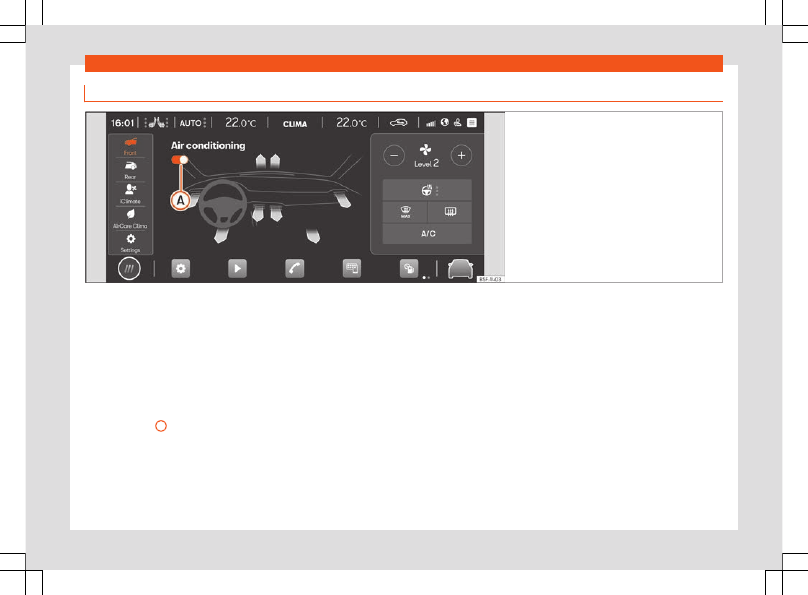
Air Conditioning Menu

Fig. 153 

Schematic representation: Air condition-

ing menu.

Within the Air Conditioning menu, the follow-
ing submenus are found depending on the
equipment:

Front Submenu

Submenu for the air conditioning in the front
of the passenger compartment where the fol-
lowing functions are found:

Connect/disconnect the Climatronic

››› 

Fig. 153 

A

.

Selection of the air distribution to one

or more of the following areas: feet, up-
per body or windscreen. In the 3-zone
Climatronic versions, it is selected by
pressing on the desired arrow. In the 1-
zone Climatronic versions, it is selected

Vents

by pressing on the desired distribution
icon.
The colour represented by the arrows
does not indicate the outlet temperature
of the air, but the requested temperature
depending on the surrounding condi-
tions.
Manual adjustment of fan speed by
pressing 

 or 

.

Turn on, change the level or turn off the
steering wheel heating. It also shows its
status (on/off) and its level.
The multifunction steering wheel can al-
so be used to switch it on and off and
change its levels 

››› 

page 162

.

The defrost/demist function of the Cli-
matronic removes ice and condensation
from the windscreen. The air is dehu-
midified and the fan is set high.
When this function is switched on, the
rear air conditioning remains switched
off.
The heated rear window only works
when the engine is running and switches
off automatically after a maximum of 10
minutes. It should be switched off as
soon as the glass is demisted. By saving
electrical power you can also save fuel.
To avoid possible damage to the battery,
an automatic temporary disconnection
of this function is possible, coming back

158

Air conditioning

on when normal operating conditions
are re-established.

Switching the cooling and demisting
system on/off.

In 



 mode, the selected temperature

will remain constant. Fan speed and air

distribution are automatically adjusted.
The 



 mode will be deactivated when

the fan speed and/or the air distribution
are modified manually.
Fan speed in 



 mode can be adjusted

in the Climaprofile (

low

medium

 or 

high

)

by successive presses on the function
button 



. Climaprofile adjustment is

also possible in the Settings submenu.

Rear Submenu

Submenu for the air conditioning in the rear of
the passenger compartment where the fol-
lowing functions are found:

Connect/disconnect the Climatronic A.

With the icon lit up, it is not possible to
adjust the temperature from the rear
area.

Press to adjust the rear zone tempera-

ture.

iClimate Submenu (only for versions with
3-zone Climatronic)

Submenu where different smart and/or auto-
matic functionalities are located:





 / 

Warm hands: automatically adjusts for a
certain time the air conditioning to heat
the steering wheel area.
Cool feet: automatically adjusts for a
certain time the air conditioning to cool
the footwell area.
Defog the windows: automatically ad-
justs for a certain time the air condition-
ing to defog the windscreen.
Warm feet: automatically adjusts for a
certain time the air conditioning to heat
the footwell area.
Fresh Air: automatically adjusts the air
conditioning for a certain time to venti-
late the passenger compartment.
Quick cooling: automatically adjusts the
air conditioning to cool the vehicle interi-
or for a certain amount of time.

AirCare Clima Submenu (only for versions
with 3-zone Climatronic)

The air conditioning system contains a filter
that can reduce the penetration of allergenic
contaminants.

When the Air Care function is activated, the
recirculation mode is on and the air is regula-
ted automatically and continuously, as long
as there is no detection of fogging hazard.

Press on 

 to activate/deactivate the

AirCare function.

Press 

 to access the information on the

status of the AirCare system.

Settings submenu

Submenu where the following settings are lo-
cated:

Automatic recirculation: to switch automat-

ic air recirculation on and off 

››› 

page 160

.

Climaprofile: to adjust the fan speed (

low

,

medium

 or 

high

) during operation in 



mode.

Smart Heated Seats: Pressing 

 turns the

smart heated seats function on/off for the
driver and front passenger 

››› 

page 161

.

Climate control usage instructions

The interior cooling system only works when
the engine is running and fan is switched on.

Economic use of the air conditioning

When the air conditioning is switched on, the
compressor consumes engine power and has
influence on fuel consumption.

The air conditioning operates most effective-
ly with the windows and the sunroof closed.
However, if the passenger compartment has
heated up after standing in the sun for some

»

159

Operation

time, the air inside can be cooled more quick-
ly by briefly opening the windows and the
sunroof.

Change the temperature unit (Climatron-
ic)

The temperature display can be changed
from Celsius to Fahrenheit on the Infotain-
ment system screen using the function button

 > Units

.

The cooling system cannot be activated

If the air conditioning system cannot be
switched on, this may be caused by the fol-
lowing:

The engine is not running.

The fan is switched off.

The air conditioner fuse has blown.

The outside temperature is lower than ap-

proximately +3°C (+38°F).

The air conditioner compressor has been

temporarily switched off because the engine
coolant temperature is too high.

Another fault in the vehicle. Have the air

conditioner checked by a specialised work-
shop.

Special characteristics

If the humidity and temperature outside the
vehicle are high, 

condensation

 can drip off

the evaporator in the cooling system and

form a pool underneath the vehicle. This is
normal and does not indicate a leak!

Note

After starting the engine, any residual hu-
midity in the air conditioner could mist over
the windscreen. Switch on the defrost func-
tion as soon as possible to clear the wind-
screen of condensation.

Rear controls

Fig. 154 

In the rear part of the centre console:

controls for the rear seats.

Temperature

Press buttons 

1

 and 

2


››› 

Fig. 154

 to ad-

just the temperature of the rear zone.

Air vents

To ensure proper heating, cooling and venti-
lation in the vehicle interior, the air vents must
remain open.

To close the air vents on the left side, move

the corresponding diffuser vent lever fully to
the right. To close the air vents on the rights
side, move the corresponding diffuser vent
lever fully to the left.

Change the air direction using the ventila-

tion grille lever.

There are other additional, non-adjustable air
vents in the dash panel, in the footwells and in
the rear area of the passenger compartment.

Note

Food, medicine and other heat or cold sen-
sitive objects should never be placed in
front of the air outlets as they may be dam-
aged or made unsuitable for use by the air.

Air recirculation 

Air recirculation mode prevents the ambient
air from entering the interior.

When the outside temperature is very high,
selecting manual air recirculation mode for a
short period refreshes the vehicle interior
more quickly.

160

Air conditioning

For safety reasons, the air recirculation is dis-
connected when 

 is pressed.

Switching the manual air recirculation
mode on and off

Press the button 

 to connect or discon-

nect manual air recirculation.

Climatronic automatic air recirculation
mode (only for versions with 3 zone Clima-
tronic)

With the automatic air recirculation mode ac-
tivated, the entry of fresh air into the cabin in-
terior is enabled. If the system detects a high
concentration of hazardous substances in the
ambient air, air recirculation mode is switched
on automatically. When the level of impurities
drops to within a normal range, recirculation
mode is switched off.

The system is unable to detect unpleasant
smells.

Automatic air recirculation is activated and

deactivated in the air conditioning settings
menu. An 

A

 will be displayed next to the recir-

culation icon 

 on the Climabar, indicating

that the function is active 

››› 

page 157

Front seat heating

With the engine on, the front seat cushion and
backrest can be heated electrically.

Control seat heating

Press the icon 

 on the Climabar

››› 

Fig. 152 

A

 to view the seat heating menu.

Press the left or right seat icon to connect

the seat heating to maximum power.

Press the left or right seat icon repeatedly

until the desired level is adjusted.

To switch off seat heating, press the corre-

sponding seat icon several times until no LED
is on.

You can also adjust the seat heating level

by using 

two

 fingers to press the sensor field

››› 

Fig. 152


1

 or 

2

 (left or right seat).

If the ignition is switched on again in approx.
the next 10 minutes, the driver seat heating is
automatically turned on to the level set the
last time.

Smart Heated Seats

This is an smart function that automatically
activates and regulates the driver and front
passenger seat heating for greater comfort.
The seat heating for the driver's seat and
front passenger seat can be adjusted sepa-
rately to achieve fully personalised comfort.

To access the Smart Heated Seatsfunction,
the SEAT CONNECT personalisation service
must first be activated 

››› 

page 182

.

The Smart Heated Seats function requires a
period for learning usage habits. Information

about the start of the learning process is
shown in the seat heating submenu on the In-
fotainment display. Its evolution (LEARNING)
will also be shown during this process, until it
is complete (AUTO).

Seat heating level 3 (maximum) needs to be
used to ensure correct learning of habits.

It is advisable to use the seat heating at dif-
ferent ambient temperatures during the
learning period to ensure that the automatic
seat heating subsequently functions perfect-
ly.

Once the learning period is over, the heated
seats are turned on and their temperature
level adjusted automatically.

If you are not satisfied with the temperature
level provided by the system during automat-
ic regulation, adjust the seat heating manual-
ly and the function will be optimised (Opti-
mising). The optimisation process will be dis-
played in the seats submenu of the infotain-
ment display.

To reset the process and start the learning
period, go to the submenu 

Settings > Reset

driver / front passenger profile

.

Cases in which the heat seating should
not be switched on

Do not switch the seat heating on if any of the
following conditions are met:

The seat is not occupied.

»

161

Operation

The seat has a cover.

A child seat has been installed on the seat.

The seat cushion is wet or damp.

The outdoor or indoor temperature is great-

er than +25°C (77°F).

WARNING

People who cannot perceive pain or tem-
perature because of medications, paralysis
or chronic diseases (e.g. diabetes) or have
a limited perception of these, may suffer
burns to the back, buttocks or legs when
using seat heating.

People with limited pain and temperature

thresholds must never use seat heating.

If an abnormality in the device's temper-

ature control is detected, have it checked
by a specialist workshop.

WARNING

If the fabric of the cushion is wet, this can
adversely affect the operation of the seat
heating, increasing the risk of burns.

Make sure the seat cushion is dry prior to

using the seat heater.

Do not sit on the seat with clothing that is

wet or damp.

Do not leave clothing that is wet or damp

on the seat.

Do not spill liquid on the seat.

CAUTION

To avoid damaging the heating elements

of the seat heaters, please do not kneel on
the seat or apply sharp pressure to a single
point on the seat cushion or backrest.

Liquids, sharps objects and insulating

materials (e.g. covers or child seats) can
damage the seat heating.

In the event of smells, switch off the seat

heating immediately and have it inspected
by a specialised workshop.

For the sake of the environment

The seat heating should remain on only
when needed. Otherwise, it is an unneces-
sary fuel waste.

Note

Please note the following for the Smart
Heated Seats feature:

The system may reset the learning proc-

ess if it has not been satisfactory.

Aeparate driver’s seat learning will be re-

quired for each registered user.

The passenger seat learns regardless of

the active registered user.

In hybrid vehicles the use of the extended

pre-air conditioning function may affect
the learning time of the function.

Steering wheel heating

Steering wheel heating works only with the
engine running.

Steering wheel heating levels

The selected steering wheel heating level will
be displayed on the instrument cluster dis-
play and in the air conditioning menu.

Level control is carried out using the 

 button

on the multifunction steering wheel:

Brief press (less than 1 second):

 the heating

is switched on at maximum level. Press the
steering wheel button repeatedly until the
desired level is adjusted. To switch off steer-
ing wheel heating, press the steering wheel
button repeatedly until the heated steering
wheel 

OFF

 icon is displayed on the instru-

ment cluster.

Long press (more than 1 second):

 the heat-

ing is switched off directly from the level that
is currently operating. If the steering wheel
button is pressed again for a long period, the
heating is switched on directly at the last lev-
el saved before switching off.

Heating levels can also be controlled through
the infotainment system's air conditioning
menu:

Press the steering wheel heating function

button 

 . The heating is switched on at its

maximum level.

162

Air conditioning

Press the function button repeatedly to set

the desired level.

To switch off steering wheel heating, press

the function button several times until no LED
is on.

Automatic off

The steering wheel heating will be switched
off automatically when any of the following
conditions are met:

Power consumption is too high.

The steering wheel heating system is faulty.

If the ignition is switched off.

Parking ventilation

With the parking ventilation function, the pas-
senger compartment can be ventilated in
spring/summer.

The power required for parking ventilation will
be provided by the 12-volt vehicle battery.

The ventilation function is controlled through
the SEAT CONNECT mobile App or the My-
SEAT website.

Connecting parking ventilation

The function will be switched on as follows:

The parking ventilation function can be

switched on immediately using the immediate
on/off button.

By programming a departure time.

In the event of low level charge of the 12V
battery, the parking ventilation will not turn
on.

Disconnecting parking ventilation

The parking ventilation will turn off in the fol-
lowing situations:

When the operating time selected by the

user for the immediate on/off mode has
elapsed.

The parking ventilation function will be

turned on through the immediate power but-
ton on that App.

When the scheduled departure time has

been reached.

The maximum operating period of the park-
ing ventilation is 60 min.

Programming a departure/trip start

The activation of the parking ventilation for a
scheduled time is only valid for a single venti-
lation process. The departure time must be
for each newly programmed ventilation proc-
ess.

Before programming the departure time, you
must check that the date and time of the car
are correctly set.

When programming a departure time, the car
automatically calculates, depending on the
environmental conditions, the necessary op-
erating time of the parking ventilation.

CAUTION

Foods sensitive to heat or cold, medica-
tions and other objects can be damaged
by the airflow.

Do not place any type of food, medicines

or other temperature sensitive items in
front of the ventilation slots.

Note

If parking ventilation works repeatedly for
long periods of time, the 12V battery
charge level will drop. It is advisable to take
the vehicle for a long drive to recharge the
battery.

163

Operation

Auxiliary heating (additional
heating)

Introduction

The auxiliary heater runs on fuel from the ve-
hicle's tank and can be used while you are
driving and when the vehicle is stationary.

The auxiliary heating can be controlled
through the auxiliary heating menu in the In-
fotainment system, through the SEAT CON-
NECT mobile app, the MySEAT website or
with the remote control.

In winter, with the auxiliary heater switched
on, you can defog the windscreen and leave
it free of ice and snow (if it is a thin layer) be-
fore you start driving.

If the outside temperature is very high, the ve-
hicle interior can be ventilated with the en-
gine off using the auxiliary heater.

The maximum operating period of the park-
ing ventilation is 60 min.

WARNING

The auxiliary heater exhaust fumes contain
carbon monoxide, an odourless and colour-
less toxic gas. Carbon monoxide can cause
people to lose consciousness. It can also
cause death.

Never switch on the auxiliary heater or

leave it running in enclosed spaces or
areas with no ventilation.

Never programme the auxiliary heater so

that it switches itself on and is running in an
enclosed space or an area with no ventila-
tion.

WARNING

The components of the auxiliary heater are
extremely hot and could cause a fire.

Always park your vehicle so that no part

of the exhaust system can come in contact
with easily flammable materials that might
be below the vehicle, such as dried grass.

CAUTION

Never place food, medicines or other tem-
perature-sensitive objects close to the air
vents. Food, medicines and other objects
sensitive to heat or cold may be damaged
or made unsuitable for use by the air com-
ing from the vents.

Switching the auxiliary heater on
and off

Connection

The independent heating can be connected
in the following ways:

Press the immediate on/off button in the

App or on the MySEAT website.

Press the immediate on/off button 

 in the

infotainment system (while the vehicle is
switched off).

Press button 

 on the remote control

››› 

page 165

.

Automatically scheduling a departure time

in the auxiliary heater menu in the infotain-
ment system, or on the MySEAT App or portal

››› 

page 166

.

Disconnection

The independent heating can be switched off
in the following ways:

The supplementary heating function will be

turned off immediately using the on/off but-
ton in the App or MySEAT website.

Press the immediate on/off icon 

 in the in-

fotainment system (while the vehicle is
switched off).

Press button 



 on the radio-operated re-

mote control 

››› 

page 165

.

Automatically at the scheduled departure

time or after the programmed operating time
has elapsed .

Automatically when the control lamp  

(fuel level indicator) lights up 

››› 

page 317

.

Automatically when the 12-volt battery

charge drops too low 

››› 

page 337

.

164

Air conditioning

Setting the desired temperature

The desired temperature for the auxiliary
heater is selected from the auxiliary heater
menu of the infotainment system.

Things to note

Once switched off, the auxiliary heater will
continue to operate for a short period of time
in order to burn the fuel remaining in the sys-
tem and also to expel the exhaust fumes.

Radio-operated remote control

Fig. 155 

Auxiliary heating: radio-operated re-

mote control.

Fig. 155

Switch the auxiliary heater on

Switch the auxiliary heater off
Control lamp



1

If the buttons of the remote control are press-
ed unnecessarily, it could switch on the auxili-
ary heater involuntarily, even when it is out of
range or when the control lamp is flashing.

To switch on and off the independent heating,
the button must be pressed and held for ap-
proximately 1 second.

Control lamp on the remote control

When the buttons are pressed, the control
lamp on the remote control 

1

 provides the

user with different information:

It lights up for approx. 2 seconds

In green:

 The auxiliary heater has been

switched on using the 

 button.

In red:

 The auxiliary heater has been

switched off con with button 



.

Flashes slowly for approx. 2 seconds

In green:

 No on signal has been received.

The remote control is out of range. Move
closer to the vehicle.

In red:

 No off signal has been received. The

remote control is out of range. Move closer to
the vehicle.

Flashes quickly approx. 2 seconds

In green:

 The independent heating is

blocked. Possible causes: the fuel tank is al-
most empty, the 12-volt battery charge is
very low or there is a fault.

It lights up for approx. 2 seconds

In orange (then in green or in red):

 The re-

mote control battery is almost flat. However,
the on or off signal has been received.

In orange (then flashes green or red):

 The

remote control battery is almost flat. No on or
off signal has been received.

Flashes for around 5 seconds

In orange:

 The remote control battery is flat.

No on or off signal has been received.

Changing the battery of the radio-operat-
ed remote control

When pressing the buttons, if the control
lamp of the remot

1

 flashes for approx. 5

orange or does not light up, the batteries
must be replaced.

The battery is located beneath a cover on
the back of the remote control.

To open the cover, lift it slightly at the bot-

tom and slide it down.

Remove the old battery.

Insert the new battery. When doing so, take

into account the polarity and use batteries of
the same type 

››› 

.

Replace the battery cover by inserting the

tabs at the top and pressing the bottom.

»

165

Operation

Range

The receiver is inside the vehicle. The remote
control, when fitted with new batteries, has a
range of several hundred metres. Obstacles
between the remote control and the vehicle,
bad weather conditions and discharged bat-
teries can considerably reduce the range of
the remote control.

WARNING

Swallowing a battery with a 20 mm diame-
ter or any other button battery can cause
serious and even fatal injuries within a very
short time.

Always keep the remote control, keyrings

with batteries, the spare batteries, button
batteries and all other batteries over 20
mm out of reach of children.

If you suspect that someone may have

swallowed a battery, seek immediate med-
ical attention.

CAUTION

The radio frequency remote control con-

tains electronic components. Therefore,
avoid getting it wet and exposing it to
knocks or direct sunlight.

The use of inappropriate batteries may

damage the radio frequency remote con-
trol. For this reason, always replace the
used battery with another of the same volt-
age, size and specifications.

For the sake of the environment

Please dispose of your used batteries

correctly and with respect for the environ-
ment.

The remote control battery may contain

perchlorate. Observe the legal provisions
regarding disposal.

Care should be taken so as not to oper-

ate the remote control unintentionally so
as to prevent the auxiliary heater being
switched on accidentally.

Programming the auxiliary heater

The activation of the parking ventilation for a
scheduled time is only valid for a single venti-
lation process. The departure time must be
for each newly programmed ventilation proc-
ess.

Before programming the departure time, you
must check that the date and time of the car
are correctly set.

When programming a departure time, the car
automatically calculates, depending on the
environmental conditions, the necessary op-
erating time of the parking ventilation.

WARNING

Never programme the auxiliary heater so
that it switches itself on and is running in an
enclosed space or an area with no ventila-

tion. The auxiliary heater exhaust fumes
contain carbon monoxide, an odourless
and colourless toxic gas. Carbon monoxide
can cause people to lose consciousness. It
can also cause death.

Usage instructions

The auxiliary heater exhaust system located
below the vehicle must be kept clear of snow,
mud and other objects. The exhaust fumes
must be able to exit freely. The emissions
generated by the auxiliary heater are re-
moved via an exhaust pipe fitted underneath
the vehicle.

On heating the vehicle interior, depending on
the outside temperature, the warm air is first
directed at the windscreen and then to the
rest of the vehicle interior through the air
vents. Directing the diffusers – towards the
windows for example – can affect air distribu-
tion.

When the auxiliary heater is not switched
on

The auxiliary heater requires about as

much power as the dipped beam headlights.
If the 12-volt battery charge is too low, the
auxiliary heater switches off automatically
and cannot be switched on. This avoids prob-
lems when starting the engine.

166

Air conditioning

The heating must be activated every time

you want to set off. Similarly, the departure
time must reactivate each time.

The control lamp  

 (fuel level indicator)

lights up.

Note

Noises will be heard while the auxiliary

heater is running.

When the air humidity is high and the in-

side temperature low, condensation from
the heating and ventilating system may
evaporate when the auxiliary heater is
switched on. In this case, steam may be re-
leased from underneath the vehicle. This
does not mean that there is a vehicle mal-
function.

If the vehicle is tilted, e.g. if parked on a

slope, the operation of the auxiliary heater
may be restricted if the fuel tank level is
low (just above the reserve level).

If the auxiliary heater is used a number of

times for a long period of time, the 12-volt
battery will lose its charge. To recharge the
battery, the vehicle must be driven for a
number of kilometres from time to time. As
a guideline: the journey should last approx-
imately as long as the heater was connec-
ted.

At temperatures below +5 °C (+41 °F), the

auxiliary heater may switch itself on auto-
matically when the engine is switched on.
The auxiliary heater is switched off again
after a certain time.

Stationary air conditioning

Introduction

3

 Valid for: hybrid vehicles.

With stationary air conditioning, the vehicle
interior can be cooled, ventilated or heated
while the vehicle is parked. It can also be
used to demist and remove ice or a thin layer
of snow from the windscreen. The stationary
air conditioning is powered by the vehicle’s
electrical socket or high-voltage battery.

Stationary air conditioning can be program-
med and controlled in the Infotainment sys-
tem in the 

Battery Manager

 menu, through

the SEAT CONNECT mobile App and on the
MySEAT website.

CAUTION

Food, medicines and other objects sensi-
tive to heat and cold may be damaged or
spoiled by the air coming out of the vent.

Never place food, medicines or other

temperature-sensitive objects close to the
air vents.

Note

Operating the stationary air conditioning
while the charging cable is not connected
reduces the vehicle’s range. In the case of
extreme outside temperatures, the station-
ary air conditioning may not have sufficient

heating or cooling capacity to reach the
desired set temperature.

Operating the stationary air condi-
tioning

3

 Valid for: hybrid vehicles.

Operation of the stationary air condition-
ing when the charging connector is not
plugged in

The stationary air conditioning can operate
when the charging connector is not plugged
in When the charging connector is not plug-
ged in, the stationary air conditioning oper-
ates with the high-voltage battery.

Open the 

Battery Manager

 menu.

Enter the settings menu.

Turn on the 

Enable High-Voltage Battery

Power

 function if necessary.

The stationary air conditioning only works if
the high voltage battery is sufficiently charg-
ed.

Setting the desired temperature

The desired temperature for the stationary

air conditioning is selected in the 

Battery

Manager

 Infotainment system menu using 

or 

.

»

167

Operation

Switching on the stationary air condition-
ing

It can be connected in the following ways:

Press the immediate on/off button in the

mobile App or on the MySEAT website.

Press the immediate on icon 

 in the Info-

tainment system (while the vehicle is switch-
ed off). During immediate air conditioning, the
vehicle reaches the set temperature in a
maximum of 30 minutes.

Automatically programming a departure

time in the mobile App, on the My SEAT web-
site, or in the 

Battery Manager

 menu of the

Infotainment system 

››› 

page 168

.

Switching off the stationary air condition-
ing

In can be switched off in the following ways:

Press the immediate on/off button in the

mobile App or on the MySEAT website.

Press the immediate on/off icon 

 in the in-

fotainment system (while the vehicle is
switched off). It is only possible to switch it off
if the stationary air conditioning was switched
on using this button.

Press the air conditioning off button in the

air conditioning menu of the infotainment sys-
tem (while the vehicle is off).

Automatically, a few minutes after the

scheduled departure time.

Automatically if the charge level of the ve-

hicle's high-voltage battery drops excessive-
ly.

If the stationary air conditioning is active
when starting to drive, it will remain active for
the established time if not manually discon-
nected.

Note

Operating noises are heard while the sta-

tionary air conditioning is connected.

When the outside humidity is high and the

inside temperature low, condensation from
the air conditioning system may evaporate
when the stationary air conditioning is run-
ning. In this case, steam may be released
from underneath the vehicle. This does not
mean that there is a vehicle malfunction.

Setting the stationary air condi-
tioning

3

 Valid for: hybrid vehicles.

The stationary air conditioning can be set in
the Infotainment system for the scheduled
departure time. You can set the desired tem-
perature of the inside of the vehicle for the
vehicle’s planned departure time.

Based on the desired temperature, the vehi-
cle calculates the time that the stationary air
conditioning needs to be switched on to

reach the desired temperature at the depar-
ture time.

Vehicle air conditioning prior to departure

Open the 

Battery Manager

 menu.

Set the scheduled departure time.

Turn on the 

air conditioning

 and 

charging

functions as needed.

If the two 

air conditioning

 and 

charging

functions are on at the same time, the high-
voltage battery is charged first and then the
vehicle is air conditioned. The departure time
can only be enabled when one of the two
functions has been enabled.

If the charging connector is plugged in, the
vehicle starts cooling down around 30 mi-
nutes before the scheduled departure time. If
the vehicle is not ready to drive at the sched-
uled departure time, it will be cooled for a fur-
ther 15 minutes.

If the charging connector is not plugged in,
the air conditioning operating time is reduced
to 10 minutes. The operating time is extended
by 5 minutes if the vehicle is not ready to
drive.

The stationary air conditioning switches off
automatically.

168

Air conditioning

Extended stationary air conditioning

In the 

Battery Manager

 menu can be found

an option to add extended air conditioning.
This means if the vehicle is air conditioned
(either by being switched on immediately or
due to departure scheduling), the conven-
ience consumers, e.g. seat or rear window
heating may switch on automatically if con-
sidered necessary by the Climatronic (in cold
conditions) before the departure time.

Comfort consumers depend on features.

Open the 

Battery Manager

 menu.

Tap on the icons of the seats whose con-

venience consumers should be switched on
in addition to the stationary air conditioning.
The driver's seat icon always stays activated
by default (the driver's seat icon includes the
comfort consumers of seat heating and
steering wheel heating).

To turn on the rear window heating before

the departure time, switch on the 

Automatic

rear window heating

 function.

Immediate activation of the rear window
heating

The rear window heating can be switched
on/off using the SEAT CONNECT mobile app
or the MySEAT website, regardless of whether
or not the stationary air conditioning is
switched on.

Vehicle air conditioning when the vehicle
is unlocked (with the opening of a door)

Open the 

Battery Manager

 menu.

Touch settings.

Enable the 

When unlocking the vehicle

function.

The vehicle’s air conditioning will switch on as
soon as it is unlocked.

Checking the schedule

When the ignition is switched off, the next ac-
tivated time and the configured functions are
displayed in the Infotainment system.

169

Infotainment system

Infotainment system

Introduction

First steps

Introduction

Infotainment functions and settings depend
on the country and equipment

Before first use

Before the first use, bear in mind the following
points, to take full advantage of the functions
and settings offered:

Observe the basic safety warnings

››› 

page 170

.

Reset the Infotainment factory settings.

Search and store favourite radio stations on

the preset buttons so you can tune them
quickly.

Use only suitable audio sources and data

media.

Pair a mobile phone to use phone manage-

ment through the Infotainment system.

Use current maps for navigation.

Register in SEAT CONNECT to run the cor-

responding services.

Current documentation attached

For using infotainment and its components,
take into account, together with this instruc-
tion manual, the following documentation:

Supplements to your vehicle’s on-board

documentation.

Instruction Manual of the mobile phone de-

vice or audio sources.

Operating instructions for data media and

external players.

Manuals for the Infotainment accessories

subsequently installed or used additionally.

Description of services when running SEAT

CONNECT services.

Safety instructions

Some function areas may include links to
third-party websites. SEAT, S.A. is not the
owner of the third-party websites accessible
through the links, and assumes no liability for
their content.

Some function areas may include outside in-
formation from third-party providers. SEAT,
S.A. is not responsible for such information
being correct, up-to-date or complete, or for
ensuring it does not infringe the rights of third
parties.

Radio stations and owners of data media and
audio sources are responsible for the infor-
mation they transmit.

Bear in mind that parking lots, tunnels, tall
buildings, mountains or due to the operation
of other electrical devices, such as chargers,
can also interfere with the reception of the ra-
dio signal.

Foils or adhesives with metallic layers on the
antenna and on the window panes can inter-
fere with radio reception.

WARNING

The infotainment central computer is inter-
connected with the control units mounted
on the vehicle. Therefore, there is a serious
danger of accident and injury if the central
computer is repaired or disassembled and
reassembled incorrectly.

Never replace the central computer with

another used, recycled or from another ve-
hicle at the end of its useful life.

The repair or disassembly and reassem-

bly of the central computer should only be
carried out at specialised workshops. SEAT
recommends visiting a SEAT dealership for
this.

WARNING

The factory assembled radio with integra-
ted software is interconnected with the
control units mounted on the vehicle.

170

Introduction

Therefore, there is a serious danger of acci-
dent and injury if the radio is repaired or
disassembled and reassembled incorrect-
ly.

Never replace the radio with another ra-

dio that is used, recycled or from another
vehicle at the end of its useful life.

The repair or disassembly and reassem-

bly of the radio should only be carried out
at specialised workshops. SEAT recom-
mends visiting a SEAT dealership for this.

WARNING

Any distraction affecting the driver in any
way can lead to an accident and cause in-
juries. Reading the information on the
screen and managing the infotainment sys-
tem can distract your attention from traffic
and cause an accident.

Always drive as carefully and responsibly

as possible.

WARNING

Connecting, inserting or removing an audio
source or data media while driving can dis-
tract your attention from the traffic and
cause an accident.

WARNING

Select volume settings that allow you to
easily hear signals from outside the vehicle

at all times (e.g. emergency services si-
rens).

Hearing may be impaired if using too high

a volume setting, even if only for short peri-
ods of time.

WARNING

The following circumstances may result in
an emergency call, phone call or data
transmission not being made or being inter-
rupted:

When in areas with zero or insufficient

mobile telephony or GPS signal. Also in
tunnels, confined areas between very tall
buildings, garages, underpasses, moun-
tains and valleys.

When in areas with sufficient mobile

phone or GPS signal, the telephony net-
work of the telecommunications provider
has interference or is not available.

When the vehicle components necessary

to make emergency calls, phone calls and
to transmit data are damaged, do not work
or do not have sufficient electrical power.

When the battery of the mobile phone

device is discharged or its charge level is
insufficient.

WARNING

In some countries and some telephone net-
works it is only possible to make an emer-
gency call, if a mobile telephone device is

connected to the telephone interface of
the vehicle, inside it there is an “unlocked”
SIM card with sufficient balance to make
calls and with sufficient network signal
coverage.

WARNING

Read and observe the operating instruc-
tions provided by the manufacturer in
question when using mobile phone devices,
data media, external devices, external au-
dio and multimedia sources.

WARNING

Position the connection cables of the audio
sources and external devices so that they
do not interfere with the driver.

WARNING

When changing or connecting an audio or
multimedia source may cause sudden
changes in the volume.

Lower the volume before connecting or

switching to audio or multimedia sources.

WARNING

If mobile phone and radiocommunication
devices are used without connection to an
external antenna, the maximum electro-
magnetic radiation levels inside the vehicle
might be surpassed, thus posing a risk to
the health of the driver and passengers.

»

171

Infotainment system

This is also the case if the external antenna
has not been correctly installed.

Keep a distance of at least 20 centime-

tres between the antennas of the mobile
phone device and an active medical de-
vice, such as a pacemaker, as mobile
phones might alter the functioning of these
devices.

Do not carry a mobile phone switched on

very close or directly on top of an active
medical device, for instance in a chest
pocket.

Immediately turn off the mobile phone if

you suspect it is causing interferences in an
active medical device or any other medical
device.

WARNING

Mobile phones, external devices and ac-
cessories that are loose or not properly se-
cured could move around the passenger
compartment during a sudden driving or
braking manoeuvre or an accident and
cause damage or injury.

Set mobile phone devices, external devi-

ces and their accessories outside the air-
bag deployment areas or store them se-
curely.

WARNING

The centre armrest may obstruct the driv-
er's arm movements, which could cause an
accident and severe injuries.

Keep the storage compartments of the

centre armrest closed at all times while the
vehicle is in motion.

WARNING

If the light conditions are not good and the
screen is damaged or dirty, the indications
and information displayed on the screen
may not be read or be read incorrectly.

The indications and information dis-

played on the screen should never induce
to take any risk that compromises safety.
The screen is not a replacement for driver
awareness.

WARNING

Radio stations can transmit disaster or haz-
ard announcements. The following condi-
tions prevent such notices from being re-
ceived or issued:

When in areas with zero or insufficient ra-

dio signal. Also in tunnels, confined areas
between very tall buildings, garages, un-
derpasses, mountains and valleys.

When the frequency bands of the radio

station have interference or are not availa-
ble in areas with sufficient radio signal re-
ception.

When the speakers and the vehicle com-

ponents necessary for radio reception are
damaged, do not work or do not have suffi-
cient electrical power.

When the infotainment is switched off.

WARNING

Switch off mobile phone devices in areas
with a risk of explosion!

WARNING

The driving recommendations and traffic
indications shown on the navigation system
may differ from the current traffic situation.

Traffic signs, signalling systems, traffic

regulations and local circumstances pre-
vail over driving recommendations and
navigation system indications.

Adapt your speed and driving style to suit

visibility, weather, road and traffic condi-
tions.

Certain circumstances can significantly

initially planned lengthen both the duration
of the trip and the route to the destination,
or even temporarily prevent navigation to
it, for example, if a road is closed to traffic.

Note

In areas where special regulations apply or
the use of mobile phones is forbidden, the
mobile device in question must be switched
off at all times. The radiation produced by

172

Introduction

a mobile phone device when switched on
may interfere with sensitive technical and
medical equipment, possibly resulting in
malfunction or damage to the equipment.

Note

If the playback volume is excessive or dis-
torted, the speakers may be damaged.

173


Content      ..     8      9      10      11     ..