Seat Leon (2022 year). Manual in english - page 8
 

  Index      Manuals     Seat Leon (2022 year). Manual in english


Search            copyright infringement  


Content      ..     6      7      8      9     ..


Seat Leon (2022 year). Manual in english - page 8


Operation

system menu using the function button 

 >

Background lighting


››› 

page 93

.

Note

The reading lights go out when the vehicle
is closed and locked or after a few minutes

of turning the ignition off. This prevents the
12-volt vehicle battery from discharging.

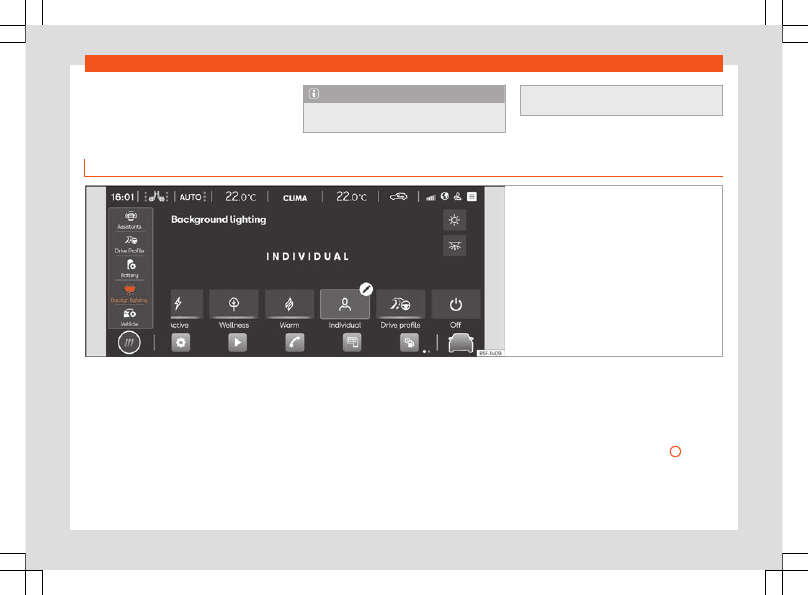
Background lighting

Fig. 107 

Schematic representation: Background

lighting

The background lighting lights up the area of
the centre console, the footwell area and, de-
pending on the version, the front door panels
and the instrument panel line.

There are predefined 

Background Lighting

versions 

››› 

Fig. 107

. The intensity of the light-

ing can be adjusted using the function button

:

Automatic:

 lights up the interior of the vehi-

cle depending on the selected driving mode.

Manual:

 to adjust the intensity of the back-

ground lighting in each of the areas as well as
to change the colour in the versions that have
lighting on the front door panel and the in-
strument panel line.

Off:

 turns off the background lighting.

Additional functions of the background
lighting

Door open alert:

 Representation on the

line of the respective front door if the vehicle

reaches 10 km/h while either of the two front
doors is not closed properly.

Rear windows locked alert:

 Representa-

tion on the line of the respective front door
when the operation buttons of the rear win-
dows are pressed, if they have been locked
with the safety button 

››› 

Fig. 100


5

 and the

vehicle is locked (Auto Lock).

Representation of the hazard warning

lights:

 Animation on the entire background

126

Visibility

lighting line while the hazard warning light
function is active.

The representation of these functions by the
background lighting can be switched on and
off both individually and as a whole in the in-
fotainment system: 

 > Background lighting

 Settings

OR:


 > Background lighting

.

Note

In some versions, the colour indicated on
the Infotainment screen may not match the
actual colour of the vehicle's interior light-
ing.

Visibility

Windscreen wiper and rear
window wiper systems

Window washer lever

Fig. 108 

Operating the windscreen wiper and

rear wiper.

More the lever to the required position:

0



Windscreen wipers off.

1



Wiper intervals.
Use control 

››› 

Fig. 108


A

 to set the in-

terval (vehicles without rain sensor), or

the sensitivity of the rain sensor.

2



Slow sweep adjustable by using con-
trol 

››› 

Fig. 108


A

.

3



Fast sweep adjustable by using control

››› 

Fig. 108


A

.

More the lever to the required position:

4

Short wipe. Brief press, short clean.
Hold the lever down for more time to in-
crease the wipe frequency.

5

Windscreen washer. The windscreen

washer function is activated by push-
ing the lever towards the steering

wheel, and the wipers operate simulta-
neously.

6

Interval wipe for rear window. The wip-
er will wipe the window approximately

every six seconds.

7

The rear window wash function is acti-

vated by pressing the lever, and the
rear wiper starts simultaneously.

WARNING

In cold conditions you should not use the
wash/wipe system unless you have
warmed the windscreen with the heating
and ventilation system. The windscreen
washer fluid could otherwise freeze on the
windscreen and obscure your view of the
road.

CAUTION

If the ignition is switched off while the wind-
screen wipers are switched on, they com-
plete their wipe and return to the rest posi-
tion. When the ignition is switched back on,
the windscreen wiper will continue to oper-
ate at the same wiping level. Ice, snow and

»

127

Operation

other obstacles on the windscreen may
damage the wiper and the windscreen wip-
er motor.

If necessary, remove snow and ice from

the windscreen wipers before starting your
journey.

Do not switch on the windscreen wipers if

the windscreen is dry. Cleaning with the
windscreen wipers while dry can cause
damage.

In icy conditions, always check that the

wiper blades are not frozen to the glass be-
fore using the wipers. In cold weather, it
may help to leave the vehicle parked with
the wipers in service position 

››› 

page 52

.

Note

The windscreen and window wipers only

function when the ignition is switched on
and the bonnet or rear lid, respectively, are
closed.

The rear wiper is automatically switched

on when the windscreen wiper is on and the
car is in reverse gear.

Wiper functions

Windscreen wipers performance in differ-
ent situations

If you stop the vehicle with the windscreen

wiper in position 1 or 2, it will automatically

change to a lower position speed. The set
speed will be resumed when the vehicle pulls
away.

The air conditioner comes on for approxi-

mately 30 seconds in air recirculation mode
when the windscreen washer is activated, 

to prevent the smell of the windscreen wash-
er fluid entering the inside the vehicle.

When wiping at intervals, the intervals vary

according to the speed. The higher the vehi-
cle speed the shorter the intervals.

Note

The wiper will try to wipe away any ob-

stacles that are on the windscreen. The
wiper will stop moving if the obstacle
blocks its path. Remove the obstacle and
switch the wiper back on again.

The windscreen will be wiped again ap-

proximately 5 seconds after the wind-
screen washer has been activated, provi-
ded the vehicle is moving (“drip” function).
If you activate the wipers less than 10 sec-
onds after the “drip” function, a new wash
sequence will begin without performing the
last wipe. For the “drip” function to work
again, you have to turn the ignition off and
then on again.

Rain sensor

Fig. 109 

Wiper lever: adjust the rain sensor 

A.

Fig. 110 

Rain sensor sensitive surface

The rain sensor controls the frequency of the
windscreen wiper intervals, depending on the
amount of rain 

››› 

. The sensitivity of the rain

sensor can be adjusted manually. Manual
wipe 

››› 

page 127

.

Move the lever to the required position

››› 

Fig. 109

:

128

Visibility

Rain sensor off.
Rain sensor on; automatic wipe if neces-
sary.
Setting sensitivity level of rain sensor

Set control to the right: high sensitivity.

Set control to the left: low sensitivity.

When the ignition is switched off and then
back on, the rain sensor remains active and
starts operating again when the windscreen
wipers are in position 

1

 and the vehicle is

travelling at more than 16 km/h (10 mph).

Modified behaviour of the rain sensor

Possible causes of faults and mistaken read-
ings 

on the sensitive surface


››› 

Fig. 110

 of the

rain sensor include:

Damaged wipers: a film of water on the

damaged blades may lengthen the activa-
tion time, reduce the washing intervals or re-
sult in a fast and continuous wipe.

Insects: insects on the sensor may trigger

the windscreen wiper.

Salt on the road: in winter, salt spread on

the roads may cause an excessively long
wipe when the windscreen is almost dry.

Dirt: dry dust, wax, coating on glass (Lotus

effect) or traces of detergent (car wash) may
reduce the effectiveness of the rain sensor or
make it react more slowly, later or not at all.

0

1

A

Windscreen crack: the impact of a stone

will trigger a single wipe cycle with the rain
sensor on. Next the rain sensor detects the re-
duction in the sensitive surface area and
adapts accordingly. The behaviour of the
sensor will vary with the size of the damage
caused by the stone.

WARNING

The rain sensor may not detect enough rain
to switch on the wipers.

If necessary, switch on the wipers man-

ually when water on the windscreen ob-
structs visibility.

Note

Regularly clean the sensitive surface of

the rain sensor 

››› 

Fig. 110

 (arrow) and

check for possible damage to the wiper
blades.

To remove wax and coatings, we recom-

mend a window cleaner containing alco-
hol.

Do not put stickers on the windscreen in

front of the rain sensor. This may cause
sensor disruption or faults.

Mirrors

Interior mirror anti-dazzle function

Rear view mirror with automatic anti-daz-
zle function

The anti-dazzle function is activated every
time the ignition is switched on.

When the anti-dazzle function is enabled, the
interior rear vision mirror will darken 

auto-

matically

 according to the amount of light it

receives. The anti-dazzle function is cancel-
led if reverse gear is engaged.

WARNING

In the event that an automatic anti-dazzle
rear vision mirror breaks, an electrolyte flu-
id may leak. This could cause irritation to
the skin, eyes and respiratory organs. If you
come into contact with this liquid, it must
be rinsed with large quantities of water. If
necessary, get medial help.

CAUTION

In the event that an automatic anti-dazzle
rear vision mirror breaks, an electrolyte flu-
id may leak. This liquid attacks plastic sur-
faces. Clean it with a wet sponge as soon
as possible.

»

129

Operation

Note

If the light falling on the interior mirror is

obstructed (e.g. with the sun blind), the an-
ti-dazzle mirror with automatic adjustment
will not operate perfectly.

When the interior lights are on or reverse

gear engaged, the mirrors do not darken
with automatic adjustment for anti-dazzle
position.

If you have to stick any type of sticker on

the windscreen, do not do so in front of the
sensors. Doing so could prevent the anti-
dazzle function from working well or even
from working at all.

Adjusting the exterior mirrors

Fig. 111 

Detail of the driver's door: control for

the exterior mirror.

Turn the control to the corresponding posi-
tion:

Turning the knob to the desired position,
adjust the mirrors on the driver side (L,
left) and the passenger side (R, right) to
the direction desired.
Depending on the equipment fitted on
the vehicle, the mirrors may be heated
according to the outside temperature.
Folding in mirrors.

L/R

Synchronized regulation of the exterior
mirrors

In the infotainment system, the function but-
ton 

 > Vehicle > Interior > Mirrors

 can be

used to select the exterior mirrors for
synchronised adjustment.

Turn the knob to position 

L

1)

.

Adjust the left-hand exterior mirror. The

right exterior mirror will be adjusted at the
same time (synchronised).

If necessary, correct the right-hand rear-

view mirror: rotate the control to position 

R

1)

.

Memory function

The memory buttons 

››› 

page 136

 can be

used to save and turn on settings for the exte-
rior mirrors.

The settings will also be saved in the user of
the online services.

Tilt function for front passenger exterior
mirror

When parking backwards, and in order to be
able to see the kerb, the passenger side mir-
ror can be automatically tilted towards the
passenger to provide a better view of the
kerb. The control must be in the position 

R

1)

for this feature to be operational.

1)

Regulation in right-hand drive vehicles is sym-

metrical.

130

Visibility

The mirror returns to its original position as
soon as you drive forward at over 15 km/h
(9 mph) or switch off the ignition. It also re-
turns to its original position if the position of
the control is adjusted.

Storing the rear view mirror settings for the
tilt function

Switch the ignition on.

In the infotainment system, select 

 > Ve-

hicle > Interior > Mirrors


››› 

page 93

.

Select the 

R

1)

 position on the control.

Select reverse gear.

Adjust the front passenger exterior mirror so

that you can see, for example, the kerb area
well.

Release the reverse gear.

The adjusted position for the rear view mir-

ror is stored.

Fold the rearview mirrors when locking the
vehicle

In the infotainment system, using the function
button 

 > Vehicle > Interior > Mirrors

 the

exterior mirrors can be selected to fold in
when the vehicle is parked and locked

››› 

page 93

.

When the vehicle is locked with the remote
control, the exterior mirrors are retracted au-
tomatically. When the vehicle is opened with
the remote control, the exterior mirrors are
deployed automatically.

WARNING

Convex or wide-angle exterior mirrors give
a larger field of vision. However, they make
objects look smaller and further away than
they really are. If you use these mirrors to
estimate the distance to vehicles behind
you when changing lane, you could mis-
judge the distance. Risk of accident!

WARNING

Fold and unfold the exterior mirror, taking
care to avoid injuries.

Only fold or unfold the exterior mirror

when there is no-one in the way of the mir-
ror.

When moving the mirror, take care not to

trap fingers between the mirror and the
mirror bracket.

CAUTION

If for any reason (e.g. a bump when ma-

noeuvring) one of the rear view mirrors is
knocked out of position, the mirrors must

first be fully retracted with the electric
control. The rear view mirror must not be
placed by hand in the starting position, as
the folding mechanism can be damaged.

Before washing the vehicle in an auto-

matic car wash, please make sure to fold
the exterior mirrors in to prevent them from
being damaged. Electrically retractable
exterior mirrors must not be folded in or out
by hand, always use the electrical power
control.

Note

If the electrical adjustment should fail to

operate, both of the mirrors can be adjus-
ted by hand by lightly pressing the edge of
the mirror glass.

The fold-in function on the exterior mir-

rors will not activate at speeds over
40 km/h (25 mph).

1)

Regulation in right-hand drive vehicles is sym-

metrical.

131

Operation

Sun protection

sun blind

Fig. 112 

Sun visor

Options for adjusting driver and front pas-
senger sun visors

Lower the sun visor towards the wind-

screen.

The sun visor can be pulled out of its

mounting and turned towards the door

››› 

Fig. 112 

1

.

Swing the sun visor towards the door, longi-

tudinally backwards.

There is a vanity mirror on the sun visor, with a
cover. When the cover is opened 

2

 a light

comes on.

The lamp goes out when the vanity mirror
cover is closed or the sun visor is pushed
back up.

WARNING

Folded sun blinds can reduce visibility.

Always store sun blinds and visors in their

housing when not in use.

Note

The light above the sun visor automatically
switches off after a few minutes in certain
conditions. This prevents the 12-volt vehicle
battery from discharging.

Seats and headrests

Adjusting seats

Manual adjustment of the front
seats

Fig. 113 

Front seats: manual seat settings.

Forwards/backwards: pull the lever and
move the seat. The seat must engage
when the lever is released!
Raise/lower: pull the lever up or push
down (several times if necessary) from its
home position.
Tilting the backrest: turn the hand wheel.
Lumbar support: move the lever until the
required position is achieved.

1

2

3

4

132

Seats and headrests

WARNING

Incorrect seat adjustment may lead to ac-
cidents and severe injuries.

Only adjust the seats when the vehicle is

stationary, as the seats could move unex-
pectedly while the vehicle is in motion and
you could lose control of the vehicle. Fur-
thermore, an incorrect position is adopted
when adjusting the seat.

Adjust the height, position and inclination

of the front seats only when their move-
ment area is empty.

Make sure there are no objects in that

area.

Make sure that the movement and lock-

ing areas of the seats are clean.

WARNING

Incorrectly using upholstery and seat cov-
ers might cause an accidental activation of
the electrical seat adjustment system and
make it move unexpectedly while driving.
This might cause loss of control of the vehi-
cle and thus accidents or injuries. More-
over, the electrical components of the front
seats might be damaged.

Never attach or place seat upholstery or

covers on the electric controls.

Never use upholstery or seat covers that

have not been explicitly authorised for the
seats of the vehicle.

Electric driver's seat adjustment

Fig. 114 

Driver's seat: electric seat settings.

Adjust the lumbar support: press the but-
ton according to the desired position.
Seat forwards/backwards: press the but-
ton forwards/backwards.
Seat up/down: Press the rear part of the
button up/down. To adjust the angle of

A

B

the seat cushion, press the front of the
button up/down.
Backrest further upright/further reclined:
press the button forwards/backwards.

The position will be saved automatically in
the SEAT Connect Active user when the igni-
tion is switched off

1)

.

WARNING

If the electric front seats are used negli-

gently or without paying due attention, it
can cause serious injury.

The front seats can also be electrically

adjusted when the ignition is switched off.
Never leave a child or any other person
who may need help in the vehicle.

In the event of an emergency, electrical

adjustment can be stopped by pressing
any control.

CAUTION

To avoid damaging the electrical compo-
nents of the front seats, please refrain from
kneeling on the seat or applying sharp
pressure at a single point to the seat cush-
ion and backrest.

»

C

1)

Valid for vehicles fitted with the Infotainment

Connect System.

133

Operation

Note

It may not be possible to electrically ad-

just the seat if the charge of the 12-volt ve-
hicle battery is very low.

If the engine is started while the seats are

being electrically adjusted, the adjustment
will stop.

When changing user a warning will be

shown on the infotainment system's screen
during the time that the seat is moving to
the saved position. This movement can be
stopped by pressing the stop button on the
screen.

Headrest

Introduction

The possibilities for the adjustment and disas-
sembly of the headrests are described below.
Always make sure that the seats are correctly
adjusted 

››› 

page 15

.

All seats are equipped with a headrest. The
central rear headrest is only intended for the
central seat of the rear bench. Therefore, do
not install it on any other seat.

Correct adjustment of headrest

Adjust the headrest so that its upper edge is
at the same level as the top of your head and

under no circumstances below eye level.
Keep the back of your head always as close
to the headrest as possible.

Adjusting the headrest for short people

Lower the headrest completely, even if your
head is below its upper edge. In the lowest
position, there may be a small distance be-
tween the headrest and the backrest.

Adjusting the headrest for tall people

Push the headrest up as far as it will go.

WARNING

If travelling with the headrests removed or
improperly adjusted, the risk of severe or
fatal injuries in the event of accidents and
sudden braking or manoeuvres increases.

Always travel with the headrest correctly

installed and adjusted.

To decrease the risk of cervical injuries in

the event of an accident, adjust the head-
rest correctly based on your height, always
making sure that its upper edge is at the
same height as the top of the head, but
never below eye level. Keep the back of
your head always as close to the headrest
as possible and centred.

Never adjust the headrest while the vehi-

cle is in motion.

Under no circumstances should the rear

passengers travel while the headrests are
in the non-use position.

CAUTION

When assembling and disassembling the
headrests, do not let them meet the top lin-
ing of the vehicle, the back rest of the front
seat or other parts of the vehicles. If not,
this could damage the vehicle.

Adjusting the headrests

Fig. 115 

Front seat: headrest adjustment.

Fig. 116 

Rear headrest: headrest adjustment.

134

Seats and headrests

Adjusting the height of the headrests

Grab the sides of the headrests with both

hands and push upwards to the desired posi-
tion. To lower it, repeat the same action,
pressing the 

1


››› 

Fig. 115


››› 

Fig. 116

 button

on the side.

The headrest must lock correctly in one po-

sition.

Removing and fitting the headrests

Fig. 117 

Front headrest: removal.

Fig. 118 

Rear headrest: removal.

Removing the front headrests

Lower the head restraint if necessary.

To unlock it, look for the rabbet on the bot-

tom of the backrest and press in the direction
of the arrow 

››› 

Fig. 117 

1

.

Remove the headrest in the direction of the

arrow 

2

.

Fitting the front headrests

Place the headrest in the correct position

on the guides of the corresponding backrest
and insert it.

Press the headrest downwards until the

bars lock.

Adjust the headrest according to the in-

structions on the correct position of the seat.

Removing the rear headrests

To remove the headrest, the corresponding
backrest must be partially folded forward.

Unlock the backrest 

››› 

page 137

.

Move the headrest upwards until it arrives

to the top.

Press button 

››› 

Fig. 118 

1

, while simultane-

ously pressing on the security hole 

2

 with a

flat screwdriver a maximum of 5 mm wide,
and remove the headrest.

Move the backrest until it engages properly

››› 

 in Folding down and raising the rear

seat backrest on page 137

.

Fitting the rear headrests

To mount the external headrests, the corre-
sponding backrest must be partially folded
forward.

Unlock the backrest 

››› 

page 137

.

Insert the headrest bars into the guides until

they perceptibly engage. It should not be
possible to remove the headrest from the
backrest.

Move the backrest until it engages properly

››› 

 in Folding down and raising the rear

seat backrest on page 137

.

»

135

Operation

WARNING

Remove the rear headrests only when it is
necessary to fit a child seat. After removing
a child seat, refit the headrest immediately.

Seat functions

Memory function

Fig. 119 

On the outer side of the driver's seat:

memory buttons.

Memory buttons

The memory buttons can be used to save
and turn on settings for the driver seat and
the exterior mirrors.

The settings will also be saved in the user of
the online services.

Save the settings of the driver seat and
the exterior mirrors while driving forward

Apply the electronic parking brake.

Move the gearshift to the neutral position.

Switch the ignition on.

Adjust the driver seat and the exterior mir-

rors.

Press  



 for longer than 1 second

››› 

Fig. 119

.

Press the memory button in which to store

the settings within approx. 10 seconds. A
warning sound will confirm they have been
stored.

Storing the passenger rear view mirror
settings while driving in reverse

Apply the electronic parking brake.

Move the gearshift to the neutral position.

Switch the ignition on.

Press the required memory button.

Select reverse gear.

Adjust the front passenger exterior mirror so

that you can see, for example, the kerb area
well.

The new position of the mirror will be stored

automatically and allocated to the vehicle
key that was used to unlock the vehicle.

Activating settings

With the vehicle stopped and the ignition

switched on, press and hold the correspond-
ing memory button until the saved position is
reached.

OR:

 With the ignition switched off and the

driver's door open, briefly press the corre-
sponding button.

The front passenger side exterior mirror au-

tomatically changes from the position stored
for reversing as soon as the vehicle moves
forward at a speed of at least 15 km/h
(10 mph) or when the gear selection lever is
changed to a position other than 

R

››› 

page 129

.

Initialising the seat position memory

The position memory system must be restar-
ted if, for example, the driver seat has been
changed.

Restarting deletes all memories and assign-
ments for the seat with position memory. The
memory keys can then be programmed
again.

Open the driver door and do not get into

the vehicle.

Operating the seat settings from outside

the vehicle.

Tilt the backrest fully forward.

Release the control to set the angle and

then press again until an audible warning is
heard.

WARNING

Adjust the memory function only when the
vehicle is stationary.

136

Seats and headrests

Note

If the driver door is opened approx. 10 mi-
nutes after the vehicle was unlocked or lat-
er, the driver seat and the exterior mirrors
do not move automatically.

Folding down and raising the rear
seat backrest

Fig. 120 

Rear seat: clip to hold the seatbelt in

place.

Fig. 121 

Rear seat: folding the backrest.

The rear seat backrest is split and each part
be lowered separately to extend the luggage
compartment.

Folding the backrest forwards

Place the side seat belts in the trim clip

››› 

Fig. 120

.

Completely lower the rear headrests

››› 

page 134

.

Press the unlock button 

››› 

Fig. 121 

1

 for-

wards and at the same time fold the backrest
down. The rear seat backrest is not engaged
when the red marking of the button 

2

 is visi-

ble.

Converting the table to a seat

Raise and lock in the back rest. The red

marking on the tab 

2

 should no longer be

visible when the backrest is properly secured.

WARNING

Serious injuries can be caused if the rear
seat backrest is lowered or lifted without
due care and attention.

Never lower or lift the rear seat backrest

while driving.

Do no trap or damage the seat belt when

raising the rear seat backrest.

When lowering or lifting the rear seat

backrest, keep your hands, fingers, feet
and other body parts out of its path.

For the rear seat belts to offer the neces-

sary protection all the parts of the rear
backrest must be properly engaged. This is
particularly important in the case of the
centre rear seat. If someone is seated in a
seat whose backrest is not properly engag-
ed they will fly forward, along with the
backrest, during an accident or a sudden
driving or braking manoeuvre.

A red signal on the button 

2

 warns that

the backrest is not engaged. Always check
that the red marking is not visible when the
backrest is in the upright position.

When the rear seat backrest is lowered or

is not properly engaged nobody else can
travel in the corresponding seats (not even
a child).

»

137

Operation

CAUTION

Serious damage can be caused to the vehi-
cle and other objects if the rear seat back-
rest is lowered or lifted without due care
and attention.

Before lowering the rear seat backrest,

always adjust the front seats so that nei-
ther the headrests nor the cushions of the
rear backrest can hit them.

Unlock the seat backrest with the
cord.

3

 Valid for: LEON Sportstourer

Fig. 122 

In the luggage compartment: levers

to unlock the rear backrest.

Lower the headrest properly.

Open the rear lid.

Pull the remote release lever of the left part

››› 

Fig. 122


1

 or right part 

2

 of the backrest

in the direction of the arrow. The released
part of the rear seat backrest is folded auto-
matically down and forwards.

If this occurs, close the rear lid.

The rear seat backrest is not engaged when
the red marking of the button 

››› 

Fig. 121


2

 is

visible.

Front centre armrest

Fig. 123 

Front centre armrest

To 

raise

 the armrest, pull it fully up in the di-

rection of the arrow 

››› 

Fig. 123

 up or step by

step depending on the desired opening.

To 

lower

 the armrest, first lift it to its highest

position. Then lower it down.

To 

move

 the armrest horizontally, move it for-

ward 

››› 

Fig. 123

 or backward as much as

possible in the direction of the corresponding
arrow.

WARNING

The front centre armrest may obstruct the
driver's arm movements, which could
cause an accident and severe injuries.

Keep the storage compartments of the

centre armrest closed at all times while the
vehicle is in motion.

Never let anyone sit on the centre arm-

rest while the vehicle is in motion, not even
a child. This position is incorrect and may
cause severe injuries.

138

Transport and practical equipment

Transport and practical
equipment

Storing objects

Positioning the luggage and cargo

It is possible to carry objects and luggage in
the vehicle, in a trailer 

››› 

page 294

 and on

the roof 

››› 

page 148

. When doing so, please

consider all legal provisions.

Placing luggage inside the vehicle safely

Distribute the load in the vehicle as evenly

as possible.

Always place equipment and heavy ob-

jects in the boot 

››› 

.

Position heavy items in the boot as far for-

ward as possible.

Take into account the maximum authorised

weight per axle, as well as the maximum au-
thorised weight of the vehicle 

››› 

page 372

.

Secure the objects to the fastening rings of

the boot using appropriate chains or belts

››› 

page 144

.

Also place small objects safely.

Adapt tyre pressure to the load. Take into

account the pressure adhesive of the tyres

››› 

page 347

.

In vehicles equipped with tyre pressure

control system, adjust to the new load status
if necessary 

››› 

page 351

.

WARNING

Loose or unsecured objects can cause seri-
ous injury in case of sudden manoeuvring
or braking or in case of an accident. Partic-
ularly if the airbag hits them when deploy-
ing and they are thrown across the inside of
the vehicle. Please observe the following
rules to minimise the risk of injury:

Place all objects inside the vehicle safe-

ly.

Secure all objects, little and large.

Place the objects in the cabin in such a

way that they can never reach the airbag
deployment areas while the vehicle is in
motion.

Keep the storage compartments closed

at all times while the vehicle is in motion.

Place the objects in such a way that they

never force any occupant of the vehicle to
sit in an incorrect position.

When transporting objects that take up a

seat, never let anyone use that seat.

Never leave hard, sharp or heavy objects

loose in open storage compartment of the
vehicle, on the cover behind the rear seat
or on the dashboard.

Remove all hard, sharp or heavy objects

from the fabrics and bags inside the cabin
and store them safely.

WARNING

The transport of heavy object changes ve-
hicle handling and increases braking dis-
tance. Heavy objects that are not properly
placed or secured may cause loss of con-
trol of the vehicle and thus severe injuries.

Never put too much load in the vehicle.

Both the carrying capacity as well as the
distribution of the load in the vehicle have
effects on the driving behaviour and brak-
ing ability.

When transporting heavy objects, the

driving behaviour of the vehicle varies due
to the displacement of the centre of gravi-
ty.

Always distribute the load in the vehicle

as evenly and horizontally as possible.

Always place heavy objects in the boot

before the rear axle and as far away from it
as possible.

Objects in the luggage compartment

that are unsecured could move suddenly
and modify the handling of the vehicle.

Adapt your speed and driving style at all

times to suit visibility, weather, road and
traffic conditions.

Accelerate with particular care and cau-

tion.

Avoid sudden braking and manoeuvres.

Brake earlier than usual.

»

139

Operation

WARNING

Never leave your vehicle unattended, es-

pecially when the rear lid is open. Children
could climb into the luggage compartment,
closing the door behind them; they will be
trapped and run the risk of death.

Close and lock all the doors and the rear

lid when you leave the vehicle. Before you
lock the vehicle, make sure that there are
no adults or children in the vehicle.

CAUTION

Electrical wires or, depending on the fea-
tures, the antenna embedded into the rear
windows could be damaged, even irrepara-
bly, if they are in contact with objects.

Note

Straps for securing the load to the fasten-
ing rings are commercially available from
accessory shops.

Luggage compartment

Luggage compartment shelf

3

 Valid for: Leon

Fig. 124 

In the luggage compartment: remov-

ing and fitting the shelf.

Fig. 125 

In the luggage compartment: remov-

ing and fitting the shelf.

Removing

Detach the cord loops 

››› 

Fig. 124 

B

 from

their hooks 

A

.

Remove the rear shelf from the side sup-

ports 

››› 

Fig. 125

 by pulling it upwards and

then take it out.

If necessary, the rear shelf can be stored un-
der the luggage compartment double floor

››› 

page 141

.

Fitting

Insert the cover horizontally so that the “re-

cess” fits onto the axis of the supports

››› 

Fig. 125

 and press down until it engages.

Hook the loops 

››› 

Fig. 124 

B

 to the rear lid.

WARNING

Animals, loose or unsecured or objects car-
ried on the rear shelf can cause serious in-
jury in case of sudden manoeuvring or
braking or in case of an accident.

Do not leave hard, sharp or heavy ob-

jects or in bags on the rear shelf.

Never transport animals on the rear shelf.

CAUTION

Before closing the rear lid, ensure that

the rear shelf is correctly fitted.

140

Transport and practical equipment

An overloaded luggage compartment

could mean that the rear shelf is not cor-
rectly seated and it may be bent or dam-
aged.

If the luggage compartment is overloa-

ded, remove the tray.

Note

Ensure that, when placing items of clothing
on the luggage compartment cover, rear
visibility is not reduced.

Store the rear shelf

3

 Valid for: Leon

Fig. 126 

In the luggage compartment: covers

for storing the rear shelf.

Fig. 127 

In the luggage compartment: fitting

the rear shelf.

Depending on the equipment, once the lug-
gage compartment shelf has been removed,
it can be stored under the boot floor.

Remove the left and right covers

››› 

Fig. 126

.

Place the rear shelf in the corresponding

housing 

››› 

Fig. 127

.

Put the left and right covers in their original

position.

Retractable shelf

3

 Valid for: LEON Sportstourer

Fig. 128 

In the luggage compartment: unroll-

ing and rolling up the shelf.

»

141


Content      ..     6      7      8      9     ..