Seat Mii electric (2021 year). Manual in english - page 11
 

  Index      Manuals     Seat Mii electric (2021 year). Manual in english


Search            copyright infringement  


Content      ..     9      10      11      12     ..


Seat Mii electric (2021 year). Manual in english - page 11


Battery

Charging process display

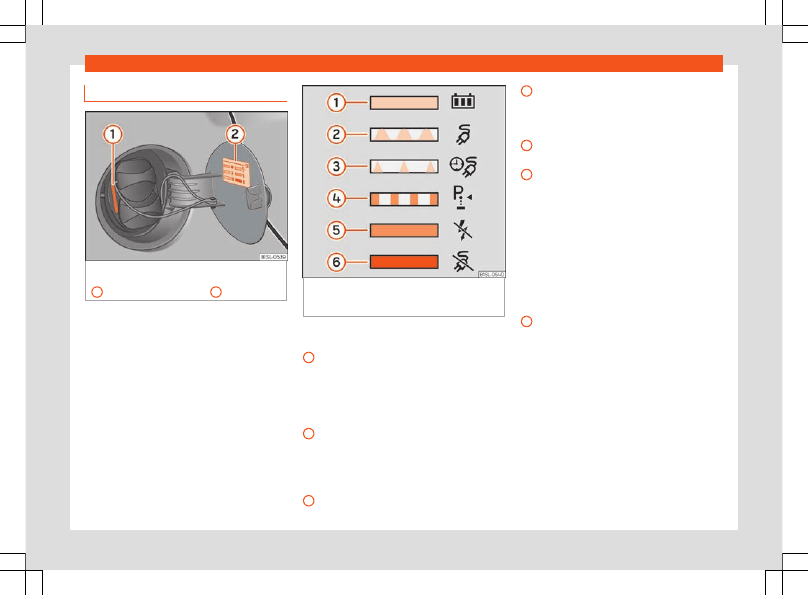
Fig. 156 

Behind the cover of the battery

charging socket: charging process indicator

1

 and information on sticker 

2

.

Fig. 157 

On the inside of the cover of the bat-

tery charging socket: sticker with information

on the charging process display.

The charging process display is a diode (LED)
located next to charging socket 

››› 

Fig. 156

1

 and it indicates the charge level. There is a

sticker that explains the different indications

››› 

Fig. 157

.

Key to the information sticker of the charging
process display 

››› 

Fig. 157

:

The green LED lights up permanently:

The charging process of the high-voltage
battery is complete. The battery has
reached the maximum or set charge lev-
el.

The LED flashes green:

 The high-voltage

battery is charging.

1

2

The LED flashes green for about 1 mi-
nute:

 Programmed charging is active

(departure time), but has not yet started

››› 

page 169

.

The LED flashes yellow:

 The parking

lock 

P

 is not engaged.

The yellow LED lights up briefly:

 The

charging connector is plugged into the
charging socket and the vehicle has de-
tected it.

The yellow LED lights up permanently:

No electrical network has been detected.
Check the power supply and the electri-
cal network. When using the charging ca-
ble for the electrical network, the protec-
tion device will display the status of the
network. Seek specialist assistance.

The red LED lights up permanently:

 It

has not been possible to lock the charg-
ing connector. Remove the charging con-
nector from the charging socket and plug
in again. If the fault continues, seek spe-
cialist assistance.

The LED flashes red:

 There is a fault in

the charging system. Seek specialist as-
sistance.

When the charging process is active, this is
displayed on the instrument panel by means
of a control lamp, and on the remaining
charge time is also displayed 

››› 

page 56

.

3

4

5

6

170

High-voltage battery

Remaining charging time

The vehicle's remaining charging time can be
displayed on the instrument cluster display
and on the mobile app (SEAT CONNECT
services).

The charge can take longer than 10 hours
with a charging cable for power sockets.

The e-Manager shows a maximum charging
time of 10:30 hours, although it can take lon-
ger.

If the charging time is longer than 10:30
hours, the instrument cluster displays >10:30.
When the remaining charge time drops below
this value, the “>” sign disappears and the
time counts down.

While the high-voltage battery is charging,
the indicator lamp 

 (yellow) flashes on the

instrument cluster.

Problems and solutions

The charging process will not start or has
paused

The relevant text message will appear in the
instrument panel display.

Use another charging source 

››› 

page 161

.

Or:

 unplug the charging cable of the vehi-

cle and plug it back in again.

Or:

 the charging system may be faulty.

Contact a specialised workshop.

Fast charge is not working

The relevant text message will appear in the
instrument panel display.

It is not possible to fast charge using direct
current.

Error in the charging system.

Contact a specialised workshop.

As an alternative, charge the high-voltage

battery using alternating voltage (AC).

The charge time is longer when using the
fast charge function

The charging current automatically reduces
during the charging process.

The high-voltage battery must be protected
against overheating when performing several
continuous charging cycles, for example,
when using the vehicle on a continuous basis
and with high ambient temperatures.

Emergency release of the charging
connector

Requirements:

The parking lock 

P

 is not engaged

››› 

page 140

.

The vehicle is unlocked 

››› 

page 69

.

The charging process has ended or has

paused 

››› 

page 162

.

If despite this, it is still impossible to unplug
the charging connector, perform an emer-
gency release of the connector.

Emergency release of the charging con-
nector

Press the charging mode button 

 at the

bottom of the centre console and keep it
pressed. At the same time, press the central
locking button 

 located on the driver’s door.

Remove the connector from the charging

socket.

Have the vehicle checked by a specialised

workshop immediately.

If the problem continues, consult a special-
ised workshop.

Note

Perform the emergency release of the
charging connector only in the event of a
fault in the vehicle.

171

Battery

Charging cable

Introduction

The type of charging cable supplied with the
vehicle depends on the delivery volume and
the specific technical specifications of each
country, e.g. charging connector connections
for power sockets.

The charging cables supplied from the facto-
ry are in the luggage compartment

››› 

page 89

 and should only be transported

there.

To charge the high-voltage battery without
problems and ensure a long useful life of the
charging cables, bear in mind the following
information and indications.

SEAT recommends to 

only

 use the charging

cables supplied from the factory.

How to maintain the charging cables in good
condition:

Use them with care.

Roll them up and roll them out completely.

Do not twist or bend them over sharp

edges.

Do not crush it and avoid driving the vehicle

over it.

When removing them from the vehicle and

from the power supply source, only pull on
the connectors.

Children should not use the charging cable.

Keep animals away from the charging ca-

ble.

After use, store them safely and without

twisting.

How to maintain the protection device and
the charging connectors in good condition:

Do not touch the charging connector’s

contacts.

After using the charging cable, replace the

protective caps.

Protect them from intense solar radiation

(the outside temperature should not exceed
50°C (122°F)).

Do not drop them.

Protect them from immersion in fluids such

as rain water.

In the event of operating faults, SEAT recom-
mends the charging cables are checked by
one of its dealers.

If there is a fault in the power socket or in the
electrical installation, seek assistance from a
technician specialised in electrical installa-
tions.

WARNING

Using a charging cable that has been dam-
aged or tampered with can cause serious
injury and fatal electric shocks.

Before each use check that the connec-

tors and the charging cable are undam-
aged, e.g. check for cracks.

Never use a charging cable that is dam-

aged or has been tampered with.

If the charging cable does not work prop-

erly, get a SEAT dealer to check it.

WARNING

Always plug the charging cable for power
sockets directly into a power socket. Never
use the charging cable in combination with
an extension cable, a cable reel, a power
strip or an adapter, such as a travel adapt-
er or a timer. Otherwise this could lead to
injuries caused by fire or the charging ca-
ble or the electrical installation of the
property could be damaged.

WARNING

Never charge the battery using unknown
power sockets or electrical installations, or
those which have not been checked by du-
ly qualified technicians. Even very low
charging currents can cause important
damages, especially fires, when using
power sockets or electrical installations
that are in poor condition. In this case, seek
assistance from a technician specialised in
electrical installations.

172

High-voltage battery

WARNING

Items that are not secured, or incorrectly
secured can cause serious injury during
sudden manoeuvres or braking, or in the
event of an accident.

Store the charging cable securely in the

luggage compartment.

Use the organizer/protective cover provi-

ded with the cable for this purpose.

WARNING

The high voltage system voltage is danger-
ous and can cause burns, other injuries and
fatal electric shocks.

Only clean the charging cable when it is

unplugged.

CAUTION

A specialist in electrical installations
should check the charging cable on a regu-
lar basis. A tester adapter will be needed to
check the charging cables.

CAUTION

The charging cable can be damaged if not
cleaned properly.

Only water should be used for this pur-

pose, and never additional cleaning prod-
ucts.

Water should be prevented from getting

into the contacts.

For the sake of the environment

Charging cables must be disposed of in an
environmentally friendly way and should
not be thrown in the household waste.

Note

Take into consideration the maximum ca-
pacity of the electrical circuit used. If the
charging cable is plugged in along with
other electrical consumers into a power
socket on the same electrical circuit, this
could cause the fuse to trip. In this case, the
high-voltage battery will not charge. Dis-
connect all other electrical consumers
from the electrical circuit or use another
circuit. In this case, seek assistance from a
technician specialised in electrical instal-
lations.

Charging cable for charging sta-
tions (AC)

Fig. 158 

In the luggage compartment: charg-

ing cable for charging stations (depending on

the equipment).

The maximum charging current is 16 or 32
amps, depending on the vehicle’s features
and the charging cable that is supplied 

››› 

.

WARNING

Charging the high-voltage battery with an
inappropriate charging cable could cause
short circuits, serious injuries and fatal
electrical shocks.

WARNING

The charging cable should not be used as
an extension lead. The charging process
could be affected.

»

173

Battery

CAUTION

Follow the manufacturer’s instructions and
indications when using the charging sta-
tion.

Note

Charging with a 16 A charging cable is not
possible in some charging stations that
support 32 A. This depends on the features
of the charging station.

Before charging the vehicle, find out

about the available charging technology.

Charging cable for power sockets

Fig. 159 

Charging cable for electrical sockets

Fig. 160 

On the charging cable for power

sockets: protection device.

Key to the 

››› 

Fig. 160

:

Control lamp of the power connector
Control lamp of the protection device
Control lamp of the vehicle
Failure warning lamp

The supplied charging cable is for charging
the high-voltage battery using alternating
voltage (AC) from a power socket

››› 

page 166

.

Also bear in mind the safety information and
indications on the charging cable label.

Protection device

Due to the electronic protection device

››› 

Fig. 160

, the charging connector does not

receive current until it is plugged into the
charging socket of the vehicle. When the
charging cable is plugged into the power

1

2

3

4

socket, the protection device automatically
performs a self-check. The control and warn-
ing lamps then briefly light up and turn off.
Then the current operating status is dis-
played.

Operating displays

The control lamps that indicate the operation
turn on or flash green.

Display

››› 

Fig. 160

Meaning

1

 on

Charging cable connected
to the electrical network.

1

2

 on, 

3

 flash-

es

a)

High-voltage battery

charging.

1

2

 and 

3

 on

Charging process com-
plete. The high-voltage bat-

tery is charged.

a)

The available supply voltage depends on each

country.

Display in the event of the charging cable
heating

The charging cable is fitted with a tempera-
ture supervision system. The temperature su-
pervision is activated if the charging cable is
too hot due to, for example, overheating in the
luggage compartment where it is stored or
exposure to intense solar radiation.

174

High-voltage battery

If it is still possible to charge, in addition to the
operating display flashing, the red warning
lamp 

››› 

Fig. 160

 will also appear. The charg-

ing current is automatically 

reduced

. The

charging current will increase again when the
charging cable has cooled down sufficiently.

In the event of the charging process having

paused

 due to the protection device, the op-

erating display will turn off and a green warn-
ing lamp will flash. The red warning lamp will
flash. Unplug the charging cable and let it
cool down. If the fault occurs again, consult a
specialised workshop.

Limiting the charging current

The charging cable limits the charging cur-
rent based in the existing power supply. De-
pending on the power socket of the country
in question, the maximum charging current
may be 6, 8 or 10 A.

The management of the battery charge ena-
bles to select a lower or maximum charging
current.

Failure indications

If the warning lamp 

4

 flashes or is red with-

out the operating display 

1

2

 or 

3

 re-

maining on, this indicates there is a failure.
The charging process will pause or cancel.
Check the failure display and consult a spe-
cialised workshop if necessary.

Display

››› 

Fig. 160

Meaning

1

 flashes, 

4

 on or

flashing

Failure in the power supply.

2

 flashes, 

4

 on or

flashing

Failure in the protection de-

vice.

3

 flashes, 

4

 on or

flashing

Failure in the vehicle.

CAUTION

Seek information regarding the appropri-
ate charging cable and the maximum per-
mitted charging current before travelling
abroad. If possible, use the charging cable
supplied in the country in question.

Note

The charging cables supplied in countries
other than Norway are often not appropri-
ate for charging from power sockets. Nor-
wegian charging cables are not fitted with
control lamp 

1

 because they use a differ-

ent electrical network.

Note

If there is another consumer connected si-
multaneously to the electrical network dur-
ing the charging process or if the vehicle is
in the vicinity of high-voltage cables, it is
possible that the charge cannot be per-

formed from a power socket. Simultaneous
connections to the electrical network:

Connection of a charger for the 12-volt

starter battery.

Contact with a working equipment con-

nected to the electrical network, i.e. an ele-
vating platform.

175

Practical tips

Practical tips

Verification and replace-
ment

Engine compartment

Safety warnings for performing
works in the engine compartment

The engine compartment of the vehicle is a
dangerous area. You should only perform
works in the engine compartment if you have
good knowledge of the necessary operations
and the general safety measures, and if you
have adequate tools, means and operating
fluids. Works performed inadequately, could
lead to serious injuries 

››› 

. In this case, seek

a specialised workshop to perform all the
works. SEAT recommends visiting a SEAT
dealership for this.

Before performing any work in the engine
compartment, always park the vehicle on
level and firm ground, taking all necessary
safety precautions.

Only specialised workshops qualified ac-
cording to the SEAT guidelines are authorised
to perform works on the high-voltage system

››› 

.

WARNING

The voltage of the high-voltage system and
of the high-voltage battery could be fatal!
Touching damaged high-voltage cables
(orange colour) and the high-voltage bat-
tery could cause an electrical shock with
deathly consequences. The high-voltage
system may be active even with the ignition
disconnected!

Never perform any type of work on the

high-voltage system, on the orange col-
oured high-voltage cables, on the high-
voltage components or on the high-voltage
battery. Only specialised workshops that
are qualified and approved for performing
works on high-voltage systems are author-
ised to perform works on the high-voltage
network.

Never modify, damage or remove the or-

ange coloured high-voltage cables, the
high-voltage components or the high-volt-
age battery, or uncouple them from the
high-voltage system.

To perform works close to high-voltage

components and cables, as well as on the
high-voltage battery, which require the use
of sharp tools, which may deform or re-
lease shavings, or sources of heat, such as
works involving welding, soldering, use of
hot air or thermal gluing, it is essential you
first ensure the system is not powered. The
voltage to the high-voltage battery cannot
be disconnected. Only duly qualified and

trained technicians are authorised to leave
the high-voltage system without power.

When there is a fault in the high-voltage

system, the engine may automatically de-
activate and the relevant display may ap-
pear on the instrument panel. In this case,
the engine will remain deactivated until du-
ly qualified and trained technicians resolve
the fault.

When performing works on the high-volt-

age system, especially on the orange col-
oured high-voltage cables, on the high-
voltage components or on the high-voltage
battery, ensure you bear in mind the SEAT
guidelines.

WARNING

If works are performed on the high-voltage
system and on the high-voltage compo-
nents in an inappropriate manner, this may
lead to faults in the operation, accidents
and injuries.

Only duly qualified and trained techni-

cians are authorised to perform works on
the high-voltage system and on any other
systems on which these may have indirect
influence.

WARNING

Any accidental movement of the vehicle
during maintenance work could cause seri-
ous injuries.

176

Verification and replacement

Never perform works underneath the ve-

hicle without having first immobilised it to
prevent it from moving. When performing
works underneath the vehicle with the
wheels on the ground, the vehicle must be
on level ground, the wheels must be locked
and, where appropriate, the vehicle key
must be removed from the ignition lock.

If work must be performed underneath

the vehicle, take the extra precaution of
supporting it safely using suitable assem-
bly support. The jack is not suitable for this
purpose and may not withstand, which
could lead to serious injuries.

WARNING

The engine compartment of any vehicle is a
dangerous area in which serious injuries
can be caused!

When performing any type of work, al-

ways ensure you are extremely cautious,
and bear in mind the general safety meas-
ures. Never put yourself at risk.

Never perform works in the engine com-

partment if you do not have solid knowl-
edge of the necessary operations. If you
are unsure of what needs to be done, seek
a specialised workshop to perform the
works. Works performed inadequately,
could lead to serious injuries.

Never open the bonnet if the engine com-

partment is discharging steam or engine
coolant. Steam or hot coolant can cause

severe burns. Always wait until you stop
hearing or seeing the steam or coolant dis-
charging from the engine compartment.

Before opening the bonnet, always wait

until the electric drive system and the high-
voltage components have cooled down.

If you touch hot parts of the electric drive

system, you may suffer skin burns.

When the electric drive system has

cooled down, before opening the bonnet
bear in mind the following:

Engage the handbrake, tighten it and
place the selector lever in position P or
the gear lever in neutral.

Switch off the ignition, remove the key
from the ignition lock and store it in a
safe place at a safe distance from the
vehicle to prevent the ignition from
turning on by mistake or power the
electrical system.

Always keep children away from the
engine compartment and never leave
them unsupervised.

When the electric drive system is hot, its

cooling system is under pressure. Never
open the coolant expansion tank cap when
the drive system is hot. Otherwise the cool-
ant could splash and cause severe burn
and other injuries.

Turn the coolant expansion tank cap
slowly and very carefully anticlockwise
while pressing it down slightly.

Always protect your face, hands and
arms from the hot coolant and steam
with a large thick cloth.

When refilling operating fluids, ensure

they do not spill onto the components of
the engine or onto the exhaust system.
These liquids could cause a fire.

WARNING

The electrical system is under high voltage
and can cause electrical shocks, burns, se-
rious injuries and even death!

Never short circuit the electrical system.

The 12-volt battery may explode.

To reduce the risk of suffering a fatal

electrical shock and serious injuries, while
the drive system is connected or is con-
necting, never touch the high-voltage com-
ponents, the high-voltage battery or the
high-voltage system, especially the orange
coloured high-voltage cables.

WARNING

The engine compartment contains rotating
parts that could cause serious injuries.

Never insert your hand in the radiator fan

or around that area. All the rotor blades
can cause serious injuries. The fan acti-
vates depending on the temperature and
can switch on automatically, even with the
ignition disconnected and with the key re-
moved from the ignition lock.

»

177

Practical tips

If you have to perform works during the

disconnection of the drive system or which
it connected, bear in mind that the rotating
parts (i.e. the radiator fan) represent a fatal
hazard. Always act with extreme care.

Always ensure that no part of your
body, or any jewellery or tie, loose
clothing, loose long hair can become
trapped in the rotating parts of the en-
gine. Before performing works in the en-
gine compartment, remove any jewel-
lery or tie you may be wearing, tie up
your hair if it is long and gather any
loose clothing to prevent them from be-
coming tangled with the engine parts.

Never step on the accelerator pedal
without paying attention, always do so
with extreme care. The vehicle could
move, even if the electronic parking
brake is activated.

Never leave any object in the engine

compartment, i.e. cloths or tools. These ob-
jects could cause functional failures, dam-
age to the electric drive system and even a
fire.

WARNING

If additional insulating elements (i.e. blan-
kets) are placed in the engine compart-
ment, this could prevent the electric drive
system from operating correctly, could
cause a fire and lead to serious injuries.

Never cover the electric drive system

with blankets or other insulating materials.

WARNING

The operating fluids and some materials of
the engine compartment are highly flam-
mable and could cause a fire and serious
injuries! · Never smoke in the vicinity of the
engine compartment.

Never perform works close to unprotec-

ted flames or sparks.

Never spill operating fluids on the elec-

tric drive system. The liquids could ignite
upon coming into contact with the hot
parts of the electric drive system and
cause injuries.

When you must perform works on the on-

board 12-volt electrical system, bear in
mind the following:

Always disconnect the 12-volt battery.
Ensure the vehicle is unlocked when
disconnecting the 12-volt battery, oth-
erwise the anti-theft alarm will trigger.

Never perform works in the vicinity of
heating elements, water boilers or un-
protected flames.

Always have a fire extinguisher close-by,

ensuring it is operational and had been
checked.

CAUTION

When refilling or changing the operating
fluids, ensure you pour the correct fluids in-
to their corresponding filler caps. Using the
wrong operating fluids could cause severe
functional failures and damage to the en-
gine.

CAUTION

After an accident or having hit an obstacle
with the vehicle underside, the high-volt-
age battery must be checked by duly
qualified and trained technicians.

For the sake of the environment

Operating fluids that overflow from the ve-
hicle contaminate the environment. There-
fore, check underneath the vehicle on a
regular basis. If there are marks left by op-
erating fluids on the ground, consult a spe-
cialised workshop and request the vehicle
be checked. If any operating fluid leaks out,
dispose of it in the correct manner.

Working in the engine compart-
ment

Before performing works in the engine com-
partment, always perform the following oper-
ations in the order indicated 

››› 

:

178

Verification and replacement

Place the vehicle on level and firm ground,

taking all necessary safety precautions.

Press the brake pedal and keep it pressed

until you disconnect the drive system.

Engage the handbrake and tighten it.

Place the selector lever to the 

P

››› 

page 140

 position.

Disconnect the drive system 

››› 

page 137

.

Remove the vehicle key outside the vehicle

and keep it at a distance to prevent the drive
system from connecting by mistake and pow-
ering the electrical system 

››› 

page 138

.

Wait for the electric drive system to cool

down.

Keep children and other people away from

the engine compartment.

Ensure the vehicle cannot go into motion

unexpectedly.

WARNING

For your own safety, do not ignore this im-
portant check list, otherwise this could
cause accidents and serious injuries.

Always follow the indications on the

check list and always bear in mind the gen-
eral safety measures.

Opening and closing the bonnet

Fig. 161 

: Release lever in the footwell on the

driver side 

: Release lever on the bonnet

Fig. 162 

: Bonnet securing rod in the bonnet.

: Bonnet supported by the bonnet securing

rod

Opening the bonnet

The bonnet is released from inside the vehi-
cle.

Before opening the bonnet, make sure that
the windscreen wiper arms are in place
against the windscreen.

»

179

Practical tips

Open the door and pull the lever under the

dashboard 

››› 

Fig. 161


1

.

Lift the bonnet up slightly while pressing the

release lever 

››› 

Fig. 161


2

 in the direction of

the arrow to completely open the bonnet.

Take out the bonnet support rod from its

clip in the direction of the arrow 

››› 

Fig. 162


3

and place it in the corresponding open posi-
tion 

4

 (arrow).

Closing the bonnet

Slightly lift the bonnet.

Release the bonnet stay and replace it in its

support.

At a height of approximately 20 cm let it fall

so it locks.

If the bonnet does not close, do not press
downwards. Open it again and let it fall as
mentioned above.

WARNING

If the bonnet is not properly closed, it could
open unexpectedly while in motion and im-
pede forward visibility. This could cause
accidents and lead to serious injuries.

After closing the bonnet, ensure that the

lock is duly engaged in the lock carrier. The
bonnet must be at the same level as the
adjacent parts of the bodywork.

If while in motion you notice the bonnet is

not properly closed, stop the vehicle imme-
diately and close the bonnet.

Open and close the bonnet only when

there is nobody in its path.

CAUTION

To avoid damage to the bonnet and to the

wiper arms, open the bonnet only when the
wiper is disconnected and the wiper arms
are positioned on the windscreen.

Before starting to move, always place the

wiper arms on the windscreen.

Cooling system

Control lamp

Flashes red

Excessive engine coolant temperature.


Stop the vehicle!

 Stop the vehicle safely as soon

as possible. Disconnect the drive system and allow to
cool until the lamp switches off. If the lamp does not

switch off once the drive system has cooled down,
seek specialist assistance.

Insufficient engine coolant level.


Stop the vehicle!

 Check the coolant level once

the drive system has cooled down and, if it is low, re-
fill with engine coolant 

››› 

page 181

.

Flashing red next to the dis-

play 

--.-

 on the instrument

panel.

Engine coolant system faulty.


Stop the vehicle!

 Seek specialist assistance.

Several control and warning lamps light up
for a few seconds when the ignition is switch-
ed on while the function is verified. They will
switch off after a few seconds.

WARNING

Observe the safety warnings 

››› 

 in Con-

trol and warning lamps on page 66

.

Coolant specifications

The engine cooling system is supplied from
the factory with a specially treated mixture of
water and at least 40 % of the additive

G12evo

 (TL-VW 774 J), purple. This mixture

gives the necessary frost protection down to
-25°C (-13°F) and protects the light alloy
parts of the engine cooling system against
corrosion. It also prevents scaling and con-
siderably raises the boiling point of the cool-
ant.

To protect the cooling system, the percent-
age of additive must always be at least 40 %,
even in warm climates where anti-freeze pro-
tection is not required.

180

Verification and replacement

If for weather reasons further protection is
necessary, the proportion of additive may be
increased, but only up to 60 %; otherwise an-
tifreeze protection will diminish and this will
worsen cooling.

When the coolant is topped up, use a mixture
of 

distilled water

 and at least 40 % of the

additive 

G12evo

 for optimal protection

against corrosion. Mixing 

G12evo

 with G13

(TL-VW 774 J), G12 plus-plus (TL-VW 774 G),
G12 plus (TL-VW 774 F), G12 (red) or G11
(green blue) engine coolants decreases pro-
tection again corrosion and should be avoi-
ded.

WARNING

If there is not enough anti-freeze in the
coolant system, the engine may fail lead-
ing to serious damage.

Ensure that the percentage of additive is

correct for the lowest expected ambient
temperature in the zone in which the vehi-
cle is to be used.

When the outside temperature is very

low, the coolant could freeze and the vehi-
cle would be immobilised.

CAUTION

The original additives should never be
mixed with coolants which are not ap-
proved by SEAT.

If the fluid in the expansion tank is not

purple but is, for example, brown, this indi-
cates that the G12evo additive has been
mixed with an inadequate coolant. The
coolant must be changed as soon as possi-
ble if this is the case!

For the sake of the environment

Coolants and additives can contaminate
the environment. If any fluids are spilled,
they should be collected and correctly dis-
posed of, with respect to the environment.

Refilling coolant

Fig. 163 

In the engine compartment: marking

on coolant expansion tank.

Fig. 164 

Engine compartment: coolant expan-

sion tank cap.

The coolant tank is located in the engine
compartment 

››› 

page 176

.

Top up coolant when the level is below the 



(minimum) mark.

Checking coolant level

Park the vehicle in a horizontal position.

Switch the ignition off.

Read off the coolant level on coolant ex-
pansion tank. When the drive system is
cold, the coolant level should be between
the marks 

››› 

Fig. 163

. With the drive system

hot, the level may be slightly above the top
mark.

Topping up coolant

Allow the drive system to cool.

»

181

Practical tips

Unscrew the cap slowly and carefully while
pressing downwards on the cap. 

››› 

.

Only refill the coolant if the coolant expan-
sion tank still contains coolant; otherwise
you could 

damage the drive system

. If

there is no coolant in the expansion tank, do
not continue driving. You should obtain pro-
fessional assistance 

››› 

.

If there is still some coolant in the expansion
tank, top up to the upper mark.

Top up with coolant until the level becomes
stable.

Screw the cap back on correctly.

If there is a coolant leak, take the vehicle spe-
cialised workshop to have the cooling system
examined.

WARNING

The cooling system is under pressure. Do

not open the coolant expansion tank cap
when the drive system is hot: risk of burns!

Store the antifreeze in its original con-

tainer and keep it out of reach of children.

If working inside the engine compart-

ment, remember that, even when the igni-
tion is switched off, the radiator fan may
start up automatically, and therefore there
is a risk of injury.

CAUTION

If you run out of coolant in the expansion
tank, park the vehicle in a safe place and
do not continue driving. Obtain technical
assistance.

Brake fluid

Check and refill the brake fluid

Fig. 165 

Engine compartment: brake fluid res-

ervoir cap.

The brake fluid reservoir is located in the en-
gine compartment.

Checking the brake fluid level

The brake fluid level must be between the 



and 



 markings.

However, if the brake fluid level goes down
noticeably in a short time, or drops below the



 mark, there may be a leak in the brake

system. Seek specialist assistance. A warning
light on the instrument panel display monitors
the brake fluid level 

››› 

page 65

.

Changing brake fluid

We recommend that you have the brake fluid
changed by a Technical Service.

WARNING

If the brake fluid level is low or unsuita-
ble/old brake fluid is used, the brake sys-
tem may fail or braking power may be re-
duced.

Check the brake system and the brake

fluid level regularly!

When the brake fluid is used and brakes

are subjected to extreme braking forces,
bubbles of vapour form in the brake sys-
tem. These bubbles can significantly re-
duce braking power, notably increasing
braking distance, and could result in the to-
tal failure of the brake system.

Be sure to always use the correct brake

fluid. Only use brake fluid that expressly
meets the VW 501 14 standard.

You can buy VW 501 14 standard brake

fluid in a SEAT dealership or a SEAT Official
Service. If none is available, use only high-
quality brake fluid that meets DIN ISO 4925

182

Verification and replacement

CLASS 4 standards, or USA Standards
FMVSS 116 DOT 4.

The replacement brake fluid must be

new.

Brake fluid should be stored in the closed

original container in a safe place out of
reach of children. Risk of poisoning!

CAUTION

Brake fluid should not come into contact
with the vehicle paintwork, as it is abrasive.

For the sake of the environment

Brake fluid is an environmental pollutant.
Collect any spilt service fluids and allow a
professional to dispose of them.

Windscreen washer reservoir

Checking the level of the window
washer tank and refilling it

Fig. 166 

In the engine compartment: window

washer tank cap.

The windscreen washer reservoir is in the en-
gine compartment.

Check the water level in the windscreen
washer reservoir regularly and top up as re-
quired.

The window washer tank contains liquid de-
tergent for the windscreen and rear window.

Open the bonnet 


››› 

page 178

.

The window washer tank is marked with the

 symbol on the cap.

Check there is enough windscreen water in

the reservoir.

Plain water is not enough to clean the wind-
screen and headlights. We recommend that
you always add a product to the windscreen
washer fluid.

Recommended windscreen wipers

For the hottest seasons we recommend

summer G 052 184 A1 for clear glass. Propor-
tions of the mixture in the washer fluid tank:
1:100 (1 part concentrate per 100 parts wa-
ter).

All year round, G 052 164 A2 for clear glass.

Approximate proportion of the winter mixture,
up to -18°C (0°F): 1:2 (1 part concentrate per 2
parts water); otherwise, a 1:4 proportion of
mixture in the washer fluid tank.

The capacity of the window washer tank can
be found in 

››› 

page 214

.

CAUTION

If the water from the windscreen washer
does not contain enough anti-freeze, it may
freeze on the windscreen and rear window,
reducing forward and rear visibility.

In winter, ensure the windscreen washer

contains enough anti-freeze.

In cold conditions, you should not use the

windscreen wiper system unless you have
warmed the windscreen with the ventila-
tion system. The antifreeze could freeze on
the windscreen and reduce visibility.

»

183

Practical tips

CAUTION

Never mix an unsuitable antifreeze or other
similar additives with the windscreen wash-
er water. A greasy layer may be formed on
the windscreen which will impair visibility.

Use clean water with a window cleaner

recommended by SEAT.

If necessary, add a suitable antifreeze to

the water in the reservoir.

CAUTION

Do not mix cleaning products recommen-

ded by SEAT with other products. This
could lead to flocculation and may block
the windscreen washer jets.

When topping up service fluids, make ab-

solutely certain that you fill the fluids into
the correct reservoirs. Using the wrong flu-
ids could cause serious malfunctions and
engine damage!

Not having windscreen wiper fluid re-

duces visibility through the windscreen,
and leads to loss of visibility in headlights
in models with headlight washer.

12-volt battery

Introduction

The 12-volt battery is part of the electrical
system and in the event of a high-voltage

system failure it supplies power to safety-crit-
ical vehicle systems. The 12-volt battery is
checked as part of inspection work and re-
placed if necessary.

You may only work on the electrical system if
you are familiar with the necessary proce-
dures and general safety measures, and if
you have the correct fluids and operating
equipment, as well as the right tools. Work
done incorrectly can cause serious injuries

››› 

 in Location of the 12 volt battery on

page 184

. Get a qualified establishment to

do all work. Seat recommends Seat dealer-
ships for this purpose.

You will find information about any warning
and control lamps that may light up in the
“Problem solving” section at the end of the
chapter 

››› 

page 187

.

Location of the 12 volt battery

The 12 volt battery is located in the engine
compartment.

Explanation of the warning indications on the

12-volt battery

Wear eye protection.

Battery acid is extremely corrosive. Wear pro-

tective gloves and eye protection. Rinse any
splashes of electrolyte with plenty of water.

Fires, sparks, open flames and smoking are

prohibited.

The 12-volt battery should only be charged in

a well-ventilated zone. Risk of explosion!

Keep children away from acid and the 12-volt
battery.

Always follow the instruction manual.

WARNING

Work on the 12 volt battery and electrical
system can cause severe burns, fires, and
electric shock. Before doing any work, the
following warning instructions must be
read and followed, and the following pre-
cautions must be taken:

Before doing any work on the 12-volt bat-

tery, switch off the ignition and all electri-
cal consumers and disconnect the nega-
tive cable from the 12-volt battery.

Keep children away from electrolyte and

the 12-volt battery at all times.

Always wear protective goggles and

gloves.

Electrolyte is highly corrosive. It can

caused skin burns and blindness. When
handling the 12-volt battery you must par-
ticularly protect your hands, arms and face
from splashes of electrolyte.

Never smoke or work close to naked

flames or sparks.

184

Verification and replacement

Avoid generating sparks when handling

cables and electronic devices, or as a re-
sult of an electrostatic discharge.

Never short the battery terminals.

Never use a damaged 12 volt battery. It

could explode. A damaged 12 volt battery
should be replaced immediately.

Never use a frozen 12 volt battery. A dis-

charged 12 volt battery may freeze at a
temperature of just 0 °C (+32 °F). A frozen
12 volt battery should be replaced immedi-
ately.

CAUTION

The 12 volt battery should not be exposed
to direct sunlight for a long time.

Ultraviolet rays could damage the bat-

tery case.

CAUTION

If it is not going to be used for a long period
of time, the 12 volt battery should be pro-
tected from frost.

The 12 volt battery can freeze and be-

come unusable.

Note

When turning on the drive system with a
drained or newly replaced 12-volt battery,
or after a jump start, it is possible that
some system settings (time, date, personal

comfort options and programs) may be lost
or deleted. Check and correct these set-
tings once the 12-volt battery is sufficiently
charged.

Check the 12-volt battery electro-
lyte level

Fig. 167 

Sight glass on the top of the 12 volt

battery (schematic representation).

The electrolyte level of the 12 volt battery
should be checked periodically in cases of
high mileage, in countries with hot climates
and if an old 12-volt battery is used. Other-
wise, the 12-volt battery is maintenance-free.

Preparations

Prepare the vehicle for work in the engine

compartment 

››› 

page 178

Open the bonnet 

››› 

page 179

Check the electrolyte level (12-volt bat-
teries with a sight glass)

Ensure sufficient lighting to clearly identify

the colour indication displayed in the circular
sight glass located at the top of the 12-volt
battery (arrow) 

››› 

Fig. 167

. Never use naked

flames or objects that burn without a flame
as lighting.

The colour displayed in the circular sight

glass changes depending on the electrolyte
level in the 12-volt battery.

There are two different colours:

The electrolyte level of

the 12-volt battery is too low. Go to a
specialised workshop to have the bat-
tery checked and replaced if necessary.

The electrolyte level of the 12-volt bat-

tery is correct.

WARNING

Working on 12-volt batteries can cause se-
vere burns, explosions and electric shock.

Always wear protective goggles and

gloves.

Electrolyte is highly corrosive. It can

caused skin burns and blindness. When
handling the 12-volt battery you must par-
ticularly protect your hands, arms and face
from splashes of electrolyte.

»

Yellow or colourless:

Black:

185


Content      ..     9      10      11      12     ..