SAAB 9000. Manual - part 34
7A•4 Manual transmission
Refitting
8 Refit the gearchange lever and housing by
reversing the removal sequence, noting the
following:
a) Observe the correct torque for the gear
lever-to-selector rod bolt and the gear
lever housing-to-floorpan bolts.
b) Refit the electric window control panel
harness connectors using the notes made
during removal.
c) On completion, check that the gear lever
can be moved from neutral to all six gear
positions. Finally, road test the vehicle,
and check that all gears can be obtained
smoothly and precisely.
Selector rod
Removal
9 Refer to the previous sub-section, and
remove the gear lever and housing. Ensure
that the appropriate gear is selected before
removal. On post-1994 model year vehicles,
remove the plug from the alignment hole in the
top of the gearbox casing, and lock the
gearbox in 4th gear using a suitable
screwdriver, as described in Section 3.
10 From within the engine bay, at the point
where the selector rod passes through the
bulkhead, slacken the pinch-bolt collar to
detach the selector rod from the gearbox (refer
to illustration 3.8)
11 From inside the cabin, carefully withdraw
the selector rod through the bulkhead, taking
care to avoid damaging the rubber grommet in
the bulkhead.
Refitting
12 Lubricate the selector rod with silicone
grease, and push it through the grommet in
the bulkhead; do not tighten the pinch-bolt
collar at the gearbox at this stage.
13 Refit the gear lever and housing as
described earlier in this Section. Fit the
bushes, and bolt the gear lever to the selector
rod.
14 Lock the gear lever in 4th gear (post-1994
model year vehicles) or reverse gear (pre-1994
model year vehicles) by inserting a screwdriver
with a 4 mm shaft into the alignment hole on
the gear lever housing.
15 Tighten the pinch-bolt collar on the
selector rod at the gearbox, observing the
specified torque.
16 Remove the screwdriver from the housing,
and refit the gear lever gaiter.
17 Before moving the vehicle, check that the
gear lever can be moved from neutral to all six
gear positions. Finally, road test the vehicle,
and check that all gears can be obtained
smoothly and precisely.
Right-hand driveshaft oil seal
Pre-1994 models
1 On these models, the right-hand driveshaft
oil seals cannot easily be serviced without
dismantling the transmission.
Post-1994 models
Note: This sub-section describes the renewal
of the O-ring oil seal in the bearing casing only.
Renewal of the driveshaft oil seal is a more
complex task, requiring access to a hydraulic
press, and as such should be entrusted to a
Saab dealer.
2 Park the vehicle on a level surface, apply the
handbrake, and chock the rear wheels.
Remove the wheel centre caps, and slacken
the wheel bolts.
3 Apply the handbrake, then raise the front of
the vehicle, rest it securely on axle stands and
remove the roadwheels; refer to "Jacking,
towing and wheel changing" for guidance.
4 Refer Section 2 and drain the transmission
oil. Clean and refit the drain plug as described
in Section 2.
5 Working from Chapter 8, remove the
intermediate driveshaft and bearing assembly.
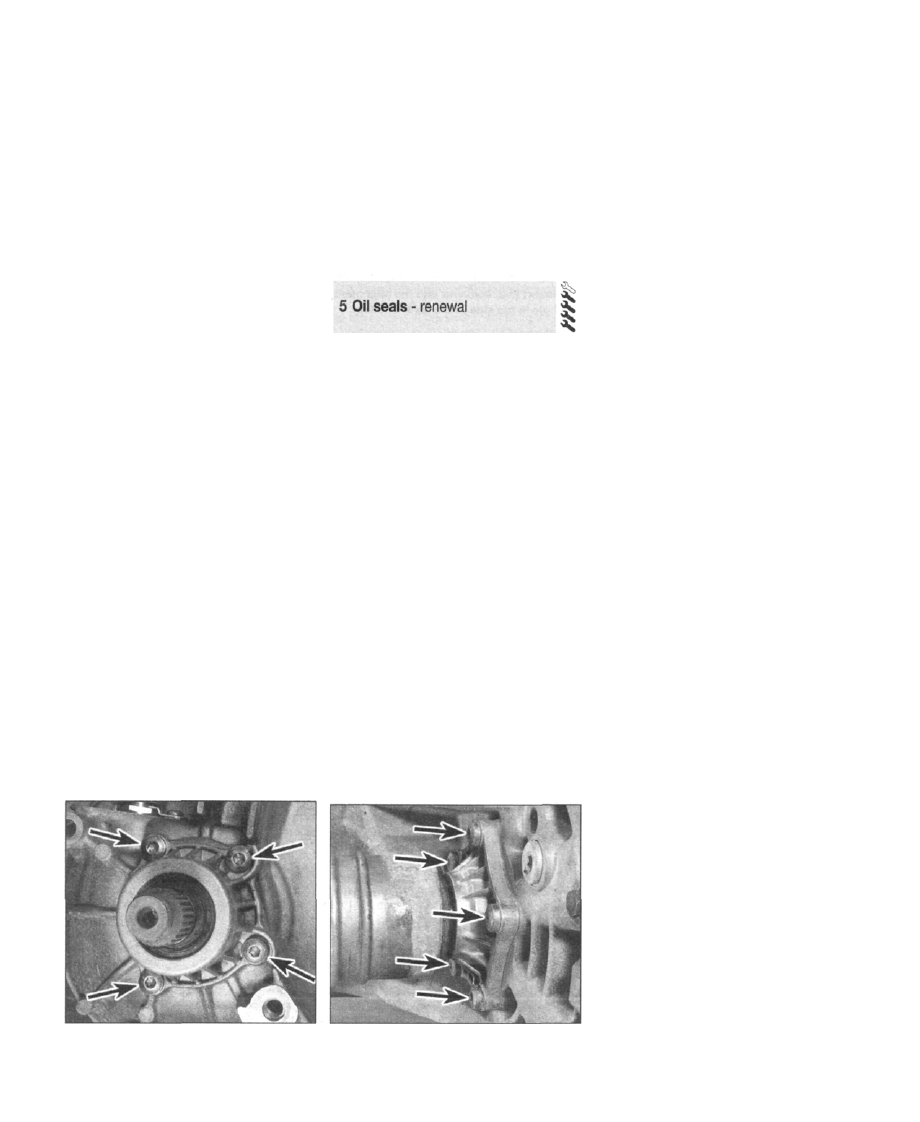
6 Remove the four retaining screws from the
driveshaft bearing housing (see illustration).
7 Thread a sliding hammer into the end of the
driveshaft, and use its percussion action to
5.6 Remove the four retaining screws
(arrowed) from the right-hand driveshaft
bearing housing
5.20 Slacken and withdraw the five
retaining screws (arrowed) from the left-
hand driveshaft bearing housing
draw the shaft and bearing housing out of the
differential casing.
8 Extract the O-ring seal from the bearing
housing, and discard it.
9 Thoroughly clean the mating surfaces of the
bearing housing and differential casing; take
precautions to prevent debris entering the
bearings of either assembly.
10 Lubricate the new O-ring seal with clean
oil, and carefully fit it over the driveshaft
bearing housing, ensuring that it is seated
squarely.
11 Lightly lubricate the inboard splines of the
driveshaft with multi-purpose grease. Offer up
the driveshaft and bearing housing to the
differential casing, and engage the splines of
the driveshaft with the differential pinion.
Using a light mallet, carefully tap the driveshaft
into the differential, until the bearing housing is
flush with the casing.
12 Ensure that the O-ring is seated squarely
and not distorted, then refit the four retaining
screws into the bearing housing, and tighten
them to the correct torque.
13 Refer to Chapter 8 and refit the
intermediate driveshaft and bearing assembly.
14 Refit the roadwheels, and lower the
vehicle to the ground. Tighten the roadwheel
bolts to the correct torque, and refit the wheel
centre caps/trims.
15 Refer to Section 2 and refill the
transmission with oil of the correct grade.
Left-hand driveshaft oil seal
Note: This sub-section describes the renewal
of the O-ring oil seal in the bearing casing only.
Renewal of the driveshaft oil seal is a more
complex task, requiring access to a hydraulic
press, and as such should be entrusted to a
Saab dealer.
16 Park the vehicle on a level surface, apply
the handbrake, and chock the rear wheels.
Remove the wheel centre caps, and slacken
the wheel bolts.
17 Apply the handbrake, then raise the front
of the vehicle, rest it securely on axle stands
and remove the roadwheels; refer to "Jacking,
towing and wheel changing for guidance.
18 Refer to Section 2 and drain the
transmission oil. Clean and refit the drain plug
as described in Section 2.
19 Working from the relevant section of
Chapter 8, disconnect the left-hand driveshaft
from the transmission at the inboard universal
joint.
20 Place a container beneath the driveshaft
housing mating face, then slacken and
withdraw the five retaining screws (see
illustration).
21 Using two large-diameter worm-drive
hose clips, strap the shaft of a slide hammer to
the outside of universal joint cup. Thread a nut
onto the end of the slide hammer shaft to
prevent it sliding off, then use the percussion
action of the hammer to draw the universal
cup, and hence the driveshaft, out of the
differential housing.