Renault Megane Electric (2022 year). Manual in english - page 2
CARDS: general information (1/3)
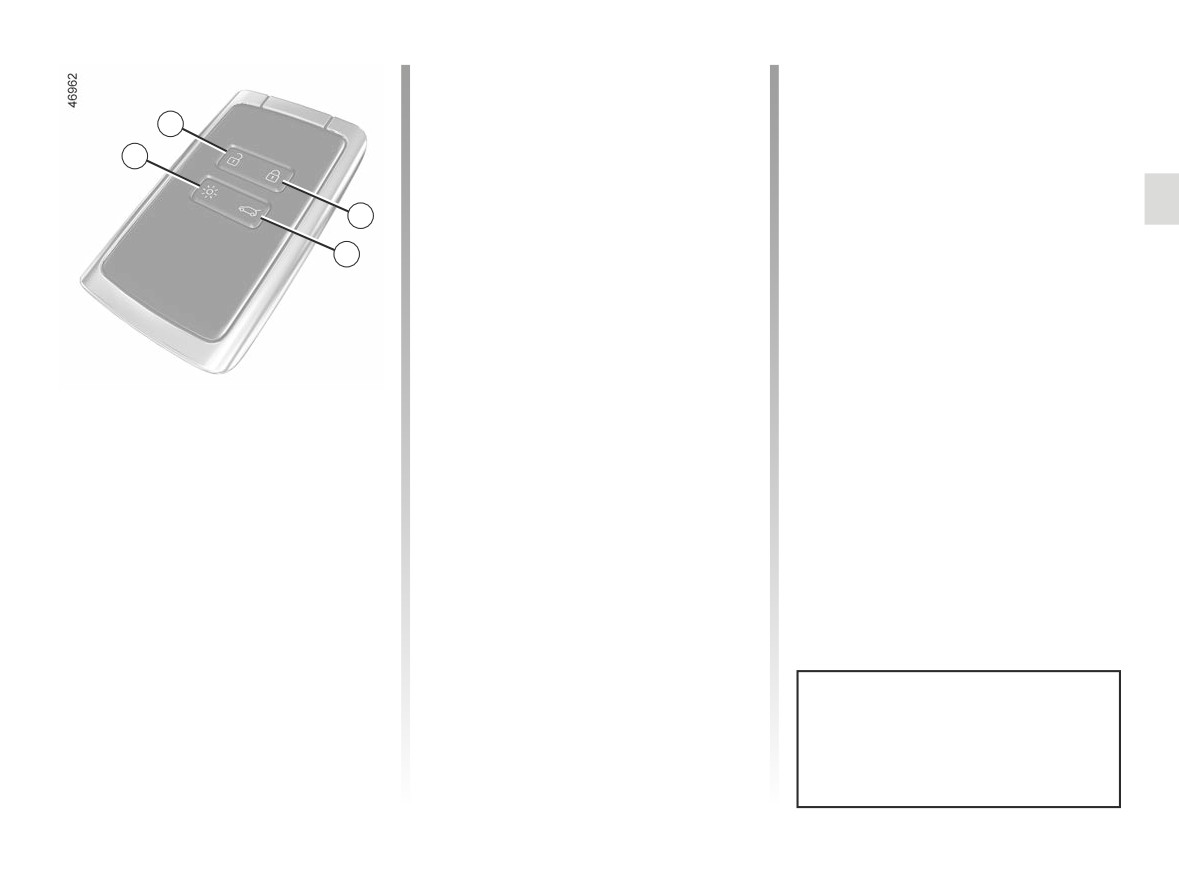
The card is used for:
card operating range
- locking/unlocking of opening ele-
This varies according to the environ-
1
ments
(doors, luggage compart-
ment: take care not to accidentally lock
ment) and folding out or in of front
or unlock the vehicle by inadvertently
4
door handles;
pressing the buttons on the card.
- the unlocking of the charging flap
Note: if a door or the boot is open or not
➥ 1.8;
2
properly shut, locking is not carried out.
- switching on the vehicle lighting re-
A beep sounds and the hazard warning
motely (refer to the following pages);
3
lights and side repeaters do not flash.
- automatic remote closing of the elec-
tric windows ➥ 1.33;
- automatic remote opening of the
electric windows ➥ 1.33.
Battery life
1 Unlocking the doors and luggage
Make sure that the correct battery type
compartment.
is being used, and that the battery is in
2 Locks all the opening elements.
good condition and inserted correctly.
3 Unlocking/locking the boot.
Its service life is approximately two
years: it should be replaced when the
4 Switching on the lighting remotely.
message “Keycard Battery Low” ap-
pears on the instrument panel ➥ 5.14.
When the battery is flat, you can still
lock/unlock and start your vehicle.
➥ 2.2 ➥ 1.33 ➥ 5.14.
1.21
CARDS: general information (2/3)
Interference
Interference by factors in the immediate
vicinity (external installations or the use
of equipment operating on the same
4
frequency as the remote control) may
affect the operation of the remote con-
Advice
trol.
Avoid leaving the card in hot, cold or
Driver’s responsibility
humid areas.
when parking or stopping
Do not keep the card in a place
the vehicle
where it could be bent or dam-
Never leave an animal,
aged accidentally, such as in a back
child or adult who is not self-suffi-
pocket of a garment.
cient alone in your vehicle, even for
a short time.
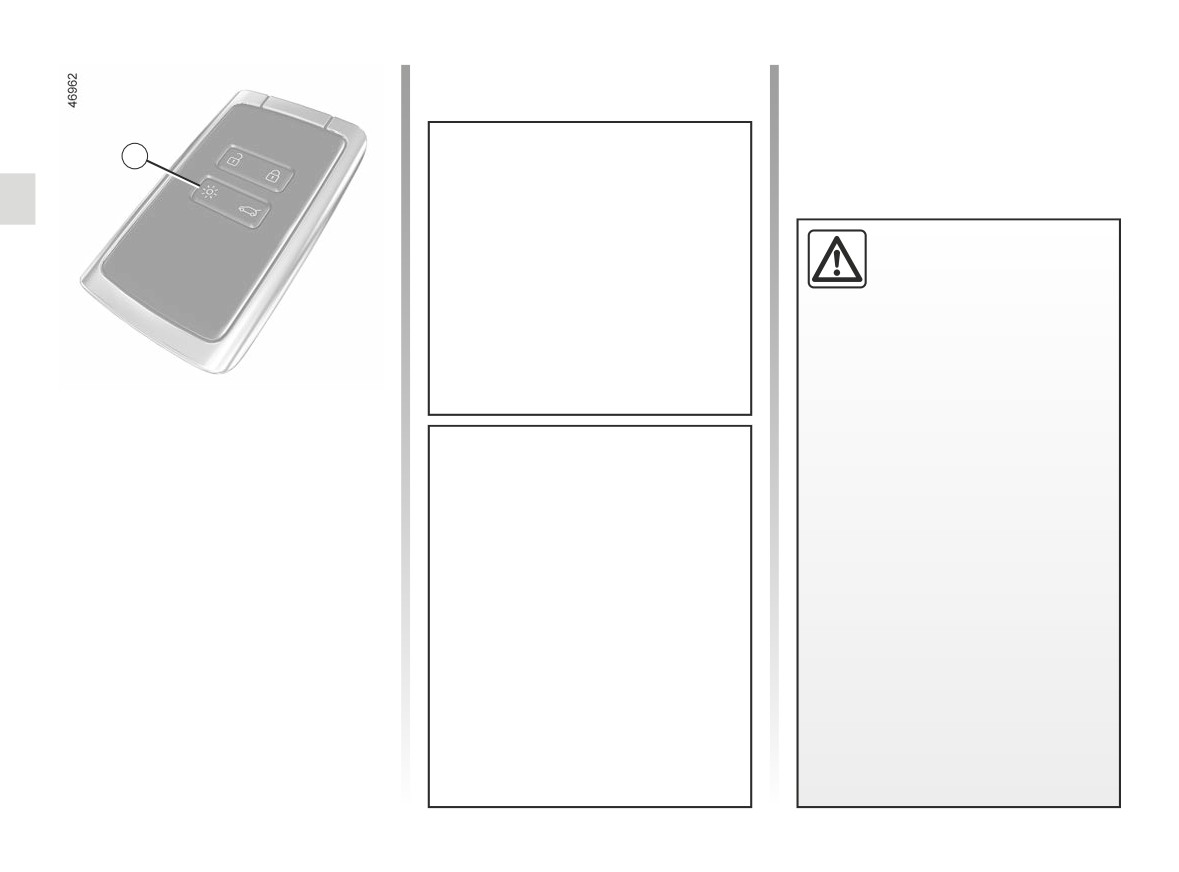
Distance lighting function
They may pose a risk to themselves
or to others by starting the engine,
Pressing button
4 switches on
the
activating equipment such as the
dipped beam headlights and the exte-
electric windows or locking the
rior lighting for approximately 20 sec-
doors, for example.
onds. This can be used, for example,
Replacement: need for an
to identify the vehicle from a distance
additional card
Also, in hot and/or sunny weather,
please remember that the tempera-
when parked in a car park. Pressing
If you lose your card or require an-
ture inside the passenger compart-
and holding the 4 button for approxi-
other, you can obtain one from an
ment increases very quickly.
mately two seconds activates the exte-
authorised dealer.
rior lighting and a sound is emitted.
RISK OF DEATH OR SERIOUS
If a card is replaced, it will be neces-
INJURY.
Note: pressing button 4 again switches
sary to take the vehicle and all its
off the lighting.
cards to an approved Dealer to ini-
tialise the system.
You may use up to four cards per
vehicle.
1.22
CARDS: general information (3/3)
5
A
7
8
6
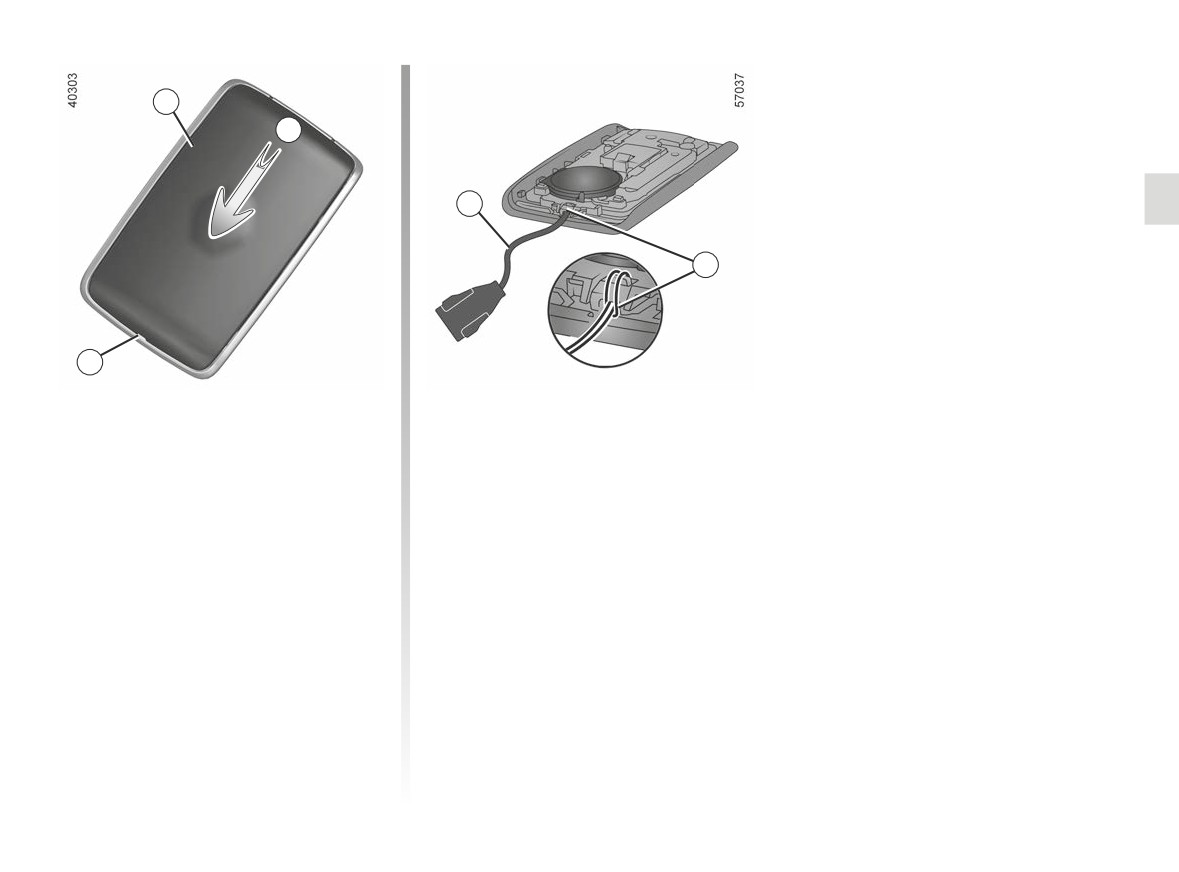
Fitting a strap 7
Insert the hand strap into the 8 com-
ponent and pass the end of the strap
Slide the rear casing
5 downwards
through the buckle.
while pressing on zone A.
Position the strap at the 6 opening and
close the cartridge.
Note: check that the diameter of the
strap cord 7 will fit the opening 6.
1.23
“HANDS-FREE” CARD: use (1/5)
Deactivating/activating the
“hands-free” mode
Depending on the vehicle, you can de-
activate/activate unlocking when ap-
proaching and locking when moving
away from the vehicle.
You can also disable/activate the sound
signal that is emitted upon locking when
Driver’s responsibility
moving away from the vehicle ➥ 1.108.
when parking or stopping
the vehicle
Never leave an animal,
child or adult who is not self-suffi-
cient alone in your vehicle, even for
a short time.
There are two ways to unlock/lock the
They may pose a risk to themselves
vehicle:
or to others by starting the engine,
activating equipment such as the
- “hands-free”, when approaching and
electric windows or locking the
moving away from the vehicle;
doors, for example.
- using the card in remote control
Also, in hot and/or sunny weather,
mode.
please remember that the tempera-
ture inside the passenger compart-
ment increases very quickly.
RISK OF DEATH OR SERIOUS
INJURY.
Do not store the card anywhere it
may come into contact with other
electronic equipment
(computer,
phone etc.) as this could hinder its
Never leave your vehicle
operation.
with the card inside.
1.24
“HANDS-FREE” CARD: use (2/5)
1
1
3
2
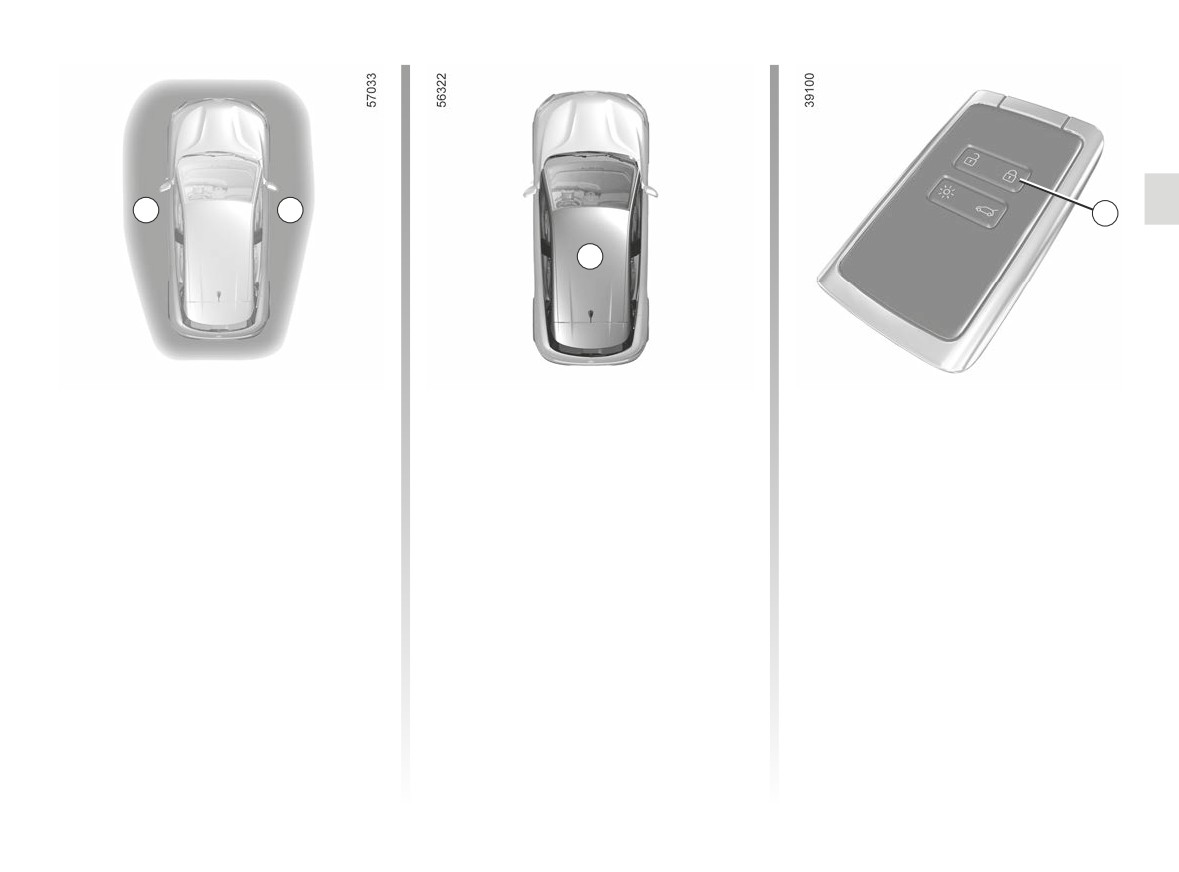
Hands-free unlocking, when
Remote “Hands-free” locking
If the card has been within the detection
area 1 for approximately 15 minutes,
approaching the vehicle;
With the card on you, doors and lug-
remote locking is disabled. To lock the
With the card in access zone 1, the ve-
gage compartment door closed, move
vehicle, press button 3 on the card.
hicle will unlock.
away from the vehicle: it will lock auto-
matically once you have left the access
The vehicle cannot be remotely locked
The front handles are folded out and
if the card is within the area 2.
zone 1. The front handles are folded in
the hazard lights and side repeaters
and the hazard lights flash twice then
flash once to indicate that the doors
remain illuminated for about four sec-
have unlocked and, on some vehicles,
onds, a beep sounds to indicate that
the door mirrors fold out automatically.
the doors have locked and, on some
vehicles, the door mirrors fold in auto-
matically.
Note: the distance at which the vehicle
locks depends on the surroundings.
1.25
“HANDS-FREE” CARD: use (3/5)
Special features of the
Special features relating to
unlocking system
“hands-free” locking
Under certain circumstances, approach
After locking in “hands-free” mode, you
unlocking is deactivated:
have to wait approximately three sec-
onds to be able to unlock the vehicle
- after eight days of no use of the vehi-
again. During these three seconds, the
cle;
door handles can be tried to make sure
- if the card remains close to the 1
that the vehicle is locked properly.
area of the vehicle for approximately
Note: if a door or the boot is open or not
five minutes after the vehicle has
properly shut, locking is not carried out.
been locked;
A beep sounds but the hazard warning
- after several passes in the vicinity of
lights and side repeaters do not flash.
the 1 area of the vehicle and without
4
the door being unlocked.
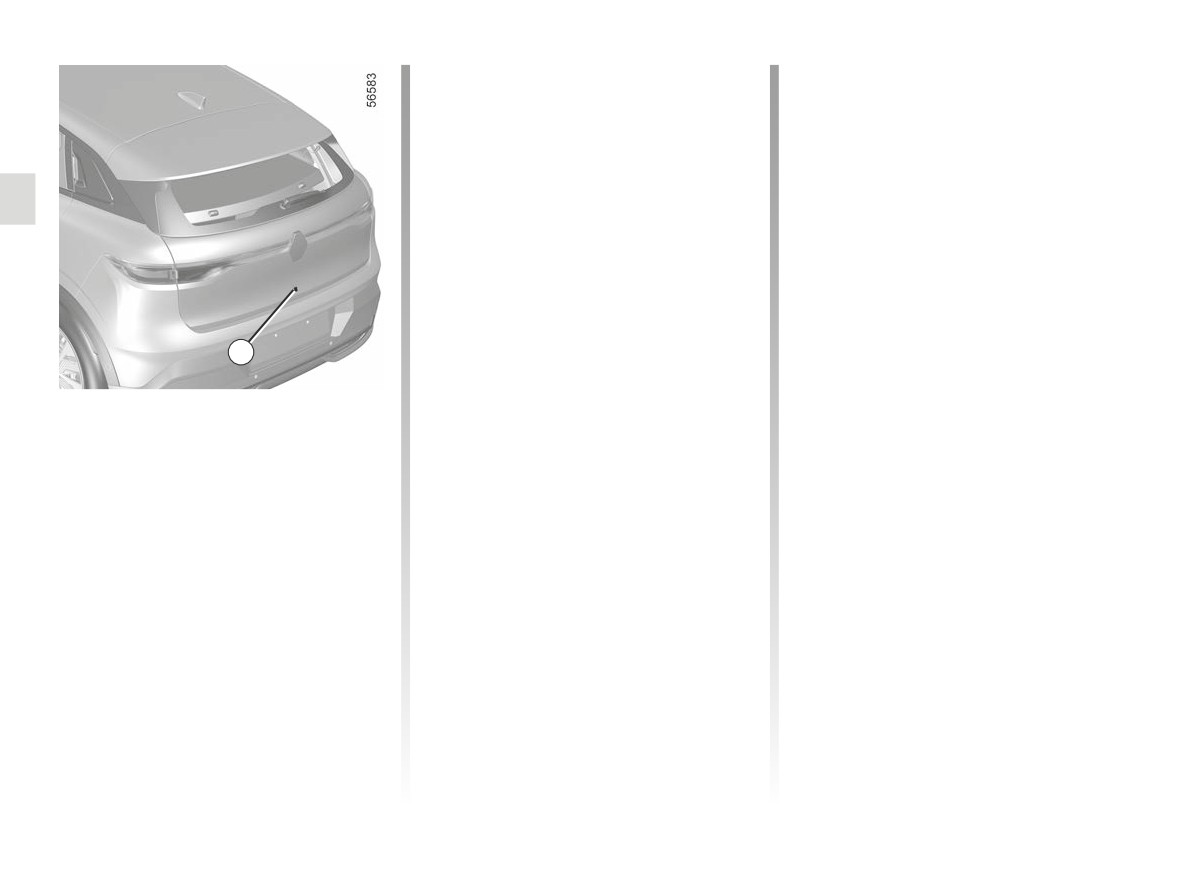
Press the luggage compartment open-
“Hands-free” unlocking
ing button 4 or use the card as a remote
by opening the luggage
control (see following pages) to unlock
compartment
the vehicle and reactivate “hands-free”
mode.
With the card in the area 1 and the ve-
hicle locked, pressing the 4 button un-
locks the entire vehicle.
The front handles are folded out and
the side indicator lights and hazard
warning lights flash once to indicate
that the doors have unlocked.
1.26
“HANDS-FREE” CARD: use (4/5)
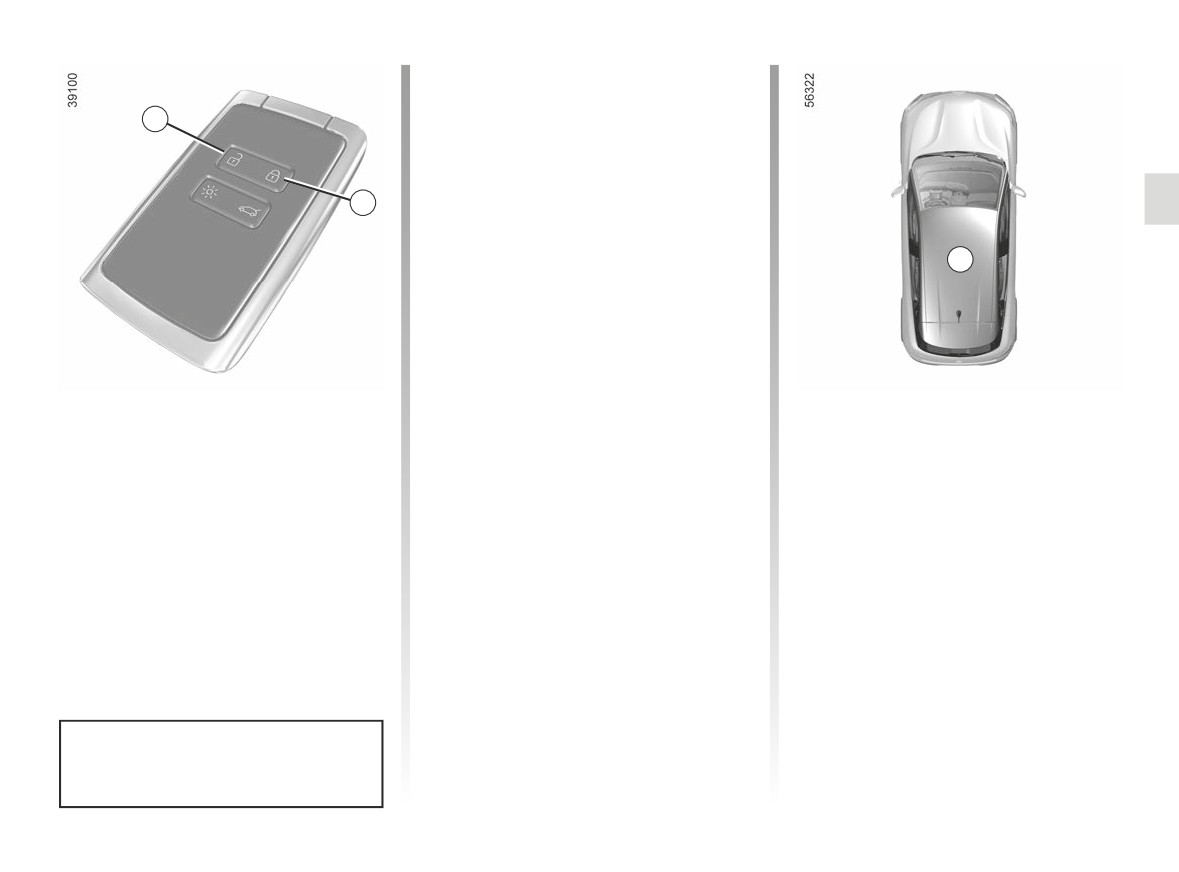
Locking using the card
With the doors and boot closed, press
5
button 3: the vehicle locks.
The front handles fold in and the hazard
lights and side repeaters flash twice
to indicate that the doors have locked
3
and, on some vehicles, the door mirrors
fold in automatically.
Depending on the vehicle, pressing the
2
button 3 twice locks the vehicle. Press
and hold the 3 button to close the front
and rear windows.
Note:
- the maximum distance at which the
Using the card as a remote
vehicle locks depends on the sur-
If, while the engine is running, a door
roundings;
is opened and closed, and the card is
control
no longer in the zone 2, the message
- if a door or the boot is open or not
Unlocking with the card
“Keycard Not Detected” indicates that
properly shut, locking is not carried
the card is not inside the vehicle. This
Press button 5.
out. A beep sounds but the hazard
will, for example, prevent you from driv-
warning lights and side repeaters do
The front handles are folded out and
ing away after dropping off a passenger
not flash.
the side indicator lights and hazard
who has kept the card on them.
warning lights flash once to indicate
The warning disappears when the card
that the doors have unlocked.
is detected again.
The card buttons are deactivated
when the engine is running.
1.27
“HANDS-FREE” CARD: use (5/5)
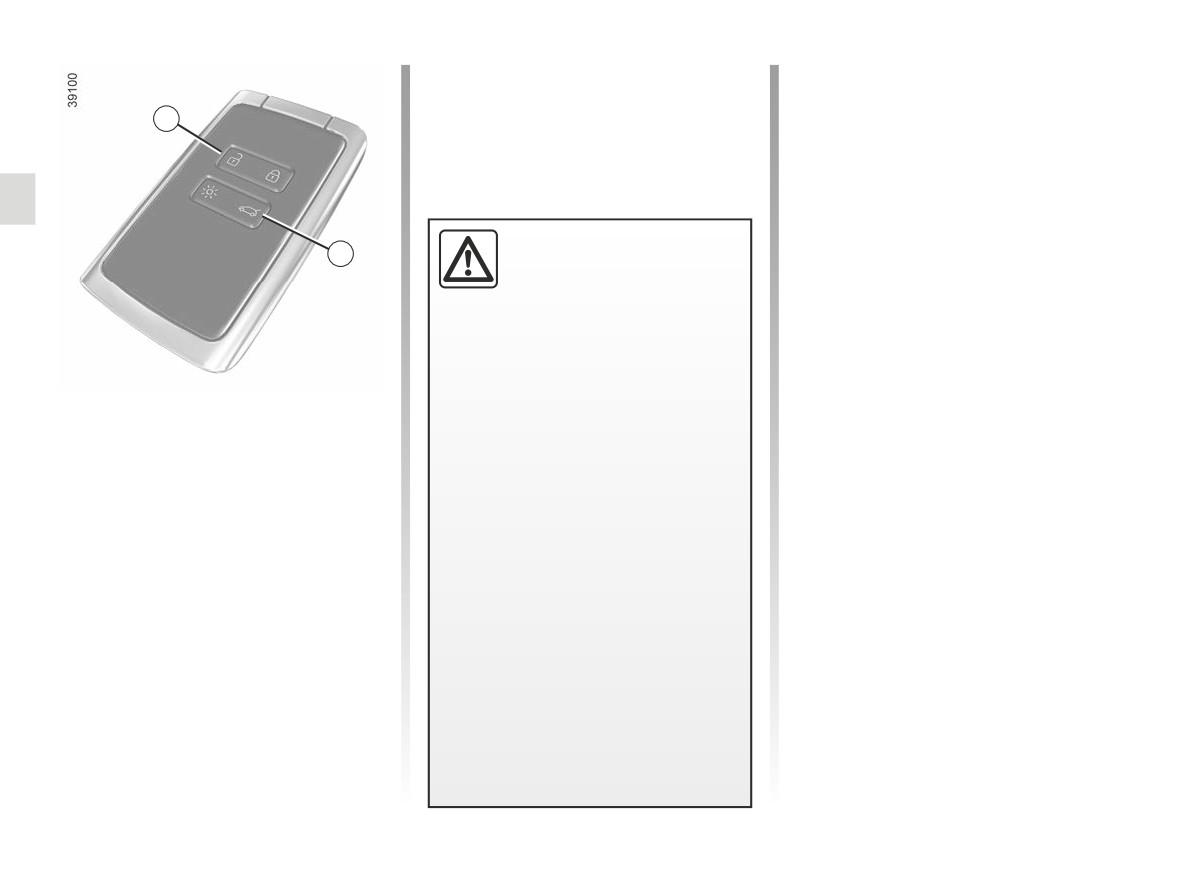
Unlocking the charging cord
Press button 5 to unlock the charging
5
cable from the vehicle.
Driver’s responsibility
6
when parking or stopping
the vehicle
Never leave an animal,
child or adult who is not self-suffi-
cient alone in your vehicle, even for
a short time.
Locking/unlocking only the
They may pose a risk to themselves
or to others by starting the engine,
boot
activating equipment such as the
Press the button 6 to lock/unlock the
electric windows or locking the
boot only.
doors, for example.
Also, in hot and/or sunny weather,
please remember that the tempera-
ture inside the passenger compart-
ment increases very quickly.
RISK OF DEATH OR SERIOUS
INJURY.
1.28
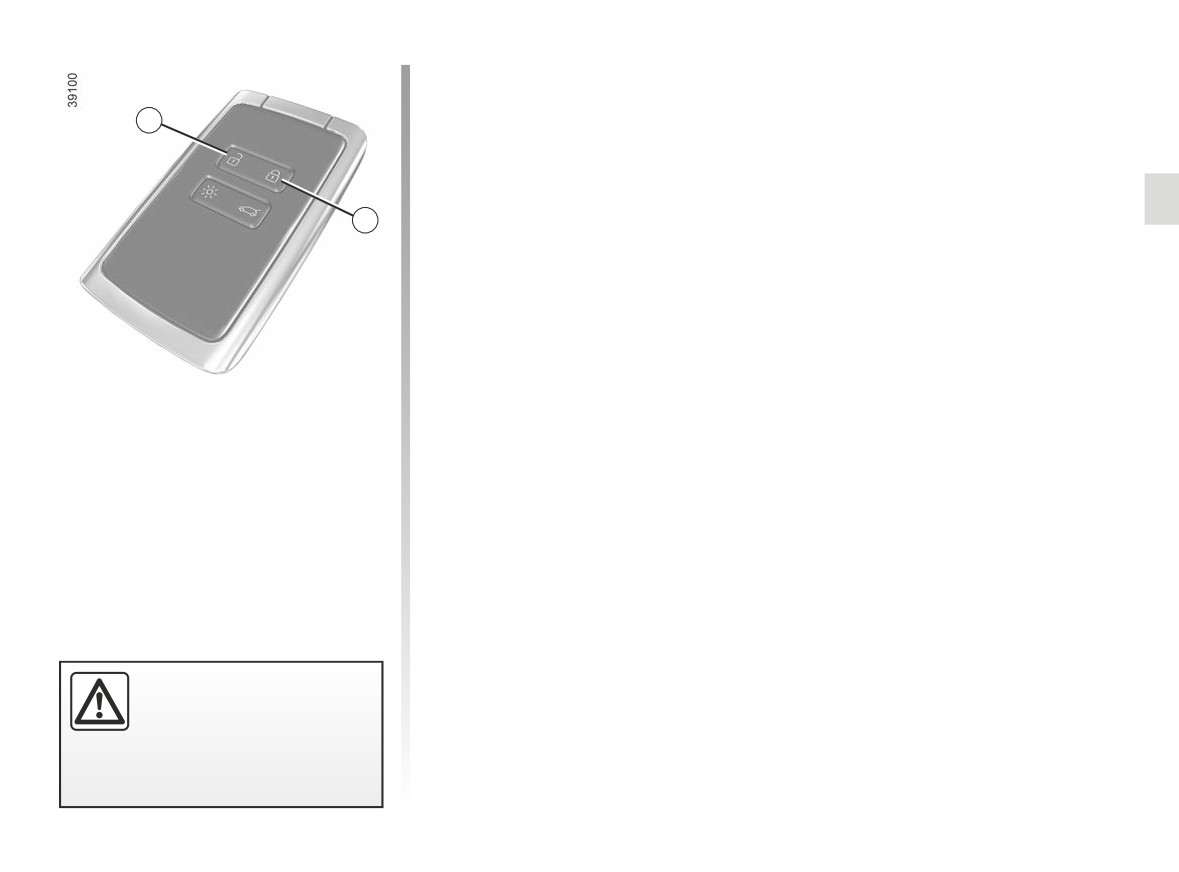
CARD: deadlocking
To activate deadlocking
Press button 2 twice in quick succes-
1
sion.
The hazard lights and side repeaters
flash twice slowly and flash three
times quickly to indicate that the doors
2
are locked and, depending on the ve-
hicle, the door mirrors fold in automat-
ically.
To deactivate deadlocking
Unlock the vehicle using button 1 on
the card.
The hazard warning lights flash once to
If the vehicle is equipped with a dead-
indicate that the doors have been un-
locking function, this allows you to lock
locked.
the opening elements and to prevent
the doors from being unlocked using
the interior handles (for example, by
breaking the window and then trying to
open the door from the inside).
Never use deadlocking if
someone is still inside the
vehicle.
1.29
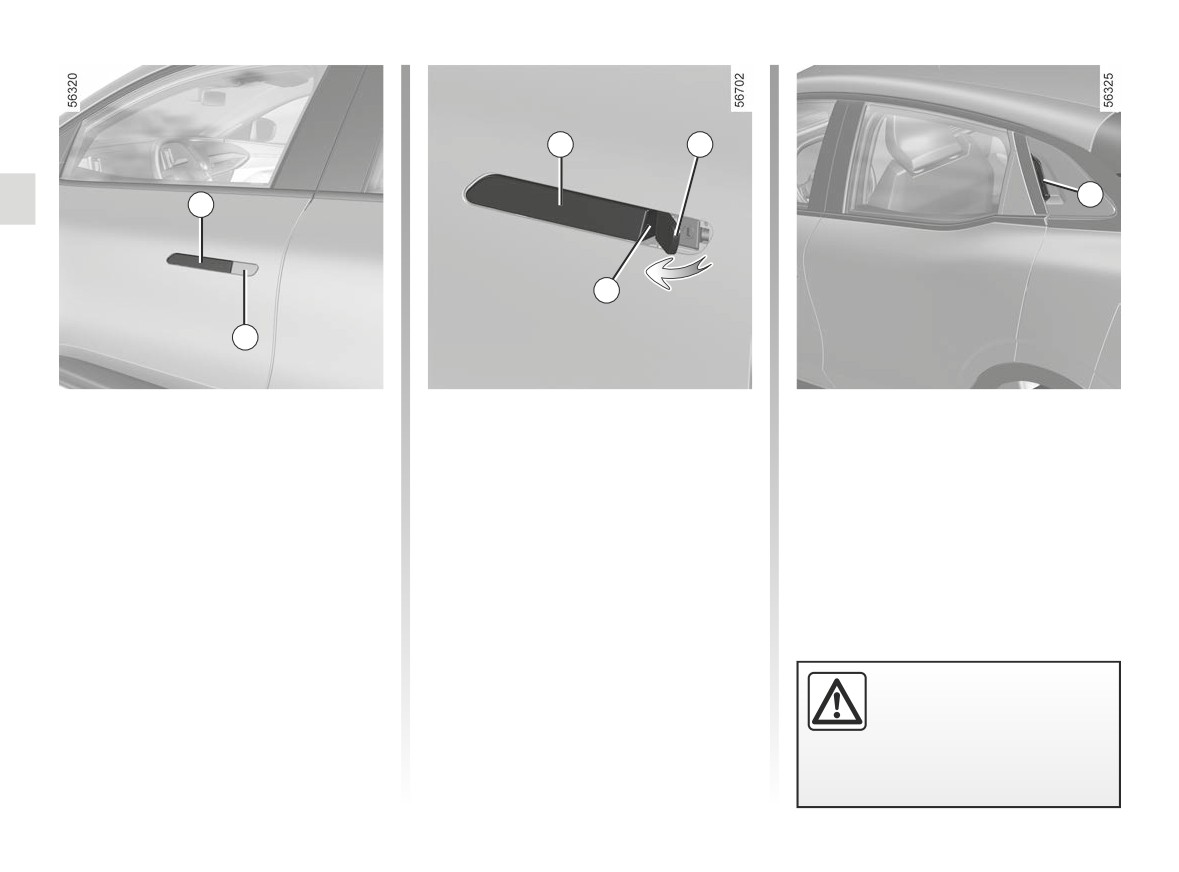
OPENING AND CLOSING THE DOORS (1/3)
1
2
3
1
A
2
Opening the doors from the
When the vehicle is unlocked, a few
Rear doors
minutes after exiting the vehicle or if
outside
With the doors unlocked, slide your
the ignition is on, slight pressure on the
hand into the handle 3 and pull towards
Front doors
handle 1 fold out the handles electri-
you.
cally.
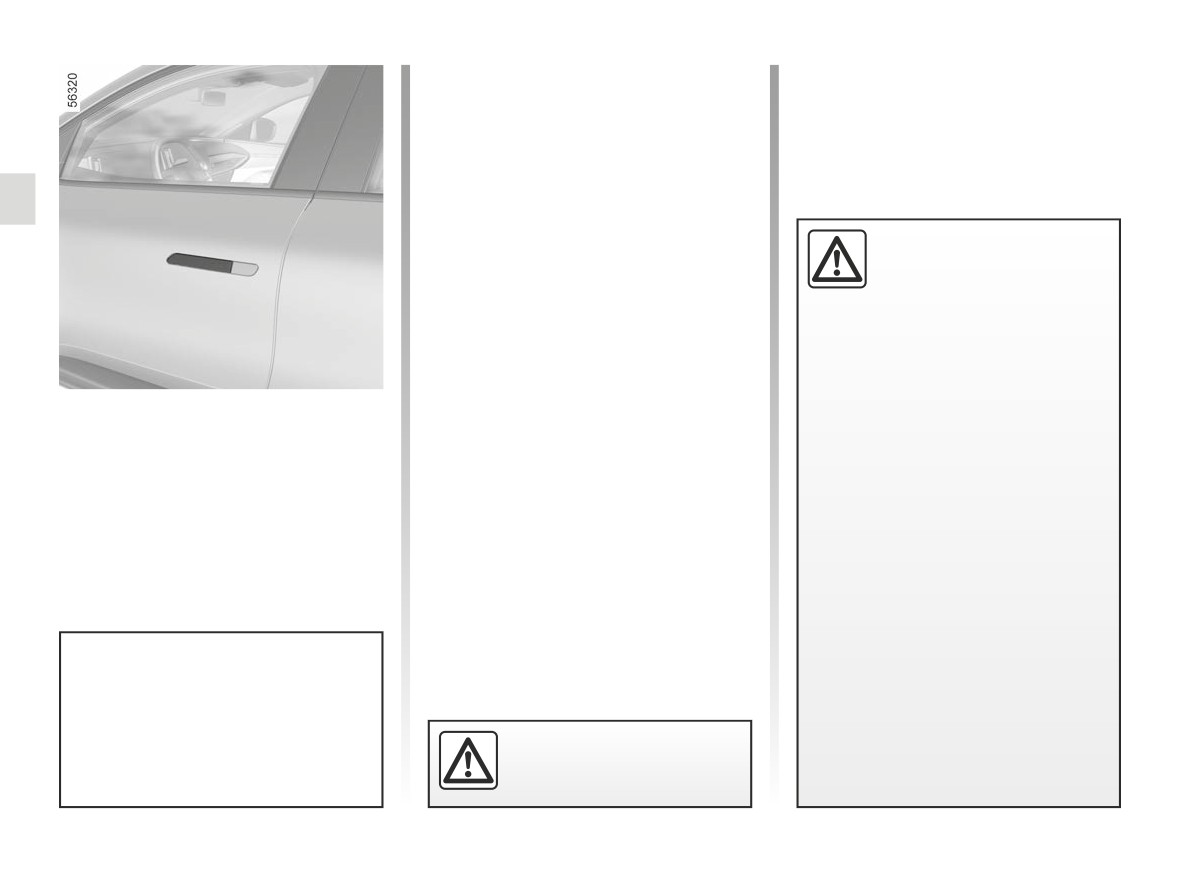
The front doors are equipped with han-
dles that fold out and in automatically
Once deployed, the handles fold in au-
according to the vehicle status:
tomatically after about 3 minutes if no
action is performed on the opening el-
- when unlocking the vehicle, the han-
ements.
dles fold out to allow access to the
vehicle;
The handle can be brought out man-
ually as well as electrically To do this,
- when locking the vehicle, the han-
move the lock cover 2 and grip the
dles fold in;
end A of the handle 1 with your finger.
As a safety precaution,
- above 3 mph (5 km/h), the handles
the doors should only be
fold in;
opened or closed when the
- when reversing, the handles fold in.
vehicle is stationary.
1.30
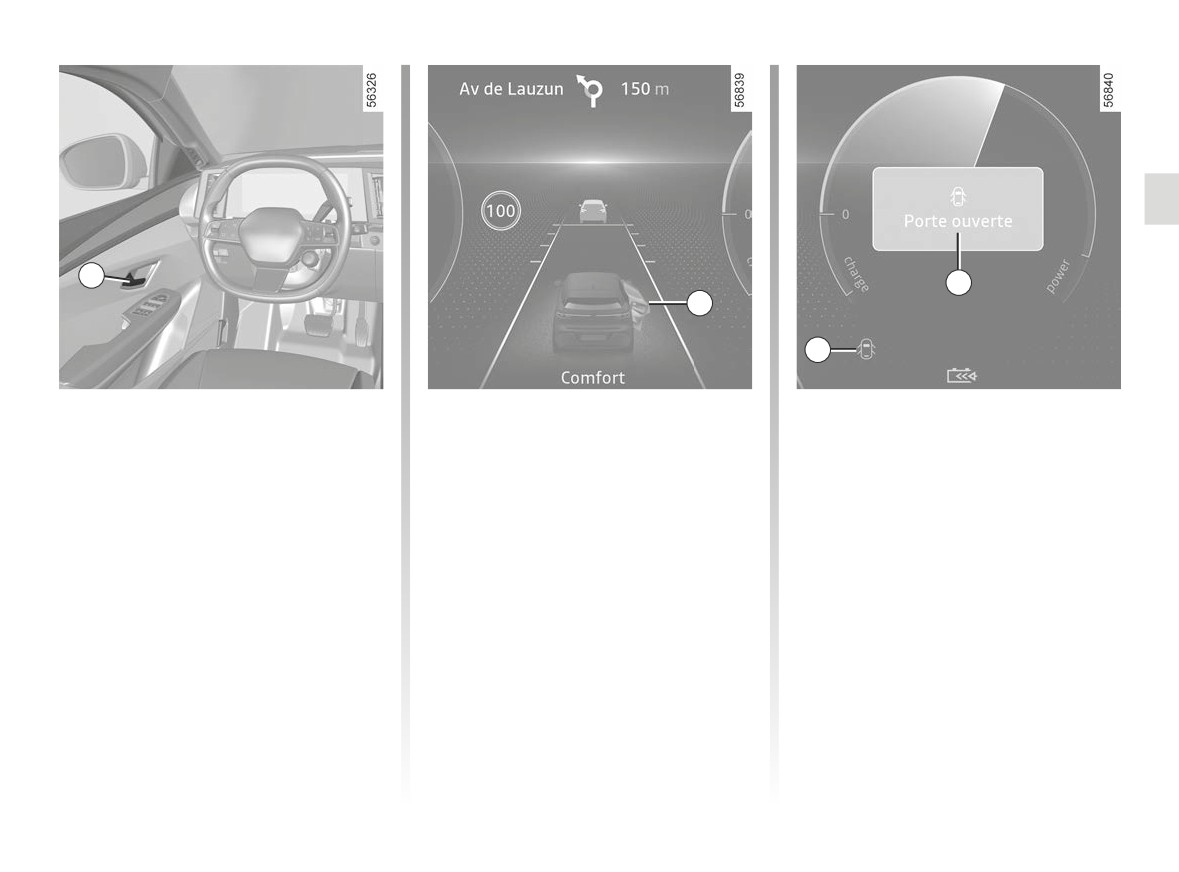
OPENING AND CLOSING THE DOORS (2/3)
4
6
5
7
Opening from the inside
When driving, the handles fold away
Door/tailgate open buzzer
automatically:
Pull handle 4.
- as soon as the vehicle speed ex-
When stationary, the
7 warning
From inside the vehicle, the front exte-
ceeds around 3 mph (5 km/h);
light indicates when an opening ele-
rior handles can be folded out:
ment (door, luggage compartment or
- when reversing.
- by opening a door;
charging flap) is open or not properly
closed. The warning light 5 indicates
- by pressing the central locking button
Lights-on reminder buzzer
that the door or the boot is open or not
once when the vehicle is locked or
properly closed.
twice when it is unlocked.
A warning beep sounds when the driv-
er’s door is opened to warn you that the
When the vehicle reaches a speed of
lights are still on.
approximately 12 mph (20 km/h), the
7 and 5 warning lights and are
accompanied by a message 6 indicat-
ing that the opening element is open or
not properly closed.
1.31
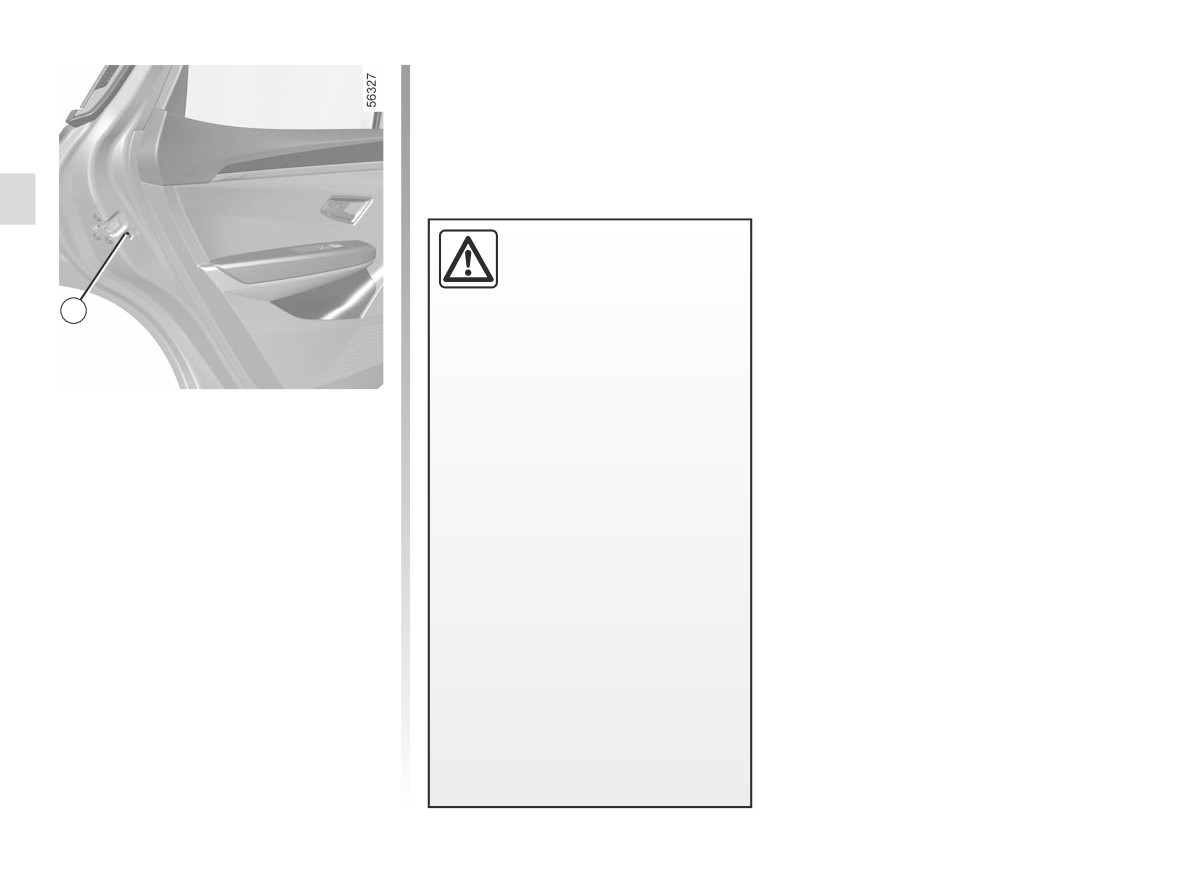
OPENING AND CLOSING THE DOORS (3/3)
Driver’s responsibility
when parking or stopping
the vehicle
8
Never leave an animal,
child or adult who is not self-suffi-
cient alone on your vehicle, even for
a short time.
Special note
They may pose a risk to themselves
or to others by starting the engine,
Once the engine has been switched off,
activating equipment such as the
the lights and accessories (radio, etc.)
electric windows or by locking the
will continue to operate until the driver’s
doors.
door is opened.
Also, in hot and/or sunny weather,
please remember that the tempera-
Child safety
ture inside the passenger compart-
To make it impossible for the rear doors
ment increases very quickly.
to be opened from the inside, move the
RISK OF DEATH OR SERIOUS
lever 8 and check from the inside that
INJURY.
the doors are securely locked.
1.32
LOCKING, UNLOCKING THE DOORS (1/3)
If the card does not work:
In certain cases, the card may not
2
work:
1
A
- when the card battery is drained, flat
battery etc;
- due to the use of electronic devices
near to the remote control
(e.g.
mobile telephone);
- vehicle located in a high electromag-
netic radiation zone.
It is then possible:
- to use the key that is built into the
card;
- to lock each of the doors manually;
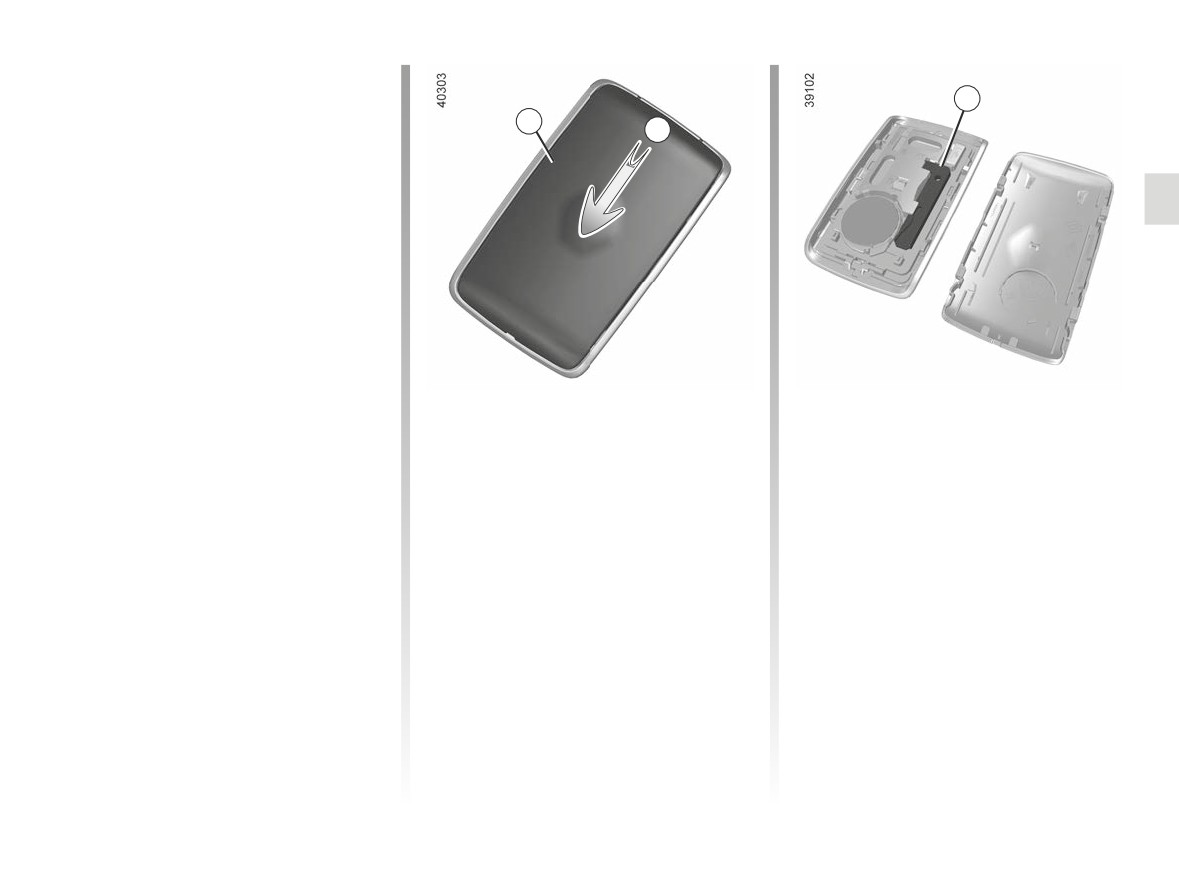
The card’s built-in key
- to use the interior door locking/un-
The integrated 2 key is used to lock or
locking control (refer to the following
unlock the front left-hand door if the
pages).
card does not work.
Access with key 2
Slide the rear casing
1 downwards
while pressing on zone A.
1.33
LOCKING, UNLOCKING THE DOORS (2/3)
3
4
2
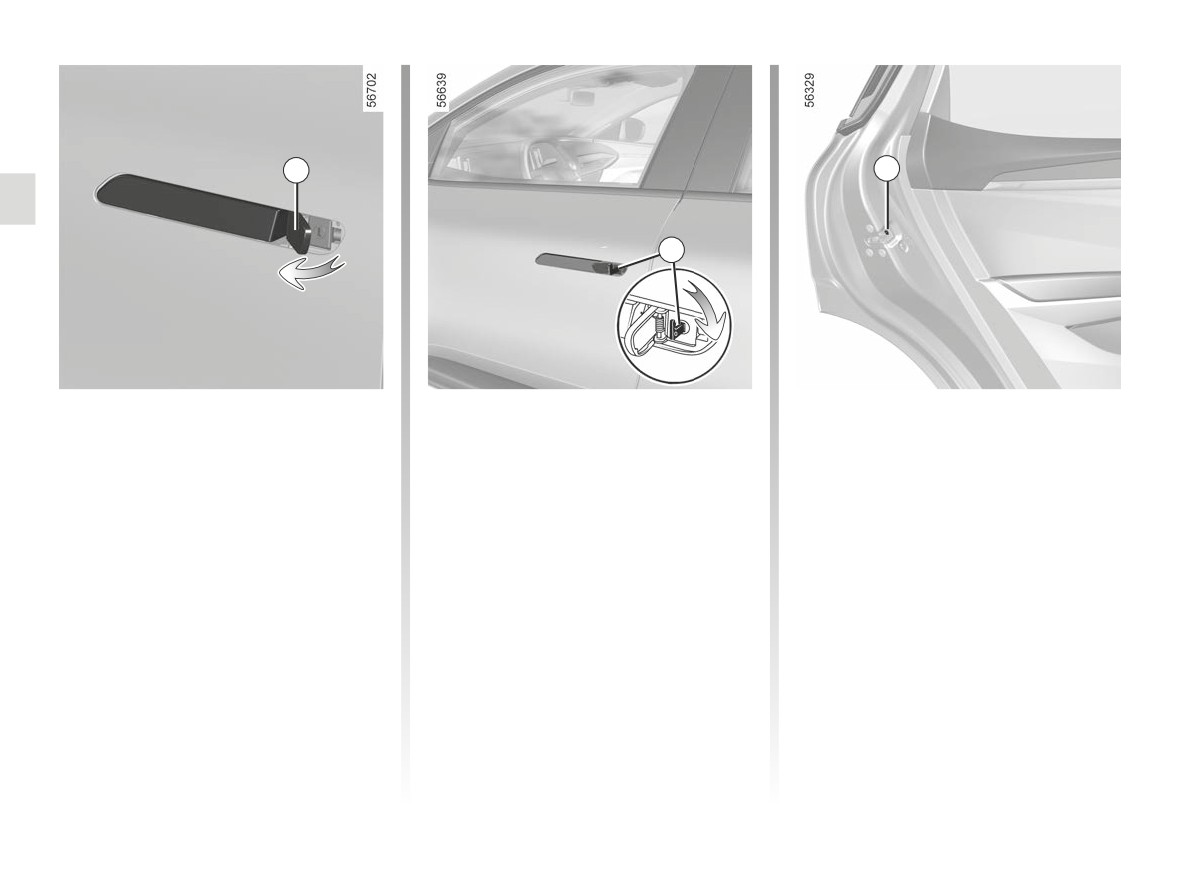
Using the key integrated in the card
Locking the doors manually
Move the lock cover 3 by pressing the
Turn screw 4 with the door open (using
left part and insert the 2 key into the lock
the end of the key) and close the door.
and lock or unlock the driver’s door.
This means that the doors are then
locked from the outside.
The doors may then only be opened
from the inside or by using the key in
the front left-hand door.
1.34
LOCKING, UNLOCKING THE DOORS (3/3)
Door and tailgate status
Locking the doors without
indicator
the card
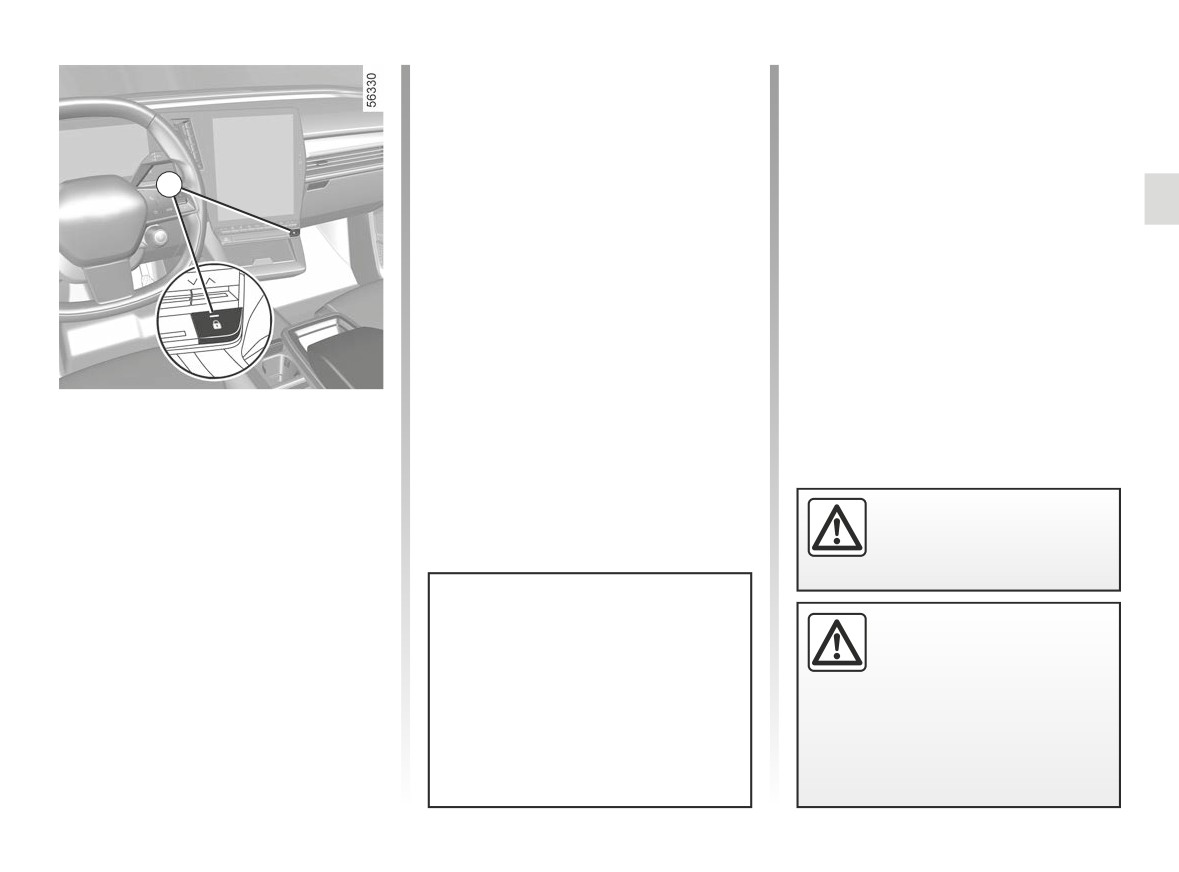
When the ignition is on, the 5 switch
For example, in the event of a dis-
warning light indicates the locking
charged battery or the card temporarily
status of the opening elements:
not working, etc.
5
– indicator light on, the doors and tail-
With the engine switched off and an
gate are locked,
opening (door or boot) open, press
and hold the switch 5 for more than five
- indicator light off, the doors and tail-
seconds.
gate are unlocked.
When the door is closed, all the doors
If the ignition is off, when you lock the
and tailgate will be locked.
doors the warning light remains lit for
some time before disappearing.
Note: unlocking the vehicle from the
outside is only possible with the card in
the vehicle’s access zone or using the
Interior locking/unlocking
key integrated in the card.
door control
Switch 5 simultaneously controls the
doors and the tailgate.
If a door or the tailgate is open or not
Never leave your vehicle
closed properly, the doors and tailgate
with the card inside.
lock/unlock quickly.
If transporting an object with the tail-
gate open, you can still lock the doors:
with the ignition off, press and hold
Driver’s responsibility
After locking/unlocking the vehi-
switch 5 for more than five seconds to
cle using the buttons on the card,
If you decide to keep the
lock the other opening elements.
remote locking and hands-free un-
doors locked when you are
locking are deactivated.
driving, remember that it
may be more difficult for those as-
To reactivate the “hands-free” mode:
sisting you to gain access to the pas-
restart the vehicle.
senger compartment in the event of
an emergency.
1.35
AUTOMATIC LOCKING WHEN DRIVING
NB: if a door is opened or closed, it
Operating faults
will automatically lock again when the
If you experience an operating fault
vehicle reaches a speed of 6 mph (10
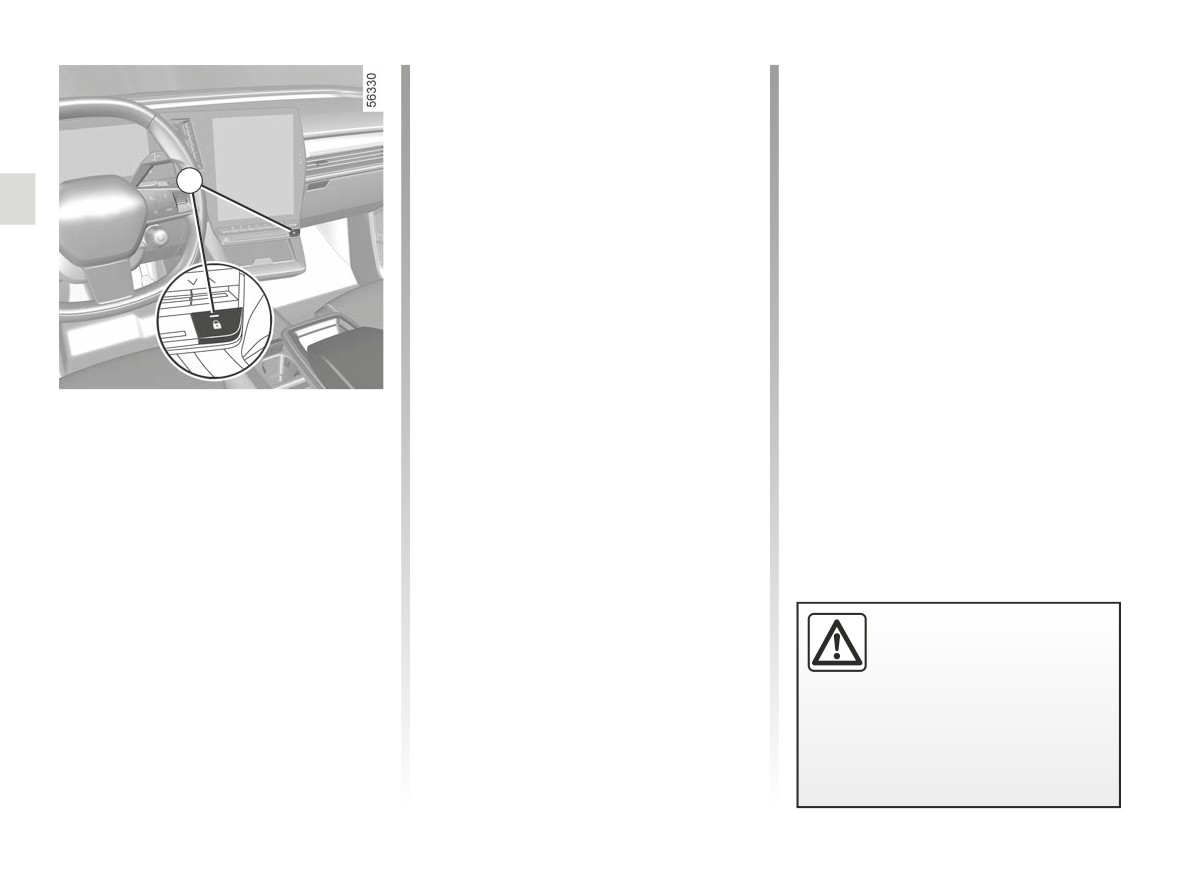
(no central locking, the indicator light 1
km/h).
does not light up when trying to lock the
doors and luggage compartment etc.),
1
Activating/deactivating the
make sure that central locking has not
been deactivated by mistake and check
function
that the doors and luggage compart-
To activate: with the vehicle station-
ment are properly closed. If they are
ary and the engine running, press the 1
properly closed, contact an approved
switch for at least five seconds until a
dealer.
beep sounds.
To deactivate: with the vehicle station-
ary and the engine running, press the 1
switch for at least five seconds until you
hear two beeps.
Operating principle
The function can also be activated and
After the vehicle is started, the system
deactivated via the multimedia screen
automatically locks the doors when you
(depending on the vehicle) ➥ 1.108.
are driving at approximately 6 mph (10
km/h) and over.
The door can be unlocked:
- by pressing the central door unlock-
ing switch 1;
- at a standstill, by opening a front
Driver’s responsibility
door from inside the vehicle.
If you decide to keep the
doors locked when you are
driving, remember that it
may be more difficult for those as-
sisting you to gain access to the pas-
senger compartment in the event of
an emergency.
1.36
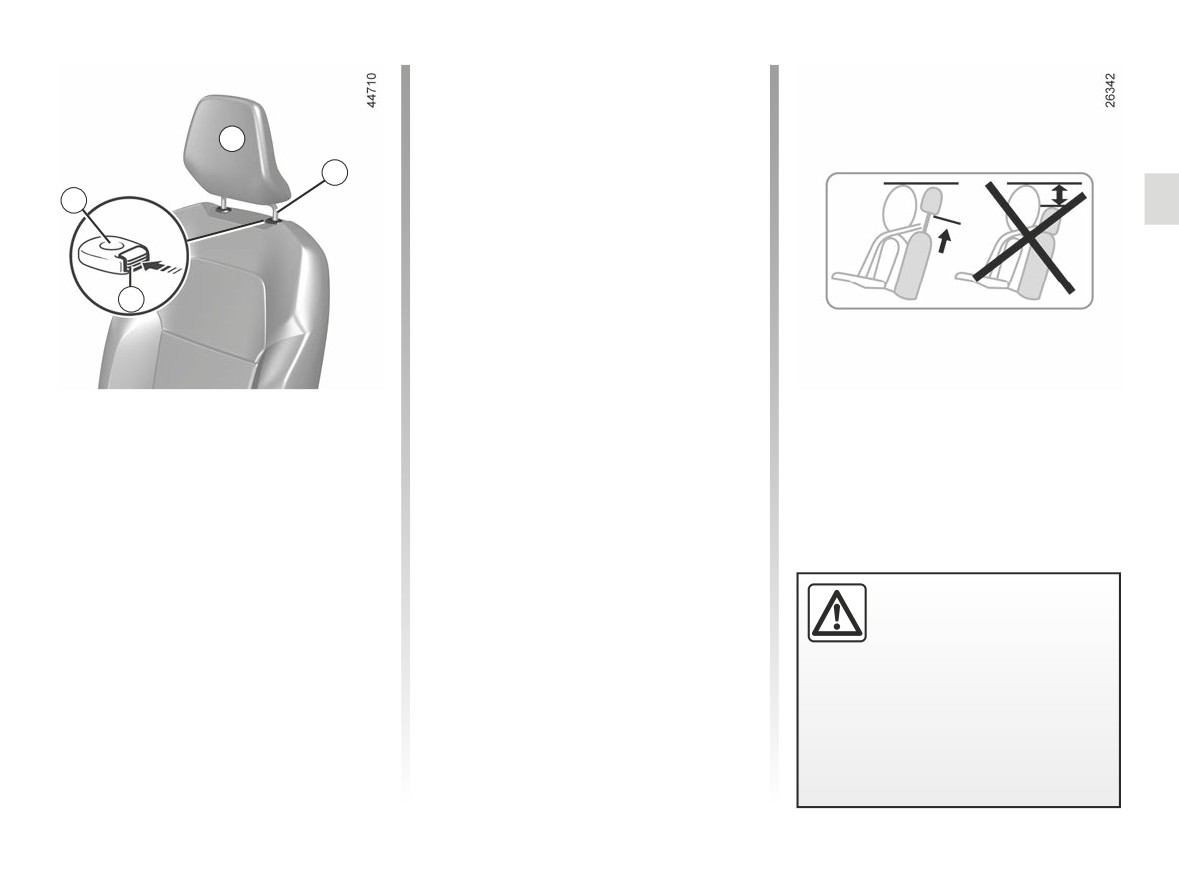
FRONT HEADRESTS
To raise the headrest
Raise it to its highest position (tilt the
seatback backwards). Press button 2
A
and lift the headrest to release it.
3
1
To refit the headrest
Check that the headrest rods are
clean 3.
Insert the headrest rods into the holes 1
2
(tilt the seatback backwards). Lower
the headrest until it locks and press
button 2 to adjust to the desired height.
Check that each rod 3 on the seatback
is securely locked.
To raise the headrest
Pull the headrest upwards to the de-
sired height. Check that it is correctly
locked.
To lower the headrest
Press button 2 and guide the headrest
down to the desired height. Check that
The headrest is important
the bonnet is correctly locked.
for safety. Ensure that it is in
place and in the correct po-
sition: the top of the head-
rest should be as close as possible
to the top of the head and there must
be a minimal distance between the
head and the headrest A.
1.37
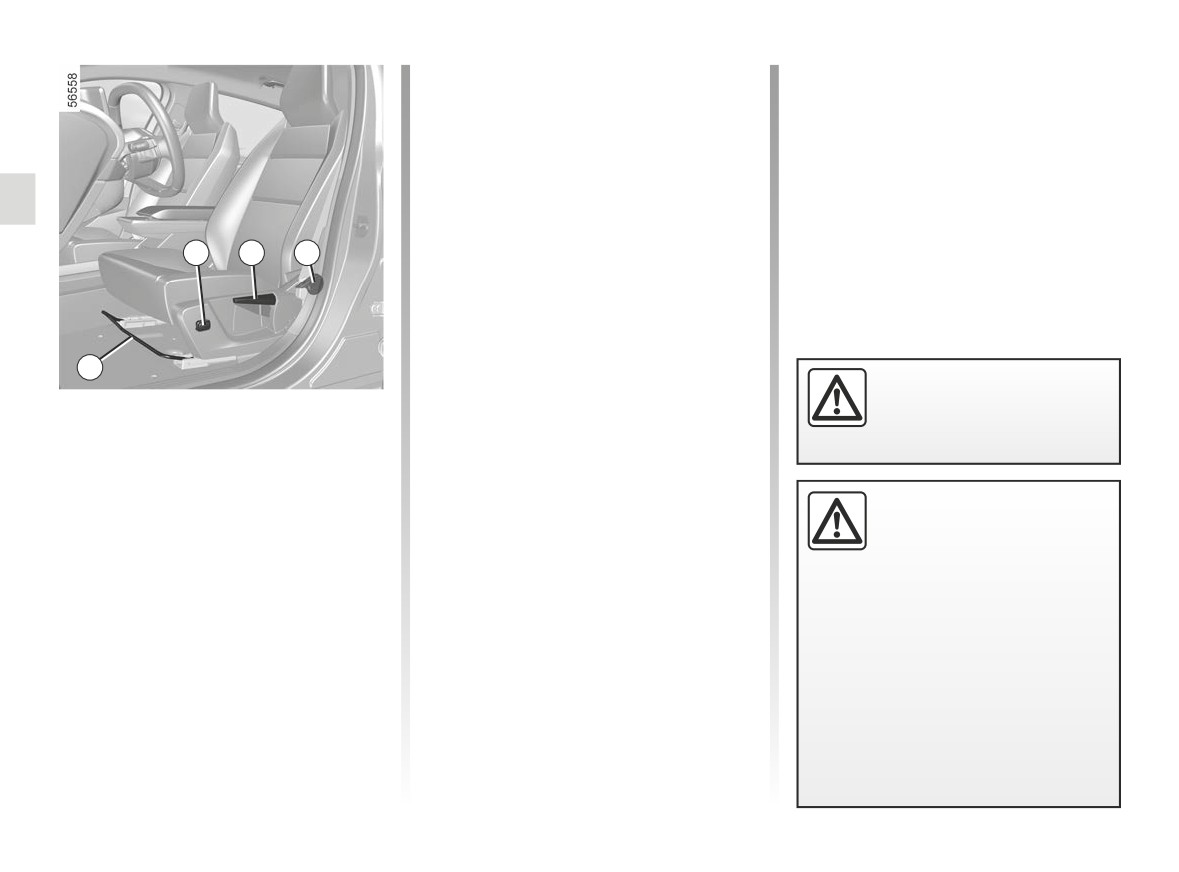
FRONT SEATS WITH MANUAL CONTROL (1/2)
To raise or lower the seat
base
Move lever 3 as many times as neces-
sary upwards or downwards.
To tilt the seatback
Lift handle 4 as far as possible and tilt
2
3
4
the seatback to the desired position.
Release the handle at the desired po-
sition and make sure that it is locked.
1
After making adjustments,
make sure that the seat-
To move the seat forwards or
backs are correctly locked
back
in place.
Lift handle 1 to release. Release the
handle at the desired position and
make sure that it is locked.
For safety reasons, carry
out any adjustments while
the vehicle is stationary.
Adjusting the lumbar support
We would advise you not to recline
on the driver’s seat
the seatbacks too far to ensure that
(depending on the vehicle)
the effectiveness of the seat belts is
Push the 2 switch forwards or back-
not reduced.
wards to adjust the lumbar pad.
Nothing should be placed on the
floor area in front of the driver as
such objects may slide under the
pedal during braking manoeuvres,
thus obstructing its use.
1.38
FRONT SEATS WITH MANUAL CONTROL (2/2)
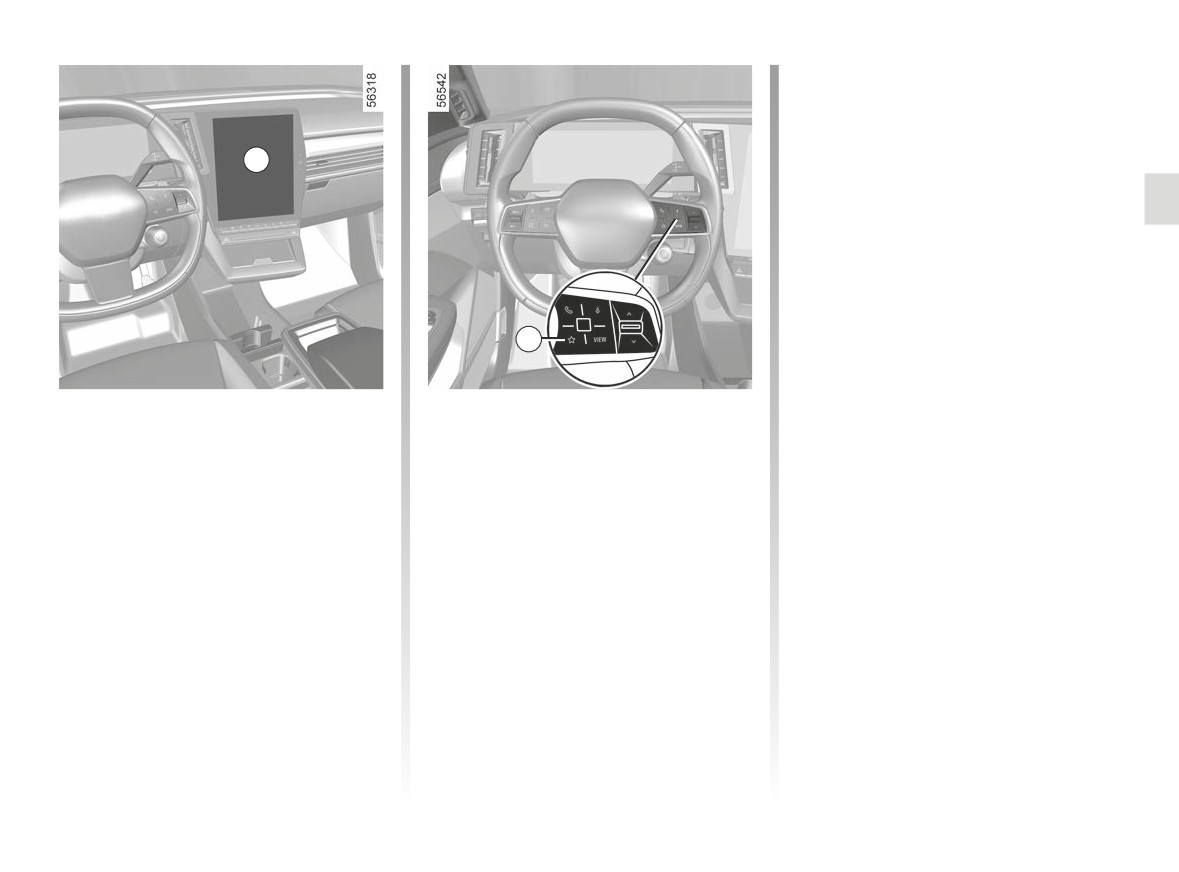
“Favourites” function
Depending on the vehicle, by pressing
the steering wheel control 6, you can
activate the heated seats according to
5
the stored use settings that you have
previously defined.
For more information on programming
this function, please refer to the multi-
media instructions.
6
Heated seats
- a third press decreases the heating
to minimum power. One integrated
Depending on the vehicle, with the ig-
warning light comes on;
nition on, you can activate the heated
seats via the multimedia screen 5:
- a fourth press turns the heating off.
In order to avoid unnecessary energy
- pressing the ð
pictogram on the
consumption, the heated passenger
required seat for the first time ac-
seat can be deactivated automatically
tivates the heating system at maxi-
in the absence of an occupant.
mum power. Three integrated switch
warning lights come on;
- a second press decreases the heat-
ing to medium power. Two integrated
warning lights come on;
1.39
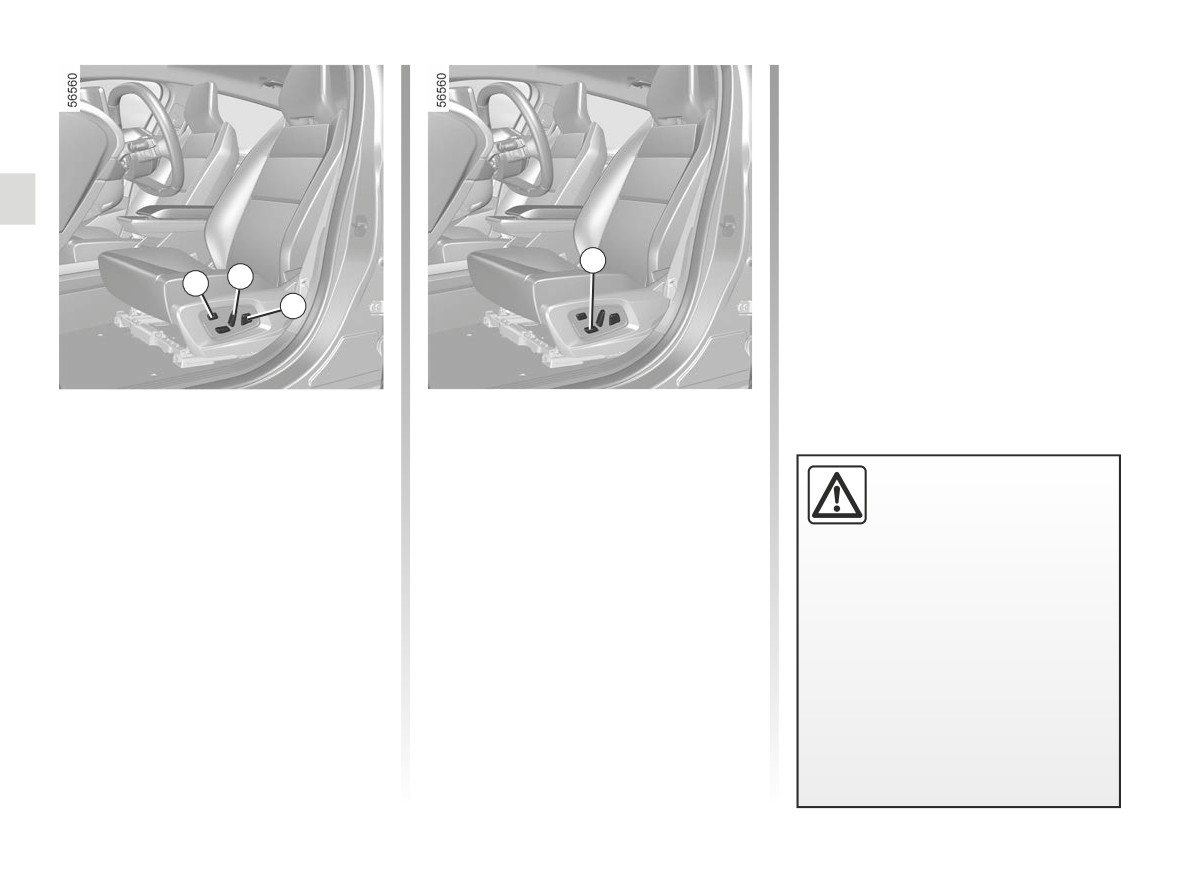
FRONT SEATS WITH ELECTRIC CONTROL (1/2)
4
2
1
3
On vehicles that are equipped, the
Adjusting the seat position
switch 1 can be used to access the
To move the seat forwards or back
“Seats” menu on the multimedia screen
(see following pages).
Move switch 4 forwards or backwards.
For safety reasons, carry
To raise or lower the seat base
out any adjustments when
the vehicle is not being
Adjusting the seatback
Move the back of switch 4 up or down.
driven.
To tilt the seatback, move the top of
We would advise you not to recline
switch 2 forwards or backwards.
the seatbacks too far to ensure that
the effectiveness of the seat belts is
Adjusting the lumbar support
not reduced.
on the driver’s seat
No object should be placed on the
Move the switch 3 forwards, back-
floor
(in front of the driver). such
wards, up or down.
objects may slide under the pedals
during sudden braking manoeuvres
and obstruct their use.
1.40
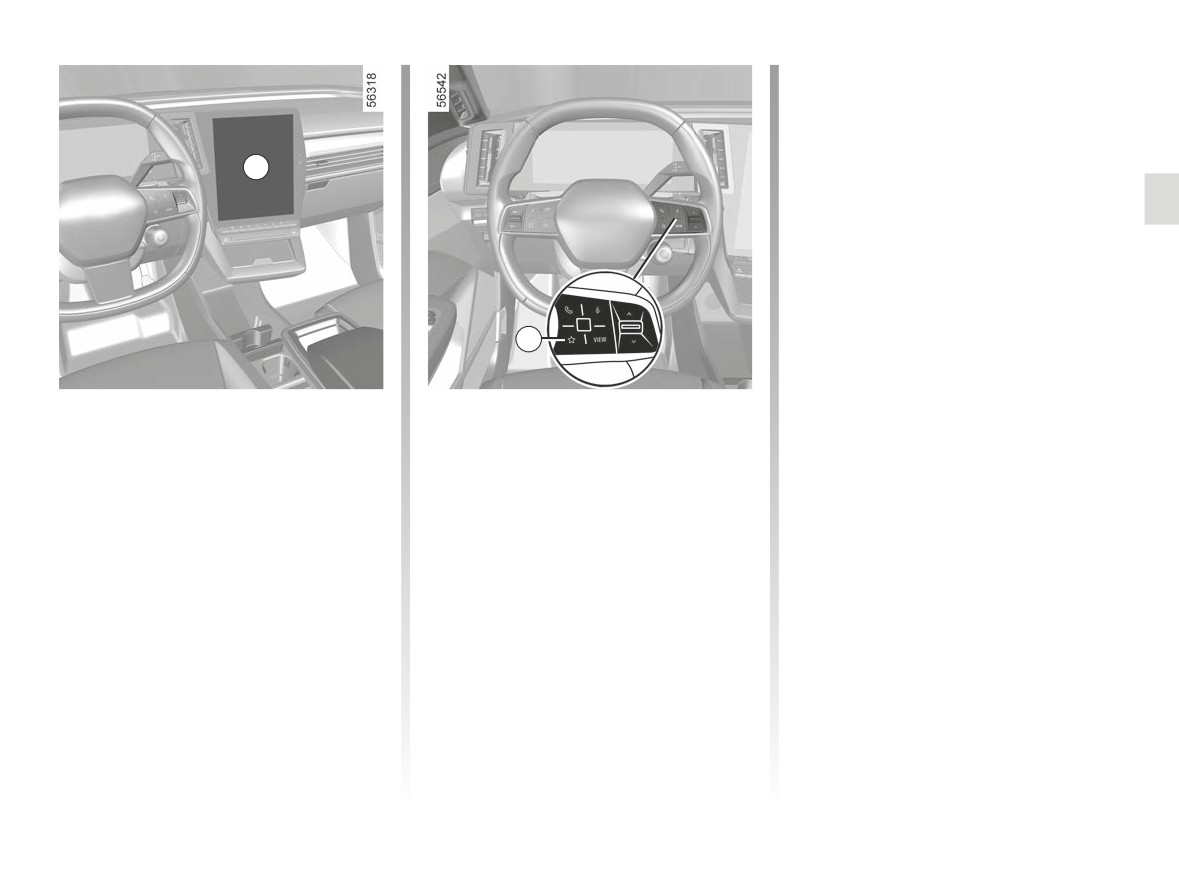
FRONT SEATS WITH ELECTRIC CONTROL (2/2)
“Favourites” function
Depending on the vehicle, by pressing
the steering wheel control 6, you can
activate the heated seats according to
5
the stored use settings that you have
previously defined.
For more information on programming
this function, please refer to the multi-
media instructions.
6
Heated seats
- a third press decreases the heating
to minimum power. One integrated
Depending on the vehicle, with the ig-
warning light comes on;
nition on, you can activate the heated
seats via the multimedia screen 5:
- a fourth press turns the heating off.
In order to avoid unnecessary energy
- pressing the ð
pictogram on the
consumption, the heated passenger
required seat for the first time ac-
seat can be deactivated automatically
tivates the heating system at maxi-
in the absence of an occupant.
mum power. Three integrated switch
warning lights come on;
- a second press decreases the heat-
ing to medium power. Two integrated
warning lights come on;
1.41