Renault Kangoo (2022 year). Manual in english - page 8
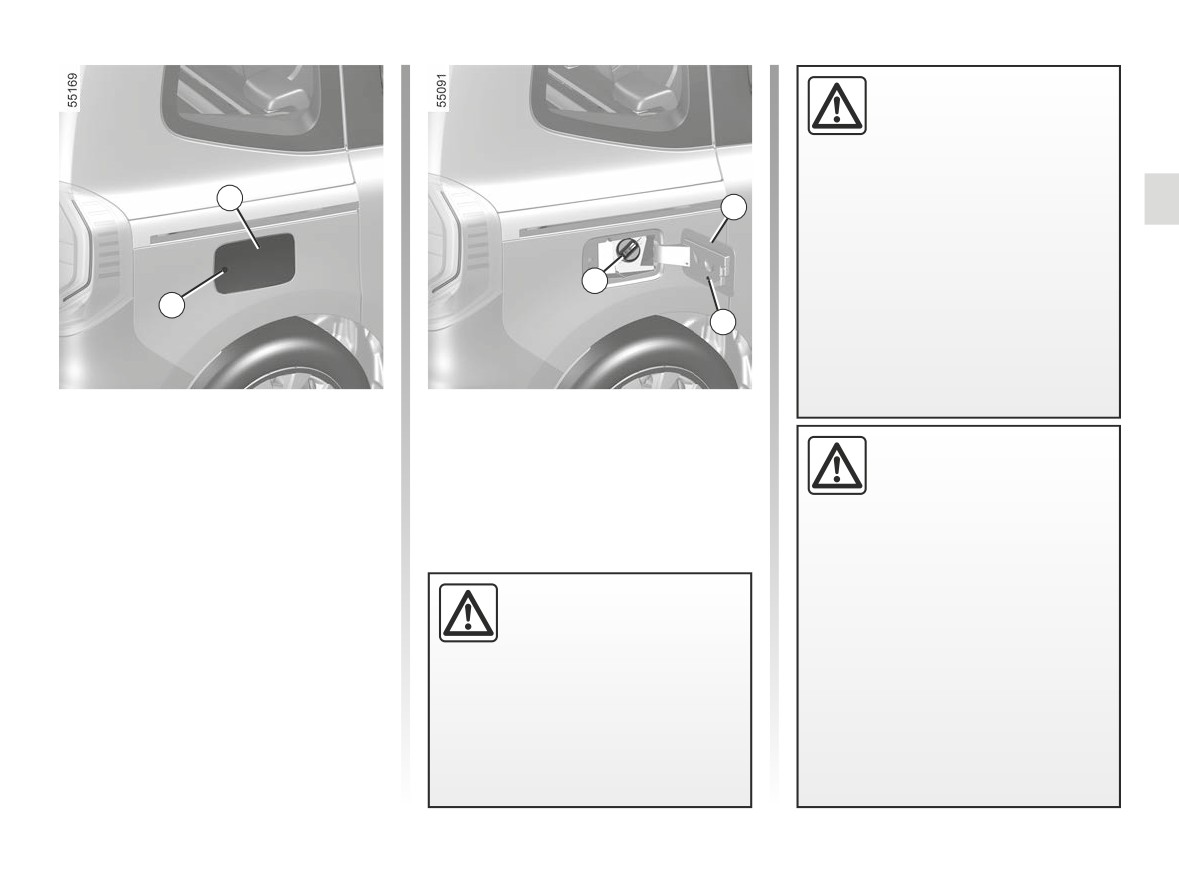
TANK (1/3)
Filler cap: this is specific.
If you have to replace it,
make sure it is identical to
the original cap. Contact an
approved Dealer.
Never place the cap near a source
1
1
of heat or flame.
Do not wash the filler area with a
high-pressure washer.
3
A
2
Useable capacity of the tank: 12 gal
Fuel grade
(54 litres) approximately.
Use a high-grade fuel that complies
with the legislation in force in each
Do not mix even small
With the vehicle unlocked, to open
country and which must comply with
amounts of petrol
(un-
cover 1, press area A then release. The
the specifications given on the label on
leaded or E85) with diesel.
cover 1 opens.
the cover 1. ➥ 6.7.
Do not use ethanol-based
Use the cap holder 2 on the flap 1
fuel if your vehicle is not compatible
during filling to hold the cap 3 in place.
with this fuel.
For details on filling the fuel tank, refer
Do not add reagent to the fuel -
to the information on “Filling with fuel”.
To fill up with fuel, the
otherwise you risk damaging the
To close it, press on the fuel filler flap by
engine must be off
(and
engine ➥ 1.150.
hand, as far as it will go.
not only on standby in the
If you wish to add an additive to the
case of vehicles equipped
fuel, use a product approved by our
with the STOP and START func-
Technical Department. Consult an
tion): you must switch off the ignition
approved dealer.
➥ 2.4, ➥ 2.5.
Fire hazard.
1.147
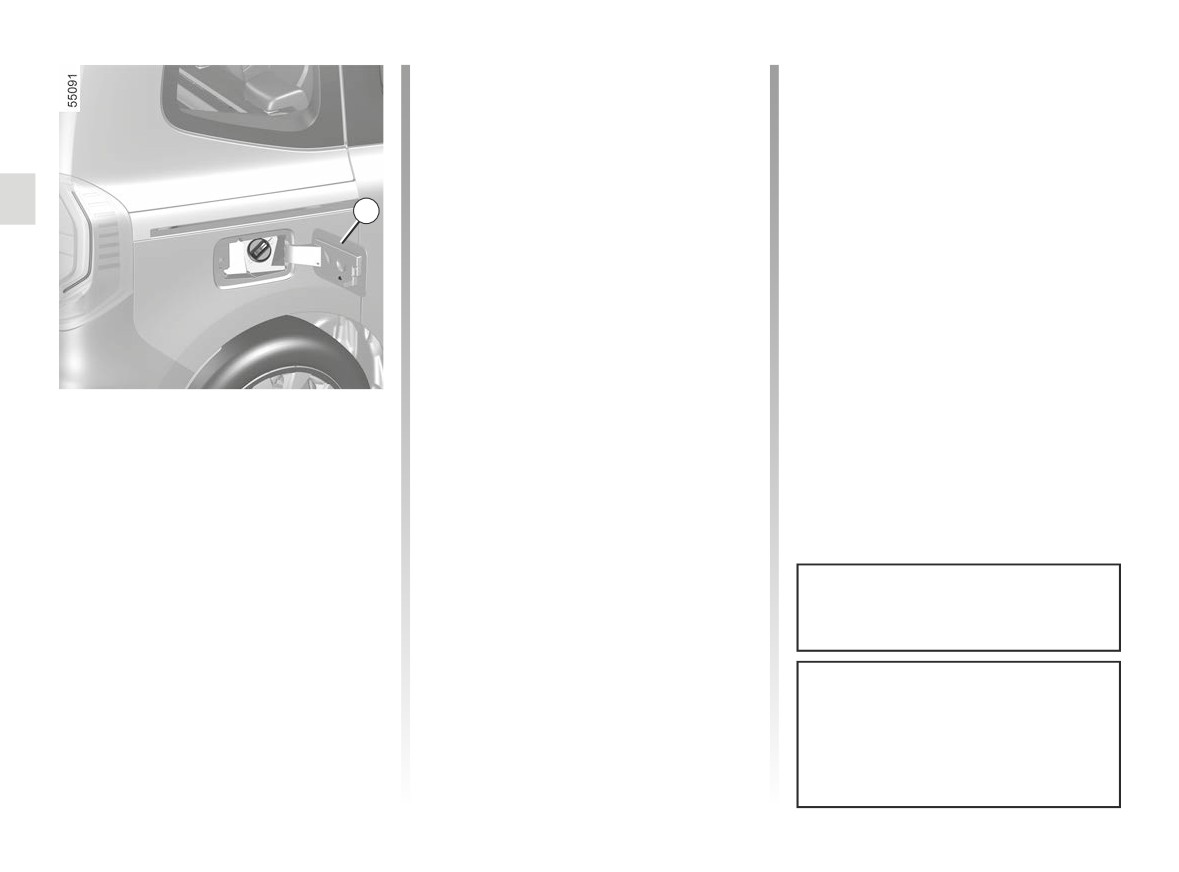
TANK (2/3)
Filling with fuel
If it is not possible to add at least
1.10 gallons (5 litres) of fuel due to the
With the ignition off, insert the nozzle
fuel level in the tank, drive the vehicle
and insert it fully before turning it on to
until the tank has capacity.
fill the fuel tank (risk of splashing).
Keep the nozzle in this position through-
Petrol version
out the entire filling operation.
Using leaded petrol will damage the
1
antipollution system and may lead to a
When the pump cuts out automatically
at the end of the filling procedure, a
loss of warranty.
maximum of two further filling attempts
To ensure that the fuel tank is not filled
may be made, as there must be suffi-
with leaded petrol, the fuel tank filler
cient space in the fuel tank to allow for
neck contains a restrictor fitted with a
expansion.
foolproof system which only allows
Make sure that no water enters the fuel
the nozzle for unleaded petrol to be
tank during filling. The cover 1 and its
used (at the pump).
surround must remain clean.
Diesel version
Special case
It is essential to use diesel fuel that
When the vehicle has been stopped for
conforms with the information given on
around three months, you must add
the label inside cover 1.
fuel to prevent damage to the fuel
Petrol version
pump.
It is essential to use unleaded petrol.
To do this, with the ignition off, top-up
The octane rating (RON) must comply
at least 1.10 gallons (5 litres) then start
with the information given on the label
the engine to operate the pump and
on the cover 1. ➥ 6.7.
renew the fuel in the circuit.
After filling, check that the cap and
cover are closed.
Fuel types that conform to European
standards with which the engines of
vehicles sold in Europe are compat-
ible: refer to the table ➥ 6.7.
1.148
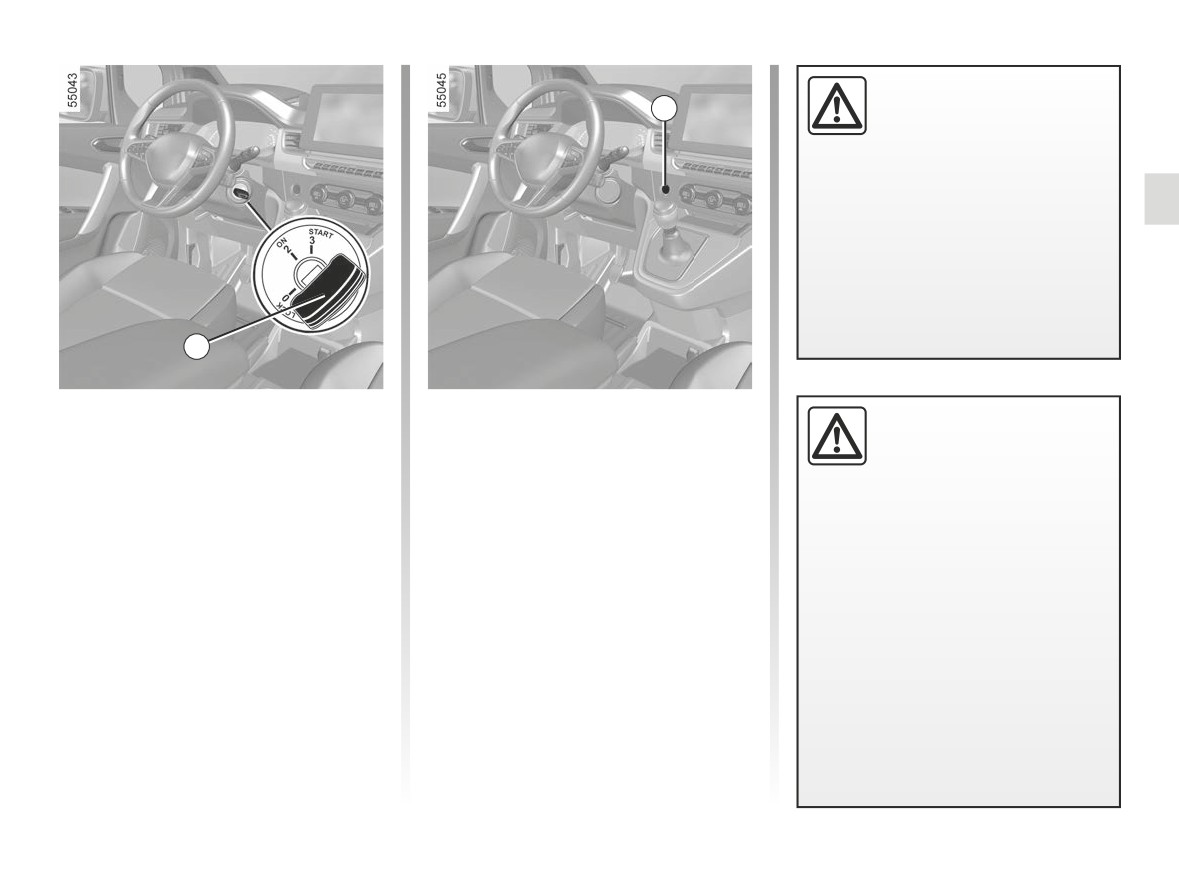
TANK (3/3)
No modifications what-
5
soever are permitted on
any part of the fuel supply
system
(electronic units,
wiring, fuel circuit, injectors, pro-
tective covers, etc.) as this may be
dangerous (unless undertaken by
qualified Network personnel).
4
Running out of fuel on diesel
Vehicles with card
Persistent fuel odour
versions
With the card in the passenger com-
If you notice a persistent
partment, press the start button 5 with-
Vehicles with key/remote control
fuel odour you should:
out pressing any of the pedals. Wait a
- Turn the ignition key 4 to the “On”
few minutes before starting.
- stop the vehicle as soon as traf-
position ON 2 and wait a few min-
fic conditions allow and switch off
This will enable the fuel circuit to be
utes before starting to allow the fuel
the ignition;
primed. If the engine does not start,
circuit to be primed;
repeat the procedure.
- switch on the hazard warning
- turn the key to position START 3. If
lights and ask your passengers to
If the engine does not start after several
the engine does not start, repeat the
leave the vehicle and stay clear
attempts, please contact an authorised
procedure;
of the traffic;
dealer.
- If the engine does not start after sev-
- contact an approved Dealer.
eral attempts, contact an approved
dealer.
1.149
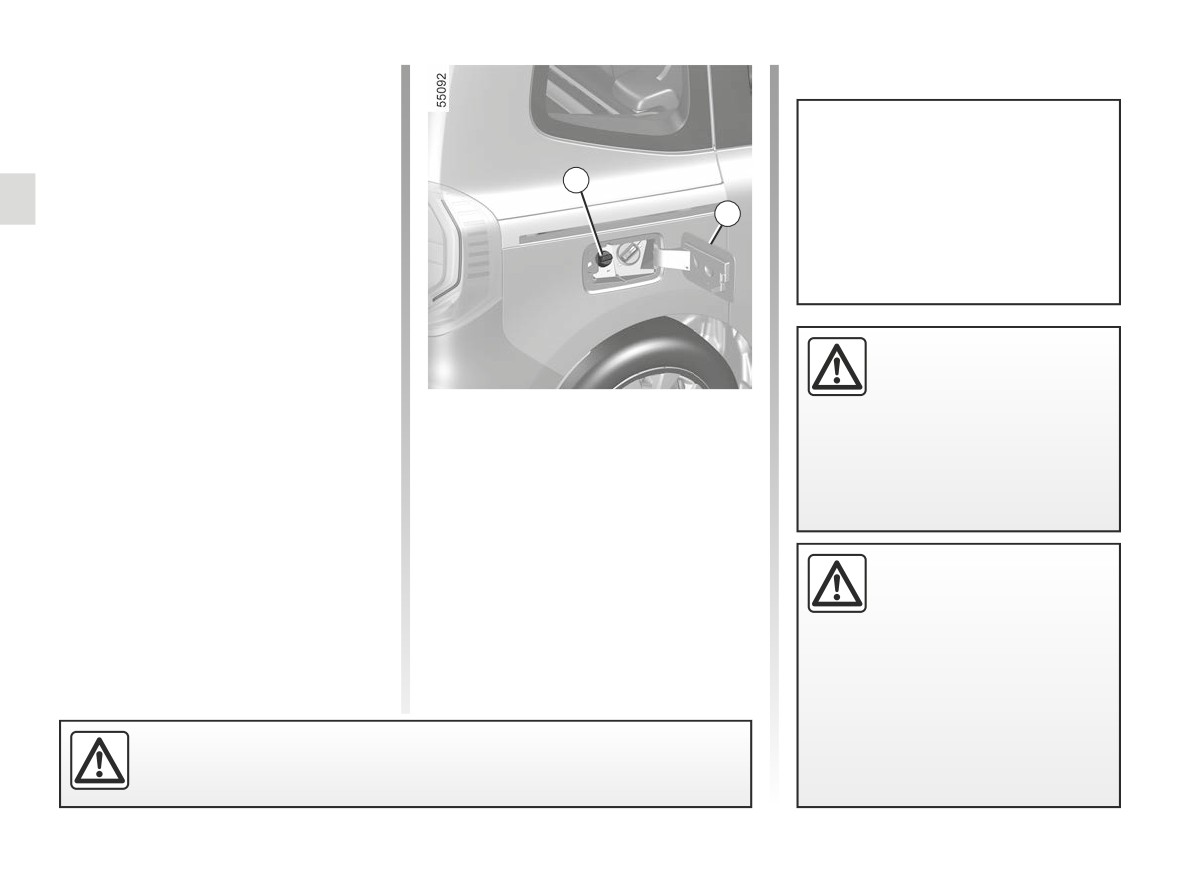
REAGENT TANK (1/4)
Please ensure that you comply with the
legislation of your country. It is impor-
tant to remember that failure to respect
regulations in force could lead to legal
To fill up with reagent, the engine
action being taken against the vehicle
must be stopped (and not only on
owner.
1
standby in the case of vehicles
A
equipped with the function) STOP
Operating principle
and START: you must switch off the
The reagent is intended for diesel en-
ignition ➥ 2.4 ➥ 2.5.
gines fitted with the SCR (selective cat-
alytic reduction) system.
The use of reagents reduces exhaust
emissions by transforming the pollut-
If the “XXX miles (XXX km)
ants into water vapour and nitrogen.
lockout refill AdBlue" mes-
Reagent consumption in real time de-
sage appears, fill the rea-
pends on vehicle usage conditions, the
Filling
gent tank and refer to the
equipment fitted, and driving style.
filling instructions.
Useable capacity of the tank: 3.74
gallons (17 litres) approximately.
Risk of immobilisation of the ve-
Reagent quality
hicle.
With the ignition switched off, open the
Use only reagents which conform
cover A, then unscrew the cap 1.
to standard ISO 22241 and in accord-
ance with the mark on the tank filler
Note: ammonium hydroxide vapour
cap.
may escape from the cap opening
Fuel filler cap: this is a
when the tank temperature is high.
specific type.
If you have to replace it,
make sure it is identical
to the original cap. Contact an ap-
proved Dealer. Do not wash the filler
area with a high pressure washer.
The reagent must not come into contact with eyes or skin. If it does, wash
the affected area with plenty of cold water. If necessary, consult a doctor.
1.150
REAGENT TANK (2/4)
Filling (continued)
If the reagent overflows, or contami-
nates any paintwork, clean the affected
The tank can be filled at the pump. With
area quickly with plenty of cold water
the ignition off, insert the nozzle fully
and a soft cloth.
before activating it to fill the fuel tank
(risk of splashing). Keep the nozzle in
Note: if the reagent crystallises, use a
this position throughout the entire filling
soft sponge.
operation.
In extreme cold weather conditions
After filling the reagent tank, check
When the pump cuts out automatically
that the cap and cover are closed,
In frosty weather conditions, the rea-
at the end of the filling procedure, a
start the engine and WAIT 10 sec-
gent tank should be refilled when the
maximum of two further filling attempts
onds with the vehicle stationary,
may be made, as there must be suffi-
indicator and the message “TOP
engine running before setting off
cient space in the fuel tank to allow for
UP AdBlue before 1200 km” appear on
again.
expansion.
the instrument panel.
If this operation is not carried out,
the filling of the tank will not be
In other filling cases, it is essential to
Special cases
taken into account automatically
read the information shown on the rea-
The reagent fluid freezes below about
until after several dozens of minutes
gent container (e.g. the can or bottle).
-10°C.
of driving.
The message “--- TOP UP AdBlue”
In these conditions, do not attempt filling
Precautions for use
and/or the warning lights will con-
when the fluid is frozen. In the event of
tinue to appear until the filling has
When filling:
needing to top up or fill the tank with re-
been registered by the system.
- handle the reagent with care. They
agent (
on), park the vehicle in a
can damage clothes, shoes, body-
hotter location if possible so that the re-
work components etc.;
agent becomes liquid again. Otherwise,
have a qualified professional top up or
- make sure that no water enters the
fill up with reagent fluid.
fuel tank.
No work whatsoever is
permitted on any part of
the system. To prevent
damage, only qualified per-
sonnel from our network may work
on the system.
1.151

REAGENT TANK (3/4)
Maintenance/Range
The information displayed on the instrument panel may be accompanied by a beep.
Indicator
Message
What to do?
lights
When the message is displayed when the ignition is switched
on, you have less than 1,488 miles (2,400 km) range.
-
“Top Up AdBlue before 2400 km“
Plan to refill, or have an Approved Dealer refill the reagent in
the tank.
When the message is displayed when the ignition is switched
on, you have between 744 miles (1,200 km) and 496 miles
comes
“TOP UP AdBlue before 1200 km“
(800 km) range.
on.
Plan to refill, or have an Approved Dealer refill the reagent in
the tank.
The message is displayed when the ignition is switched on and
is repeated:
- Approximately every 62 miles (100 km), you have between
about 496 miles (800 km) and 124 miles (200 km) range;
comes
“XXX KM failure Top up AdBlue”
- approximately every 31 miles (50 km), you have a range of
on.
less than 124 miles (200 km).
In any event, fill or have an Approved Dealer fill the reagent
tank as soon as possible.
The engine will not start.
“0 KM failure Top up AdBlue”
flashes.
To restart, you must fill the reagent tank yourself.
1.152

REAGENT TANK (4/4)
System faults
When the indicator lights light up, this may be accompanied by a beep.
Indicator lights
Message
Readings
“Check Anti- Pollution System”
Indicates a fault in the system. Contact your approved
“AdBlue quality to check“
Dealer as soon as possible.
“AdBlue injection to check“
Indicates a system fault and that in less than 496
miles (800 km) it will become impossible to re-
start the vehicle.
These warnings are repeated:
- every 62 miles (100 km) until there are between
“XXX KM failure antipollution”
500 miles (800 km) and 124 miles (200 km) re-
maining until the vehicle cannot be restarted;
- Every 31 miles (50 km) when there is less than
124 miles (200 km) left before the vehicle cannot
be restarted.
Contact your approved Dealer as soon as possible.
Indicates that after the ignition is switched off the ve-
“0 KM failure antipollution”
hicle will not restart. Call an approved Dealer.
1.153
1.154
Section 2: Driving
Running in
2.2
Ignition switch
2.3
Starting, stopping the engine
2.4
Stop and Start function
2.8
Special features of petrol versions
2.12
Special features of diesel versions: particle filter
2.14
Gear lever, Handbrake
2.16
Electronic parking brake
2.17
Eco-driving
2.21
Maintenance and antipollution advice
2.29
Environment
2.30
Tyre pressure warning and monitoring system
2.31
Driver correction devices and aids
2.42
Lane departure warning
2.48
Lane Keeping Assist
2.53
Blind spot warning
2.59
Safe distance alert
2.69
Advanced Safety
2.73
Fatigue detection warning
2.90
Detection of road signs
2.92
Speed limiter
2.96
Cruise control
2.100
Adaptive cruise control
2.105
Highway and Traffic Jam Companion
2.118
Parking distance control
2.134
Reversing camera
2.142
Assisted parking
2.145
Automatic gearbox
2.150
“Overspeed” function
2.154
Fast idle speed
2.155
Emergency call
2.156
2.1
RUNNING IN
Petrol version
Diesel version
For the first 600 miles (1,000 km), do
For the first 1,000 miles (1,500 km),
not exceed 78 mph (130 km/h) in the
do not exceed 80 mph (130 km/h) in
highest gear, or 3,000 to 3,500 rpm.
the highest gear, or 2,500 rpm. After
completing this mileage you may drive
You may only expect top performance
faster, although you may only expect
from your vehicle after approximately
top performance after approximately
1,800 miles (3,000 km).
3,600 miles (6,000 km).
Service intervals: refer to the
During the running in period, do not ac-
Maintenance Document for your vehi-
celerate hard while the engine is still
cle.
cold and do not let the engine over-rev.
Service intervals: refer to the
Maintenance Document for your vehi-
cle.
2.2
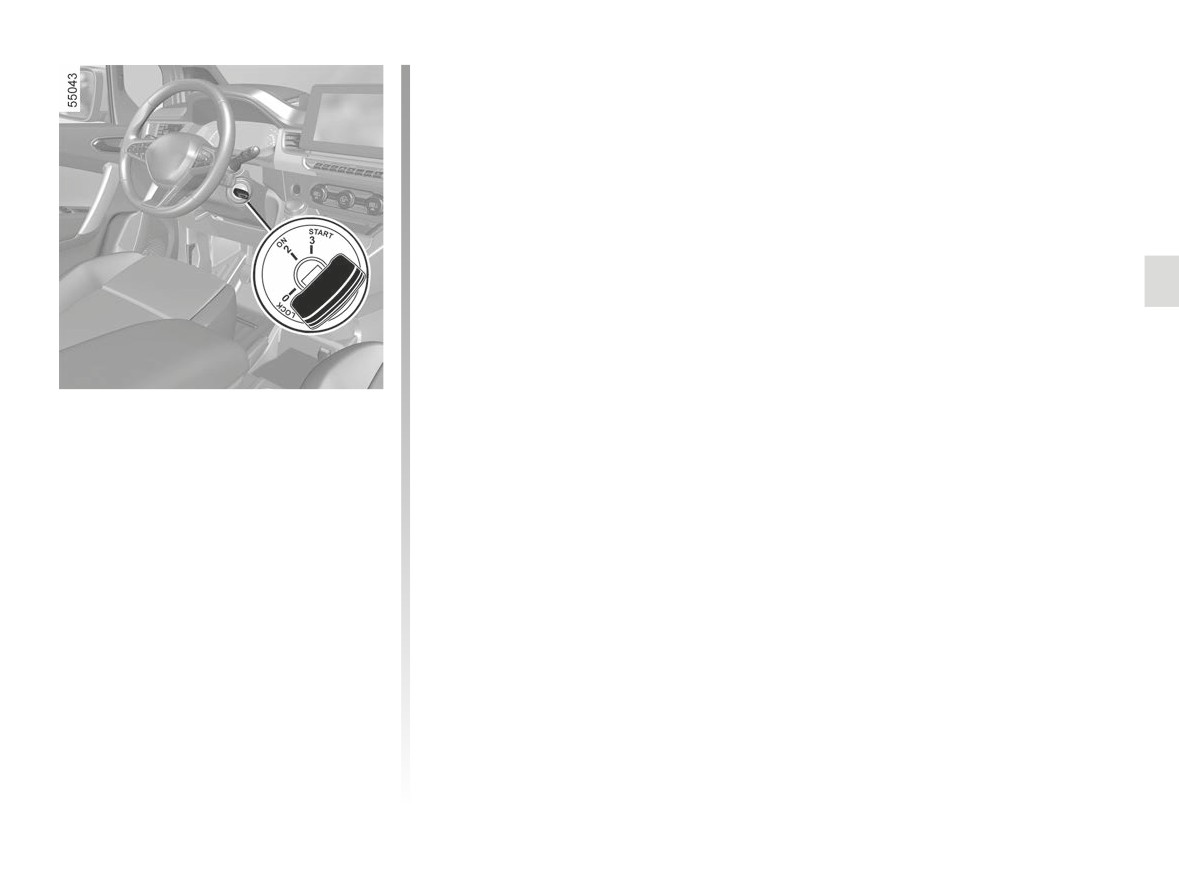
IGNITION SWITCH: vehicle with key
“Ignition” position ON 2
The ignition is switched on: Any acces-
sories (radio etc.) can be used.
“Start” position START 3
If the engine fails to start at the first
attempt, the key must be turned back
before the starter can be activated
again. Release the key as soon as the
engine starts.
Note: on diesel versions, several sec-
onds may pass between turning the
key and the engine starting to allow for
engine preheating.
Ignition switch
Off position LOCK 0 (steering lock
applied)
To lock: remove the key and turn the
steering wheel until the steering column
locks.
To unlock: turn the key and the steering
wheel slightly.
2.3
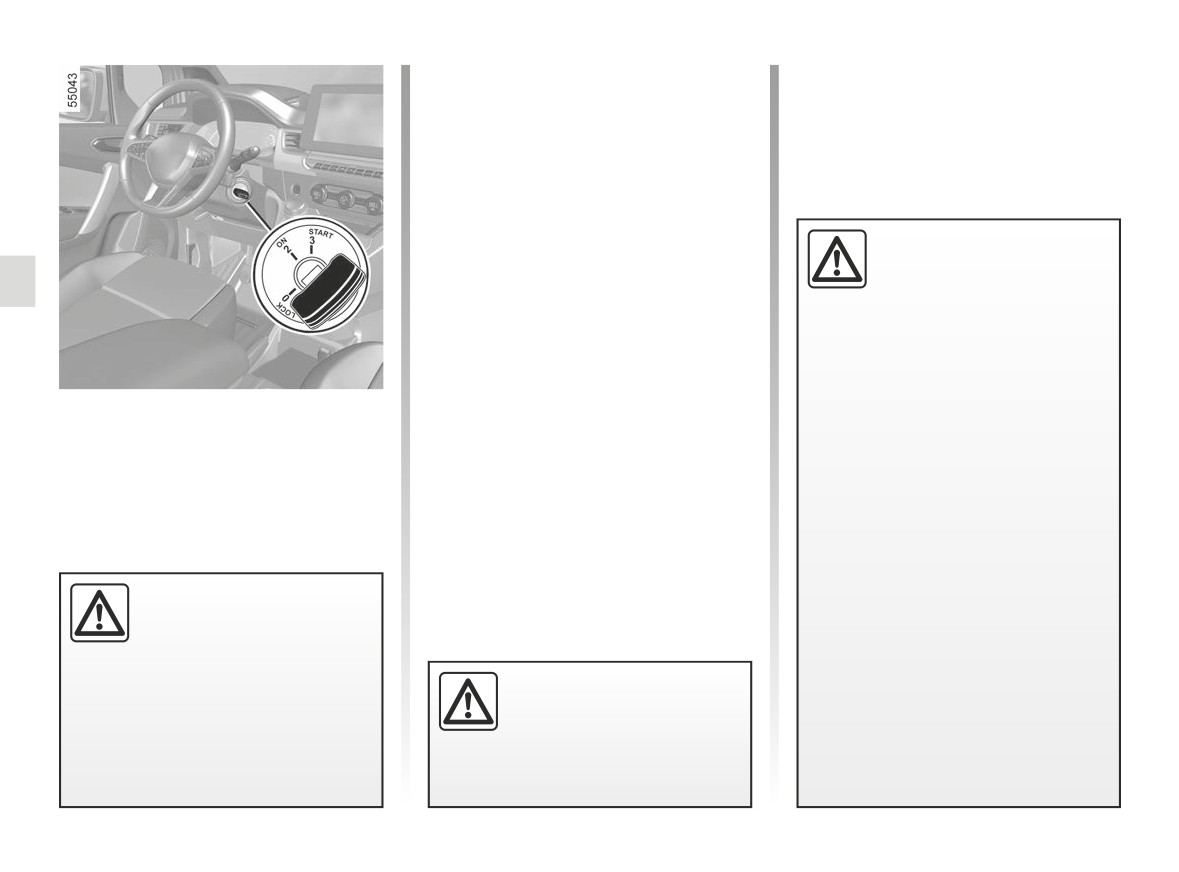
STARTING, STOPPING THE ENGINE: vehicle with key
Petrol versions
Note: on vehicles equipped with a
- Activate the starter without acceler-
manual gearbox, in the event of engine
ating;
stalling the message “Press Clutch” will
- release the key as soon as the
be displayed on the instrument panel.
engine starts.
Fully press the clutch pedal to restart
the engine.
Diesel versions
É
Driver’s responsibility
- Turn the ignition key to the “ON” po-
when parking or stopping
sition 2 and hold this position until
the vehicle
the engine preheating light goes off;
- turn the key to the start position
Never leave an animal,
“START” 3 without pressing the
child or adult who is not self-suffi-
accelerator;
cient alone in your vehicle, even for
- release the key as soon as the
a short time.
engine starts.
Starting the engine
They may pose a risk to themselves
Special note: if starting the engine
or to others by starting the engine,
when the outdoor temperature is very
To start:
activating equipment such as the
low (below - 10 ° C): hold down the
On vehicles equipped with automatic
electric windows or locking the
clutch pedal until the engine starts.
gearboxes, set the lever to position P.
doors, for example.
Stopping the engine
Also, in hot and/or sunny weather,
With the engine idling, turn the key to
please remember that the tempera-
the “LOCK” position 0.
ture inside the passenger compart-
ment increases very quickly.
Never switch off the igni-
RISK OF DEATH OR SERIOUS
tion before the vehicle has
INJURY.
stopped completely. Once
the engine has stopped, the
brake servo, power-assisted steer-
Never start your vehicle
ing etc., and the passive safety de-
while freewheeling on a gra-
vices such as the airbags and pre-
dient. Risk of non-activation
tensioners will no longer operate.
of power-assisted steering.
There is a risk of accidents.
2.4
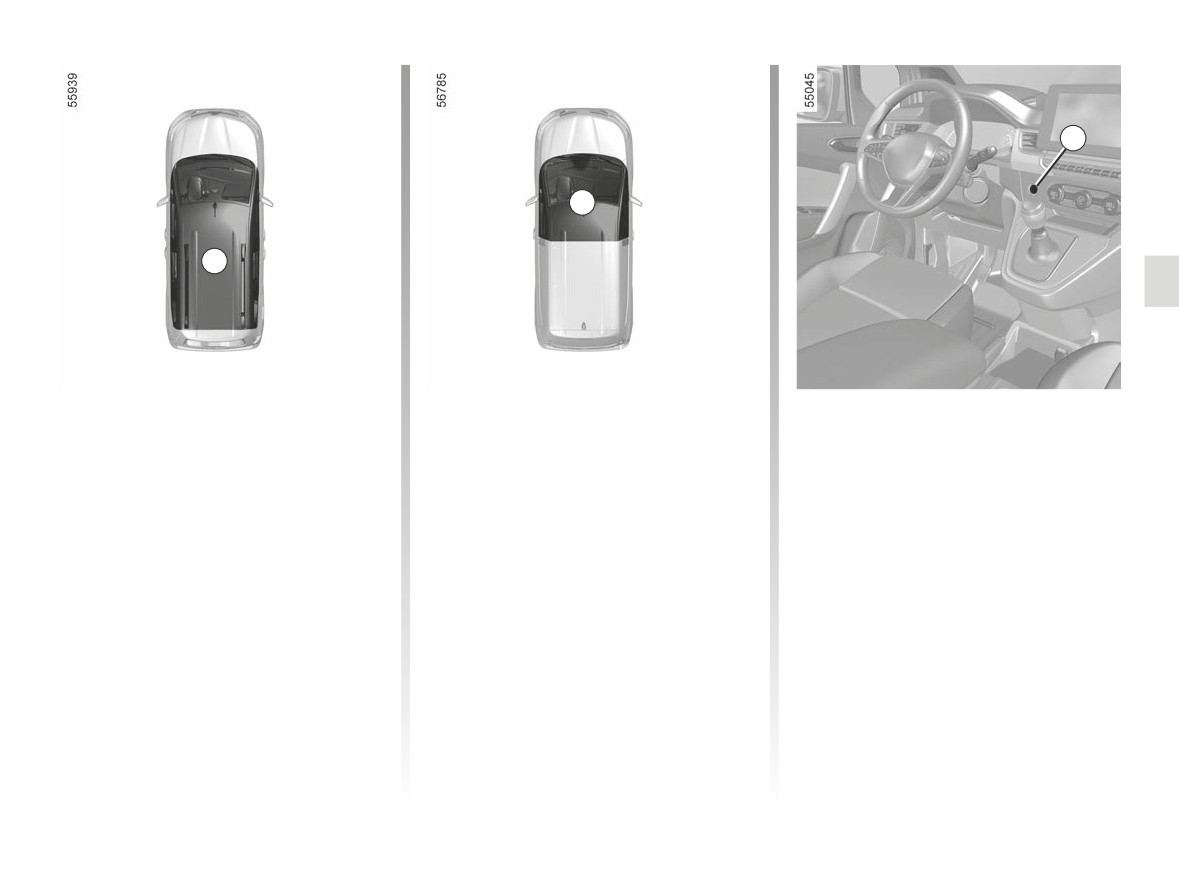
STARTING, STOPPING THE ENGINE: vehicle with card (1/3)
3
2
1
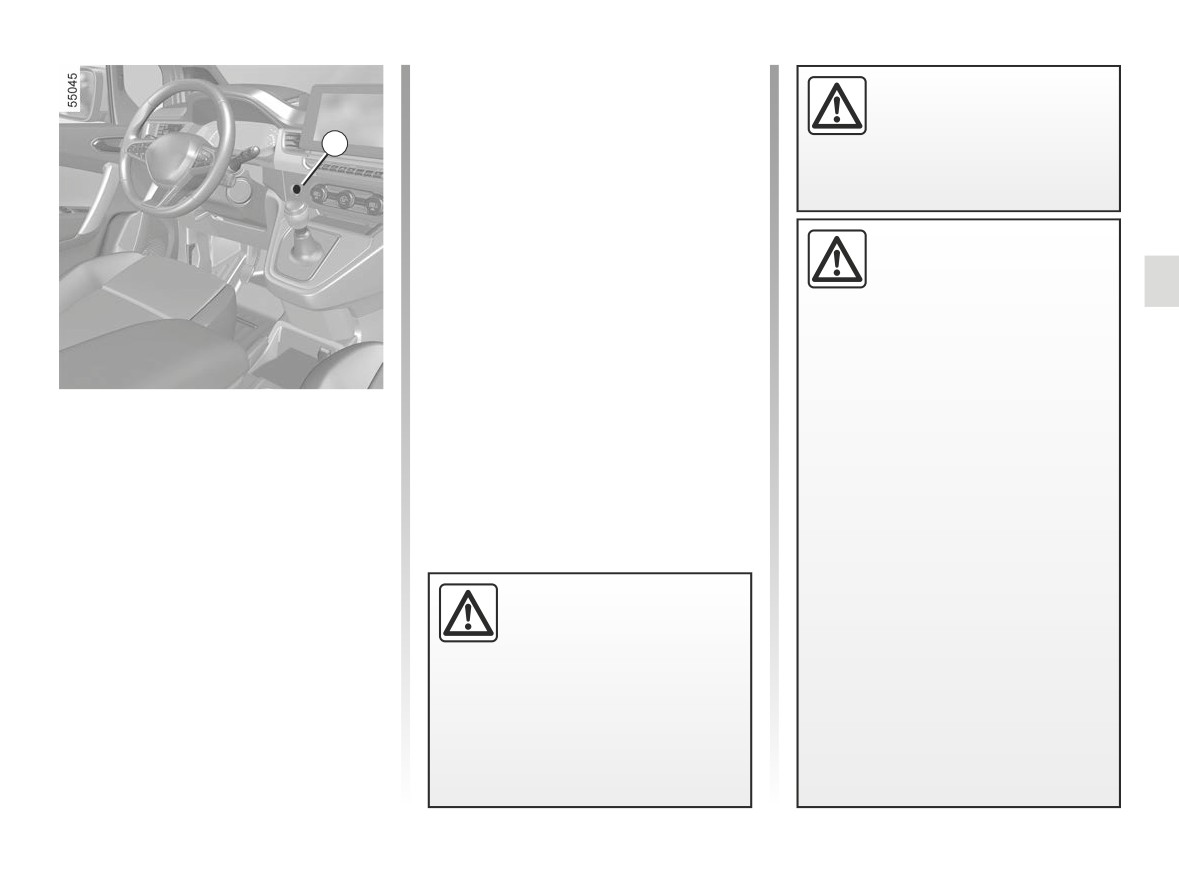
The card must be in detection zone 1
Special features
Note: on vehicles equipped with a
or, depending on the vehicle, in detec-
manual gearbox, in the event of engine
- If any of the starting conditions are
tion zone 2.
stalling the message “Press Clutch” will
not met, the message “Press Brake
be displayed on the instrument panel.
To start:
+ START” or “Press Clutch + START”
Fully press the clutch pedal to restart
or “Select Gearbox Position “P”” is
- vehicles with an automatic gearbox,
the engine.
displayed on the instrument panel;
in the P position, press the brake
pedal, press the 3 button, then re-
- in some cases, it will be necessary
lease the brake pedal once the
to move the steering wheel whilst
engine has started;
pressing the start button 3 to help
– vehicles with a manual gearbox,
unlock the steering column; the
press the brake pedal and press
message “Turn Steering Wheel +
the 3 button, then release the brake
START” will warn you of this;
pedal once the engine has started.
If a gear is engaged, also press the
clutch pedal.
2.5
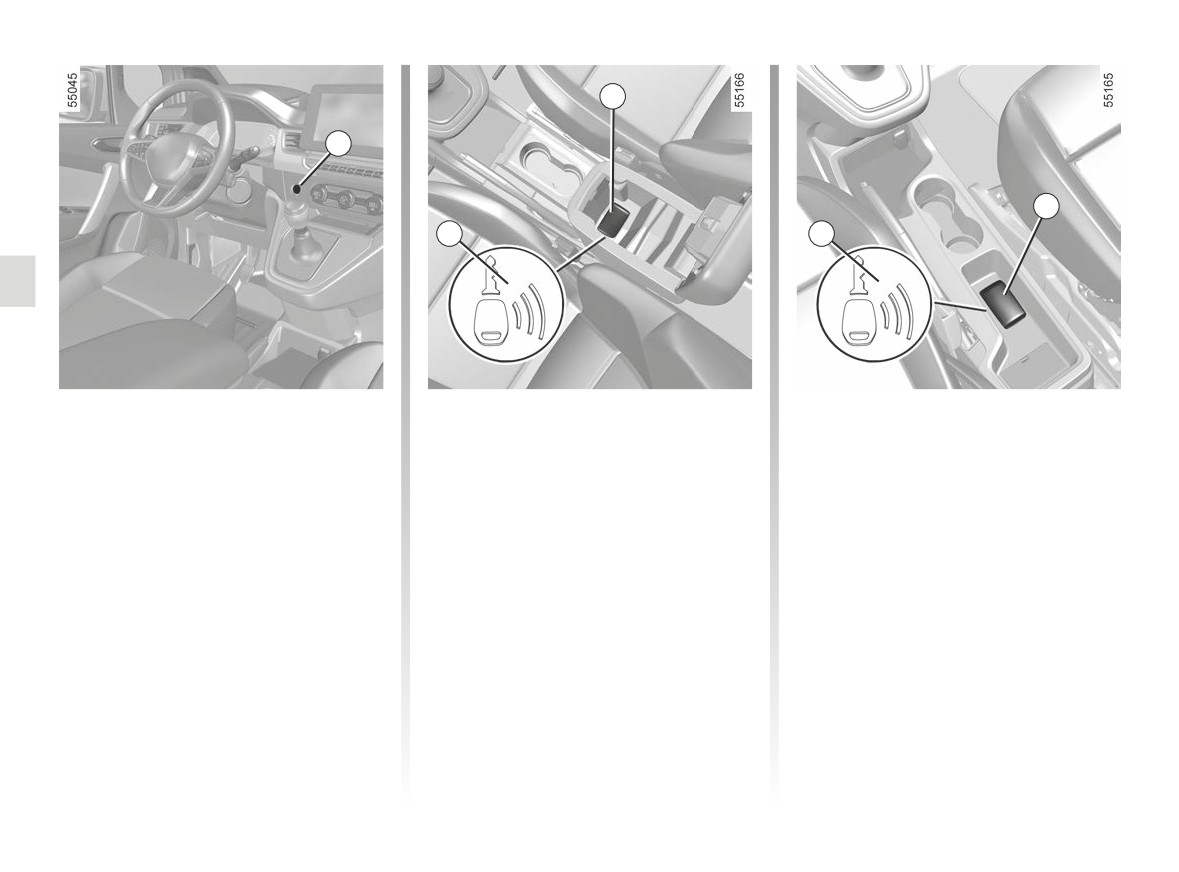
STARTING, STOPPING THE ENGINE: vehicle with card (2/3)
5
3
5
4
4
“Hands-free” starting with
Operating faults
The message “Place card on zone +
START” appears on the instrument
the tailgate open
In certain cases, the hands-free card
panel.
In this case, the card should not be lo-
may not work:
Press the brake or clutch pedal, then
cated in the luggage compartment, to
- when the card battery is dead;
place the card
5 (button side) on
prevent the risk of loss.
– near to appliances operating on the
the placement area marked by the 4
same frequency as the card (moni-
symbol. Press the 3 button to start the
Accessories function
tor, mobile phone, video game, etc.);
vehicle. The message goes out.
(switching on the ignition)
- vehicle located in a high electromag-
Once you have gained access to your
netic radiation zone.
vehicle, you may use some of its func-
tions (radio, navigation, wipers, etc.).
To use the other functions, with the
card in the passenger compartment,
press the 3 button without pressing the
pedals.
2.6
STARTING, STOPPING THE ENGINE: vehicle with card (3/3)
If the card is no longer in the passen-
When you leave your vehi-
ger compartment or if the card’s battery
cle, especially if you have
is worn, when the vehicle is stationary
your card with you, check
and you try to switch the engine off,
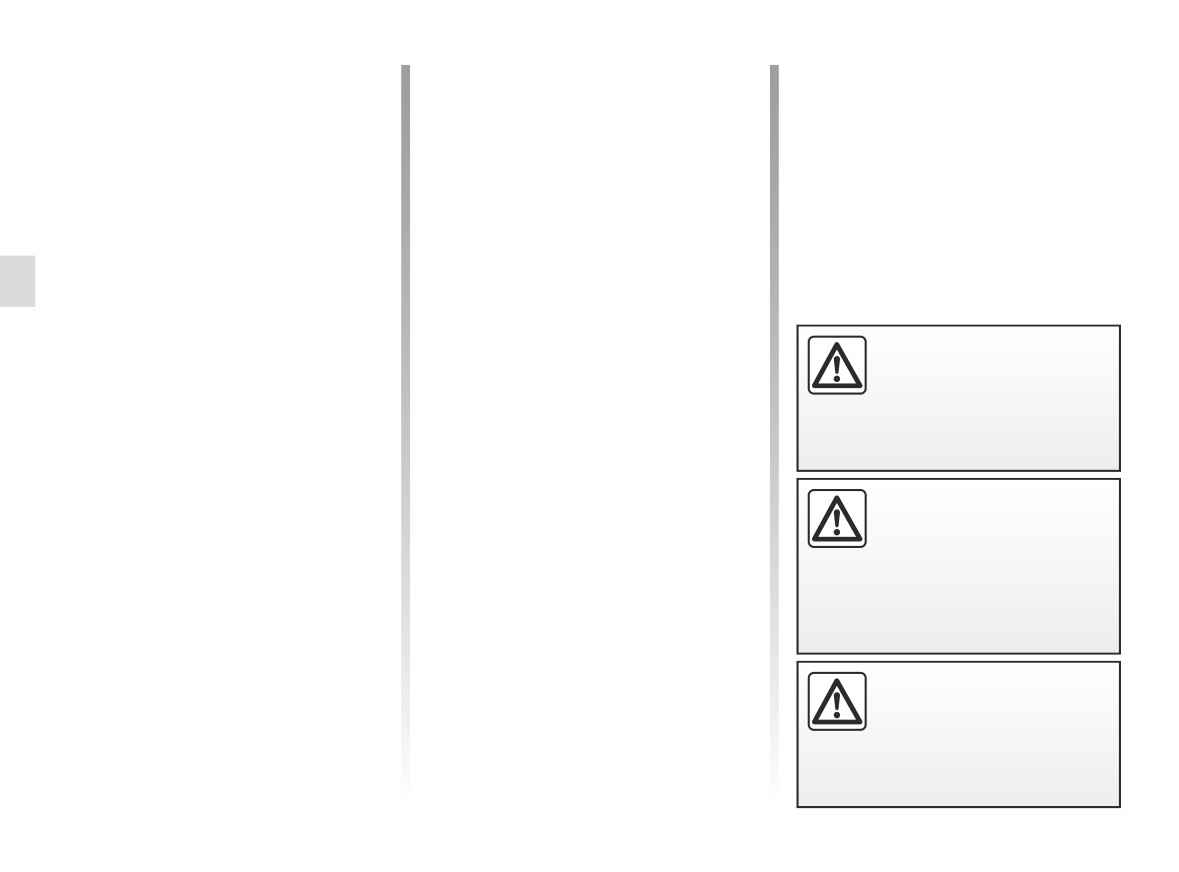
3
that the engine is com-
the message “Keycard absent: press/
pletely switched off.
hold START” appears on the instrument
panel: press button 3 for longer than
two seconds. If the card is no longer
in the passenger compartment, make
Driver’s responsibility
sure you can retrieve it before press-
when parking or stopping
ing and holding the button. Without the
the vehicle
card, you will not be able to restart the
Never leave an animal,
vehicle.
child or adult who is not self-suffi-
With the engine switched off, any ac-
cient alone in your vehicle, even for
cessories being used (radio, etc.) will
a short time.
continue to function for approximately
Conditions for stopping the
They may pose a risk to themselves
10 minutes.
or to others by starting the engine,
engine
When the driver’s door is opened, the
activating equipment such as the
The vehicle must be stationary, lever
accessories stop working.
electric windows or locking the
in position P on vehicles with an auto-
doors, for example.
matic gearbox.
Also, in hot and/or sunny weather,
With the card in the vehicle, press
please remember that the tempera-
button 3: the engine stops. The steer-
ture inside the passenger compart-
ing column is locked when a door is
ment increases very quickly.
opened or the vehicle is locked.
Never switch off the igni-
RISK OF DEATH OR SERIOUS
tion before the vehicle has
INJURY.
stopped completely. Once
the engine has stopped, the
brake servo, power-assisted steer-
ing etc., and the passive safety de-
vices such as the airbags and pre-
tensioners will no longer operate.
2.7
STOP AND START FUNCTION (1/4)
This system enables a reduced fuel
and
The vehicle equipment remain opera-
consumption and lower greenhouse
- when the vehicle speed is zero
tional while the engine is stopped.
gas emissions. The system is acti-
during approximately one second or,
When the engine switches to standby,
vated automatically when the vehicle is
depending on the vehicle, as soon
the steering assistance may no longer
started. While driving, the system stops
as the vehicle speed is below ap-
be operational.
the engine (standby) when the vehicle
proximately 3 mph (5 km/h).
is at a standstill (traffic jam, traffic lights,
In this case it becomes operational
The engine remains on standby if posi-
etc).
again when the engine is no longer on
tion P is selected, or if position N is se-
standby or the speed exceeds approxi-
lected with the handbrake engaged and
mately 1 mph (1 km/h) (downhill, slope
Conditions for engine
the brake pedal released.
etc.).
standby
For vehicles equipped with manual
gearboxes:
The vehicle has set off from where it
- the gearbox is in neutral;
was parked.
If the engine is put in
standby, the electronic
For vehicles equipped with auto-
If the
warning light flashes
parking brake (depending
matic gearboxes:
and the message “Release Clutch
on the vehicle) is not ap-
- the gearbox is in position D, N or in
pedal” appears on the instrument
plied automatically.
manual mode;
panel, this indicates that the clutch
and
pedal is not sufficiently released;
- the brake pedal is depressed (suffi-
and
ciently hard);
- the clutch pedal is released;
Keep your vehicle station-
and
ary when the engine is
If the
warning light flashes,
- the vehicle speed is less than ap-
on standby (shown by the
vehicle stationary, and the message
proximately 3 mph (5 km/h).
“Press brake pedal” appears on the
warning light
on the
instrument panel, it indicates that the
instrument panel).
The warning light
on the instru-
brake pedal is not sufficiently de-
ment panel is lit when the engine is on
pressed;
standby.
and
- the accelerator pedal is not de-
The engine MUST be
pressed;
stopped (not put in standby)
before leaving the vehicle.
➥ 2.3 ➥ 2.5.
2.8
STOP AND START FUNCTION (2/4)
Preventing the engine from
Conditions for coming out of
For vehicles equipped with manual
gearboxes:
standing by
engine standby
- when opening the driver’s door, with-
In certain situations, such as negoti-
For vehicles equipped with auto-
out any gear engaged and the clutch
ating a crossroads for instance, it is
matic gearboxes:
pedal released;
possible (with the system activated) to
-
when the driver’s door is opened;
keep the engine running so as to be
or
or
ready to move off quickly.
- when unfastening the driver’s seat
-
when the driver’s seat belt is unfas-
belt, without any gear engaged and
For vehicles equipped with au-
tened;
the clutch pedal released;
tomatic gearboxes and when the
or
engine standby is performed only
-
the brake pedal is released, with po-
or
when the vehicle stopped:
sition D or manual mode engaged;
- the gearbox is in neutral and the
or
clutch pedal is slightly depressed;
Keep the vehicle stationary without
-
the brake pedal is released in gear
pressing too hard on the brake pedal.
or
position N with the handbrake off;
- the engine is in gear and the clutch
For vehicles equipped with manual
or
pedal is pressed right down.
gearboxes:
-
the brake pedal is pressed again in
gear position P or N engaged with
Special note: Depending on the vehi-
Keep the clutch pedal pressed right
the handbrake applied;
cle, if you switch off the ignition when
down.
or
the engine is on standby, the Ä
-
the vehicle is in gear position R;
warning light may be displayed for a
or
few seconds on the instrument panel.
-
the accelerator pedal is depressed.
To fill up with fuel, the engine must
be off (and not only on standby in
For vehicles equipped with a
the case of vehicles equipped with
manual gearbox:
the STOP and START function):
you must switch off the ignition
the restart may be interrupted if the
➥ 2.4, ➥ 2.5.
clutch pedal is released too quickly
while a gear is engaged.
Fire hazard.
2.9
STOP AND START FUNCTION (3/4)
Conditions preventing the
- the slope is too steep for vehicles
fitted with an automatic gearbox;
standby of the engine
- the “Clear view” function is activated
Certain conditions prevent the system
➥ 3.9 ;
from using the engine standby function,
including when:
- the engine temperature is too low;
-
the driver’s door is not closed;
- the emission control system is being
regenerated;
–
the driver’s seat belt is not fastened
or was not fastened when driving
- ...
began;
Warning light
is displayed on the
-
reverse gear is engaged;
instrument panel. This notifies you that
–
the bonnet is not locked;
engine standby is not available.
–
the outdoor temperature is too low or
The
warning light may appear
too high;
along with a message on the instru-
-
the battery is not sufficiently charged;
ment panel:
- “Optimising Battery Recharge” to pri-
–
the difference between the vehicle
oritise battery charging;
interior temperature and the auto-
- “Prioritising Thermal Comfort” to pri-
matic climate control instruction is
oritise air conditioning;
too high;
- “Prioritising running engine” to priori-
-
parking distance control is in opera-
tise engine operations.
tion;
–
the altitude is too high;
Deactivate the Stop and
Start function for any opera-
tion performed in the engine
compartment.
2.10
STOP AND START FUNCTION (4/4)
Special feature of the automatic
Deactivating, activating the
engine re-start
function
Under certain conditions, the engine
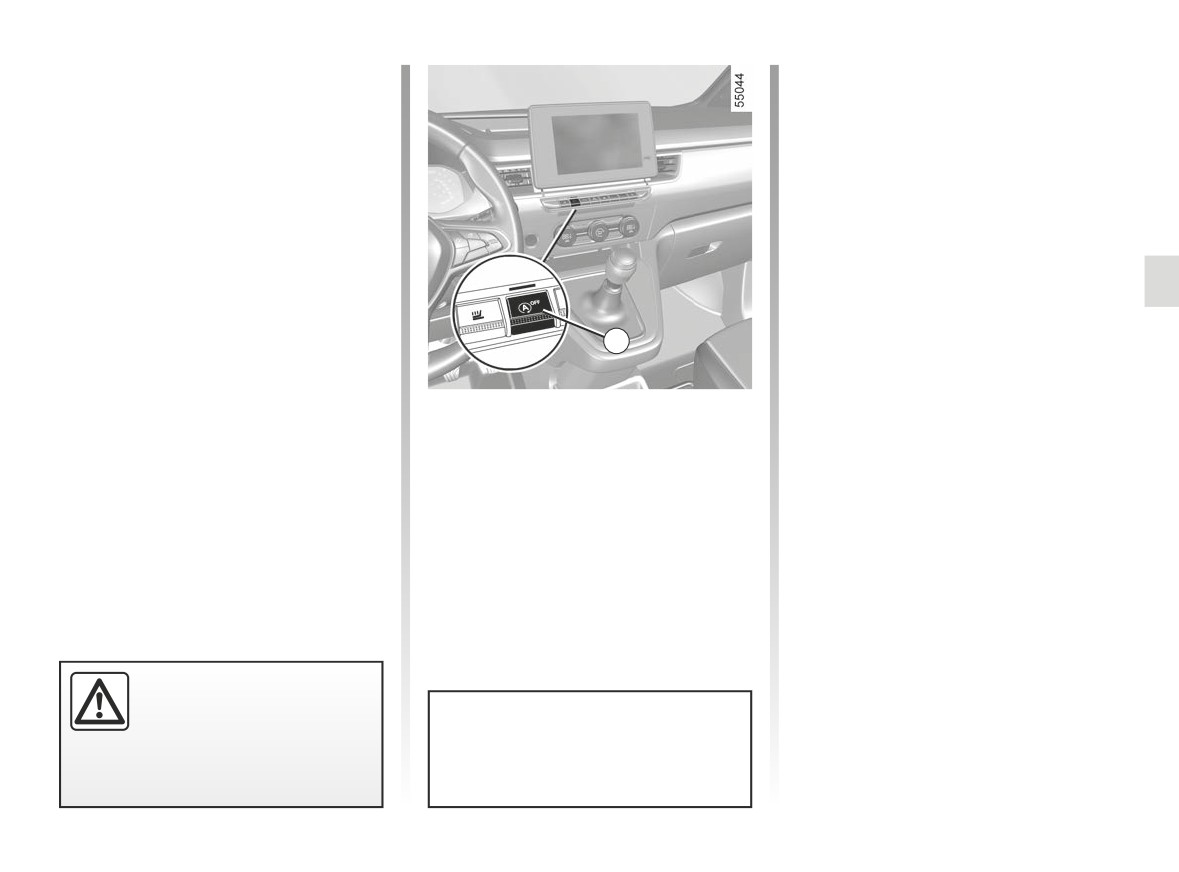
Press 1 to deactivate the function. The
can restart on its own in order to guar-
message “Stop & Start deactivated” ap-
antee your safety and comfort.
pears on the instrument panel and the
This can occur especially when:
ignition warning light 1 appears.
- the outdoor temperature is too low or
Pressing again will reactivate the
too high;
system. The message “Stop & Start
- the “Clear view” function is activated
Activated” appears on the instrument
➥ 3.9 ;
panel and the 1 switch disappears.
- the battery is not sufficiently charged;
The system is automatically reactivated
each time the vehicle is started using
- the vehicle speed is above 3 mph
1
the start button. ➥ 2.3 ➥ 2.5.
(5 km/h) (downhill slope, etc.);
- repeated pressing on the brake
Operating faults
pedal or braking system require-
ment;
When the “Check Stop & Start” mes-
The
warning light may appear
- ...
along with a message on the instru-
sage appears on the instrument panel
ment panel:
and the 1 switch is on, this indicates
The
warning light is displayed on
- “Optimising Battery Recharge” to pri-
that the system is deactivated.
the instrument panel to notify you of au-
oritise battery charging;
Please consult an authorised dealer.
tomatic engine restarting.
- “Prioritising Thermal Comfort” to pri-
oritise air conditioning;
- “Prioritising running engine” to priori-
tise engine operations.
The engine MUST be
stopped (not put in standby)
before leaving the vehicle.
Special note: engine on standby,
➥ 2.3 ➥ 2.5.
press switch 1 to automatically re-
start the engine.
2.11
SPECIAL FEATURES OF PETROL VERSIONS (1/2)
The following operating conditions
If you notice any of the above operat-
should be avoided:
ing faults, have the necessary repairs
carried out as soon as possible by an
- driving for long periods when the low
approved dealer.
fuel level warning light is lit;
These faults may be avoided by regu-
- using leaded petrol;
larly taking your vehicle to an approved
- using lubricant or fuel additives
Dealer at the intervals specified in the
which are not approved.
Maintenance Document.
Or operating faults such as:
- faulty ignition, running out of fuel or
Starting problems
disconnected spark plugs resulting
To avoid damaging the catalytic con-
in the engine misfiring or cutting out
verter or the starter, and to prevent pre-
when driving;
mature wearing of the battery, do not
- loss of power,
keep trying to start the engine (using
the start button, or by pushing or towing
may cause the catalytic converter to
the vehicle) without having identified
overheat, reducing its efficiency which
and corrected the starting fault.
may irreparably damage it and cause
heat damage to the vehicle.
If the fault cannot be identified, do not
keep trying to start the engine, but con-
tact an approved Dealer.
Do not park the vehicle or
run the engine in locations
where combustible sub-
stances or materials such as
grass or leaves can come into con-
tact with the hot exhaust system.
2.12
SPECIAL FEATURES OF PETROL VERSIONS (2/2)
Particle filter
Note: The indicator light may go out
If the filter becomes saturated, the
after 20 minutes when the driving con-
warning light and, depending
The particle filter is used in the treat-
ditions needed to clean the filter are not
ment of exhaust gases from petrol en-
completely met.
on the vehicle, the
warning light
gines.
will appear on the instrument panel, ac-
Depending on the vehicle, the warning
If the vehicle is stopped before the
companied by the message “Check in-
warning light disappears you will have
jection”. In this case, please consult an
light
displayed on the instrument
to restart the process from the begin-
Authorised Dealer.
panel indicates that the filter is becom-
ning.
ing clogged and requires cleaning. To
If the
®
warning light and, de-
clean it, when the
warning light
pending on the vehicle, the
appears, and as traffic conditions and
warning light appears, accompanied by
speed limits allow, drive at between
the “WARNING: Engine Failure Risk”
about 31 mph (50 km/h) and 68 mph
message, stop the vehicle, switch off
(110 km/h) until the light goes out.
the engine and contact an Approved
Dealer.
After between approximately 5 and
20 minutes, the warning light should go
out.
Warning light
®
re-
quires you to stop immedi-
ately, for your own safety,
as soon as traffic conditions
allow. Switch off the engine and do
not restart it. Contact an approved
Dealer.
2.13