Renault Kangoo (2022 year). Manual in english - page 7
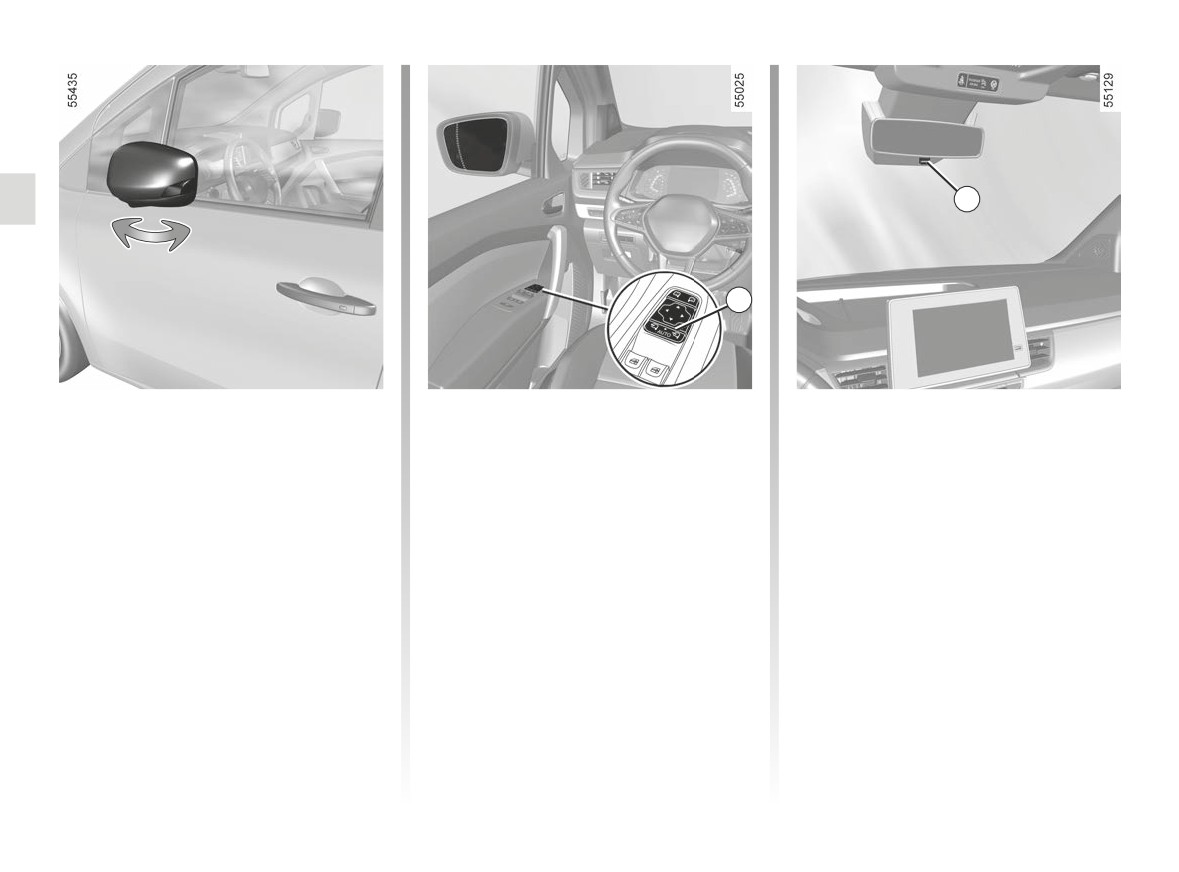
REAR VIEW MIRRORS (2/4)
4
3
Manually folding door mirrors
Special case
Interior rear view mirror
When the rear view mirror has been
Its position can be adjusted.
To fold down the door mirror, pull it to-
manually deployed or folded back, it is
wards the door window until you hear a
possible to reset it to a usage position.
Rear view mirror with lever 4
mechanical click.
When driving at night, to avoid being
To do this, press the 3 switch. A me-
To return the door mirror to its operating
dazzled by the headlights of the vehicle
chanical tapping noise can be heard
position, proceed in the reverse order.
behind, depress the little lever located
from the door mirror.
Ensure that it is correctly locked in po-
behind rear view mirror 4.
sition.
If a tapping noise cannot be heard,
press once again on 3 switch until the
Rear view mirror without lever 4
tapping noise can be heard from the
The rear view mirror automatically dark-
door mirror.
ens when you are being followed by a
vehicle which illuminates you or in very
bright lighting.
1.126
REAR VIEW MIRRORS (3/4)
5
F
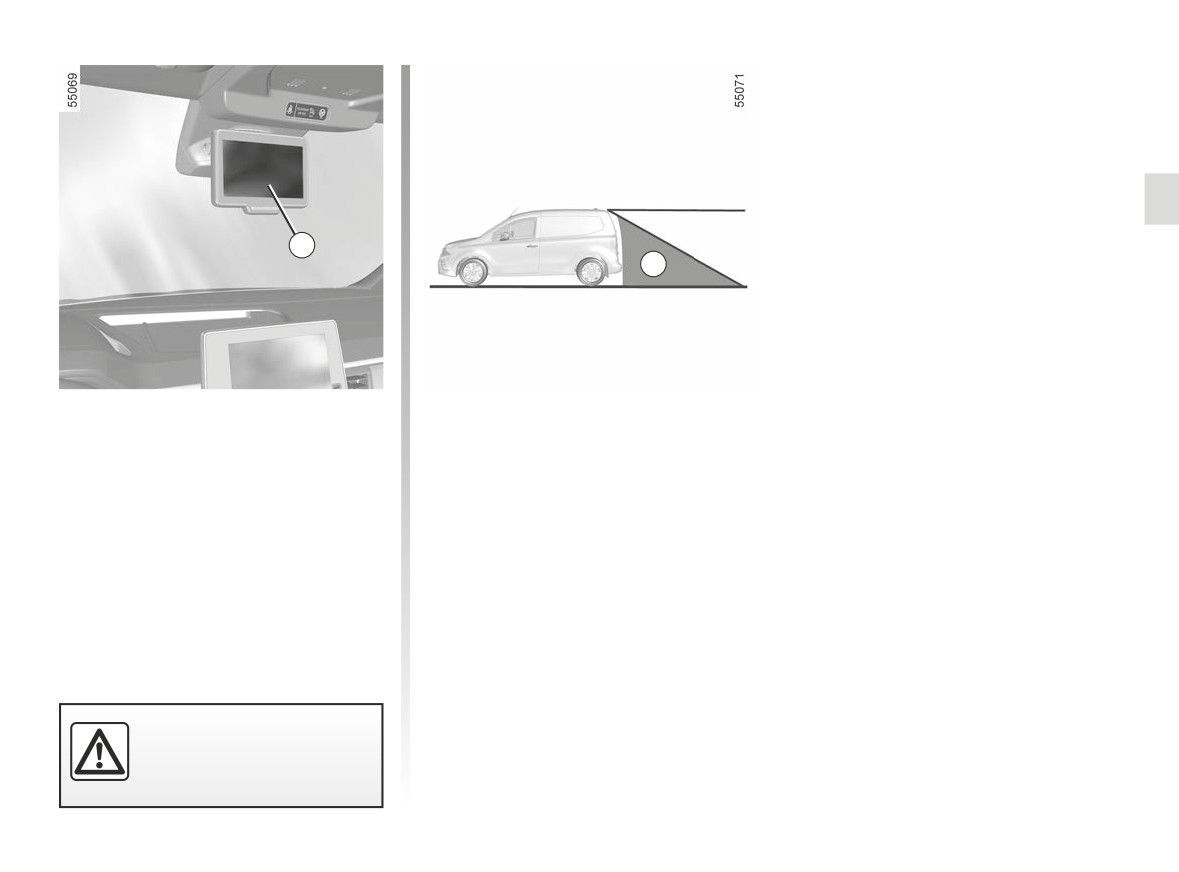
Camera rear view system
The camera’s field of vision does not
cover the entire area behind the vehi-
screen
cle, particularly the blind spot area F.
The screen 5 can be positioned left
to right and upwards and downwards
➥ 1.129.
For safety reasons, carry
out any adjustments when
the vehicle is not being
driven.
1.127
REAR VIEW MIRRORS (4/4)
G
H
H
7
6
I
G
I
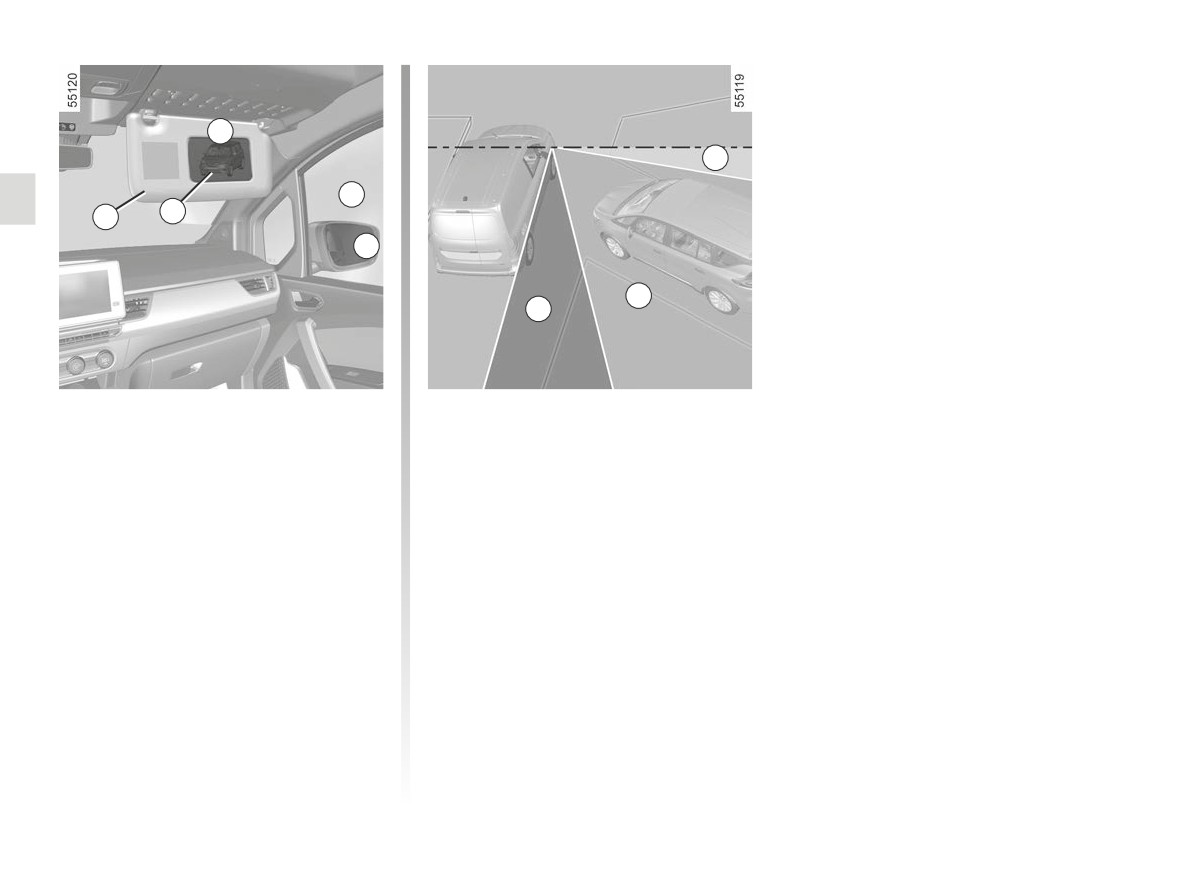
Wide angle rear view mirror 7
The various zones seen by the driver
(depending on the vehicle)
are:
- G in the wide-angle rear view mirror;
Lower the sun visor 6 to access the
- H via the front passenger window;
special mirror to increase side vision
- I in the exterior rear view mirror.
when manoeuvring.
1.128
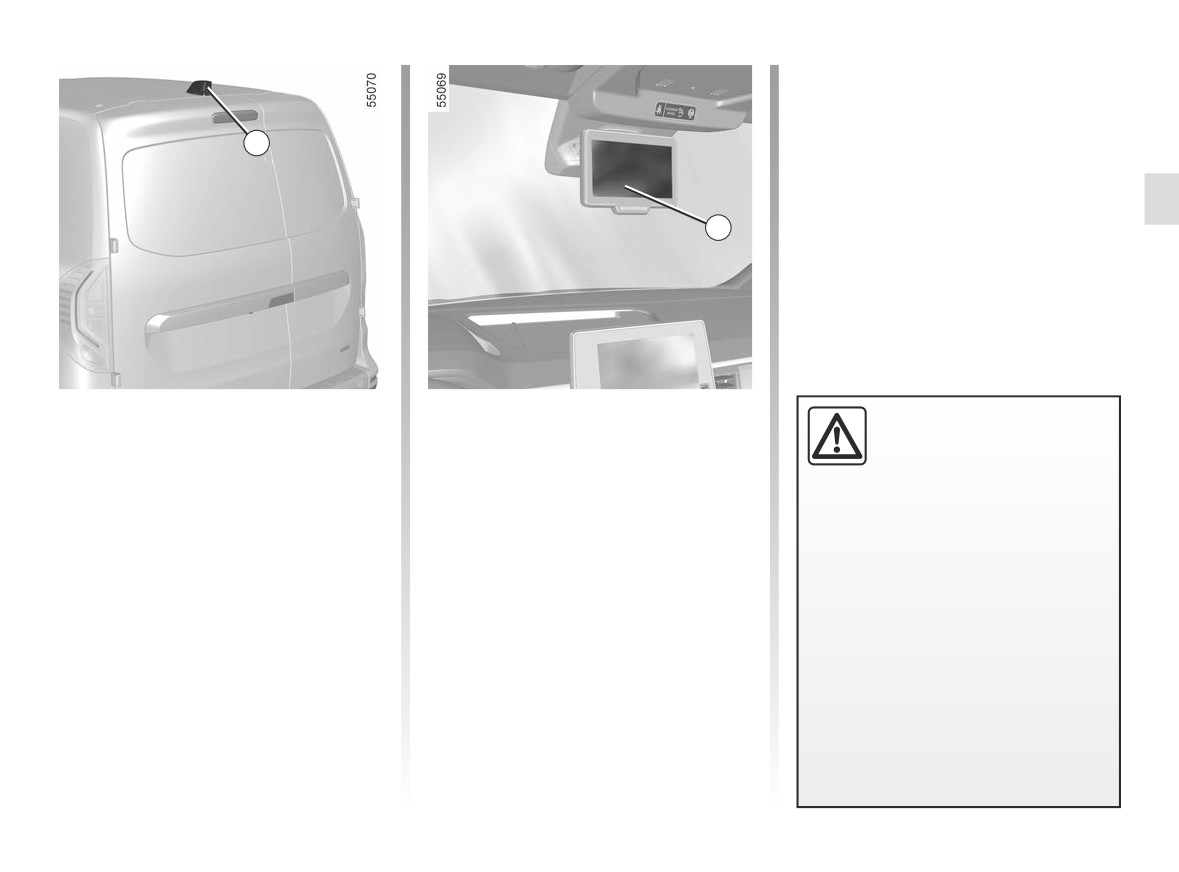
CAMERA REAR VIEW (1/4)
1
2
When the ignition is switched on, the 2
De-icing the rear camera
This function is an additional
screen on the roof centre console dis-
In cold weather, this function enables
aid. It cannot, therefore,
plays the view behind the vehicle that is
rapid electrical de-icing of the camera.
under any circumstances
transmitted by the camera 1.
replace the vigilance or the
De-icing is carried out simultaneously
Note: the screen 2 can be positioned
responsibility of the driver.
with electrical rear view mirror de-icing
left to right or top to bottom.
➥ 3.5 ➥ 3.9.
The driver should always be ready
for sudden incidents while driv-
Make sure that the 1 camera is not ob-
ing: always ensure that there are
scured (by dirt, mud, snow, condensa-
no small, narrow moving obstacles
tion etc.).
(such as a child, animal, pushchair,
bicycle, stone, post, etc.) in the blind
spot when manoeuvring.
1.129
CAMERA REAR VIEW (2/4)
3
2
A
Operation
Switching off the function
Special features related to
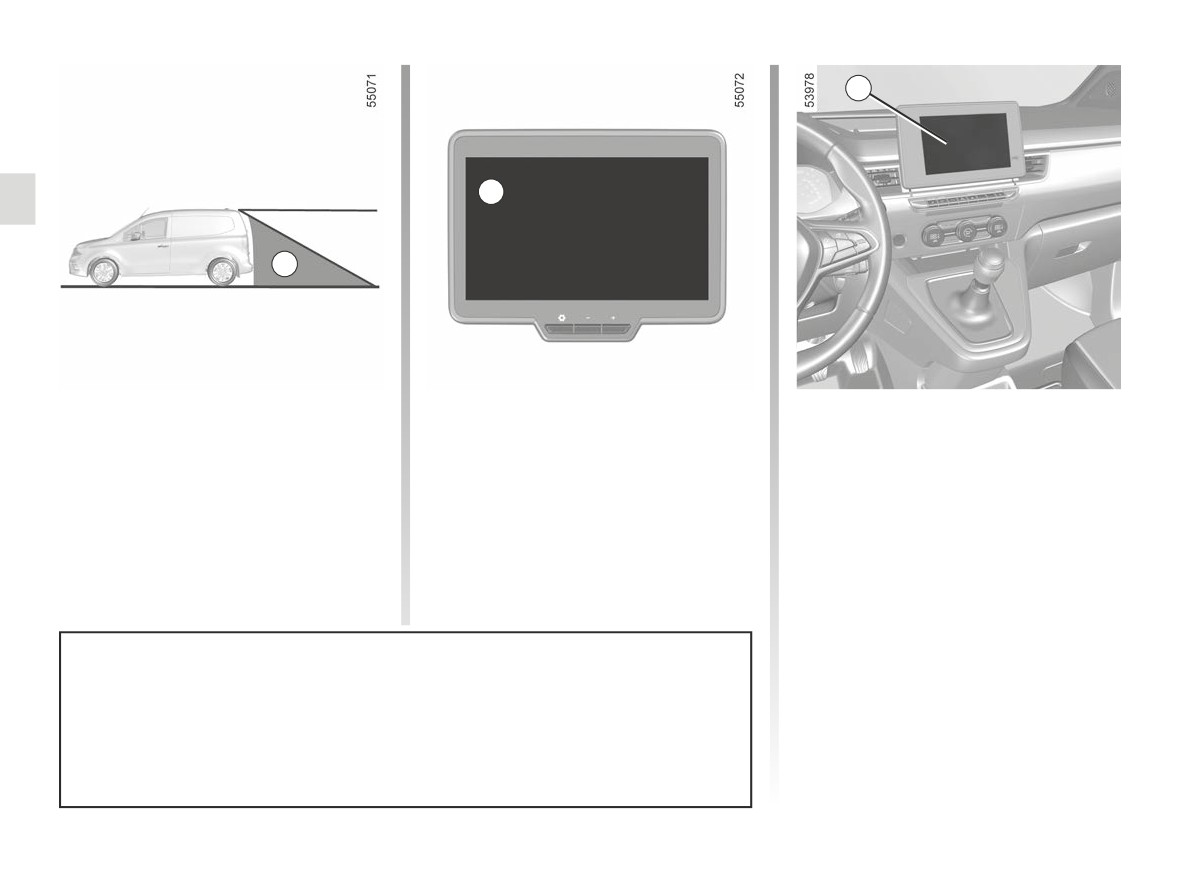
The camera’s field of vision does not
The display switches of:
the reverse gear
cover the entire area behind the vehi-
- at least two minutes after the ignition
When the reverse gear is engaged, the
cle, particularly the blind spot area A.
is switched off;
camera located on the rear-end door
- immediately after locking the vehicle.
displays the area to the rear of the ve-
On vehicles equipped with the Stop
and Start function, the display remains
hicle. ➥ 2.142.
active when the engine is in standby.
Vehicles fitted with a multimedia
➥ 2.8.
screen 3
When the vehicle is reversing, consider
the images transmitted by the rear view
camera (multimedia screen) in addition
to the information available through the
Objects which appear on the edge of screen 2 may be deformed.
rear view mirror as there remains a rear
In very bright light (snow, vehicle in sunshine, etc.), the camera view may be par-
view blind spot A ➥ 2.142.
tially disturbed.
In low brightness or poor weather, the image on the screen may be distorted.
1.130
CAMERA REAR VIEW (3/4)
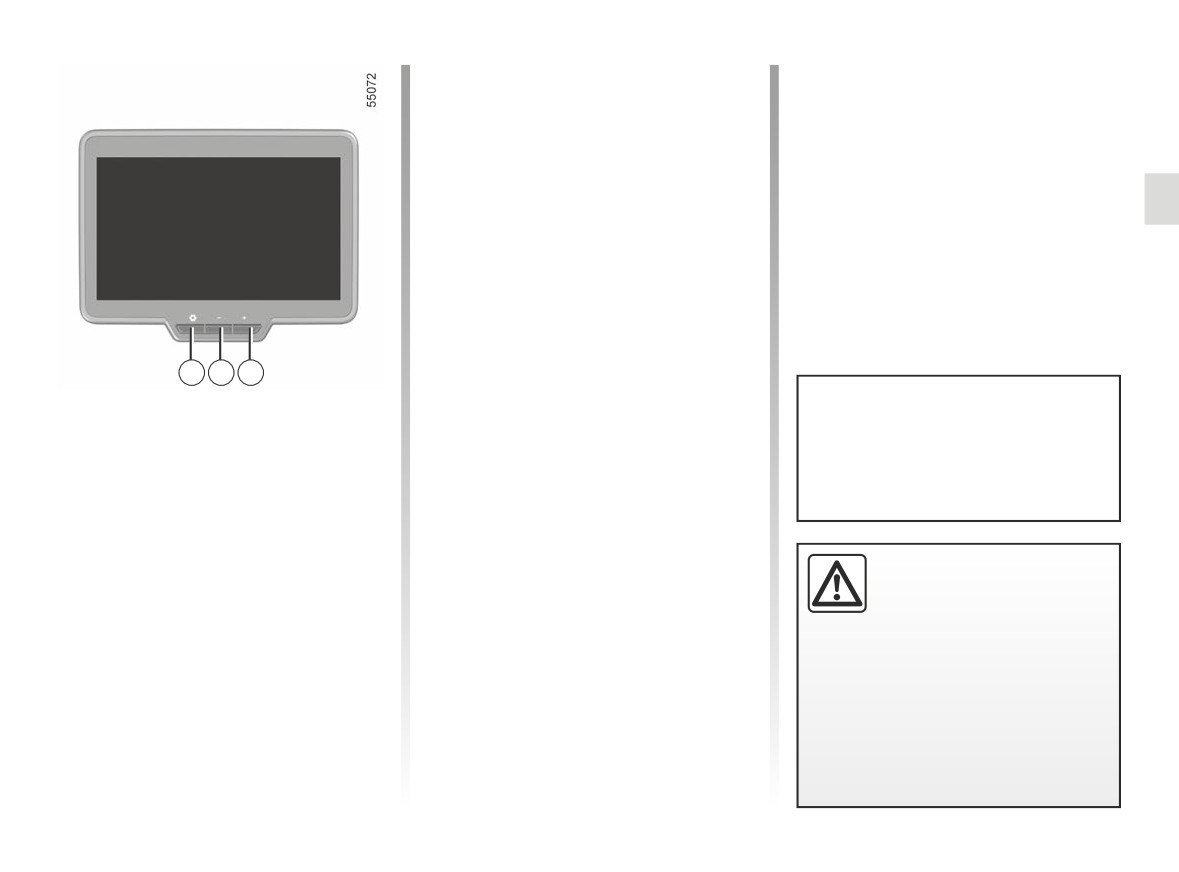
Selecting the settings:
a) adjusting the brightness;
b) adjusting the vertical viewing angle;
c) adjusting the horizontal viewing
angle;
d) activating/deactivating automatic ad-
justment of the vertical angle accord-
ing to the vehicle speed;
e) depending on the vehicle, activating/
deactivating the reversing camera
display;
f) reset, to reset the default settings.
4
5
6
Exit the settings menu:
Adjusting the display and the
- automatically after approximately
camera
five seconds and without pressing
Each time the vehicle is started,
any buttons;
the function returns to the settings
Press the 4 button once to access the
saved at the last engine stop.
settings menu.
or
Repeatedly press the 4 button to scroll
- by pressing the 5 “-” or 6 “+” buttons
through the setting options until you
on the “X” tab.
reach the desired setting option.
Note: the vertical angle will not be auto-
For safety reasons, carry
Use the 5 “-” and 6 “+” buttons to adjust
matically adjusted according to the ve-
out any adjustments
or activate/deactivate the desired set-
hicle speed if the vertical viewing angle
while the vehicle is sta-
ting.
has been set to the maximum.
tionary.
Adjust the field of vision for the
system and the door mirrors before
driving the vehicle (especially after
changing the vehicle load).
1.131
CAMERA REAR VIEW (4/4)
2
7
7
B
C
C
Special feature
Operating faults
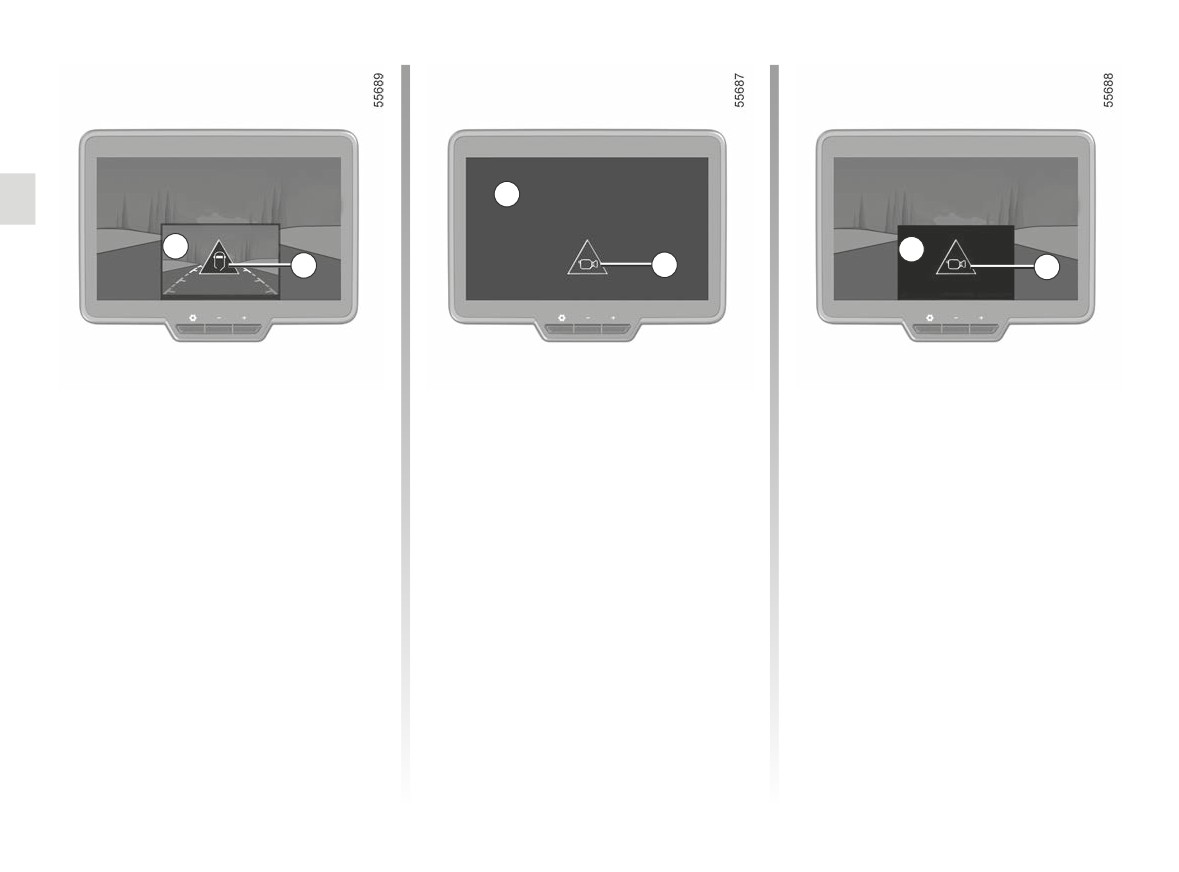
If the warning light C continues to
appear on a black background, please
When the vehicle is reversing, on vehi-
If the system detects an operating fault,
consult an approved dealer.
cles not equipped with the multimedia
the warning light C appears on a black
system, when the rear door is opened
background on the screen 2 or, de-
or incorrectly closed the warning light B
pending on the vehicle, on the display 7
appears on the display 7.
for the reversing camera. This may be
caused by a fault affecting the camera
or screen (clearness, fixed image, de-
layed communication etc.).
1.132
EXTERIOR LIGHTING AND SIGNALS (1/6)
Depending on the vehicle, the dipped
1
2
beam headlights will appear automati-
cally after several sweeps of the wind-
3
screen wiper blades.
1
Side lights
Dipped beam
š
k
headlights
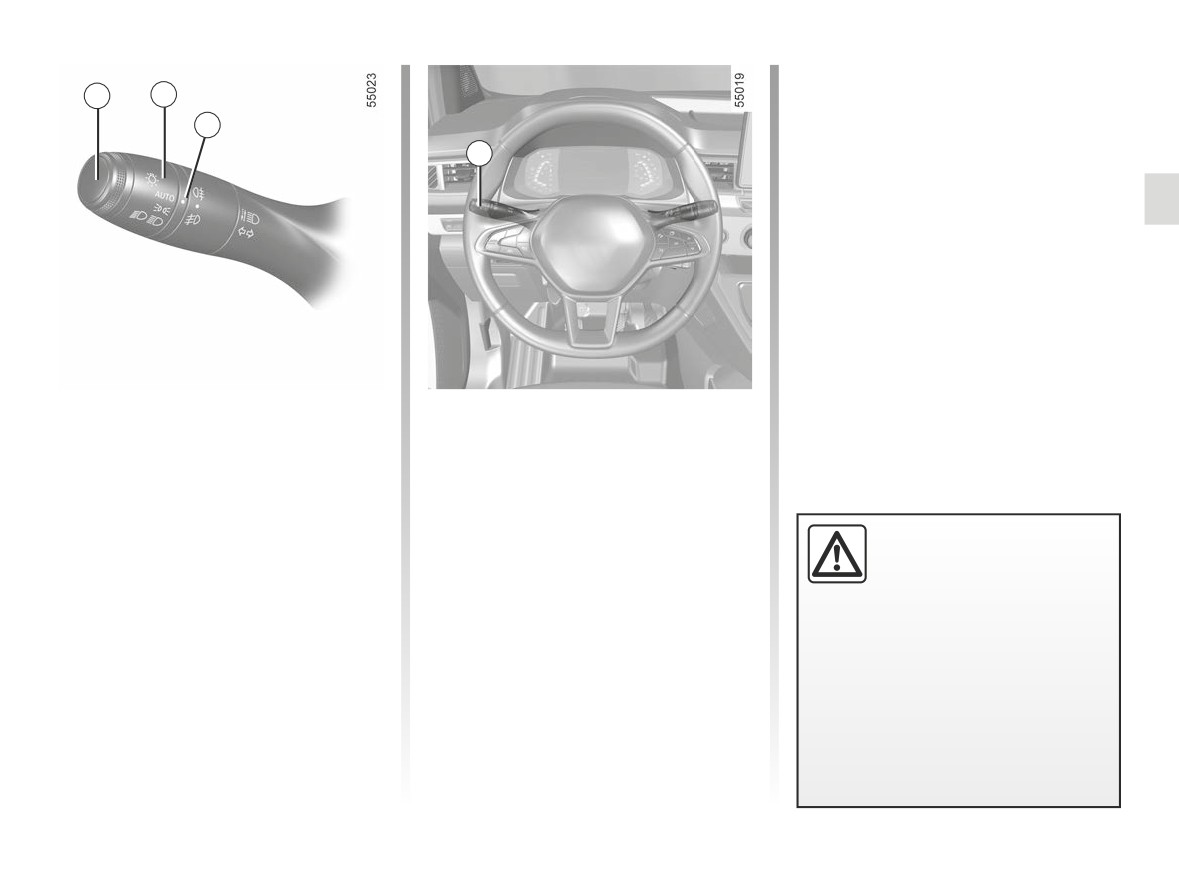
Turn ring 2 until the symbol is
Manual operation
opposite mark 3.
This indicator light on the instrument
Turn ring 2 until the symbol is opposite
panel comes on.
mark 3. This indicator light on the in-
strument panel comes on.
Before driving at night,
check that the electrical
Daytime running lights
Automatic operation
equipment is operating cor-
function
(depending on the vehicle)
rectly and adjust the head-
The daytime running lights come on
Turn ring 2 until the AUTO symbol is op-
light beams (if your vehicle is not
automatically with no action on stalk 1
posite mark 3: with the engine running,
carrying its normal load).➥ 1.139. As
when the engine is started, and they go
the dipped beam headlights switch on
a general precaution, check that
off once the engine is switched off.
or off automatically depending on the
the lights are not obscured (by dirt,
brightness of the light outside, without
mud, snow or objects being trans-
any action on stalk 1.
ported).
1.133
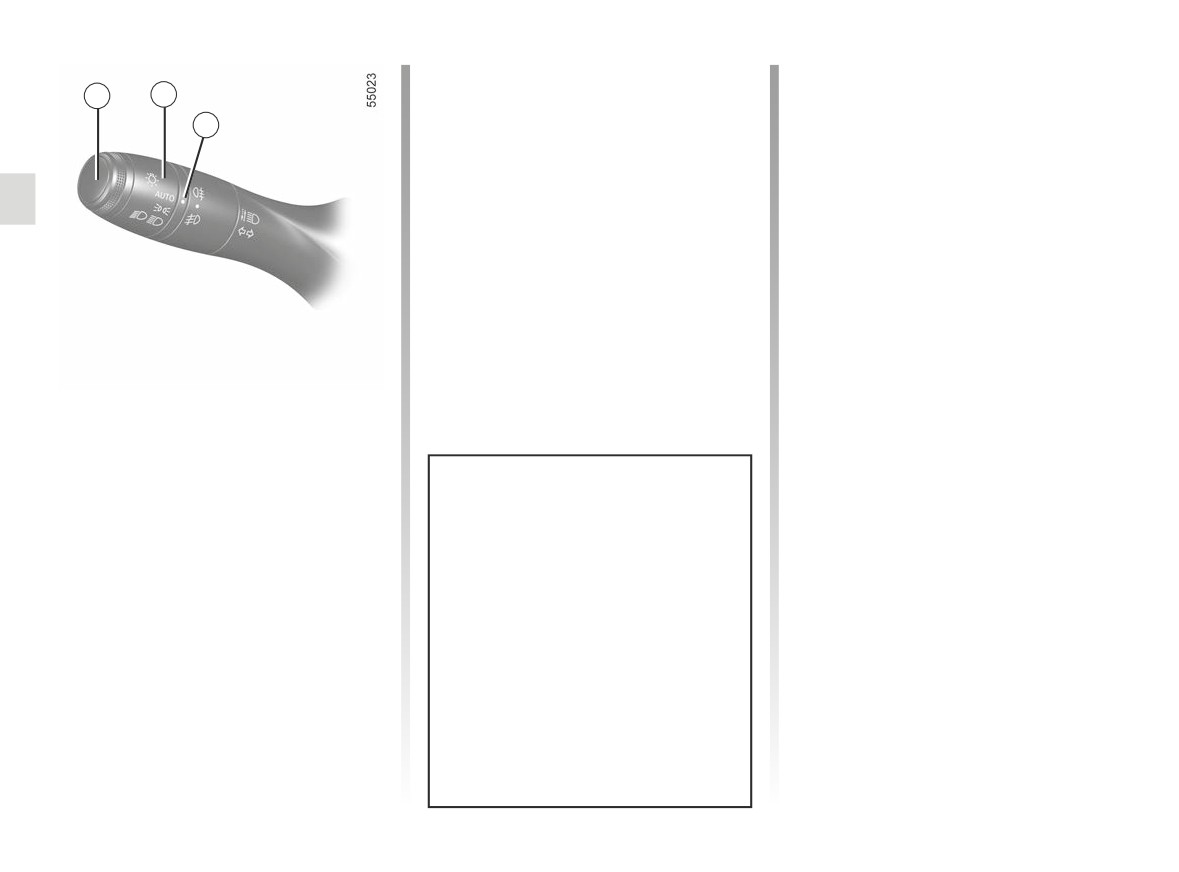
EXTERIOR LIGHTING AND SIGNALS (2/6)
During deactivation of the main beam
The main beam headlights come on au-
1
2
headlights, the dipped beam headlights
tomatically if:
return to their original position.
- exterior light is weak;
3
- no other vehicles or lighting are de-
tected;
Automatic main beam
- the vehicle speed is above approxi-
headlights
mately 25 mph (40 km/h).
Depending on the vehicle, this system
If any of the above conditions are not
switches the main beam headlights on
fulfilled, the system switches to dipped
and off automatically. It uses a camera
beam headlights.
located behind the interior rear-view
Note: make sure the windscreen is not
mirror to detect vehicles that are being
obscured (dirt, mud, snow, condensa-
followed and those coming in the oppo-
tion etc.).
site direction.
To activate automatic main beam
headlights:
Main beam headlights
- turn the ring 2 until the AUTO symbol
á
With the engine running and
is opposite the mark 3;
the dipped beam headlights lit, push
- push the stalk 1.
stalk 1. This indicator light on the instru-
ment panel comes on.
Warning light
comes on the in-
The system may encounter difficul-
To return to the dipped headlight posi-
strument panel.
ties under certain conditions, inclu-
tion, pull stalk 1 towards you again.
ding:
- extreme weather conditions (rain,
“Raise lights during driving”
snow, fog, etc.);
function
- obstruction in front of the wind-
(depending on the vehicle)
screen or camera;
When the main beam headlights are
- when a following or oncoming ve-
activated, the “Raise lights during driv-
hicle has weak or hidden lighting;
ing” function improves driver visibil-
- incorrect settings for the front
ity by automatically raising the dipped
headlights;
beam headlight and the main beam
- reflective systems;
headlights.
- ...
1.134
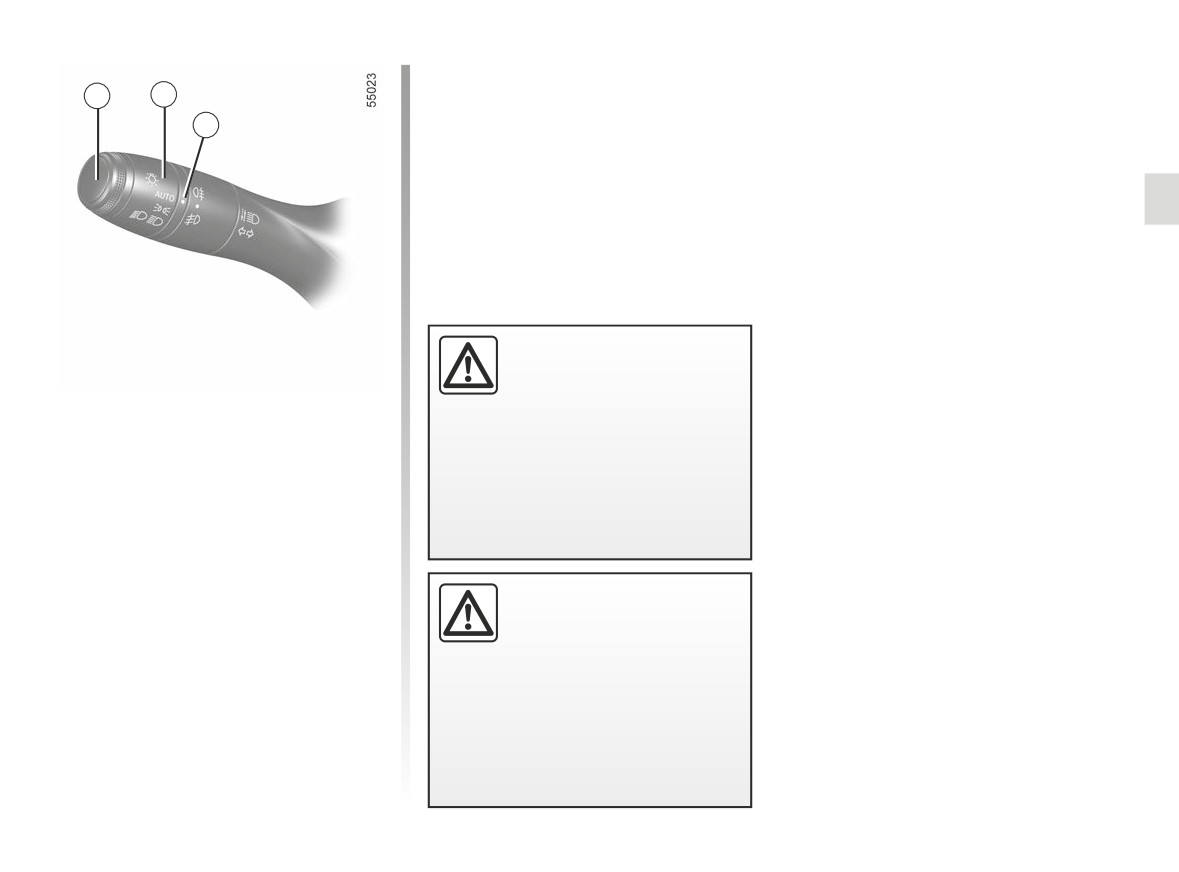
EXTERIOR LIGHTING AND SIGNALS (3/6)
Operating faults
1
2
When the message “Check Automatic
3
Lighting” appears on the instrument
panel, the system is deactivated.
Consult an approved dealer.
Using the portable naviga-
tion system at night in the
windscreen area below the
Automatic main beam
camera may disturb the op-
headlights (continued)
eration of the “automatic main beam
headlights” system (risk of reflection
To deactivate automatic main beam
on the windscreen).
headlights:
- turn ring 2 to a position other than
AUTO;
or
- pull the stalk 1.
The “automatic main beam
headlights” system should
Warning light
goes out on the in-
under no circumstances be
strument panel.
used to replace driver atten-
Note: the main beam headlights will be
tion and responsibility with regard
activated upon deactivation of the au-
to vehicle lighting and adapting to
tomatic main beam headlights function.
light, visibility and traffic conditions.
1.135
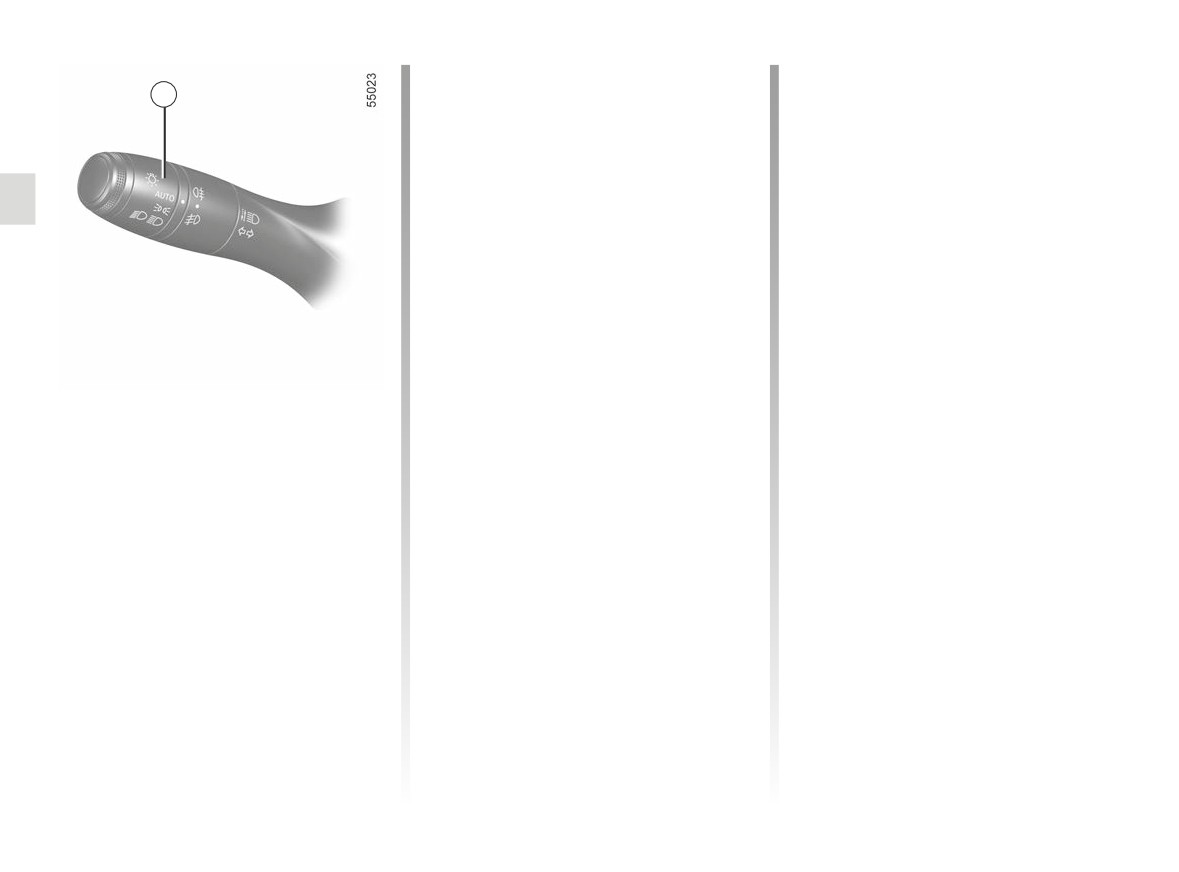
EXTERIOR LIGHTING AND SIGNALS (4/6)
Welcome and goodbye
Lights-on reminder buzzer
2
function
If the lights are on after the engine is
(depending on the vehicle)
switched off, a warning beep sounds
Once the function is activated, the day-
when the driver’s door is opened to
time running lights and the rear side
warn you that the lights are still on.
lights will light up automatically upon
detection of the card or when the vehi-
Operating faults
cle is unlocked.
When the message “WARNING: Check
They switch off automatically:
Lighting” with warning light
– approximately one minute after light-
ing up;
is displayed and warning light k
flashes on the instrument panel, this in-
- when starting the engine based on
dicates that there is a lighting fault.
the position of the lighting stalk;
Consult an authorised dealer.
or
Switching off the lights
- upon locking the vehicle.
The lights will go out automatically
when the engine is switched off, the
Activating/deactivating the function
driver’s door is opened or the vehicle
For activation or deactivation of the ex-
is locked. In this case, the next time
ternal reception, refer to the multimedia
the engine is started the lights will be
manual.
switched back on according to the posi-
tion of the ring 2.
Select “ON” or “OFF”.
Note: if the fog lights are lit, the lights
are not switched off automatically.
1.136
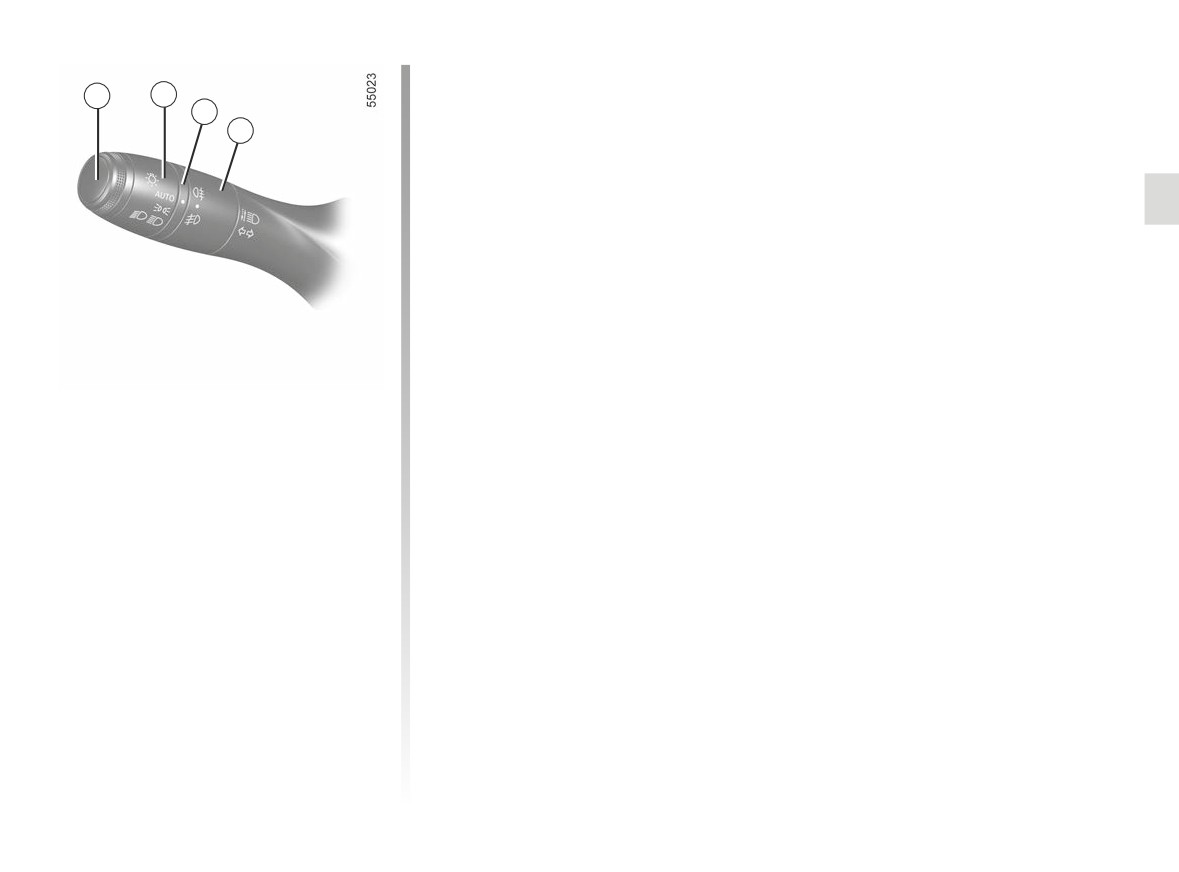
EXTERIOR LIGHTING AND SIGNALS (5/6)
With the engine lights switched off,
1
2
the 2 ring in AUTO, pull the lever 1 to-
3
wards you: the side lights and dipped
4
beam headlights will switch on for ap-
proximately 30 seconds along with the
š
and k
warning lights on the
instrument panel.
To increase this duration, you may pull
the stalk up to four times (total time re-
stricted to approximately two minutes).
The message “Follow-me Home for
_ _ _” along with the time the lights will
be on for is displayed on the instrument
panel to confirm this action. You can
then lock your vehicle.
“See-me-home lighting”
To switch off the lights before they go
function
out automatically, turn ring 2 to any po-
sition, then return it to position AUTO.
This function enables you to briefly
switch on the side lights and dipped
beam headlights (e.g. to provide light
when opening a gate).
1.137
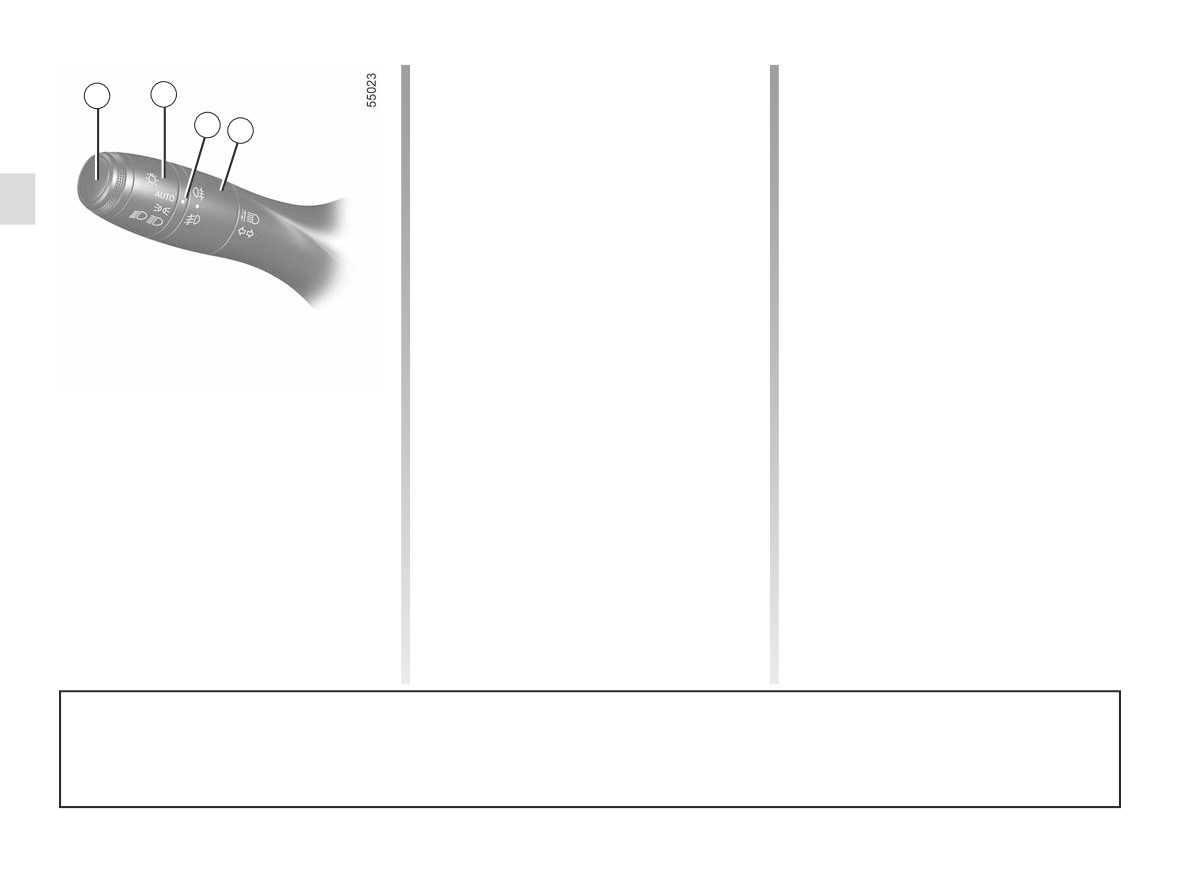
EXTERIOR LIGHTING AND SIGNALS (6/6)
Rear fog lights
Cornering lights
1
2
(depending on vehicle)
Turn centre ring 4 on the stalk
3
until the symbol faces mark 3, then re-
When driving in forward gear, with
4
lease it.
the vehicle speed below approxi-
mately 25 mph (40 km/h), whenever
Operation of the fog lights depends on
the dipped beam headlights are on:
the exterior lighting selected, and an in-
under certain conditions (the steering
dicator light will light up on the instru-
wheel at an angle, the indicator lights
ment panel.
on etc.), when turning a corner one of
Do not forget to switch off the fog lights
the front fog lights will switch on to light
when they are no longer needed, to
the inside of the bend.
avoid inconveniencing other road
When reverse gear is engaged and
users.
the dipped beam headlights are on the
two front fog lights illuminate automati-
Switching off the lights
cally.
Front fog lights
Turn the centre ring 4again until the 3
Note: when shifting from reverse gear
g
(depending on the vehicle)
symbol is opposite the symbol for the
into forward gear (for example during a
Turn
centre ring
4 on the
fog lights. The corresponding indicator
parking manoeuvre), the two fog lights
stalk 1 until the symbol faces mark 3,
light on the instrument panel goes out.
are activated until the vehicle exceeds
then release it.
approximately 6 mph (10 km/h).
The rear fog lights switch off when the
Operation of the fog lights depends on
exterior lights are switched off.
the exterior lighting position selected,
and an indicator light will light up on the
instrument panel.
When driving in fog or snow, or when transporting objects which are higher than the roof, the headlights do not come on au-
tomatically.
Switching on the fog lights remains the responsibility of the driver: the indicator lights on the instrument panel inform you
whether the fog lights are lit (indicator light on) or not (indicator light not on).
1.138
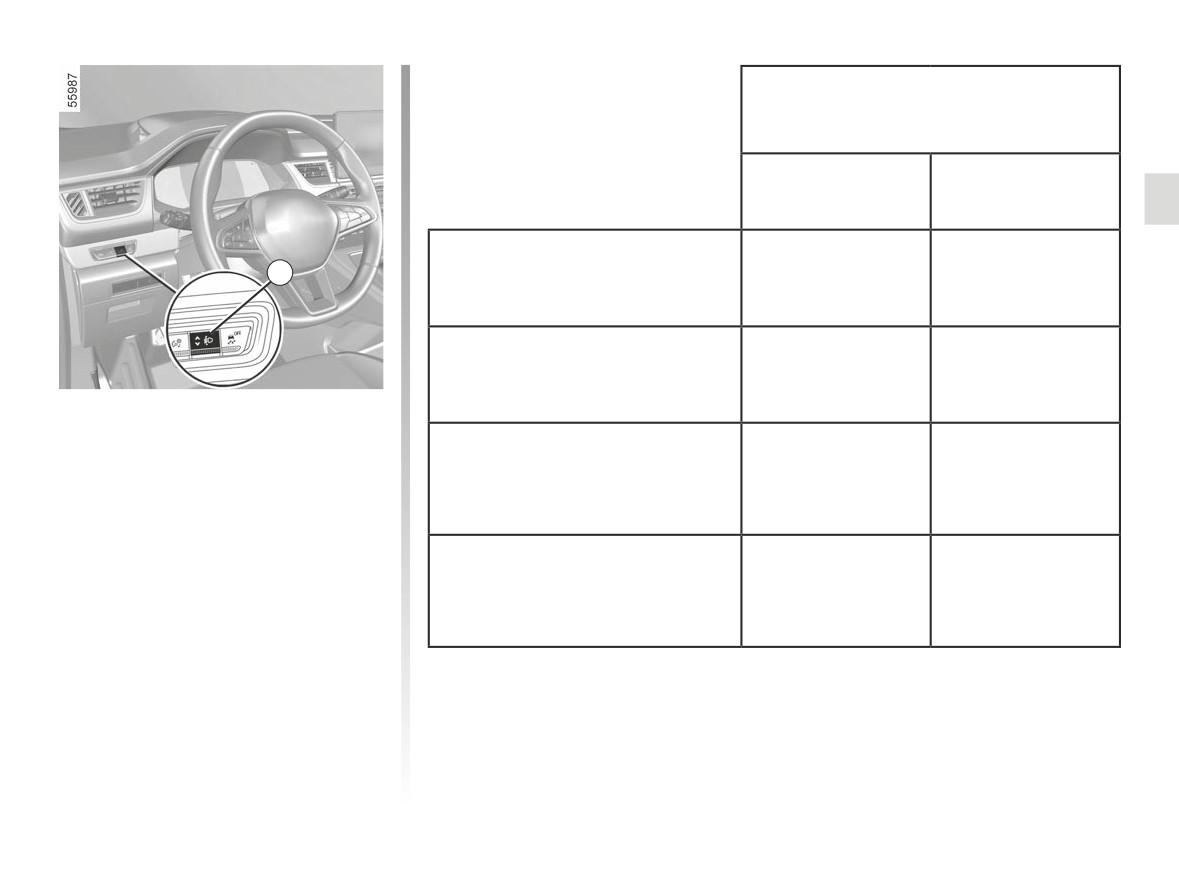
HEADLIGHT BEAM ADJUSTMENT (1/2)
Examples of positions for adjusting
control A according to the load
Van version
Estate versions
Driver alone or with front
A
0
0
passenger
All seats occupied
-
1
Switch A is used to adjust the height of
the headlight beams according to the
load.
Driver with passengers and
luggage (or load) reaching the
With the dipped beam headlights lit,
-
2
maximum permissible all-up
press or lift switch A as many times as
weight
is necessary to select the required po-
sition on the instrument panel.
Driver without passengers and
Note: depending on the vehicle, when
luggage (or load) reaching the
the engine is started, the position se-
4
3
maximum permissible all-up
lected is displayed on the instrument
weight
panel for approximately 30 seconds
and for 5 seconds each time switch A
is pressed.
The table below gives some examples. In all cases, adjust control A according to
the vehicle load so that the road can be seen and other drivers are not dazzled.
1.139
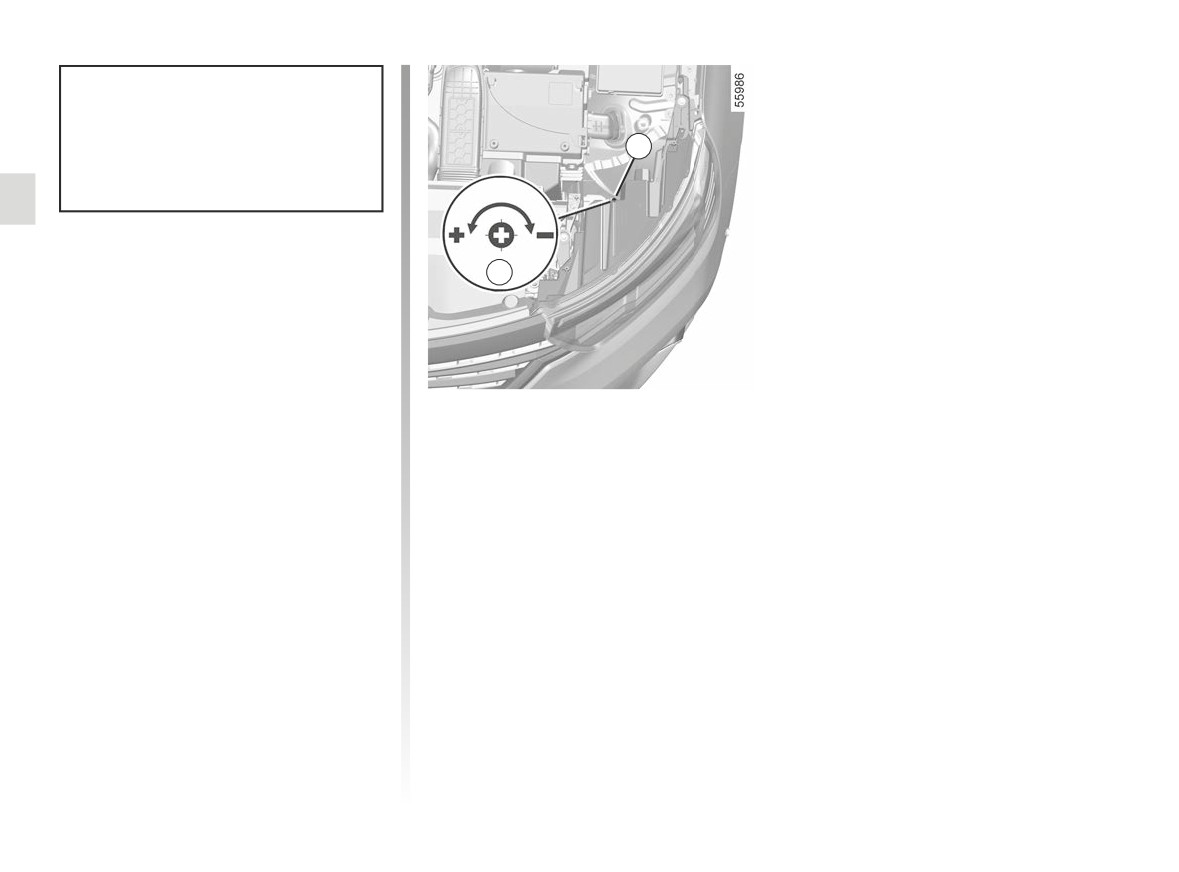
HEADLIGHT BEAM ADJUSTMENT (2/2)
When driving on the left in a left-
hand drive vehicle (or vice versa),
you must adjust your lights tempo-
1
rarily during your stay.
B
Temporary adjustment
Open the bonnet and identify the mark-
ing B next to one of the front headlight
projectors.
Operating principle
Using a screwdriver or similar, turn the
bolt 1 a half turn towards the - symbol to
lower the beams.
Return to the original position once
your trip is over: turn the bolt 1 by a half
turn towards the + symbol to raise the
beams.
1.140
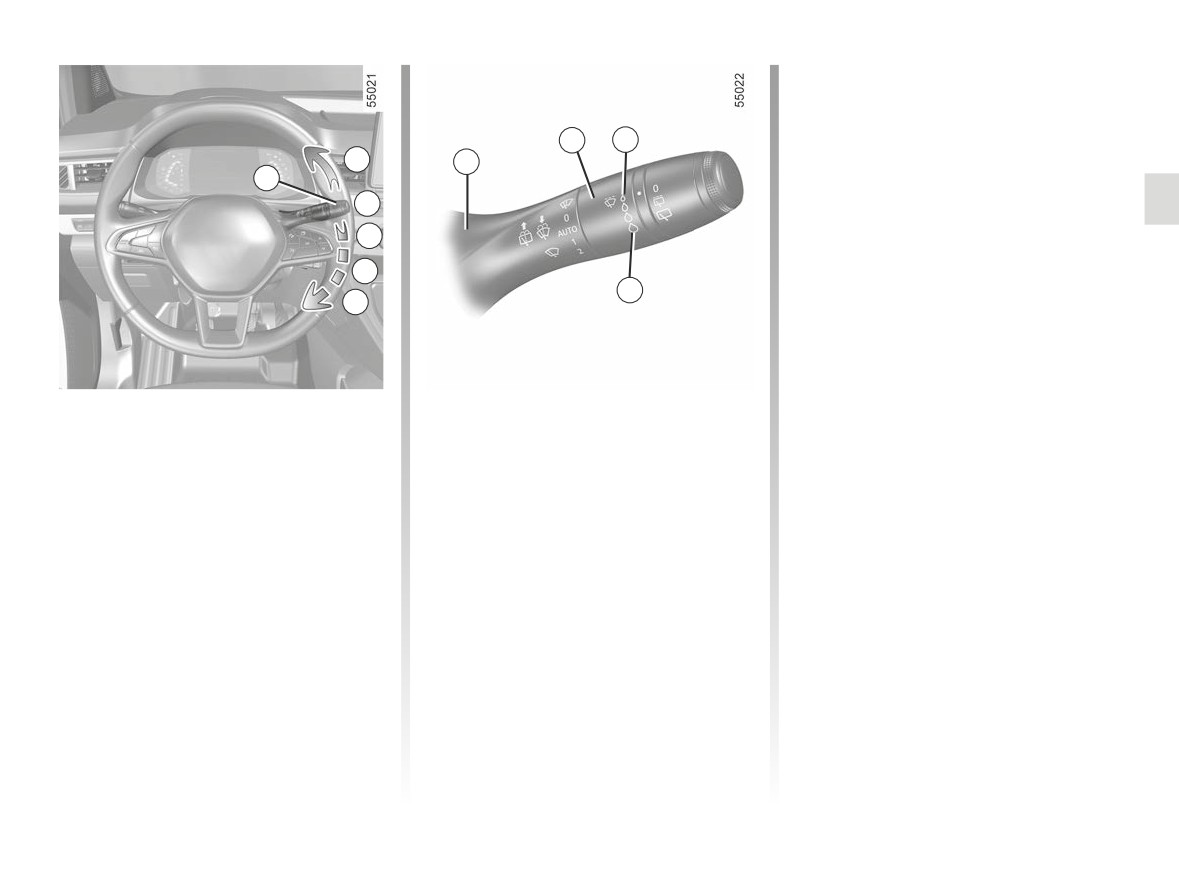
WINDSCREEN WASH, WIPE (1/4)
When activating automatic wiping or
when increasing sensitivity, one sweep
of the blades is performed.
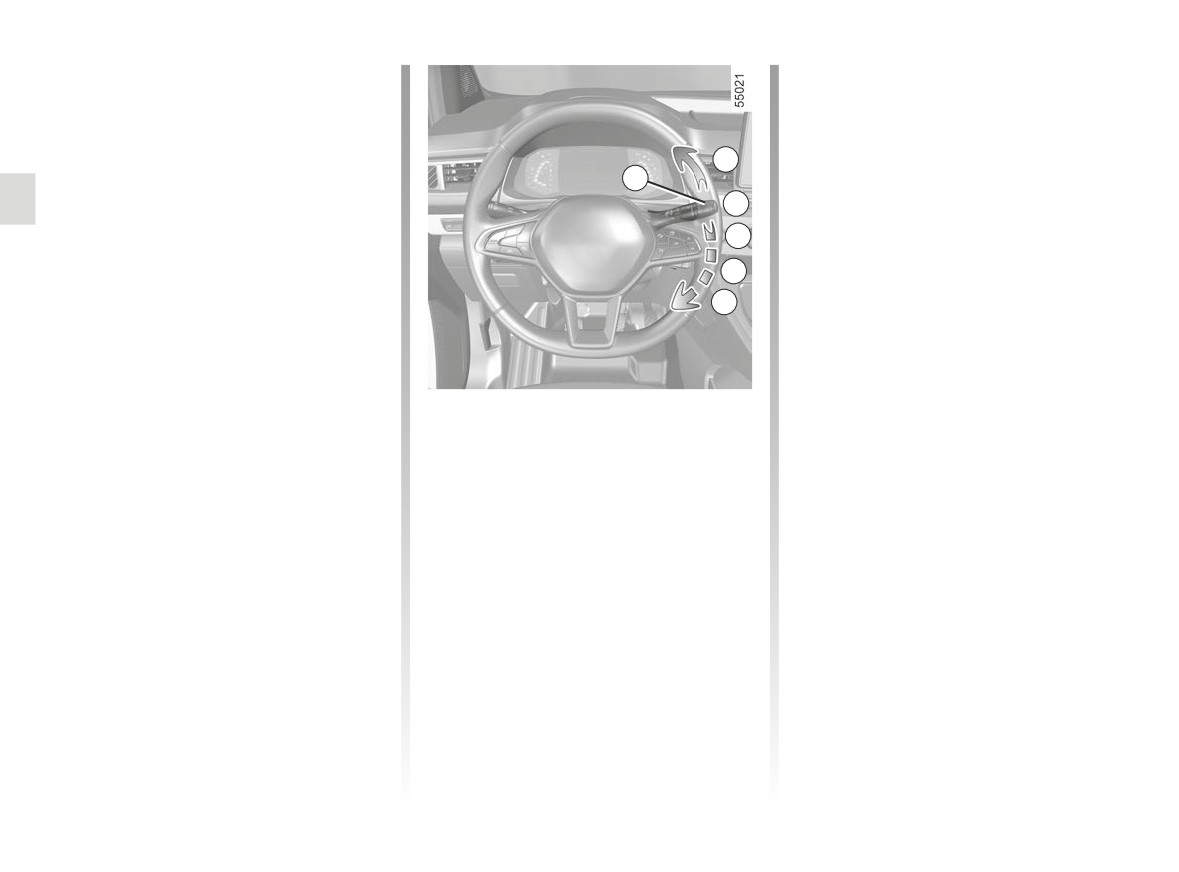
2
F
Note:
A
1
1
- the rain sensor is only intended as a
B
driving aid. In the event of reduced
visibility, the driver should manually
C
activate the wipers. In foggy weather
or during snowfalls, wiping is not au-
D
tomatically triggered and remains
G
E
under the driver’s control;
- in the event of temperatures below
zero, automatic wiping is not acti-
vated when the vehicle is started. It
is automatically activated as soon as
Your vehicle is fitted with
C
automatic wiper function
the vehicle exceeds a certain speed
When this position is selected, the
a front windscreen wiper
(approximately 5 mph (8 km/h));
system detects water on the wind-
equipped with a rain sensor
screen and triggers the wipers at a
- do not activate automatic wiping in
The rain sensor is located on the winds-
suitable wiping speed. It is possi-
dry weather;
creen, in front of the interior rear-view
ble to change the triggering thresh-
- fully de-ice the windscreen before
mirror.
old and the time sweeps by turn-
activating automatic wiping.
ing ring 2:
A single sweep
-
F : minimum sensitivity
A short push will trigger one sweep
–
G : maximum sensitivity
of the wipers.
The higher the sensitivity, the quicker
B stop
the wipers will react and the faster
the wipe.
1.141
WINDSCREEN WASH, WIPE (2/4)
Operating faults
Special note
In the event of a malfunction of the au-
When driving the vehicle, the wiping
tomatic wiping, the wiper is set to inter-
speed slows down whenever the vehi-
mittent wiping. Contact an authorised
cle stops. For example, fast wiping
dealer.
A
speed will slow to normal wiping speed.
1
As soon as the vehicle moves off,
The operation of the rain sensor can be
B
wiping will return to the speed originally
disturbed in the event of:
selected.
- damaged wiper blades; a screen
C
If stalk 1 is operated, it overrides and
of water or traces left by a blade in
D
cancels the automatic function.
the sensor’s detection zone may
increase the response time of the
E
Precautions
automatic wiper, or increase the
wiping frequency;
- In the event of ice, check whether the
- a windscreen with any chip or
blades are stuck to the windscreen
crack level with the sensor, or a
before operating the wiping mecha-
windscreen covered in dust, dirt,
nism. If you activate the wipers while
D
slow continuous wiping
insects, ice, the use of washing
the blades are stuck down with ice,
wax and water-repellent chemi-
E
fast continuous wiping
you may risk damaging both the
cals; the automatic wiping will be
blade and the wiper motor.
less sensitive, or even unrespon-
- Do not activate the wipers on a dry
sive.
screen. This will lead to premature
wear or damage to the blades.
1.142
WINDSCREEN WASH, WIPE (3/4)
Specific front wiper position
(service position)
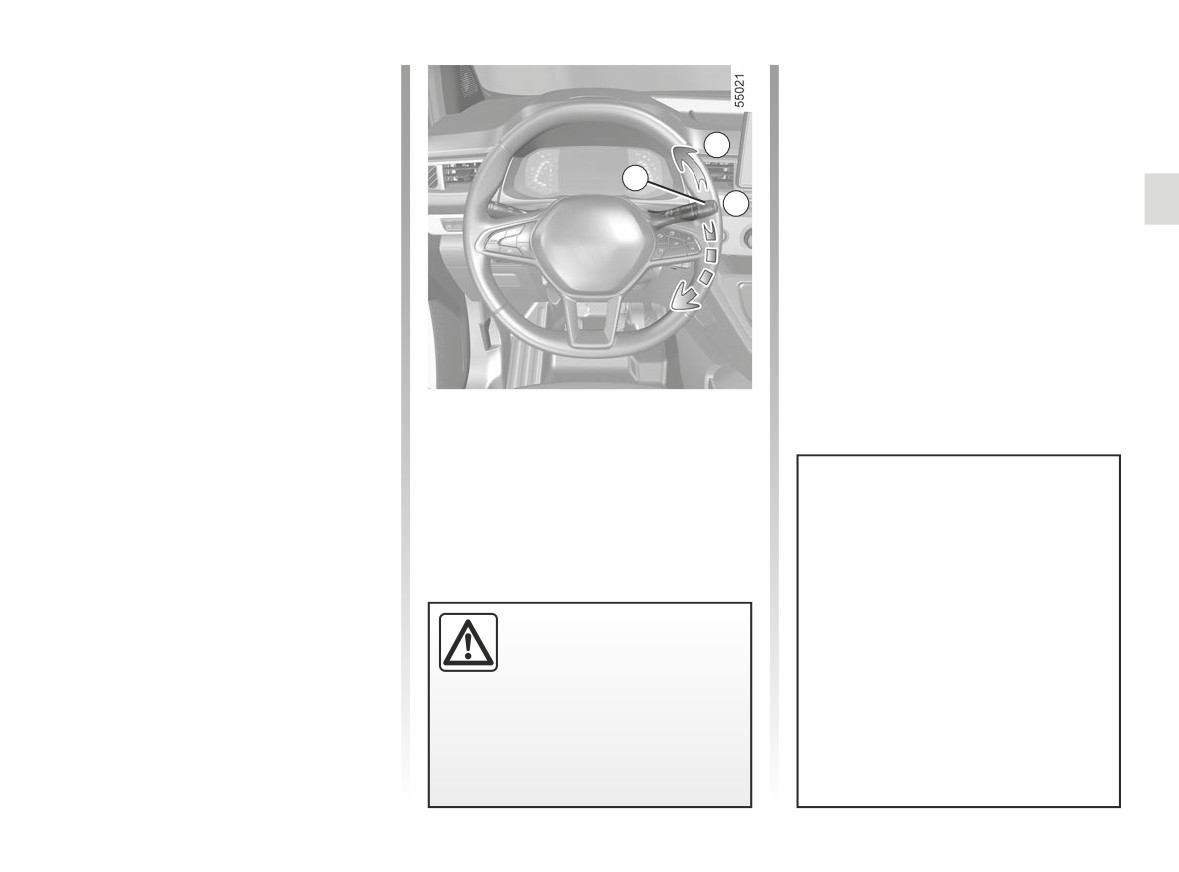
This position enables the blades to be
lifted to remove them from the winds-
A
creen.
1
This can be useful:
B
- to clean the blades;
- to release the blades from the winds-
creen in winter;
- replace the blades ➥ 5.38.
With the ignition on and the engine off,
lift the stalk 1 twice to position A (single
sweep). The blades stop slightly away
from the bonnet.
To return the blades to the lowered po-
sition, with the ignition on, ensure that
the wipers have folded down onto the
windscreen, then move the stalk 1 to
position A (single sweep).
Before switching on the ignition,
In the event of obstacles on the
place the wipers on the windscreen.
windscreen (dirt, snow, ice etc.),
Otherwise, there may a risk of damage
clean the windscreen (including the
to the bonnet or the wipers when they
central area located behind the inte-
are switched on.
rior rear view mirror) before starting
Before any action involving
the wipers (risk of motor overheat-
the windscreen
(washing
ing).
the vehicle,
de-icing,
If an object is preventing a blade
cleaning the windscreen,
from moving, it may stop functio-
etc.) return stalk
1 to position B
ning. Remove the obstacle and
(stop).
reactivate the wiper using the wiper
Risk of injury and/or damage.
stalk.
1.143
WINDSCREEN WASH, WIPE (4/4)
Note:
In temperatures below zero, the washer
liquid risks freezing to the windscreen,
thereby reducing visibility. Heat the
windscreen using the demister control
1
before cleaning.
B
Efficiency of a wiper blade
Check the condition of the wiper
blades. How long they last depends
on you:
- it must remain clean: clean the
blade and the screen regularly
with soapy water;
- do not use it when the screen is
dry;
Windscreen washer
- free it from the screen when it has
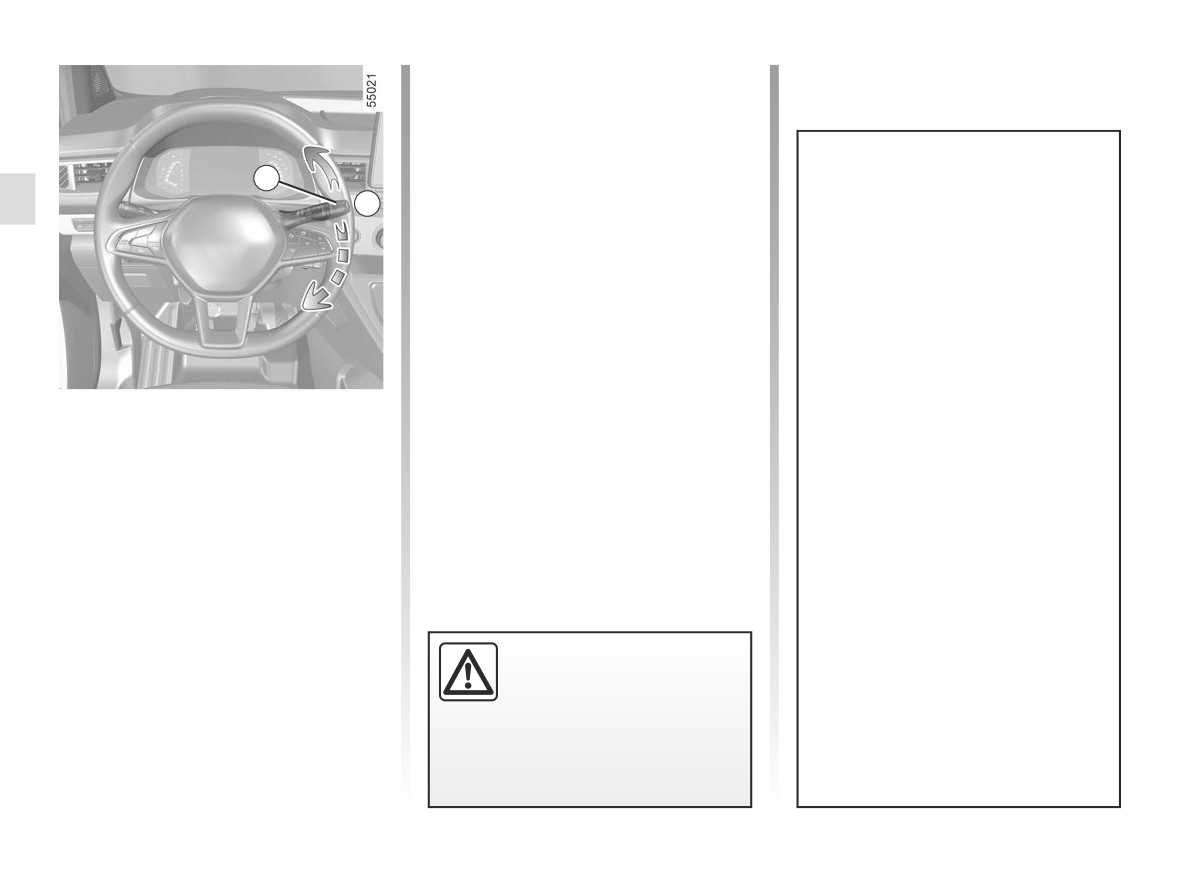
With the ignition on, pull stalk 1 then
not been used for a long time.
release.
In all cases, replace it as soon as
A longer pull will trigger, in addition to
it begins to lose efficiency: approxi-
the windscreen washer, two sweeps
mately once a year. ➥ 5.38.
of the wipers followed, a few seconds
later, by a third.
Precaution for using the
On vehicles fitted with a multimedia
wipers
screen, you can choose to activate or
disable the third sweep of the blades.
- In freezing or snowy weather
➥ 1.119
conditions, clear the screen
When working in the engine
before starting the wipers (risk of
compartment, ensure that
motor overheating);
the windscreen wiper stalk
- ensure that no objects are ob-
is in position B (stop).
structing the travel of the blade.
Risk of injury.
1.144
REAR SCREEN WASHER, WIPER (1/2)
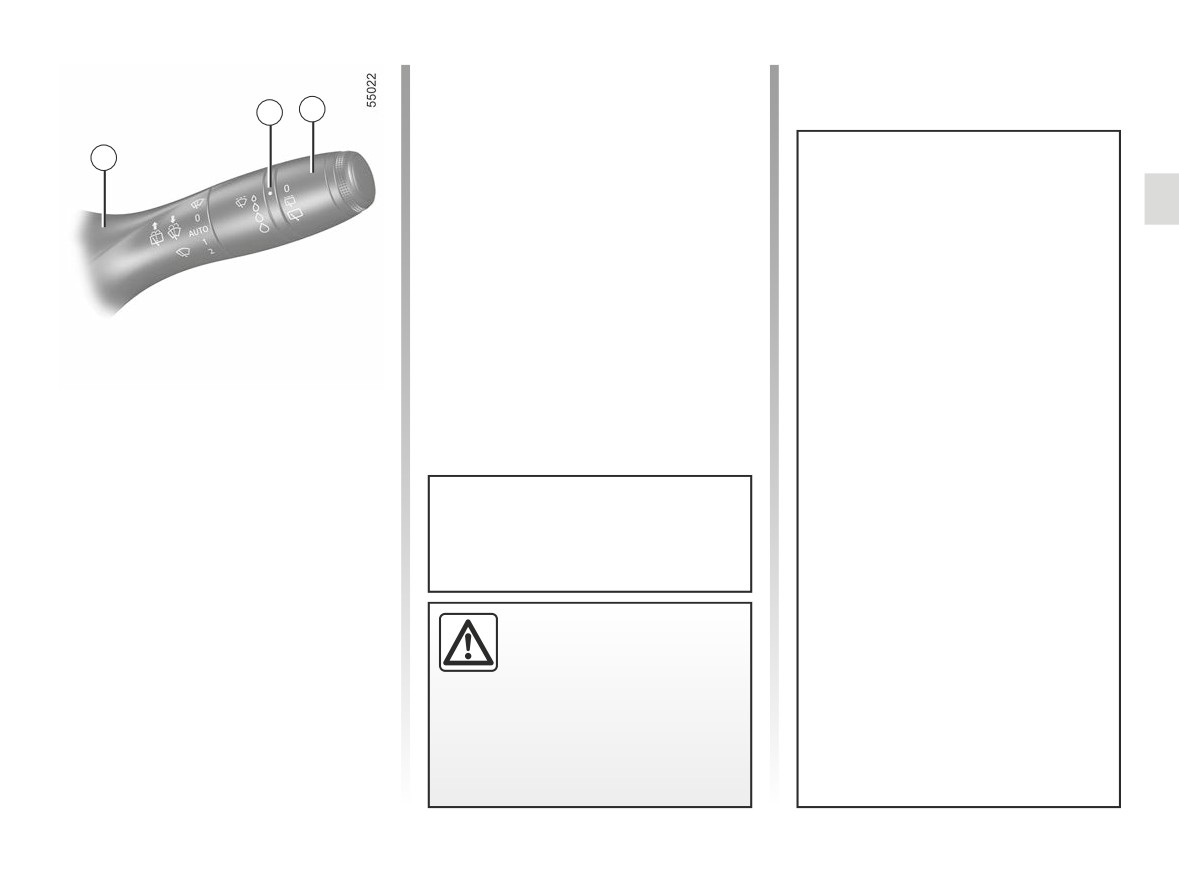
To stop the operation, pivot ring 3 again.
Note:
2
3
When washing using a roller type car
wash, return the ring 3 on the stalk 1
1
to the stop position to deactivate auto-
matic wiping.
Follow usage recommendations.
Efficiency of a wiper blade
Check the condition of the wiper
blades. How long they last depends
on you:
- it must remain clean: clean the
blade and the screen regularly
with soapy water;
- do not use it when the screen is
dry;
Rear screen wiper
- free it from the screen when it has
Y
With the ignition on, rotate the
not been used for a long time.
ring 3 on the lever 1 until the symbol is
In all cases, replace it as soon as
opposite the reference point 2:
it begins to lose efficiency: approxi-
- stop;
mately once a year. ➥ 5.38.
Do not use the wiper arm to open or
- intermittent wiping;
close the tailgate.
The wipers will pause for several
Precaution for using the
seconds between sweeps. Wiping
wipers
frequency varies with vehicle
speed;
Before any action involving
- In freezing or snowy weather
conditions, clear the screen
the rear screen (washing
– slow continuous wiping.
before starting the wipers (risk of
the vehicle, de-icing, clean-
motor overheating);
ing, etc.) return stalk 1 to
- ensure that no objects are ob-
the stop position.
structing the travel of the blade.
Risk of injury and/or damage.
1.145
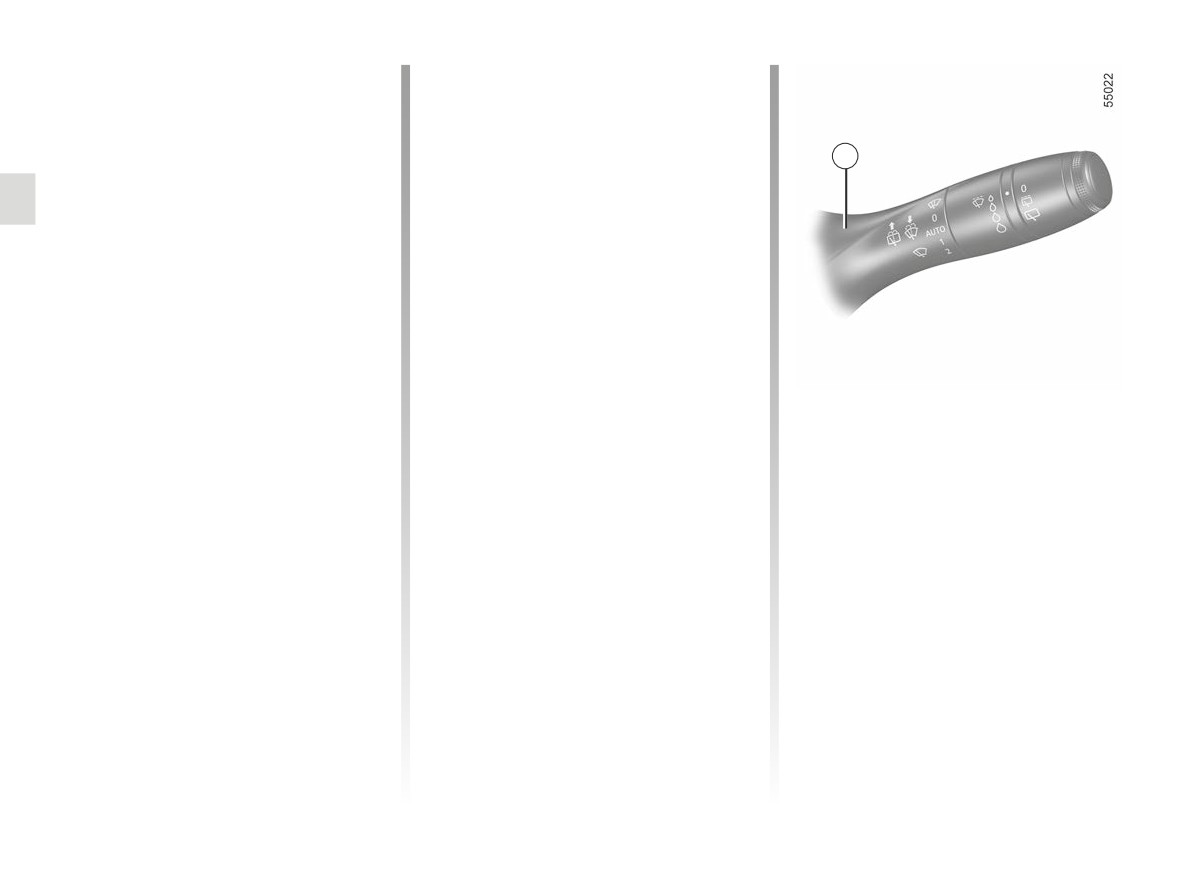
REAR SCREEN WASHER, WIPER (2/2)
Activation/deactivation of the rear
In the event of obstacles present on the
screen wiper
rear window (dirt, snow, etc.), the wiper
will try to sweep away all the obstacles.
Engaging reverse gear triggers inter-
If an obstacle prevents the blade from
mittent wiping (if the front wipers are in
moving, it can be stopped. Remove the
1
operation). If your vehicle is equipped
obstacle, wait for around 30 seconds
with a vehicle settings customisation
and reactivate the wiper using the wiper
menu, you can opt to activate or deacti-
stalk.
vate this function. ➥ 1.119.
Precautions
- In the event of ice, check that the
blades are not stuck to the wind-
screen before operating the wipers.
If you activate the wiper while the
blade is blocked by ice, you risk dam-
aging both the blade and the wiping
motor.
Rear screen wash/wipe
p
- Do not operate the wipers on a dry
With the ignition on, push and
screen. This will lead to the prema-
hold stalk 1, then release.
ture wear or damage to the blades.
Holding the stalk for longer will trigger
(in addition to the windscreen washer)
two sweeps of the wipers followed,
a few seconds later, by a third (drip
wiping function).
When the stalk is released, it returns to
the rear wipe position.
1.146