Renault Zoe (2018 year). Instruction - part 9
 

  Index      Renault     Renault Zoe - instruction 2018 year in english


Search            


Content   ..  7  8  9  10   ..


Renault Zoe (2018 year). Instruction - part 9


3.11

AIR CONDITIONING: remote activation

The air-conditioning can be activated 

using the card RENAULT or by the con-

nected services.
This function enables you to bring your 

vehicle to a comfortable temperature 

before using it.

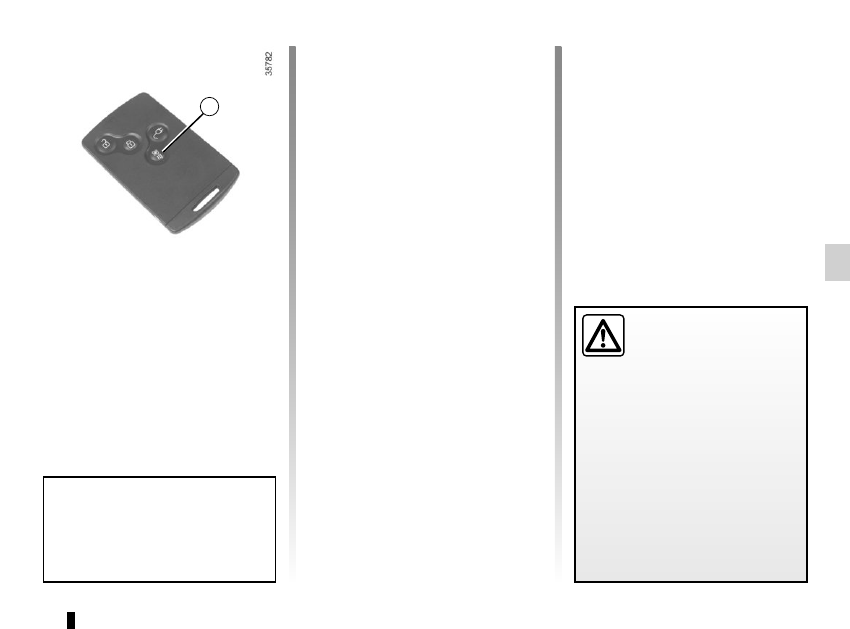
1

Operating condition
–  the engine must be switched off;
–  the traction battery charge level must 

be greater than 25% or, depending 

on the vehicle, 45%

Activating the function
It is carried out by:

–  a long press on the button 1 of the 

card RENAULT (make sure you 

are within the card's field of action - 

please see the information on "Card 

RENAULT : general information" in 

Section 1);

– connected services.
Activating the function is visualised by 
–  constant illumination of the hazard 

warning lights and the side repeat-

ers for 3 seconds;

– the warning lights in the buttons 

 and AUTO on the air-condi-

tioning control are lit.

Switching off the function
–  automatically, after a period of ap-

proximately 5 minutes;

–  upon starting the engine;
–  if you press on the “automatic mode” 

controls, the “clear view” function, 

the fan settings or quick access to 

the “air-conditioning programming” 

menu;

 – if the energy taken exceeds 5% of 

the traction battery level.

Driver’s responsibility 

when parking or stopping 

the vehicle
Never leave an animal, 

child or adult who is not self-suffi-

cient alone on your vehicle, even for 

a short time.
In hot and/or sunny weather, please 

remember that the temperature 

inside the passenger compartment 

increases very quickly.
RISK OF DEATH OR SERIOUS 

INJURY.

Advice: to optimize vehicle range, 

use this function when the vehicle is 

plugged in.

3.12

AIR CONDITIONING: programming 

(1/4)

Adjusting the programming

With the vehicle connected to a power 

source, this function enables:

–  a comfortable temperature prior to 

using the vehicle;

–  optimisation of the vehicle range.
The programmable air-conditioning 

is triggered the hour before the pro-

grammed hour in order to reach a com-

fortable temperature.

1

Driver’s responsibility 

when parking or stopping 

the vehicle
Never leave an animal, 

child or adult who is not self-suffi-

cient alone on your vehicle, even for 

a short time.
In hot and/or sunny weather, please 

remember that the temperature 

inside the passenger compartment 

increases very quickly.
RISK OF DEATH OR SERIOUS 

INJURY.

Operating conditions

–  the ignition must be switched off;
–  the vehicle must be locked;
–  the traction battery charge level must 

be greater than 25% or, depending 

on the vehicle, 45% for the function 

to be triggered;

–  the vehicle has to be plugged into 

the mains;

– programming should be done at 

least 2 hours prior to departure;

and
–  air-conditioning programming must 

be activated.

  Depending on the vehicle, the pro-

gramming is done from:

  –  the multimedia display;
 or

  –  the vehicle settings customisation 

menu.

  The integrated warning light in 

button  1 and warning light 


come on.

3.13

AIR CONDITIONING: programming 

(2/4)

The two programmed times cannot 

be activated simultaneously.

A

1

2

From the multimedia 

display A

Setting the start time for the 

function
You can set two different times.
– press button 1 for quick access to the 

programming menu on display A;

–  select “Change” on one of the two 

set times;

–  adjust the hours then the minutes, 

then confirm.

The function is triggered one hour prior 

to the programmed time to reach a 

comfortable temperature.
The warning lights integrated in the 

button  1, the AUTO button 2 and the 

warning light 

 on the instrument 

panel are lit up.

“Programme” activation
–  With the ignition switched on and the 

air-conditioning operating (please 

refer to the information on “Automatic 

air-conditioning” in Section 3);

–  select the programme to be acti-

vated from menu “Comfort timer“;

–  make sure one of the programmes is 

confirmed.

–  switch off the engine;

–  plug the vehicle into a power source;

–  lock the vehicle.

3.14

From the vehicle settings 

customisation menu 3

Setting the start time for the 

function

You can programme a single time.
–  briefly press button B or C to access 

the menu “PROGRAMMING”;

–  press and hold button B or C to con-

firm;

–  briefly press button B or C to access 

the menu “Warm up cabin for”;

–  press and hold button B or C to con-

firm;

–  briefly press button B or C to access 

the clock settings;

–  hold down button B or C - the hours 

flash;

– press buttons B and C to set the 

hour;

–  hold down button B or C to confirm 

the hour setting;

–  the minutes flash - press buttons B 

and C to set the minutes;

–  hold down button B or C to confirm 

the minutes setting. Your settings are 

now saved.

3

B

C

AIR CONDITIONING: programming 

(3/4)

3.15

Stopping the programmed air 

conditioning

The air conditioning stops automati-

cally around ten minutes after the set 

end time.

However, the function can be deacti-

vated if:

–  the charging socket is disconnected;

–  the “Remote Activation” function is 

activated – please see the informa-

tion on “Air conditioning: remote acti-

vation” in Section 2;

–  the traction battery charging level is 

lower than 15% or, depending on the 

vehicle, 30%

Driver’s responsibility 

when parking or stopping 

the vehicle
Never leave an animal, 

child or adult who is not self-suffi-

cient alone on your vehicle, even for 

a short time.
In hot and/or sunny weather, please 

remember that the temperature 

inside the passenger compartment 

increases very quickly.
RISK OF DEATH OR SERIOUS 

INJURY.

AIR CONDITIONING: programming 

(4/4)

Connected services

The air conditioning can also be acti-

vated using the connected services. 

For more information regarding the op-

erating conditions, please contact an 

authorised dealer.

“Programme” activation
–  With the ignition switched on and the 

air-conditioning operating (please 

refer to the information on “Automatic 

air-conditioning” in Section 3);

–  press the button 1.
The function is triggered two hours prior 

to the programmed time so that a com-

fortable temperature is reached.
The warning lights integrated in the 

button  1, the AUTO button 2 and the 

warning light 

 on the instrument 

panel are lit up.

1

2

3.16

1

2

FRAGRANCE DIFFUSER.

Controls

1  Fragrance diffuser outlet
2 Capsule housing

Fragrance selection

On the display A, select “Menu”, “vehi-

cle”, “well-being”, “fragrance diffuser”, 

then one of the two fragrances.

Fragrance diffuser intensity 

settings

Select one of the five fragrance intensi-

ties by pressing “-” or “+”.
The intensity and uniformity will also 

vary depending on the air distribution 

and the air-conditioning control.
To stop distribution, select “Stop”.
NB: If the fan control is in position 0 

(stop), the fragrance diffuser is not ac-

tivated.

Replacing a fragrance 

diffuser capsule

Press the capsule housing 2 to open it. 

Replace capsule, then press the cap-

sule housing 2 to close it.
NB: if used for 1 hour a day, a capsule 

may last for approximately 3 months. 

You can buy capsules from Authorised 

Dealers.

Precautions

–  Always use capsules recommended 

by our Technical Department.

–  Do not open or refill the diffuser cap-

sule.

–  Keep out of reach for children.
–  Do not expose the diffuser capsule 

to direct sunlight.

–  In the event of contact with the eyes 

or skin, rinse in plenty of safe drink-

ing water. If necessary, consult a 

doctor.

–  Do not use the fragrance diffuser 

capsule for anything other than its 

intended purpose.

For safety reasons, do not 

replace the fragrance dif-

fuser capsule while driving.

A

3.17

AIR IONIZER

Selecting the operating mode

Air conditioning in operation, on the dis-

play A, select “Menu”, “Vehicle”, “Care” 

then “Ioniser ”.

Select one of the two modes or stop dif-

fusion:
–  CLEAN : helps to reduce bacteria 

and allergenic particles present in 

the air;

–  RELAX: provides a clean and relax-

ing driving environment by emitting 

ions;

–  Stop (stop diffusion).

Activating the ioniser in CLEAN 

mode at each engine start-up
To activate CLEAN mode at each 

engine start-up, check the line “Start 

ioniser at each vehicle start” and con-

firm.
NB: 
–  if the fan control is set to position 0 

(stop), activating the ioniser at each 

engine start-up will automatically op-

erate the fan for at least around 

10 seconds.

–  if the air distribution setting does not 

feed air to the central air vents, the 

ioniser is not activated.

Do not close the vents while the ion-

iser is activated. This enables a uni-

form distribution of ions.

A

3.18

AIR CONDITIONING: information and operating instructions 

(1/2)

Do not open the refriger-

ant fluid circuit. The fluid 

may damage eyes or skin.

Advice on use

In some situations, (air conditioning 

off, air recirculation activated, ventila-

tion speed at zero or low, etc.) you may 

notice that condensation starts to form 

on the windows and windscreen.
If there is condensation, use the “Clear 

View” function to remove it, then use 

the air conditioning in automatic mode 

to stop it forming again.

Maintenance

Refer to the Maintenance Document 

for your vehicle for the inspection fre-

quency.

Range

It is normal to notice an increase in 

energy usage when the air conditioning 

is operating.

Recommendations to limit energy 

consumption and maintain the 

range of the vehicle:

Drive with the air vents open and the 

windows closed. If the vehicle has been 

parked in the sun, open the doors for a 

few moments to let the hot air escape 

before starting the engine.
Favour:

–  before departure, the use of the air-

conditioning programming or remote 

activation. Please refer to the infor-

mation on “Air-conditioning: pro-

gramming” and “Air-conditioning: 

remote activation” in Section 2);

–  during your journeys, using ECO 

mode. Please see information about 

“ECO mode function” in Section 2.

Operating faults

As a general rule, contact your ap-

proved dealer in the event of an oper-

ating fault.
–  Reduction in de-icing, demisting 

or air conditioning performance. 

This may be caused by the passen-

ger compartment filter cartridge be-

coming clogged.

–  No hot or cold air is being pro-

duced. Check that the controls are 

set correctly and that the fuses are 

sound. Otherwise, switch off the 

system.

Presence of water under the 

vehicle

After prolonged use of the air condi-

tioning system, it is normal for water 

to be present under the vehicle. This is 

caused by condensation.

Vehicles equipped with  

modeECO
Once activated, ECO mode may 

reduce air conditioning perform-

ance. Please refer to the informa-

tion on “Driving advice, Eco-driving” 

in Section 2.

Use the air conditioning system reg-

ularly, even in cold weather, running 

it at least once a month for approxi-

mately 5 minutes.

3.19

AIR CONDITIONING: information and operating instructions 

(2/2)

The refrigerant circuit may contain 

fluorinated greenhouse gases.
Depending on the vehicle, you will find 

the following information on label A af-

fixed inside the engine compartment.
The presence and location of the infor-

mation on label A depends on the ve-

hicle.

A

A

A

Do not open the refrigerant 

fluid circuit. The fluid may 

damage eyes or skin.

Ñ

Type of refrigerant fluid   

Type of oil in the air condi-

tioning circuit

Inflammable product 


Consult the driver’s hand-

book

Maintenance

Quantity of refrigerant 

fluid present in the ve-

hicle.

x.xxx kg

G l o b a l   Wa r m i n g 

Potential (CO2 equi-

valent).

GWP xxxxx

Quantity in weight and 

in CO2 equivalent.

CO2 eq 

x.xx t

Before performing any 

action in the engine com-

partment, the ignition must 

be switched off (please see 

the information on “Starting, stop-

ping the engine” in Section 2).

3.20

Safety of rear occupants

The driver can prevent 

operation of the rear elec-

tric windows by pressing 

switch 4. A confirmation message is 

displayed on the instrument panel.

Driver’s responsibility

Never leave your vehicle with the 

RENAULT card inside, and never 

leave a child, adult who is not self-

sufficient or a pet, even for a short 

while. They may pose a risk to 

themselves or to others by starting 

the engine or activating equipment 

(such as the gear lever or electric 

windows). If any part of the body be-

comes trapped, reverse the direc-

tion of the window immediately by 

pressing the relevant switch.

Risk of serious injury.

ELECTRIC WINDOWS 

(1/2)

These systems operate with the igni-

tion on or off, until one of the front doors 

is opened (limited to about 3 minutes).

From the driver’s seat, use switch:

  1  for the driver’s side;

  2  for the front passenger side;

  3 and  5 for the rear passenger win-

dows.

From the passenger seats, use 

switch 6.

Note: if the window detects resistance 

when closing (e.g.: branch of a tree, 

etc.) it stops and then lowers again by a 

few centimetres.

Electric windows

Press or pull the switch to raise or lower 

a window to the desired height (the rear 

windows do not open fully);

One-touch mode

(depending on vehicle)

This mode works in addition to the ope-

ration of the electric windows described 

previously. It can be fitted to the driver’s 

window.

Briefly press or pull the window switch 

fully: the window is fully lowered or 

raised. Pressing the switch again stops 

the window moving.

1

2

3

4

5

6

Avoid resting any objects against 

a half-open window: there is a risk 

that the electric window could be 

damaged.

3.21

ELECTRIC WINDOWS 

(2/2)

/MANUAL WINDOW WINDERS

Operating faults

If a fault occurs when closing a window, 

the system switches to normal mode: 

lift the switch concerned as many times 

as necessary until the window is fully 

closed, release it. Press the switch 

again (still on the closing side) for ap-

proximately one second to reset the 

system.
If necessary, contact an approved 

Dealer.

Manual window winder 

controls

Turn handle 8.

8

When closing the windows, 

ensure that no part of the 

body (arm, hand, etc.) is 

protruding from the vehicle.

Risk of serious injury.

3.22

INTERIOR LIGHTING/SUN VISOR

When the doors or luggage com-

partment are unlocked and opened 

the courtesy and footwell lights 

come on temporarily.

1

2

3

Courtesy light

Tilt switch 2 to move it to the position 

for:
– permanent lighting;
–  lighting controlled by opening one 

of the doors. This switches off after 

a time delay, once the doors con-

cerned have been closed correctly;

–  immediate switching off.

Map reading lights

Move switches 1 or 3.

4

Luggage compartment light

Light  4 comes on when the boot is 

opened.

6

Sun visor

Lower the sun visor 5 over the wind-

screen or unclip it and turn it over the 

side window.

Courtesy mirrors

Depending on the vehicle, lift or slide 

the cover 6.

5

When driving, ensure the 

courtesy mirror cover is 

closed. Risk of injury.

3.23

Front door storage 

compartments 1

PASSENGER COMPARTMENT STORAGE, FITTINGS 

(1/3)

1

No object should be placed 

on the floor (in front of the 

driver). Such objects may 

slide under the pedals 

during sudden braking manoeuvres 

and obstruct their use.

When turning corners, 

accelerating or braking, 

ensure that the recepta-

cle being held by the cup 

holder is not dislodged.
There is a risk of burning if hot liquid 

escapes.

2

3

Cup holder 2 and 4

Centre console storage 

compartment 3

4

3.24

PASSENGER COMPARTMENT STORAGE, FITTINGS 

(2/3)

5

Ensure that no hard, heavy 

or pointed objects are 

placed in the “open” storage 

compartments in such a 

way that they may fall onto passen-

gers during sudden turning, braking 

or in the event of an accident.

Rear door storage 

compartment 7

7

Dashboard storage 

compartment 5

Glove box

Pull handle 6 to open it.
It can hold A4 size documents, a large 

bottle of water, etc.

6

Grab handle 8

This offers support and can be held 

when the vehicle is being driven.
Do not use it for getting into or out of 

the vehicle.

8

3.25

PASSENGER COMPARTMENT STORAGE, FITTINGS 

(3/3)

Storage pocket 9 with side 

opening

9

10

10 storage pocket

Sun visor storage 11

Can be used to hold motorway toll tick-

ets, maps, etc.

11

Ensure that no hard, heavy 

or pointed objects are 

placed in the “open” storage 

compartments in such a 

way that they may fall onto passen-

gers during sudden turning, braking 

or in the event of an accident.

3.26

Ashtray 1

To open, lift the cover. To empty, pull the 

ashtray towards you and it will be re-

leased from its housing.

ASHTRAY, ACCESSORIES SOCKET

Accessories socket 2

It is provided for connecting accessories 

approved by our Technical Department.

If your vehicle does not have an 

ashtray, you can purchase one from 

an approved dealer.

1

2

Connect accessories with 

a maximum power of 

120 watts (12 V) only.

When several accessory 

sockets are used at the same time, 

the total power of the connected 

accessories must not exceed 

180 watts.

Fire hazard.


Content   ..  7  8  9  10   ..