Renault Megane RS (2012 year). Instruction - part 12
 

  Index      Renault     Renault Megane RS - instruction 2012 year in english


Search            


Content   ..  10  11  12  13   ..


Renault Megane RS (2012 year). Instruction - part 12


bulbs

changing .........................................(up to the end of the DU)

fog lights ...............................................(up to the end of the DU)

changing a bulb ....................................(up to the end of the DU)

lights:

fog lights .........................................(up to the end of the DU)

bulbs

changing .........................................(up to the end of the DU)

lights

additional ........................................(up to the end of the DU)

lights

fog lights .........................................(up to the end of the DU)

5.14

ENG_UD11884_2

Projecteurs avant Feux de brouillard avant additionnels (X95 - B95 - D95 - Renault)

ENG_NU_837-6_BDK95_Renault_5

heaDlIghts: additional/front fog lights

additional lights

If you wish to fit fog lights or long range 

headlights to your vehicle, consult an 

approved Dealer.

Any operation on (or modi-

fication  to)  the  electrical 

system must be performed 

by  an  approved  dealer 

since an incorrect connection might 

damage  the  electrical  equipment 

(harness, components and in partic-

ular the alternator). In addition, your 

Dealer has all the parts required for 

fitting these units.

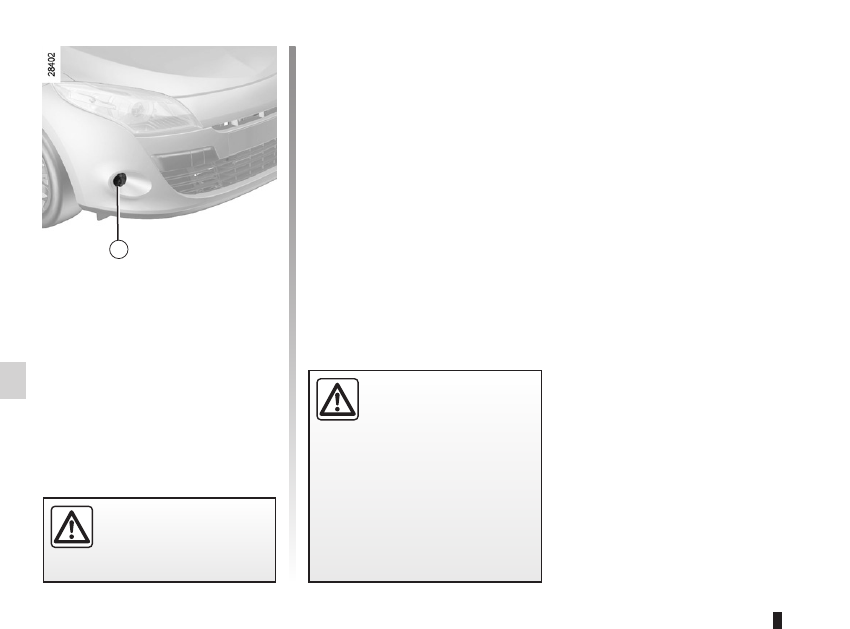
Front fog lights 1

However,  because  the  front  bumper 

needs to be removed, 

you are advised 

to  have  your  bulbs  replaced  by  an 

approved dealer.

The bulbs are under pres-

sure  and  can  break  when 

replaced.
Risk of injury.

1

bulbs

changing .........................................(up to the end of the DU)

changing a bulb ....................................(up to the end of the DU)

lights:

direction indicators ...........................................(current page)

lights:

side lights .........................................................(current page)

lights:

brake lights ......................................................(current page)

lights:

reversing lights .................................................(current page)

lights:

fog lights ..........................................................(current page)

indicators:

direction indicators ...........................................(current page)

bulbs

changing .........................................(up to the end of the DU)

5.15

ENG_UD18877_3

Feux arrière et latéraux : remplacement des lampes (X95 - B95 - D95 - Renault)

ENG_NU_837-6_BDK95_Renault_5

Rear lights (changing bulbs)

rear lIghts anD InDIcatOr lIghts: changing bulbs 

(1/6)

5

–  loosen  nut 1,  press  down  on  it  to 

release the front of the light (move-

ment A) then remove the nut;

–  from  the  outside,  pull  the  light  to-

wards you (movement B);

–  remove the bulb holder 3 by releas-

ing the clips 4.

Direction indicator lights 5
Bulb type: Py21w.
side light and brake light
 6
Bulb type: P21/5w.
refitting
To refit, proceed in the reverse order, 

taking care not to damage the wiring.

Five-door versions

Direction indicator lights/brake and 

side lights
–  Unclip  the  cover  to  access  nuts 1 

and 2;

–  unscrew  nut 2  without  removing  it 

completely;

The bulbs are under pres-

sure  and  can  break  when 

replaced.
Risk of injury.

4

6

a

B

1

2

3

5.16

ENG_UD18877_3

Feux arrière et latéraux : remplacement des lampes (X95 - B95 - D95 - Renault)

ENG_NU_837-6_BDK95_Renault_5

rear lIghts anD InDIcatOr lIghts: changing bulbs 

(2/6)

Five-door versions

(continued)
Fog lights/side lights and reversing 

lights
–  From  the  luggage  compartment, 

unclip  flap 7,  then  remove  the 

bolts 8.

–  Lower the tailgate, then pull light 9 

towards the rear to release it.

–  Unscrew the bulb holder for the bulb 

concerned.

7

9

10

8

11

reversing light 10
Bulb type: w16w.
Fog light/side light
 11
Bulb type: P21/4w.

5.17

ENG_UD18877_3

Feux arrière et latéraux : remplacement des lampes (X95 - B95 - D95 - Renault)

ENG_NU_837-6_BDK95_Renault_5

three-door versions

–  Unclip the access flap;
–  unscrew nuts 12 and 13;
–  from  the  outside,  remove  bolt 14

then pull on the light;

–  remove the bulb holder by releasing 

the clips 15;

16  side light/stop light

Bulb type: P21/5w.

17  Direction indicator light

Bulb type: Py21w.

18  reversing light

Bulb type: P21w.

rear fog light
Undo bulb holder 19, turning it towards 

the centre of the vehicle by accessing it 

from underneath.
Bulb type: P21w.

The bulbs are under pres-

sure  and  can  break  when 

replaced.
Risk of injury.

rear lIghts anD InDIcatOr lIghts: changing bulbs 

(3/6)

18

16

17

12

13 14

15

19

5.18

ENG_UD18877_3

Feux arrière et latéraux : remplacement des lampes (X95 - B95 - D95 - Renault)

ENG_NU_837-6_BDK95_Renault_5

rear lIghts anD InDIcatOr lIghts: changing bulbs 

(4/6)

sport tourer Versions

side lights/reversing lights and fog 

lights
–  From  the  luggage  compartment, 

unclip  flap 20  (movement C),  then 

remove the bolts .

–  Lower the tailgate, then pull light 21 

towards the rear to release it.

–  Turn the bulb holder of the bulb con-

cerned a quarter of a turn.

20

side light 22
Bulb type: w5w.
reversing light 23
Bulb type: P21w.
Fog light 24
Bulb type: h21w.
refitting
To refit, proceed in the reverse order, 

taking care not to damage the wiring.

c

21

23

24

The bulbs are under pres-

sure  and  can  break  when 

replaced.
Risk of injury.

22

5.19

ENG_UD18877_3

Feux arrière et latéraux : remplacement des lampes (X95 - B95 - D95 - Renault)

ENG_NU_837-6_BDK95_Renault_5

rear lIghts anD InDIcatOr lIghts: changing bulbs 

(5/6)

28

29

side light and brake light 28
Bulb type: P21/5w.
Direction indicator lights
 29
Bulb type: Py21w.

estate versions

(continued)
Brake and side lights/direction 

indicator lights
–  Unclip covers 25 to access the nuts;
–  unscrew the 2 nuts;
–  from  the  outside,  pull  the  light  to-

wards you;

–  remove the bulb holder 27 by releas-

ing the clips 26.

25

27

26

side indicator lights

changing bulbs .................................................(current page)

lights:

number plate lights ..........................................(current page)

5.20

ENG_UD18877_3

Feux arrière et latéraux : remplacement des lampes (X95 - B95 - D95 - Renault)

ENG_NU_837-6_BDK95_Renault_5

Rear lights (changing bulbs)

rear lIghts anD InDIcatOr lIghts: changing bulbs 

(6/6)

Indicator lights 33

–  Unclip  indicator  light 33  (using  a 

flat-blade screwdriver type tool po-

sitioned  at D to move the indicator 

light towards the front of the vehicle);

–  turn  the  bulb  holder  a  quarter  of  a 

turn and take out the bulb.

Bulb type: w5w.

number plate lights 32

–  Unclip light 32 by pressing tab 31;
–  remove the light cover to gain access 

to the bulb.

Bulb type: w5w.

high level brake light 30

Consult an approved Dealer.

30

22

23

33

D

32

31

The bulbs are under pres-

sure  and  can  break  when 

replaced.
Risk of injury.

courtesy light ........................................(up to the end of the DU)

lighting:

interior .............................................(up to the end of the DU)

5.21

ENG_UD17364_2

Eclairage intérieur : remplacement des lampes (X95 - B95 - D95 - Renault)

ENG_NU_837-6_BDK95_Renault_5

Interior lights (changing bulbs)

The bulbs are under pres- 

sure  and  can  break  when  

replaced.
Risk of injury.

InterIOr lIghtIng: changing bulbs 

(1/2)

courtesy light

–  Position the 3 switches in the central  

position;

–  move the courtesy light backwards  

(movement A)  then  tilt  the  front  

downwards (movement B);

–  when  removing  the  courtesy  light,  

ensure that you do not pull the elec- 

trical wires;

–  unclip the lens 1;
note: to remove the defective bulb, you  

can use a flat-blade screwdriver or sim- 

ilar.
Bulb type: w5w.

glove box light

Open the access cover 3, you can then  

unclip the bulb holder more easily 4.
Bulb type: c5w.

Door lights

Unclip light 2 (using a flat-blade screw- 

driver or similar).
Turn the bulb holder a quarter of a turn  

and take out the bulb.
Bulb type: w5w.

2

4

B

a

3

1

5.22

ENG_UD17364_2

Eclairage intérieur : remplacement des lampes (X95 - B95 - D95 - Renault)

ENG_NU_837-6_BDK95_Renault_5

The bulbs are under pres- 

sure  and  can  break  when  

replaced.
Risk of injury.

luggage compartment light

Unclip the light at 5 using a flat-blade  

screwdriver or similar.

Disconnect the light.
Press  tab 6  to  release  lens 8  and  

access bulb 7.
Bulb type: w5w.

InterIOr lIghtIng: changing bulbs 

(2/2)

5

6

7

8

fuses .....................................................(up to the end of the DU)

5.23

ENG_UD14417_2

Fusibles (X95 - B95 - D95 - Renault)

ENG_NU_837-6_BDK95_Renault_5

Fuse box

If  any  electrical  component  does  not 

work, check the condition of the fuses.
Unclip cover A or B (depending on ve-

hicle).

tweezers 1

Remove the fuse using tweezers 3, lo-

cated at the back of cover A or B.
To remove the fuse from the tweezers, 

slide the fuse to the side.
It is not advisable to use the free fuse 

locations.

Fuses

INCORRECT

CORRECT

Check the fuse in question 

and 

replace  it,  if  neces-

sary, 

by a fuse of the same 

rating.

If a fuse is fitted where the rating is 

too high, it may cause the electrical 

circuit to overheat (risk of fire) in the 

event of an item of equipment using 

an excessive amount of current.

Fuses 

(1/2)

1

a

B

In accordance with local legislation 

or as a precautionary measure:
Obtain an emergency kit containing 

a set of spare bulbs and fuses from 

an approved Dealer.

5.24

ENG_UD14417_2

Fusibles (X95 - B95 - D95 - Renault)

ENG_NU_837-6_BDK95_Renault_5

Fuses 

(2/2)

Some  accessories  are  protected  by 

fuses  located  in  the  engine  compart-

ment in fuse box C.
However, because of their reduced ac-

cessibility, we advise you to have your 

fuses replaced by an approved Dealer.

allocation of fuses

(the presence of certain fuses depends 

on the vehicle equipment level)
1 Electronic parking brake;
2 Brake lights;
3 Automatic door locking;
4 Driver’s electric window;
5 Passenger compartment unit;
6 Direction indicator lights;
7 Navigation system;

8 Interior rear-view mirror;
9 Rear screen wiper;
10 and 11 Rear electric windows;
12 ABS/ESP;
13 Passenger electric window;
14 Windscreen washer;
15 Heated door mirrors;
16 Radio;
17 Luggage compartment accessories 

socket;
18 Rear seat accessories socket;
19 Cigarette lighter.

c

1

2

3

4

5

6

7

8

9

10

11

12

13

14

15

16

17

18

19

battery

troubleshooting ...............................(up to the end of the DU)

5.25

ENG_UD9611_2

Batterie : dépannage (X95 - B95 - D95 - Renault)

ENG_NU_837-6_BDK95_Renault_5

Battery

Battery: troubleshooting 

(1/2)

to avoid all risk of sparks:

–  Ensure that any electrical consumers 

(courtesy  lights,  etc.)  are  switched 

off  before  disconnecting  or  recon-

necting the battery.

–  When  charging,  stop  the  charger 

before connecting or disconnecting 

the battery.

–  Do  not  place  metal  objects  on  the 

battery to avoid creating a short cir-

cuit between the terminals.

–  Always wait at least one minute after 

the  engine  has  been  switched  off 

before disconnecting a battery.

–  Make  sure  that  you  reconnect  the 

battery terminals after refitting.

connecting a battery charger

the  battery  charger  must  be  com-

patible with a battery with nominal 

voltage of 12 volts.
Do not disconnect the battery when the 

engine is running. 

Follow the instruc-

tions given by the manufacturer of 

the battery charger you are using.

Special procedures may be 

required  to  charge  some 

batteries. Contact your ap-

proved dealer.

Avoid all risk of sparks which may 

cause an immediate explosion, and 

charge  the  battery  in  a  well-venti-

lated area. Risk of serious injury.

Handle the battery with care 

as it contains sulphuric acid, 

which  must  not  come  into 

contact with eyes or skin. If 

it does, wash the affected area with 

plenty  of  cold  water.  If  necessary, 

consult a doctor.
Ensure that naked flames, red hot 

objects and sparks do not come into 

contact with the battery as there is a 

risk of explosion.
The engine may be hot when car-

rying out operations in close prox-

imity. In addition, the engine cooling 

fan can come on at any moment.
Risk of injury.

5.26

ENG_UD9611_2

Batterie : dépannage (X95 - B95 - D95 - Renault)

ENG_NU_837-6_BDK95_Renault_5

Attach positive lead A to mounting 1 

attached  to  (+)  terminal 2  then  to 

(+) 

terminal 3 of the battery supplying 

the current.
Attach  the  negative  lead B  to  the 

(– ) 

terminal 4 of the battery supplying 

the current, then to the (–) 

terminal 5 

of the discharged battery.
Start the engine. As soon as it is run-

ning, disconnect leads A and B in the 

reverse order 

( 5 - 4 - 3 - 2 ).

starting the vehicle using the 

battery from another vehicle

If you have to use the battery from an-

other  vehicle  to  start,  obtain  suitable 

jump leads (with a large cross section) 

from an approved dealer or, if you al-

ready  have  jump  leads,  ensure  that 

they are in perfect condition.
the two batteries must have an iden-

tical nominal voltage of 12 volts. The 

battery  supplying  the  current  should 

have a capacity (amp-hours, Ah) which 

is at least the same as that of the dis-

charged battery.
Ensure that there is no risk of contact 

between the two vehicles (risk of short 

circuiting  when  the  positive  terminals 

are connected) and that the discharged 

battery  is  properly  connected.  Switch 

off your vehicle ignition.
Start the engine of the vehicle supply-

ing the current and run it at an interme-

diate engine speed.

Battery: troubleshooting 

(2/2)

2

3

4

5

a

B

1

Check that there is no con-

tact between leads A and B 

and that the positive lead A 

is  not  touching  any  metal 

parts  on  the  vehicle  supplying  the 

current.
Risk of injury and/or damage to the 

vehicle.

2

5

RENAULT card

battery .............................................(up to the end of the DU)

RENAULT card battery .........................(up to the end of the DU)

5.27

ENG_UD14060_2

Carte RENAULT : pile (X91 - B91 - K91 - Renault)

ENG_NU_837-6_BDK95_Renault_5

Operating faults

If the battery is too weak to ensure cor-

rect operation, you may start (insert the 

RENAULT card in the card reader) and 

lock/unlock the vehicle (refer to the in-

formation  on  “Locking/unlocking  the 

doors” in Section 1).

RENAULT card: battery

renault carD: battery

replacing the battery

When the message “Low card battery” 

appears  on  the  instrument  panel,  re-

place the RENAULTcard battery, press 

button 1, pulling on emergency key 2

then unclip cover 3 using tab 4.

Remove the battery by pressing on one 

side  (movement A)  and  by  lifting  the 

other (movement B) then replace it, en-

suring  the  polarity  and  model,  shown 

on cover 3 are respected.

Do  not  throw  away  your 

used batteries; give them to 

an organisation responsible 

for collecting and recycling 

batteries.

1

2

When refitting, proceed in the reverse 

order, then press one of the buttons on 

the card four times, close to the vehicle: 

the next time the vehicle is started, the 

message will disappear.
note: it is not advisable to touch the 

electronic  circuit  or  contacts  on  the 

RENAULT card when replacing the bat-

tery.

a

B

3

The batteries are available from approved Dealers, and their service life approxi-

mately two years. Check that there is no dye on the battery: risk of an incorrect 

electrical contact.

4

Check that the cover is clipped shut.

fitting a radio .........................................(up to the end of the DU)

speakers

location ...........................................(up to the end of the DU)

radio

fitting a radio ...................................(up to the end of the DU)

fitting a radio .........................................(up to the end of the DU)

5.28

ENG_UD6351_1

Prééquipement radio (X95 - B95 - D95 - Renault)

ENG_NU_837-6_BDK95_Renault_5

Fitting a radio

FIttIng a raDIO

If your vehicle is not fitted with an audio 

system, one can be fitted and locations 

have been provided for:
–  the radio 1;

–  tweeter speakers 2;

–  bass speakers 3.
To install any equipment, please con- 

sult an approved dealer.

radio location 1

Unclip the blanking cover. The aerial, + 

and – supply and speaker wire connec- 

tions are located behind it.

–  In all cases, it is very important to follow the manufacturer’s instructions care- 

fully.

–  The specifications of the brackets and wires (available from our network) vary 

depending on the equipment level of your vehicle and the type of radio.

  Consult an approved Dealer to find out the correct part number.
–  No work may be carried out on the vehicle’s electrical or radio circuits, except 

by approved dealers: an incorrectly connected system may result in damage 

being caused to the electrical equipment and/or the components connected to 

it.

1

2

3

accessories...........................................(up to the end of the DU)

5.29

ENG_UD12965_3

Accessoires (S65 - X84 - B84 - C84 - E84 - L84 - K84 - J84 - X85 - B85 - C85 - S85 - X91 - B91 - K91 - D91 - B65 - C65 - K85 - X95 - B95 - D95 - J95 - R95 - X33 - X38 - 

ENG_NU_837-6_BDK95_Renault_5

Accessories

accessOrIes

use of transmission/

receiving devices 

(telephones, cB 

equipment etc.).

Telephones and CB equipment with 

integrated aerials may cause inter-

ference  to  the  original  electronic 

systems fitted to the vehicle: it is ad-

visable only to use equipment with 

an external aerial.
Furthermore,  we  remind  you  of 

the need to comply with the legis-

lation in force concerning the use 

of such equipment.

electrical and electronic 

accessories
– Connect  accessories 

with  a  maximum  power  of 

120 Watts only.

  Fire hazard.
–  No work may be carried out on 

the  vehicle’s  electrical  or  radio 

circuits,  except  by  approved 

Dealers:  an  incorrectly  con-

nected  system  may  result  in 

damage  being  caused  to  the 

electrical  equipment  and/or  the 

components connected to it;

–  if  the  vehicle  is  fitted  with  any 

aftermarket  electrical  equip-

ment,  make  sure  that  the  unit 

is correctly protected by a fuse. 

Establish the rating and position 

of this fuse.

Before fitting an electrical or 

electronic  device  (particu-

larly for transmitters/receiv-

ers:  frequency  bandwidth, 

power  level,  position  of  the  aerial 

etc.),  ensure  that  it  is  compatible 

with your vehicle.
Contact an approved dealer for this 

information.

Fitting after-market 

accessories

If you wish to install acces-

sories on the vehicle: con-

sult an approved dealer.

Also,  to  ensure  the  correct  opera-

tion  of  your  vehicle,  and  to  avoid 

any risk to your safety, we recom-

mend that you use only specific ac-

cessories,  designed  for  your  vehi-

cle, which are the only accessories 

for which the manufacturer will pro-

vide a warranty.

If you are using an anti-theft 

device, only attach it to the 

brake pedal.


Content   ..  10  11  12  13   ..