Renault Captur (2018 year). Instruction - part 5
 

  Index      Renault     Renault Captur - instruction 2018 year in english


Search            


Content   ..  3  4  5  6   ..


Renault Captur (2018 year). Instruction - part 5


1.66

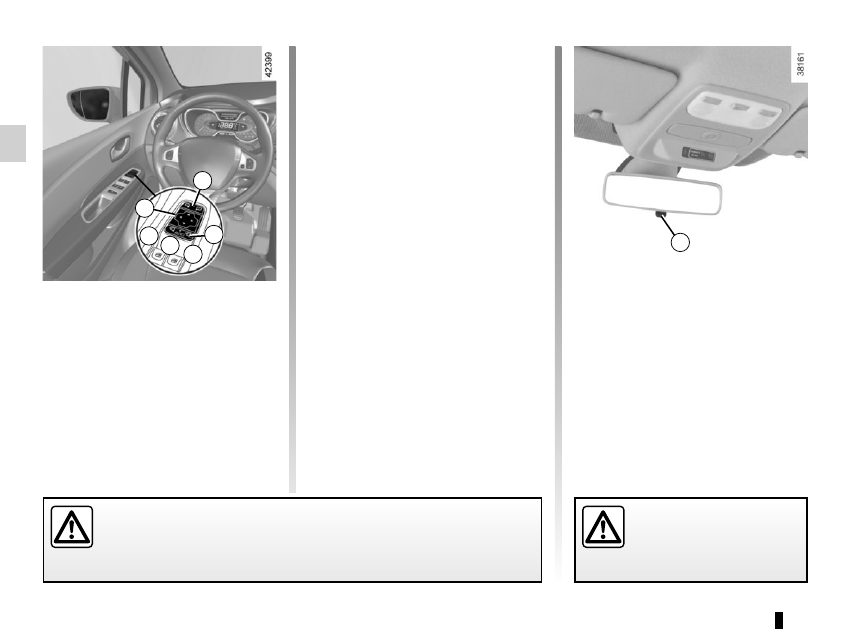
Interior rear view mirror

Its position can be adjusted.

Rear view mirror with lever 4

When driving at night, to avoid being 

dazzled by the headlights of the vehicle 

behind, depress the little lever located 

behind rear view mirror 4.

Rear view mirror without lever 4

The rear view mirror darkens automa-

tically at night if you are being followed 

by a vehicle with its lights on.

Folding door mirrors
The door mirrors automatically fold out 

when the vehicle is unlocked (switch 3 

in position B). The door mirrors fold in 

when the vehicle is locked.
In any case, you can make the rear view 

mirrors fold in (switch 3 in position C) or 

fold out (switch 3 in position A).

Automatic mode is then deactivated. To 

reactivate it, position switch 3 to B.

Door mirrors

Adjustment
Select the door mirror using switch 2

then use button 1 to adjust it to the de-

sired position.

Heated door mirrors
With the engine running, 
mirror deic-

ing is activated simultaneously with 

rear screen de-icing/demisting.

REAR VIEW MIRRORS

For safety reasons, carry 

out any adjustments when 

the vehicle is not being 

driven.

4

1

2

3

A

B C

Objects observed in the door mirror glass are actually closer than they 

appear. For your safety, take this into account in order to correctly assess 

the distance before any manoeuvre.

1.67

Daytime running lights 

function

The daytime running lights come on 

automatically with no action on stalk 1 

when the engine is started, and they go 

off once the engine is switched off.

EXTERIOR LIGHTING AND SIGNALS 

(1/3)

š

Side lights

Turn the ring 2 until the symbol 

is opposite mark 3.
An indicator light on the instrument 

panel will come on.

1

Before driving at night, check that the electrical equipment is operating 

correctly and adjust the headlight beams (if your vehicle is not carrying 

its normal load). As a general precaution, check that the lights are not ob-

scured (by dirt, mud, snow or objects being transported).

k

Dipped beam 

headlights

Manual operation
Turn the ring 2 until the symbol is oppo-

site mark 3. This indicator light on the 

instrument panel comes on.

Automatic operation

(depending on vehicle)
Turn ring 2 until the AUTO symbol is op-

posite mark 3: with the engine running, 

the dipped beam headlights switch on 

or off automatically depending on the 

brightness of the light outside, without 

any action on stalk 1.

When driving on the left in a left-

hand drive vehicle (or vice versa), 

drivers must re-adjust their lights 

throughout their stay (see “Adjusting 

headlight beams” in Section 1).

3

1

2

1.68

Adjusting the headlight beam 

height

Depending on the vehicle, the headlight 

adjustment is automatic, based on the 

vehicle load.

“Follow-me-home lighting” 

function

This function allows you to briefly switch 

on the dipped beam headlights (to pro-

vide light when opening a gate, etc.).

With the engine and lights switched 

off and the ring 2 in position 0 or AUTO

pull the stalk 1 towards you: the dipped 

beam headlights come on for approxi-

mately thirty seconds. To increase this 

duration, you may pull the stalk up to 

four times (total time restricted to two 

minutes). The message “Follow-me 

home for - - -” accompanied by the 

lighting time is displayed on the instru-

ment panel to confirm the action. You 

can then lock your vehicle.

To switch off the lights before they go 

out automatically, turn ring 2 to any po-

sition, then return it to position AUTO.

EXTERIOR LIGHTING AND SIGNALS 

(2/3)

1

2

Switching off the lights

There are two possibilities:

–  manually, move ring 2 to position 0;

–  the lights will go out automatically 

when the engine is switched off, the 

driver’s door is opened or the vehicle 

is locked. In this case, the next time 

the engine is started, the lights will 

be switched back on according to the 

position of the ring 2, taking into ac-

count the exterior light level, without 

moving the stalk 1.

Welcome and goodbye 

function

(depending on vehicle)
Once the function is activated, the side 

lights come on automatically when the 

vehicle is unlocked.
They switch off automatically:

–  approximately one minute after light-

ing up;

–  when starting the engine based on 

the position of the lighting stalk;

or

–  upon locking the vehicle.

á

Main beam headlights

With the engine running and 

the dipped beam headlights on, push 

stalk 1. This indicator light on the instru-

ment panel comes on.

To return to the dipped headlight posi-

tion, pull stalk 1 towards you again.

Lights-on reminder buzzer

A warning beep sounds when the driv-

er’s door is opened to warn you that the 

lights are still on.

1.69

EXTERIOR LIGHTING AND SIGNALS 

(3/3)

f

Rear fog light

Turn the centre ring 4 on 

the stalk until the symbol is opposite 

mark 5, then release it.
Depending on the vehicle, the stalk re-

turns to the initial position or stays in 

position.
Operation of the fog lights depends on 

the exterior lighting selected, and an in-

dicator light will light up on the instru-

ment panel.
To avoid inconveniencing other road 

users, remember to switch off the rear 

fog light when it is no longer needed.

Cornering lights

Whenever the dipped beam headlights 

are on and under certain conditions (at 

speed, the steering wheel at an angle, 

in forward gear, the indicator lights on, 

etc.), when taking a corner one of the 

front fog lights will come on to light the 

inside of the bend.

Turning off the fog lights

There are two possibilities:

–  manually, depending on the vehi-

cle, turn the ring 4 again to bring the 

mark 5 opposite the symbol for the 

fog light that you want to switch off, 

or bring the ring 4 into position -. The 

corresponding indicator light will go 

out on the instrument panel;

– the lights will go out automati-

cally when the engine is switched 

off or the vehicle is locked, and the 

fog lights when the driver’s door is 

opened.

The front and rear fog lights switch off 

when the exterior lights are switched 

off.

4

1

5

g

Front fog lights

Turn the centre ring 4 on the 

stalk  1 until the symbol is opposite 

mark 5, then release it.
Operation of the fog lights depends on 

the exterior lighting position selected, 

and an indicator light will light up on the 

instrument panel.

When driving in fog or snow, or when transporting objects which are higher than the roof, the headlights do not come on au-

tomatically.
Switching on the fog lights remains the responsibility of the driver: the indicator lights on the instrument panel inform you 

whether the fog lights are lit (indicator light on) or not (indicator light not on).

1.70

é

Hazard warning lights 

Press switch 2.

This switch activates all four direction 

indicators and the side indicator lights 

simultaneously. It must only be used in 

an emergency to warn drivers of other 

vehicles that you have had to stop in 

an area where stopping is prohibited or 

unexpected, or that you are obliged to 

drive under special conditions.

Depending on the vehicle, the hazard 

warning lights may come on auto-

matically under heavy deceleration. 

You can switch them off by pressing 

switch 2 once.

Direction indicators

Move stalk 1 parallel to the steering 

wheel and in the direction you are going 

to turn it.

One-touch mode
When driving, it is possible that the 

steering wheel may not be turned suf-

ficiently to return the stalk automatically 

to its starting position.

In this case, move the stick 1 to half-

way, then release it: it will return to its 

initial position and the indicator light 

flashes three times.

Horn

Press steering wheel boss A.

Headlight flasher

Pull stalk 1 towards you to flash the 

headlights.

AUDIBLE AND VISUAL SIGNALS

A

1

2

1.71

HEADLIGHT BEAM ADJUSTMENT 

(1/2)

On vehicles fitted with this function, 

control A allows you to adjust the height 

of the beams according to the load.
Turn control A downwards to lower the 

headlights and upwards to raise them.

A

For manual settings

Examples of positions for adjusting control A according to the load

Halogen 

headlights

LED headlight

0

0

Driver alone or with front passenger

1

1

All seats occupied

1

2

Driver with passengers and luggage 

(or load) reaching the maximum 

permissible all-up weight

2

3

Driver without passengers and luggage 

(or load) reaching the maximum 

permissible all-up weight

4

4

To use according to the vehicle load

1.72

HEADLIGHT BEAM ADJUSTMENT 

(2/2)

Temporary adjustment

Open the bonnet and identify the mark-

ing B next to one of the front headlight 

projectors.
For each halogen headlight, use a 

screwdriver to turn the screw 1 by a 

quarter turn towards the - symbol to 

lower the beams.
Return to the original position once your 

trip is over: turn the screw 1 a quarter of 

a turn towards the + symbol to raise the 

beams.

When driving on the left in a left-

hand drive vehicle (or vice versa), 

you must adjust your lights tempo-

rarily during your stay.

B

1

For an LED headlight, use a screw-

driver to turn the bolt 1 by a half turn to-

wards the - symbol to lower the beams.
Return to the original position once 

your trip is over: turn the bolt 1 by a half 

turn towards the + symbol to raise the 

beams.

1.73

WINDSCREEN WASH/WIPE 

(1/2)

A

B

C

D

1

With the ignition on, move stalk 1
–  A park.
–  B
 intermittent wiping.

The wipers will pause for several 

seconds between sweeps. It is 

possible to change the time be-

tween sweeps by turning ring 2.

–  C normal wiping speed.
–  D
 fast wiping speed.

Positions BC and D are accessible 

with the ignition on.

Vehicles with automatic wiper 

function

With the engine running, move stalk 1
–  A park.
–  B
 automatic wiper function

When this position is selected, the 

system detects water on the wind-

screen and triggers the wipers at a 

suitable wiping speed. It is possi-

ble to change the triggering thresh-

old and the time sweeps by turning 

ring 2:

–  E: minimum sensitivity

–  F: maximum sensitivity

NB: in foggy weather or during 

snowfalls, the wiping is not automati-

cally triggered and remains under 

the driver’s control.

–  C normal wiping speed.
–  D
 fast wiping speed.

Position C is accessible with the ig-

nition on. Positions B and D are ac-

cessible only with the engine run-

ning.

1

2

E

F

Special note
When driving,
 the wiping speed slows 

down whenever the vehicle stops. For 

example: the speed will change from 

a fast wiping speed to normal wiping 

speed.

As soon as the vehicle moves off, 

wiping will return to the speed originally 

selected.

Any action on stalk 1 overrides and 

cancels automatic operation.
Starting the vehicle with the stalk in 

position  D triggers a slow continuous 

sweeping movement. Adjusting the 

stalk to position D is necessary to trig-

ger a rapid continuous sweeping move-

ment. 

1.74

Windscreen washer

With the ignition on, pull stalk 1 to-

wards you.
A brief pull will trigger a single sweep 

of the wipers, in addition to the wind-

screen washer.
A longer pull triggers, as well as the 

windscreen washer, continuous sweep-

ing until the end of the request, then 

three return sweeps, then after a few 

seconds, a fourth.

WINDSCREEN WASH/WIPE 

(2/2)

In freezing or snowy weather, ensure 

they are not stuck to the windscreen 

(including the central area located 

behind the interior rear-view mirror) 

and the rear screen before starting 

the wipers (risk of motor overheat-

ing).
Check the condition of the wiper 

blades. You are responsible for their 

service life:

–  they must remain clean: clean 

the blades, windscreen and 

rear screen regularly with soapy 

water;

–  do not use them when the wind-

screen or rear screen are dry;

–  free them from the windscreen or 

rear screen when they have not 

been used for a long time.

In all cases, replace them as soon 

as they begin to lose efficiency: ap-

proximately once a year.

Before using the windscreen wiper, 

check that no objects are obstruct-

ing the travel of the blade.

Do not try to lift the wiper blades. 

They cannot remain detached from 

the windscreen. To replace the 

blades, refer to Section 5: “Wiper 

blades”.

When working in the engine 

compartment, ensure that 

the windscreen wiper stalk 

is in position A (park).

Risk of injury.

Before any action involving 

the windscreen (washing 

the vehicle, de-icing, clean-

ing the windscreen, etc.) 

return stalk 1 to position A (park).
Risk of injury and/or damage.

A

B

C

D

1

1.75

p

Rear screen wash/wipe

With ignition on, turn the end 

of the stalk 1 to bring the mark 2 in line 

with the symbol. When the stalk is re-

leased, it returns to the rear windscreen 

wiper position.

A short pull triggers the rear windscreen 

wipers.

A prolonged action triggers, in addition 

to the rear windscreen wipers, a contin-

uous sweep until the stalk is released, 

then two return wipes followed by a 

third, after a few seconds.

Special note
If the windscreen wipers are operat-

ing or are in automatic mode, the rear 

screen wiper wipes intermittently when 

reverse gear is engaged.

Depending on the vehicle, you can 

deactivate this function on the touch 

screen. Please see the equipment in-

structions for further information.

Y

Speed-dependent 

timed rear screen 

wiper

With the ignition on, turn the end of 

stalk 1 to align mark 2 with the symbol.

Wiping frequency varies with speed.

REAR SCREEN WASH, WIPE

1

2

In freezing or snowy weather, ensure 

they are not stuck to the windscreen 

(including the central area located 

behind the interior rear-view mirror) 

and the rear screen before starting 

the wipers (risk of motor overheat-

ing).
Check the condition of the wiper 

blades. You are responsible for their 

service life:

–  they must remain clean: clean 

the blades, windscreen and 

rear screen regularly with soapy 

water;

–  do not use them when the wind-

screen or rear screen are dry;

–  free them from the windscreen or 

rear screen when they have not 

been used for a long time.

In all cases, replace them as soon 

as they begin to lose efficiency: ap-

proximately once a year.

Before using the rear wiper, check 

that no object obstructs the travel of 

the blade.

Do not use the wiper arm to open or 

close the tailgate.

Before any action on the windscreen (washing the vehicle, de-icing, 

cleaning the windscreen, etc.) return stalk 1 to the park position.
Risk of injury or damage.

1.76

FUEL TANK 

(1/3)

A

B

2

1

Fuel grade

Use a high-grade fuel that complies 

with the legislation in force in each 

country and which must comply with 

the specifications given on the label 

on the cover A. Please refer to the in-

formation on “Engine specifications” in 

Section 6.
Diesel version
Only
 use diesel fuel which complies 

with the information on the label located 

inside the cover A.

Useful capacity of fuel tank: approx. 

45 litres.
The engine 0,9 TCe has a fuel tank ca-

pacity of 40 litres or 45 litres (depend-

ing on the vehicle).
To open cover A, place your finger into 

recess B

When filling, use the cap holder 1 on 

the cover A to secure the cap 2.

After filling, check that the cap and 

cover are closed.

Fuel filler cap: this is spe-

cific.
If you have to replace it, 

make sure it is identical 

to the original cap. Contact an ap-

proved Dealer.

Never place the cap near a source 

of heat or flame.
Do not wash the filler area with a 

high-pressure washer.

Do not mix even small 

amounts of petrol (un-

leaded or E85) with diesel. 

Do not use ethanol-based 

fuel if your vehicle is not compatible 

with this fuel.

Do not add additive to the fuel –

otherwise you risk damaging the 

engine.

Petrol version
It is essential to use unleaded petrol. 

The octane rating (RON) must comply 

with the information given on the label 

on the cover A. Refer to Section 6 for 

information on “Engine specifications”.

1.77

FUEL TANK 

(2/3)

3

Filling with fuel

With the ignition off, insert the nozzle 

and insert it fully before turning it on to 

fill the fuel tank (risk of splashing).
Keep the nozzle in this position through-

out the entire filling operation.

When the pump cuts out automatically 

at the end of the filling procedure, a 

maximum of two further filling attempts 

may be made, as there must be suffi-

cient space in the fuel tank to allow for 

expansion.

Make sure that no water enters the fuel 

tank during filling. The cover A and its 

surround must remain clean.

Petrol versions

Using leaded petrol will damage the 

antipollution system and may lead to a 

loss of warranty.

To ensure that the fuel tank is not filled 

with leaded petrol, the fuel tank filler 

neck contains a restrictor fitted with a 

foolproof system which only allows 

the nozzle for unleaded petrol to be 

used (at the pump).

Vehicle fitted with the Stop and 

Start function
To fill up with fuel, the engine must 

be stopped (and not on standby): 

stop the engine by pressing the 

engine stop button 3 (please refer 

to the information on “Starting and 

Stopping the engine” in Section 2).

Persistent fuel odour

If you notice a persistent 

fuel odour you should:

–  stop the vehicle as soon as traf-

fic conditions allow and switch off 

the ignition;

– switch on the hazard warning 

lights and ask your passengers to 

leave the vehicle and stay clear 

of the traffic;

–  contact an approved Dealer.

1.78

FUEL TANK (3/3)

4

3

No modifications what-

soever are permitted on 

any part of the fuel supply 

system (electronic units, 

wiring, fuel circuit, injectors, pro-

tective covers, etc.) as this may be 

dangerous (unless undertaken by 

qualified Network personnel).

Running out of fuel on diesel 

versions

Vehicles with priming bulb 4

After a breakdown caused by com-

pletely running out of fuel, the system 

must be reprimed before the engine is 

restarted:

Fill the tank with at least 8 litres of 

diesel fuel.

Press priming bulb 4 several times.
The engine can now be restarted.

If the engine does not start after several 

attempts, contact an approved Dealer.

Vehicles without priming bulb 4
Insert the RENAULT card into the 5 

card reader. Press the start button 3 

without pressing any of the pedals. Wait 

a few minutes before starting. This will 

enable the fuel circuit to be primed. If 

the engine does not start, repeat the 

procedure.

The engine may be hot 

when working in close prox-

imity. In addition, the engine 

cooling fan may come on at 

any moment.
Risk of injury.

5

2.1

Section 2: Driving

(Advice on use relating to fuel economy and the environment)

Running in . . . . . . . . . . . . . . . . . . . . . . . . . . . . . . . . . . . . . . . . . . . . . . . . . . . . . . . . . . . . . . . . . . . . .  

2.2

Starting/stopping the engine . . . . . . . . . . . . . . . . . . . . . . . . . . . . . . . . . . . . . . . . . . . . . . . . . . . . . . .  

2.3

Stop and Start Function . . . . . . . . . . . . . . . . . . . . . . . . . . . . . . . . . . . . . . . . . . . . . . . . . . . . . . . . . . .  

2.6

Special features of petrol versions  . . . . . . . . . . . . . . . . . . . . . . . . . . . . . . . . . . . . . . . . . . . . . . . . . .   2.10

Special features of Diesel versions . . . . . . . . . . . . . . . . . . . . . . . . . . . . . . . . . . . . . . . . . . . . . . . . . .   2.11

Gear lever/Handbrake . . . . . . . . . . . . . . . . . . . . . . . . . . . . . . . . . . . . . . . . . . . . . . . . . . . . . . . . . . . .   2.12

Driving advice, Eco-driving . . . . . . . . . . . . . . . . . . . . . . . . . . . . . . . . . . . . . . . . . . . . . . . . . . . . . . . .   2.13

Maintenance and antipollution advice . . . . . . . . . . . . . . . . . . . . . . . . . . . . . . . . . . . . . . . . . . . . . . . .   2.18

Environment  . . . . . . . . . . . . . . . . . . . . . . . . . . . . . . . . . . . . . . . . . . . . . . . . . . . . . . . . . . . . . . . . . . .   2.19

Tyre pressure loss warning . . . . . . . . . . . . . . . . . . . . . . . . . . . . . . . . . . . . . . . . . . . . . . . . . . . . . . . .   2.20

Driver correction devices/aids . . . . . . . . . . . . . . . . . . . . . . . . . . . . . . . . . . . . . . . . . . . . . . . . . . . . . .   2.23

Blind spot warning . . . . . . . . . . . . . . . . . . . . . . . . . . . . . . . . . . . . . . . . . . . . . . . . . . . . . . . . . . . . . . .   2.28

Speed limiter . . . . . . . . . . . . . . . . . . . . . . . . . . . . . . . . . . . . . . . . . . . . . . . . . . . . . . . . . . . . . . . . . . .   2.31

Cruise control  . . . . . . . . . . . . . . . . . . . . . . . . . . . . . . . . . . . . . . . . . . . . . . . . . . . . . . . . . . . . . . . . . .   2.34

Parking distance control  . . . . . . . . . . . . . . . . . . . . . . . . . . . . . . . . . . . . . . . . . . . . . . . . . . . . . . . . . .   2.38

Reversing camera . . . . . . . . . . . . . . . . . . . . . . . . . . . . . . . . . . . . . . . . . . . . . . . . . . . . . . . . . . . . . . .   2.42

Assisted parking  . . . . . . . . . . . . . . . . . . . . . . . . . . . . . . . . . . . . . . . . . . . . . . . . . . . . . . . . . . . . . . . .   2.44

Automatic gearbox. . . . . . . . . . . . . . . . . . . . . . . . . . . . . . . . . . . . . . . . . . . . . . . . . . . . . . . . . . . . . . .   2.48

2.2

RUNNING IN

Petrol version

For the first 600 miles (1,000 km), do 

not exceed 78 mph (130 km/h) in the 

highest gear, or 3,000 to 3,500 rpm.
You may only expect top performance 

from your vehicle after approximately 

1,800 miles (3,000 km).
Service intervals: refer to the 

Maintenance Document for your vehi-

cle.

Diesel version

For the first 1,000 miles (1,500 km),  

do not exceed 80 mph (130 km/h) in 

the highest gear, or 2,500 rpm. After 

completing this mileage you may drive 

faster, although you may only expect 

top performance after approximately 

3,600 miles (6,000 km).
During the running in period, do not ac-

celerate hard while the engine is still 

cold and do not let the engine over-rev.
Service intervals: refer to the 

Maintenance Document for your vehi-

cle.

2.3

Hands-free RENAULT card

The RENAULT card must be inserted 

in card reader 2 or in detection zone 3.
To start, depress the brake or clutch 

pedal and press button 1. If a gear 

is engaged, the vehicle may only be 

started by depressing the clutch pedal.

Starting with the boot open in 

hands-free mode
In this case, the RENAULT card must 

not be located in the luggage compart-

ment.

Remote control RENAULT 

card

When you get into the vehicle, insert 

the RENAULT card integrated key, 

pointing towards you, fully into the card 

reader 2.
To start, press button 1. If a gear is en-

gaged, depress the clutch pedal to start 

the vehicle.

STARTING, STOPPING THE ENGINE 

(1/3)

3

Special features

vehicles with an automatic gearbox
The lever should be in position P.

All vehicles
–  If one of the starting conditions is 

not met, the message “Press brake 

+ START” or “PRESS CLUTCH + 

START” or “SELECT PARK” is dis-

played and, depending on the vehi-

cle, flashes on the instrument panel;

–  in some cases, it will be necessary 

to move the steering wheel whilst 

pressing the start button 1 to help 

unlock the steering column; the mes-

sage “TURN STEERINGWHEEL + 

START” will warn you of this;

–  in the event of starting the engine 

in very low exterior temperatures 

(lower than -10°C): hold down the 

clutch pedal until the engine starts.

1

2


Content   ..  3  4  5  6   ..