Peugeot Expert Dag (2006 year). Instruction - part 6
 

  Index      Peugeot     Peugeot Expert Dag - instruction 2006 year in english


Search            


Content   ..  4  5  6  7   ..


Peugeot Expert Dag (2006 year). Instruction - part 6


Practical information

76 -

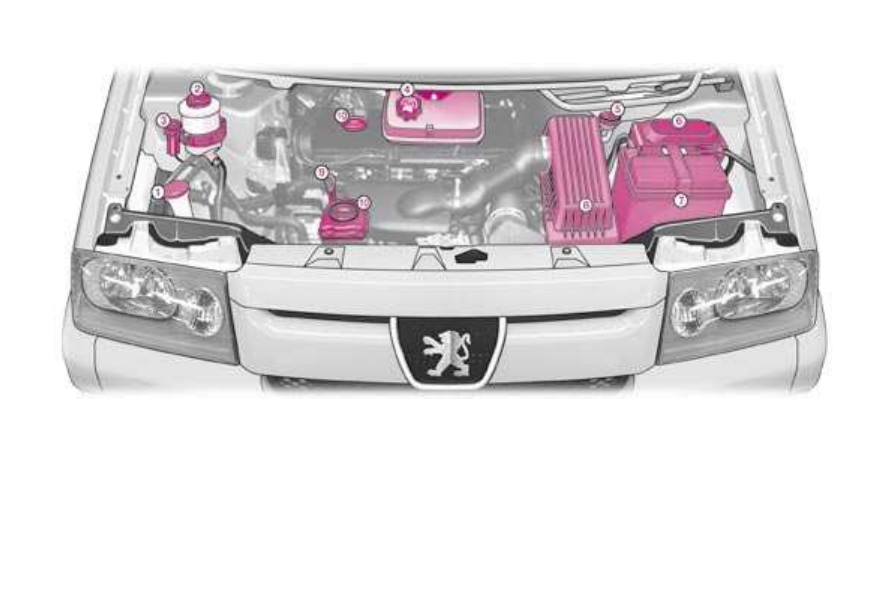
2 LITRE 16V PETROL ENGINE (136 bhp)

1 -  Windscreen/headlamp* wash 

reservoir.

2 -  Power steering reservoir.

3 -  Fuel supply switch.

4 -  Coolant reservoir.

5 -  Brake fluid reservoir.

6 -  Fuse box.

7 -  Battery.

8 -  Air filter.

9 -  Dipstick.

10 - Engine oil filler cap.

*  According to country.

77

Practical information -

1.9 LITRE (70 bhp) DIESEL ENGINE

1 -  Windscreen and headlamp* 

wash reservoir.

2 -  Power steering reservoir.

3 -  Fuel repriming.

4 -  Coolant reservoir.

5 -  Brake fluid reservoir.

6 -  Fuse box.

7 -  Battery.

8 -  Air filter.

9 -  Dipstick.

10 - Engine oil filler cap.

*  According to destination.

Practical information

78 -

2 LITRE TURBO DIESEL HDI ENGINE (95 bhp/110 bhp)

1 -  Windscreen/headlamp* wash 

reservoir.

2 -  Power steering reservoir.

3 -  Coolant reservoir.

4 -  Brake fluid reservoir.

5 -  Fuse box.

6 -  Battery.

7 -  Air filter.

8 -  Dipstick.

9 -  Engine oil filler cap.

*  According to destination.

79

Practical information -

2 LITRE 16V TURBO DIESEL HDI ENGINE (110 bhp)

1 -  Windscreen/headlamp* wash 

reservoir.

2 -  Power steering reservoir.

3 -  Coolant reservoir.

4 -  Brake fluid reservoir.

5 -  Fuse box.

6 -  Battery.

7 -  Air filter.

8 -  Dipstick.

9 -  Engine oil filler cap.

*  According to destination.

Practical information

80 -

CHECKING THE LEVELS

Oil level

Check the level regularly and top up 

between  changes.  The  maximum 

consumption  is  0.5  l  per  600  miles 

(1 000 km).

Check the level with the vehicle level, 

engine cold, using the oil level gauge 

on  the  instrument  panel  or  the  dip-

stick. 

Dipstick

There  are  two  marks  on 

the dipstick:

A = maximum

Never fill past this mark.

B = minimum

To maintain the reliability 

of  engines  and  emission 

control  systems,  the  use 

of  additives  in  engine  oil 

is prohibited.

Oil change

According to the information given in 

the servicing booklet.

Note:  avoid  used  oil  coming  into 

prolonged  contact  with  the  skin. 

Empty the used oil into the contain-

ers  intended  for  this  purpose  in  the  

PEUGEOT network.

Viscosity selection

In  all  cases,  the  oil  selected  must 

meet  the  manufacturer's  require-

ments.

Brake fluid change:

-  must be carried out according to the 

manufacturer's servicing schedule.

-  use  fluids recommended by the

manufacturer,  which  fulfil DOT4

standards.

Note: brake fluid is harmful to health

and very corrosive. Avoid all contact 

with the skin.

Cooling system

Use  the  fluid recommended by the

manufacturer.

When  the  engine  is  warm,  the  tem-

perature  of  the  coolant  is  controlled 

by the engine fan. As this fan can op-

erate  with  the  ignition  key  removed 

and  because  the  cooling  system  is 

pressurised, wait for at least one hour 

after the engine has stopped before 

carrying out any work.

Power steering reservoir

Open  the  reservoir,  with  the  engine 

at  ambient  temperature.  The  level 

should  always  be  above  the  MIN. 

mark and close to the MAX. mark.

Windscreen and headlamp* 

wash level

For  best  quality  cleaning  and  for  your 

safety,  we  would  advise  that  you  use 

products recommended by PEUGEOT.

*  According to country.

Slacken  the  cap  by  two  turns  to  re-

lease  the  pressure  to  prevent  any 

risk  of  scalding.  When  the  pressure 

has  dropped,  remove  the  cap  and 

top up the level.

Note:  the  coolant  does  not  need  to 

be changed.

On  vehicles  fitted with a particle

emission  filter, the fan may operate

after  the  engine  has  been  switched 

off, even when the engine is cold.

Used oil

Do  not  dispose  of  used  oil,  brake  

fluid or coolant into drains or onto the

ground.

81

Practical information -

CHECKS

Battery

At the start of winter, have your bat-

tery checked by a PEUGEOT dealer.

Air filter and passenger

compartment filter

Have  the  filter elements replaced

regularly.

  If  you  drive  in  dusty  

conditions, change them twice as 

often.

Brake pads

Brake pad wear depends on the style 

of  driving,  in  particular  for  vehicles 

which  are  used  in  town,  over  short 

distances

It  may  be  necessary  to  check  the 

thickness of the pads, even between 

services.

Handbrake

Where  the  handbrake  travel  is  too 

great  or  there  is  a  reduction  in  the 

performance  of  the  system,  the 

handbrake should be adjusted, even 

between services.

Have  the  system  checked  by  a  

PEUGEOT dealer.

Oil filter

Change the filter regularly, in accord-

ance with the servicing schedule.

Manual gearbox

This  does  not  require  an  oil  change. 

Check the level in accordance with the 

manufacturer's servicing schedule.

To check the main levels and cer-

tain  components,  in  accordance 

with the manufacturer’s servicing 

schedule,  refer  to  the  pages  of 

the servicing booklet which corre-

spond to your vehicle’s engine.

Only  use  products  recom-

mended  by  PEUGEOT  or 

products of equivalent qual-

ity and specifications.

To  ensure  best  perform-

ance from components as important 

as the power steering and the brak-

ing  system,  PEUGEOT  selects  and 

offers quite specific products.

To  prevent  damage  to  the  electrical 

units, avoid washing the engine.

-  fill the fuel tank with at least five li-

tres of diesel,

-  squeeze  and  release  the  manual 

re-priming pump, under the bonnet 

under the protective cover, until fuel 

appears in the transparent pipe,

-  operate the starter until the engine 

starts.

To re-establish the fuel supply, press 

the switch on the corner of the front 

right-hand suspension assembly, un-

der the bonnet.

RUNNING OUT OF FUEL 

(DIESEL)

FUEL SUPPLY CUT-OFF 

(PETROL)

If you should run 

out  of  fuel,  it  is 

necessary to re-

prime the circuit:

In  a  serious  collision, 

a  switch  prevents  fuel 

from  reaching  the  en-

gine.

Practical information

82 -

CHANGING A WHEEL

Parking the vehicle

-  If possible, park the vehicle on lev-

el, stable and non-slippery ground.

-  Apply the handbrake, switch off the 

ignition and engage first or reverse

gear  (position 

P  for  the  automatic 

gearbox).

Access to the spare wheel 

and the jack

The wheel is located outside the ve-

hicle, under the rear floor, supported

by a metal carrier.

The tools are located under the driver's 

seat.

-  Use the trim remover 

1 to unscrew 

the jack bolt.

-  Remove  the  trim  remover 

1,  the 

jack 

2 and the wheelbrace 3.

-  Using  the  wheelbrace 

3,  slacken 

the  spare  wheel  carrier  retaining 

bolt, located on the inside near the 

closing system.

-  Lift the carrier to release the hook 

rearwards, then lower it.

Removing a wheel

-  If  possible,  chock  the  rear  of  the 

wheel  diagonally  opposite  the 

wheel to be changed.

-  Remove  the  wheel  trim,  using  the 

wheelbrace 

3 (large model) or the 

trim  remover 

1  (small  model),  by 

pulling at the valve passage hole.

-  Slacken the wheel bolts.

-  Place the jack 

at one of the four 

locations 

A  provided  on  the  sub-

frame,  the  closest  to  the  wheel  to 

be changed. Ensure that the entire 

surface of the jack base plate is in 

contact with the ground.

-  Extend  the  jack,  completely  un-

screw  the  bolts  and  remove  the 

wheel.

83

Practical information -

Replacing the wheel in the 

carrier

-  Replace the wheel in the carrier.

-  Lift the wheel, then the carrier and 

reposition the hook.

-  Do  not  forget  to  fully  tighten  the 

spare wheel carrier retaining bolt.

-  Stow the wheelbrace 

and the jack 

under the driver's seat.

-  Unfold  the  jack  using  the  trim  

remover 

1.

-  Put  the  trim  remover 

1  back  in  its 

housing.

Refitting the wheel

-  After  positioning  the  wheel,  light-

ly  pre-tighten  the  bolts  using  the 

wheelbrace 

3.

-  Compress the jack 

and release it.

-  Fully  tighten  the  bolts  using  the 

wheelbrace.

-  Replace  the  trim,  starting  at  the 

valve passage hole, and press it on 

using the palm of the hand.

For  your  safety,  always 

change a wheel:

-  on level, stable, non-slippery ground,

-  with the handbrake applied,

-  with  first or reverse gear engaged

(position 

P for the automatic gear-

box),

-  with the vehicle chocked,

-  never go underneath a vehicle which 

is supported only by a jack (use an 

axle stand).

After changing the wheel:

-  Have  the  tightening  of  the  bolts 

and the pressure of the spare tyre 

checked as soon as possible by a 

PEUGEOT dealer.

-  Have  the  punctured  tyre  repaired 

and  replace  it  on  the  vehicle  as 

soon as possible.

Practical information

84 -

CHANGING A BULB

Front lights

1.  Dipped beam headlamps/Main 

beam headlamps (H4-60/55 W) 

-  Disconnect the connector.

-  Remove the protective cover 

A.

-  Push  the  spring  towards  the  right, 

as indicated on the headlamp.

-  Remove and replace bulb.

2.  Side lights (W 5 W)

-  Turn  the  bulb  holder 

B  a  quarter 

turn and remove it.

-  Change the bulb.

3.  Direction indicators  

(PY 21 W amber)

-  Turn  the  bulb  holder 

C  a  quarter 

turn and remove it. 

-  Change the bulb.

Note: in certain weather conditions (low 

temperatures, humidity), 

the presence 

of condensation on the inside of the 

headlamp  glass  is  normal;  it  disap-

pears  a  few  minutes  after  the  lights 

have been switched on.

85

Practical information -

Only  use  H4  bulbs  manu-

factured by: 

- GE/TUNGSRAM,

- PHILIPS,

- OSRAM,

to avoid damaging the headlamps.

These meet the anti-UV (ultra-violet) 

specifications necessary for the cor-

rect  operation  and  reliability  of  the 

headlamps.

The headlamps are fitted with a poly-

carbonate lens coated with a protec-

tive varnish. You are strongly advised 

to avoid cleaning them using a dry or 

abrasive  cloth  and  using  detergent 

products or solvents.

Use a soft, damp cloth.

Direction indicator side repeaters 

(WY 5 W amber)

-  Push  the  transparent  cover  for-

wards and release it.

-  Turn the bulb holder a quarter turn.

-  Change the bulb. 

4 -  Front fog lamps (H1-55 W)

-  Remove the closer then the screw, 

located under the bumper.

-  Pull the assembly forwards.

-  Disconnect the connector.

-  Turn the protective cover 

A a quar-

ter turn.

-  Disconnect the connector 

B.

-  Move aside the springs 

C.

-  Remove the bulb and change it.

To refit, proceed in the reverse order

to removal.

It  is 

essential that the screw closer 

is refitted.

Amber  coloured  bulbs  (di-

rection  indicators  and  side 

repeaters) must be replaced 

by bulbs of identical specifi-

cation and colour.

Practical information

86 -

Rear lights

1 -  Brake lights/Side lights  

(P 21/5 W).

2 -  Direction indicators (P 21 W).
3 -  Reversing lights (P 21 W).
4 -  Fog lamp (P 21 W).

-  Open the corresponding rear door.

-  Unscrew  the  two  wing  nuts 

A  on 

the inside.

-  Take  out  the  light  unit  gently  and 

disconnect it.

-  Remove the light unit.

-  Unclip the bulb holder by pressing 

the tabs 

B.

-  Change the faulty bulb.

To refit, proceed in the reverse order

to removal.

Number plate lights (5 W)

Unclip  the  translucent  cover  to  gain 

access to the bulb.

87

Practical information -

Third brake light  

(rear left door) (P 21 W)

 

Unscrew nut 

A on the inside.

 

Take  out  the  unit  from  the  out-

side.

 

Unscrew  the  faulty  bulb  and 

change it.

To refit, proceed in the reverse order.

Practical information

88 -

CHANGING A FUSE 

The  fuse  boxes  are  located  under 

the fascia and in the engine compart-

ment.

Fascia fuse box

On the driver's side, open the cover 

to gain access to the fuses.

The  spare  fuses 

A  and  the  pliers  B 

are located inside the box.

Removing and fitting a fuse

Before  changing  a  fuse,  the  cause 

of the fault must be found and reme-

died. The fuse numbers are indicated 

on the fuse box.

Use the pliers 

B.

Always replace a faulty fuse with a 

fuse of the same rating.

Correct

Incorrect

Pliers B

Practical information

92 -

The electrical circuit of your 

vehicle is designed to oper-

ate with standard or option-

al equipment.

Before  installing  other  electrical 

equipment or accessories in your ve-

hicle, consult a PEUGEOT dealer.

Some  electrical  accessories  or  the 

way in which they are fitted may have

an adverse effect on the operation of 

your  vehicle  (its  electronic  control  

circuits,  the  audio  circuit  and  the 

electrical charging circuit).

PEUGEOT  declines  any  responsi-

bility  for  expenses  incurred  through 

the  repair  of  your  vehicle  or  for  any 

malfunctions  resulting  from  the  in-

stallation  of  auxiliary  accessories, 

not  supplied  and  not  recommended 

by  PEUGEOT  and  not  installed  in  

accordance with PEUGEOT's instruc-

tions, in particular for any equipment 

the power consumption of which ex-

ceeds 10 milliamps.

The  maxi  fuses  provide  additional 

protection for the electrical systems. 

Any  work  on  these  fuses  must  be 

carried out by a PEUGEOT dealer.

Engine compartment fuse box

To  gain  access  to  the  box  in  the 

engine  compartment  (next  to  the 

battery), unclip the cover.

After  carrying  out  work,  close  the 

cover very carefully.

The  spare  fuses 

A and the pliers B 

are located inside the box.

93

Practical information -

Rating

Functions

1

20 A

Fuel pump.

2

10 A

Right dipped headlamp.

3

10 A

Left dipped headlamp.

4

25 A

Headlamp wash.

5

-

Shunt.

6

10 A

Engine immobiliser.

7

10 A

Catalytic converter sensor.

8

20 A

Towbar.

9

25 A

1-120 W fan assembly.

30 A

1-180 W fan assembly.

10

15 A

Fog lamps.

11

-

Not used.

12

10 A

Left main beam.

13

10 A

Right main beam.

MF1

70 A

Engine running relay.

MF2

70 A

ABS control unit - Ignition switch.

MF3

30 A

Air blower - Air conditioning.

MF4

30 A

Fan assembly.

Practical information

88 -

CHANGING A FUSE 

The  fuse  boxes  are  located  under 

the fascia and in the engine compart-

ment.

Fascia fuse box

On the driver's side, open the cover 

to gain access to the fuses.

The  spare  fuses 

A  and  the  pliers  B 

are located inside the box.

Removing and fitting a fuse

Before  changing  a  fuse,  the  cause 

of the fault must be found and reme-

died. The fuse numbers are indicated 

on the fuse box.

Use the pliers 

B.

Always replace a faulty fuse with a 

fuse of the same rating.

Correct

Incorrect

Pliers B


Content   ..  4  5  6  7   ..