Peugeot Expert Dag (2006 year). Instruction - part 5
 

  Index      Peugeot     Peugeot Expert Dag - instruction 2006 year in english


Search            


Content   ..  3  4  5  6   ..


Peugeot Expert Dag (2006 year). Instruction - part 5


63

Visibility -

When  using  a  car  wash, 

switch  off  the  ignition  or 

check  that  the  windscreen 

wipers  stalk  is  in  position 

0-Off.

In winter, you are advised to wait un-

til  the  windscreen  has  been  de-iced 

fully before operating the windscreen 

wipers stalk.

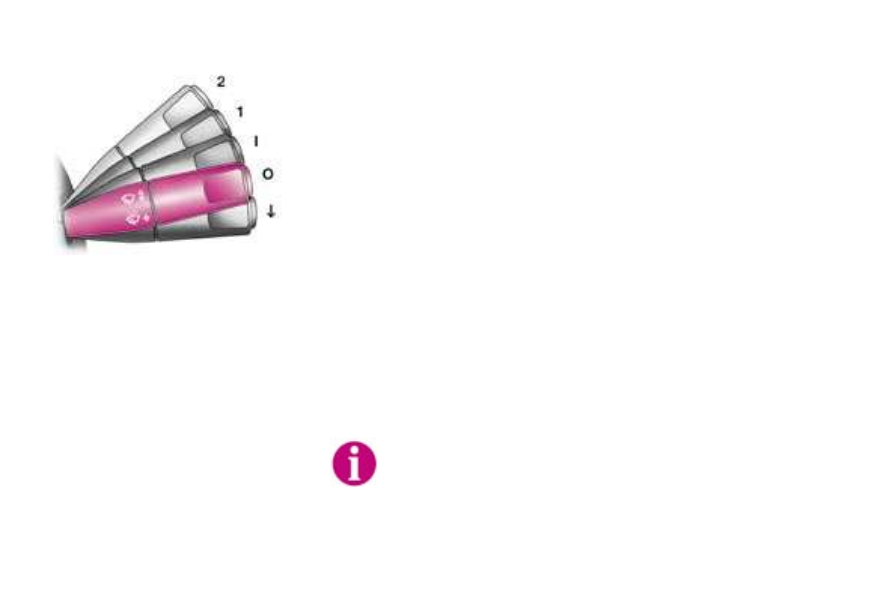
WINDSCREEN WIPER STALK

Front windscreen wiper

2  Fast wipe (heavy rain).

1  Normal wipe (moderate rain).

l 

Intermittent wipe.

0  Off.

  Single wipe (press downwards).

Operation

In  position 

1  or  2,  when  the  vehicle 

stops,  the  windscreen  wiper  chang-

es  to  a  lower  wiping  speed,  then 

resumes  its  initial  speed  when  the 

vehicle starts again.

In the 

Intermittent position, the wiping 

speed is proportional to the speed of 

the vehicle.

Windscreen and headlamp wash

Pull  the  windscreen  wiper  stalk  to-

wards  you.  The  windscreen  wash 

then  the  windscreen  wipers  operate 

for a fixed period.

The headlamp wash is also activated, 

if the headlamps are on

Visibility

64 -

ELECTRIC WINDOWS

1 -  Driver's electric window 

switch.

2 -  Passenger's electric window 

switch.

SLIDING SIDE WINDOW

To  open  the  window,  pull  control 

A 

and push the window forwards.

To close the window, push it towards 

the rear and press control 

B to lock 

it.

Always  remove  the  key 

from the ignition when leav-

ing  the  vehicle,  even  for  a 

short time.

If  an  obstacle  is  detected 

when operating the electric windows, 

you  must  reverse  the  movement  of 

the  window.  To  do  this,  press  the 

control concerned.

When  the  driver  operates  the  pas-

senger  electric  window  controls,  he 

must ensure that no one is prevent-

ing correct closing of the windows.

The driver must ensure that passen-

gers  use  the  electric  windows  cor-

rectly.

Be aware of children when operating 

the windows.

Notes:

In the event of unwanted opening of 

the window when closing (for exam-

ple,  in  the  case  of  frost),  press  the 

control until the window is fully open, 

then  pull  it  again  until  the  window 

closes.  Continue  to  pull  the  control 

for  approximately  one  second  after 

closing.

Following reconnection of the battery, 

in the event of a malfunction, release 

the control and pull it again until the 

window closes completely.

Continue  to  pull  the  control  for  ap-

proximately one second after closing.

Automatic operation  

(driver's side):

 press or pull the switch fully. One 

touch  completely  opens  the  win-

dow. 

You have two options:

Manual operation:

 press  or  pull  the  switch  gently. 

The window stops as soon as the 

switch is released.

65

Visibility -

MIRRORS

Electric exterior mirrors
 

Move  switch 

A  to  the  right  or  to 

the  left  to  select  the  correspond-

ing mirror.

 

Move  switch 

A  in  all  four  direc-

tions to adjust.

 

Return switch 

to the centre po-

sition.

When  parked,  the  mirrors  can  be 

folded back manually.

Manual exterior mirrors

Move  the  lever  in  all  four  directions 

to adjust.

When the vehicle is parked, the ex-

terior  mirrors  can  be  folded  back 

manually.

Manual interior mirror

The interior mirror has two positions:

-  day (normal),

-  night (anti-dazzle).

To  change  from  one  to  the  other, 

push  or  pull  the  lever  on  the  lower 

edge of the mirror.

AREAS FOR TOLL CARDS/

CAR PARK TICKETS

The  athermic  windscreen  has  two 

non-reflective zones located either

side of the base of the interior mirror.

They  are  intended  for  affixing toll

cards and/or car park tickets. 

Comfort and safety

66 -

HEADLAMP ADJUSTMENT

Depending on the load or the number 

of people in your vehicle, it is recom-

mended  that  the  headlamp  beam  is 

adjusted.

0  -  Empty/Driver only.

-  -  2 or 3 people.

1  -  Minimal load/5 or 6 people.

2  -  Medium load/7 to 9 people.

3  -  Maximum load/1 to 3 people 

in the front + maximum 

authorised loads.

Initial setting is position 0.

STEERING WHEEL HEIGHT 

ADJUSTMENT

When  stationary,  push  the  handle 

A  fowards  to  unlock  the  steering 

wheel.

Adjust it to the desired height.

Pull the handle 

A towards you fully to 

lock the steering wheel.

HAZARD WARNING LIGHTS

Press the button, the direction indica-

tors flash.

They can operate with the ignition off. 

HORN

Press the end of the lights 

and  direction  indicators 

stalk.

67

Comfort and safety -

COURTESY LIGHTS

1 -  Front courtesy light

Horizontal position:

lighting  on  opening  one  of  the  front 

doors.

Tilted position:

permanent lighting, key in the acces-

sories or ignition on position.

2 -  Rear courtesy light (Combi)

Horizontal position:

off.

Tilted position:

on, key in the accessories or ignition 

on position.

3 -  Rear courtesy light (Van)

Horizontal position:

off.

Tilted position:

on, key in the accessories or ignition 

on position.

Comfort and safety

68 -

1.  Fittings in the doors


A. Armrest


B. Storage compartment.


C. Bottle holder/Can holder.


D. Storage compartment.

2.  Overhead storage

Overhead storage maximum load:

 5 kg.

3.  Courtesy light

4.  Sun visors

The sun visors are equipped with a ticket holder.

FRONT FITTINGS

69

Comfort and safety -

For  greater  safety,  always 

ensure that the loads trans-

ported are stowed securely.

5.  Glove box or passenger  

air bag*

This location is reserved either for a 

glove box or for a passenger air bag 

with a storage compartment.

6.  Glove box

To  open  the  glove  box  with  cover, 

push the handle towards the left.

It  has  two  locations  on  the  cover  to 

be used as can holders and an inter-

nal retaining strap.

LASHING RINGS

Use  the  4  lashing  rings  on  the  lug-

gage  compartment  floor to secure

your loads. 

7.  Lighter

8.  Removable ashtray

To open, lift the cover and release it; 

the cover opens automatically.

To close, lift the cover to the stop and 

fold it back.

To  empty,  after  opening,  press  the 

left  edge  of  the  cover  then  pull  up-

wards to remove.

*  According to destination.

69

Comfort and safety -

For  greater  safety,  always 

ensure that the loads trans-

ported are stowed securely.

5.  Glove box or passenger  

air bag*

This location is reserved either for a 

glove box or for a passenger air bag 

with a storage compartment.

6.  Glove box

To  open  the  glove  box  with  cover, 

push the handle towards the left.

It  has  two  locations  on  the  cover  to 

be used as can holders and an inter-

nal retaining strap.

LASHING RINGS

Use  the  4  lashing  rings  on  the  lug-

gage  compartment  floor to secure

your loads. 

7.  Lighter

8.  Removable ashtray

To open, lift the cover and release it; 

the cover opens automatically.

To close, lift the cover to the stop and 

fold it back.

To  empty,  after  opening,  press  the 

left  edge  of  the  cover  then  pull  up-

wards to remove.

*  According to destination.

Driving

72 -

If the battery is flat and the

lever is in position 

P, it will 

be impossible to change to 

another position.

"PORSCHE TIPTRONIC 

SYSTEM" AUTOMATIC 

GEARBOX

The  four  speed 

automatic  gearbox 

offers  a  choice  between  the  comfort 

of 

integral automatic operation, en-

hanced  by  a 

snow  program,  or  the 

pleasure of 

manual gear changing.

Gear selection gate

 Move  the  lever  in  the  gate  to 

select a position.

Once  the  position  is  selected,  the 

corresponding indicator light appears 

on the instrument panel display.

: snow program

P

ark:  to 

immobilise  the  vehicle  or 

start the engine, with the handbrake 

on or off.

R

everse:  to 

reverse  (select  this  

position  with  the  vehicle  stationary,  

engine at idle).

N

eutral:  to 

start  the  engine  and  to 

park, with the handbrake on.

Note: if position N is engaged inad-

vertently while driving, allow the en-

gine to return to idle before engaging 

position 

D to accelerate.

D

rive: for 

driving in automatic mode.

M

anual: for 

driving in manual mode.

Moving off

With the engine running, to move off 

from position 

P:

 it is essential to press the brake 

pedal to exit position P,

 select  position  R,  D  or  M,  then 

gradually  release  the  pressure 

on  the  brake  pedal;  the  vehicle 

moves off immediately.

You can also move off from position 

N:

 with  your  foot  on  the  brake,  re-

lease the handbrake,

 select  position  R,  D  or  M,  then 

gradually  release  the  pressure 

on  the  brake  pedal;  the  vehicle 

moves off immediately.

WARNING
When the engine is at idle, brakes not 

applied,  if  position 

R,  D  or  M  is  se-

lected the vehicle moves even with-

out the accelerator being pressed. 

For  this  reason, 

do  not  leave  

children  unsupervised  inside  the  

vehicle, with the engine running.

When maintenance operations need 

to be carried out with the engine run-

ning, apply the handbrake and select 

position 

P.

73

Driving -

Automatic operation

Automatic  changing  of  the 

four 

gears:

 select position 

in the gate.

The gearbox always selects the most 

suitable gear according to the follow-

ing parameters:

-  the style of driving,

-  the road profile,

-  the vehicle load.

The  gearbox  is  then  operating  in 

auto-adaptive  mode,  without  any  

action on your part.

WARNING

Never  select  position 

N  when  the  

vehicle is moving.

Never select positions 

or R unless 

the vehicle is stationary.

Never  change  between  positions 

to  optimise  braking  on  a  slippery  

surface.

If  you  take  your  foot  off  the  accel-

erator suddenly, the gearbox will not 

change to a higher gear for reasons 

of safety.

Snow program

In addition to the auto-adaptive pro-

gram, there is a special program.

The  program  is  displayed  on  the  

instrument panel screen.

The Snow program improves starting 

and drive when traction is poor.

 Press  button    once  the  vehicle 

has  been  started  and  position 

selected.

The  gearbox  adapts  to  driving  on 

slippery roads.

Note:  you  can  return  to  the  auto-

adaptive program at any time.

 Press button 

 again to switch off 

the program you are in.

Manual operation

Manual changing of the 

four gears:

 select position 

in the gate,

 push  the  lever  to  the 

+  sign  to 

change to a higher gear,

 pull  the  lever  to  the 

-  sign  to 

change to a lower gear.

You  can  change  from  position 

(driving  in  automatic  mode)  to  posi-

tion 

M  (driving  in  manual  mode)  at 

any time.

Operating abnormality 

Any operating abnormality is indicated 

by an audible signal, accompanied by 

flashing of the Snow warning light on

the instrument panel.

In  this  situation  the  gearbox  oper-

ates  in  downgrade  mode  (locked  in 

3rd  gear).  You  may  feel  a  substan-

tial  knock  when  changing  from 

P  to 

and from to (this will not cause 

any damage to the gearbox).

Do  not  exceed  60  mph  (100  km/h), 

keeping within the limit of local speed 

restrictions.

Contact a PEUGEOT dealer as soon 

as possible.

Notes:

For  immediate  maximum  accelera-

tion without touching the gear lever, 

press the accelerator pedal down as 

far as it will go (kick down). The gear-

box  will  automatically  change  down 

or  maintain  the  gear  selected  until 

maximum engine speed is reached.

When braking, the gearbox will auto-

matically  change  down  in  order  to 

provide efficient engine braking.

Notes:

It is only possible to change from one 

gear to another if the vehicle speed 

and engine speed permit. If they do 

not,  the  vehicle  will  operate  tempo-

rarily in automatic mode.

When  the  vehicle  is  stationary  or 

moving  very  slowly,  the  gearbox  

automatically selects gear 

M1.

The 

  (snow)  program  does  not  

operate in manual mode.

Driving

74 -

MANUAL GEARBOX

Reverse*

To  change  to  reverse  gear,  lift  the 

ring  under  the  gear  lever  knob  and 

push the gear lever to the left then to 

the front.

Reverse gear can only be engaged 

when the vehicle is stationary with 

the engine idling.

*  According to engine.

AIR BAGS

The air bags have


been designed to 

maximise the safety of the occupants 

in  the  event  of  serious  collisions. 

They  work  in  conjunction  with  the 

pretensioning  seat  belts  with  force 

limiter.

The electronic detectors register and 

analyse  any  abrupt  deceleration  of 

the  vehicle:  if  the  triggering  thresh-

old is reached, the air bags inflate in-

stantly and protect the occupants of 

the vehicle.

Immediately after the impact, the air 

bags  deflate rapidly so that they do

not  hinder  the  visibility  of  the  occu-

pants nor their exit if necessary from 

the vehicle.

The air bags are not deployed in the 

case of minor collisions, for which the 

seat belt is sufficient to ensure maxi-

mum protection. The seriousness of 

a collision depends on the nature of 

the obstacle and the speed of the ve-

hicle at the moment of impact.

Air  bags  only  operate  when  the  

ignition is switched on.

Note: the gas escaping from the air 

bags can be a minor irritant.

FRONT AIR BAGS

These are folded in the centre of the 

steering  wheel  for  the  driver  and  in 

the  fascia  for  the  front  passenger 

(one seat). They are deployed simul-

taneously.

If  this  warning  light  comes 

on on the instrument panel, 

accompanied  by  an  audible 

signal, contact a PEUGEOT 

dealer  to  have  the  system 

checked.

Front air bag fault

Driving

70 -

HANDBRAKE

Lighting of this warning light, 

while  the  vehicle  is  moving, 

indicates that the handbrake 

is still applied or has not been 

released correctly.

When  parking  on  a  slope, 

direct your wheels towards 

the pavement and apply the 

handbrake.

Only  apply  the  handbrake 

when the vehicle is stationary.

Illumination of this warning 

light,  accompanied  by  an 

audible  signal,  indicates  a 

malfunction of the electron-

ic  brake  force  distribution, 

which can cause a loss of control of 

the vehicle when braking.

Stop immediately.

Contact a PEUGEOT dealer.

Applying

When parking, pull the handbrake to 

immobilise your vehicle.

Releasing

Pull the handle and press the button 

to release the handbrake.

ANTI-LOCK BRAKING 

SYSTEM (ABS)

The ABS with Electronic Brake Force 

Distribution  (EBFD)  increases  the 

stability and manoeuvrability of your 

vehicle,  particularly  on  poor  or  slip-

pery road surfaces.

Note:  when  changing  wheels  (tyres 

and rims), make sure that these are 

approved.

The anti-lock braking system comes 

into  operation  automatically  when 

there is a risk of wheel lock.

Normal  operation  of  the ABS  may 

make  itself  felt  by  slight  vibrations 

of the brake pedal.

In emergency braking, press very 

firmly without releasing the pres-

sure.

71

Driving -

On a steep slope, the cruise 

control  will  not  be  able  to 

prevent  the  vehicle  from 

exceeding the programmed 

speed.

The cruise control cannot, in any cir-

cumstances, replace the need to re-

spect speed limits nor can it replace 

the need for vigilance and responsi-

bility on the part of the driver.

Do not use cruise control on slippery 

roads or in heavy traffic.

CRUISE CONTROL

Cruise  control  enables  the  vehicle 

to  maintain  a  steady  speed  pro-

grammed by the driver.

In  order  for  it  to  be  memorised, 

the  vehicle  speed  must  be  greater 

than  25  mph  (40  km/h)  or  40  mph  

(60 km/h), (according to engine), with 

at  least  4th  gear  engaged  (second 

for the automatic gearbox).

Operation

 Press switch 

A. The indicator light 

will come on.

A speed can be memorised.

 Press  switch 

A  again  to  cancel. 

The indicator light will switch off.

Memorising a speed

As  soon  as  you  reach  the  chosen 

speed,  push  stalk 

B  upwards  or 

downwards.  This  memorises  the 

speed,  which  will  be  maintained  

automatically.

Note:  it  is  possible  to  accelerate 

momentarily  without  disarming  the 

cruise control.

Cancelling the memorised 

speed

 Pull stalk 

towards you or press 

the brake or clutch pedal.

Recalling the memorised 

speed

After  cancellation,  push  stalk 

B  up-

wards  or  downwards.  Your  vehicle 

will  return  to  the  last  memorised 

speed.

Changing the memorised 

speed

To memorise a speed higher than the 

previous one:

 keep stalk 

pressed upwards;

 release it when you have reached 

the required speed.

To memorise a speed lower than the 

previous one:

 keep stalk 

pressed downwards;

 release it when you have reached 

the required speed.

Disarming the cruise control

 Press switch 

A to switch the sys-

tem off or switch off the ignition.

Driving

74 -

MANUAL GEARBOX

Reverse*

To  change  to  reverse  gear,  lift  the 

ring  under  the  gear  lever  knob  and 

push the gear lever to the left then to 

the front.

Reverse gear can only be engaged 

when the vehicle is stationary with 

the engine idling.

*  According to engine.

AIR BAGS

The air bags have


been designed to 

maximise the safety of the occupants 

in  the  event  of  serious  collisions. 

They  work  in  conjunction  with  the 

pretensioning  seat  belts  with  force 

limiter.

The electronic detectors register and 

analyse  any  abrupt  deceleration  of 

the  vehicle:  if  the  triggering  thresh-

old is reached, the air bags inflate in-

stantly and protect the occupants of 

the vehicle.

Immediately after the impact, the air 

bags  deflate rapidly so that they do

not  hinder  the  visibility  of  the  occu-

pants nor their exit if necessary from 

the vehicle.

The air bags are not deployed in the 

case of minor collisions, for which the 

seat belt is sufficient to ensure maxi-

mum protection. The seriousness of 

a collision depends on the nature of 

the obstacle and the speed of the ve-

hicle at the moment of impact.

Air  bags  only  operate  when  the  

ignition is switched on.

Note: the gas escaping from the air 

bags can be a minor irritant.

FRONT AIR BAGS

These are folded in the centre of the 

steering  wheel  for  the  driver  and  in 

the  fascia  for  the  front  passenger 

(one seat). They are deployed simul-

taneously.

If  this  warning  light  comes 

on on the instrument panel, 

accompanied  by  an  audible 

signal, contact a PEUGEOT 

dealer  to  have  the  system 

checked.

Front air bag fault

75

Driving -

SIDE AIRBAGS*

These  are  incorporated  into  the 

frame of the driver and front passen-

ger (one seat) seat back, on the door 

side.

They  are  deployed  independently 

of  each  other  depending  on  which 

side the collision occurs, in collisions 

which could cause injury to the chest, 

the abdomen or the head.

This  is  confirmed by an 

indicator light on the instru-

ment panel.

It  comes  on  for  six  sec-

onds, each time the ignition 

is switched on.

Operating check

If the indicator light:

-  does not light up when the ignition 

is switched on, or

-  does not go out after six seconds, 

or

-  flashes for five minutes then stays

on,

contact a PEUGEOT dealer.

For the front and side* air 

bags to be fully effective, 

observe  the  following 

safety rules:

• Wear  a  correctly  adjusted  seat 

belt.

• Sit in a normal upright position.

• Do not leave anything between the 

occupants and the air bags (child, 

animal, object...).

  This  could  hamper  the  operation  of 

the air bags or injure the occupants.

• All work on the air bag systems is 

strictly  prohibited  unless  it  is  car-

ried  out  by  qualified personnel of

the PEUGEOT network.

• After  an  accident  or  if  the  vehicle 

has  been  stolen  or  broken  into, 

have the air bag systems checked.

Front air bags

• Do  not  drive  holding  the  steering 

wheel by its spokes or resting your 

hands  on  the  centre  part  of  the 

wheel.

• Passengers  must  not  place  their 

feet on the fascia.

• Smoke as little as possible; deploy-

ment  of  the  air  bags  can  cause 

burns  or  the  risk  of  injury  from  a 

cigarette or pipe.

• Never  remove  or pierce  the steer-

ing wheel or hit it violently.

*  According to country. 

Side air bags*

• Only  put  approved  covers  on  the 

front seats. Contact your PEUGEOT 

dealer.

• Do  not  fix or glue anything to the

front seat backs. This could cause 

injury to the chest or arms when the 

side air bag inflates.

• Do not sit with the upper part of the 

body  any  nearer  to  the  door  than 

necessary.

75

Driving -

SIDE AIRBAGS*

These  are  incorporated  into  the 

frame of the driver and front passen-

ger (one seat) seat back, on the door 

side.

They  are  deployed  independently 

of  each  other  depending  on  which 

side the collision occurs, in collisions 

which could cause injury to the chest, 

the abdomen or the head.

This  is  confirmed by an 

indicator light on the instru-

ment panel.

It  comes  on  for  six  sec-

onds, each time the ignition 

is switched on.

Operating check

If the indicator light:

-  does not light up when the ignition 

is switched on, or

-  does not go out after six seconds, 

or

-  flashes for five minutes then stays

on,

contact a PEUGEOT dealer.

For the front and side* air 

bags to be fully effective, 

observe  the  following 

safety rules:

• Wear  a  correctly  adjusted  seat 

belt.

• Sit in a normal upright position.

• Do not leave anything between the 

occupants and the air bags (child, 

animal, object...).

  This  could  hamper  the  operation  of 

the air bags or injure the occupants.

• All work on the air bag systems is 

strictly  prohibited  unless  it  is  car-

ried  out  by  qualified personnel of

the PEUGEOT network.

• After  an  accident  or  if  the  vehicle 

has  been  stolen  or  broken  into, 

have the air bag systems checked.

Front air bags

• Do  not  drive  holding  the  steering 

wheel by its spokes or resting your 

hands  on  the  centre  part  of  the 

wheel.

• Passengers  must  not  place  their 

feet on the fascia.

• Smoke as little as possible; deploy-

ment  of  the  air  bags  can  cause 

burns  or  the  risk  of  injury  from  a 

cigarette or pipe.

• Never  remove  or pierce  the steer-

ing wheel or hit it violently.

*  According to country. 

Side air bags*

• Only  put  approved  covers  on  the 

front seats. Contact your PEUGEOT 

dealer.

• Do  not  fix or glue anything to the

front seat backs. This could cause 

injury to the chest or arms when the 

side air bag inflates.

• Do not sit with the upper part of the 

body  any  nearer  to  the  door  than 

necessary.


Content   ..  3  4  5  6   ..