Peugeot 4008 (2017 year). Instruction - part 13
 

  Index      Peugeot     Peugeot 4008 - instruction 2017 year in english


Search            copyright infringement  


Content   ..  11  12  13  14   ..


Peugeot 4008 (2017 year). Instruction - part 13


191

8

In the event of a breakdown

4008_en_Chap08_en-cas-de panne_ed01-2016

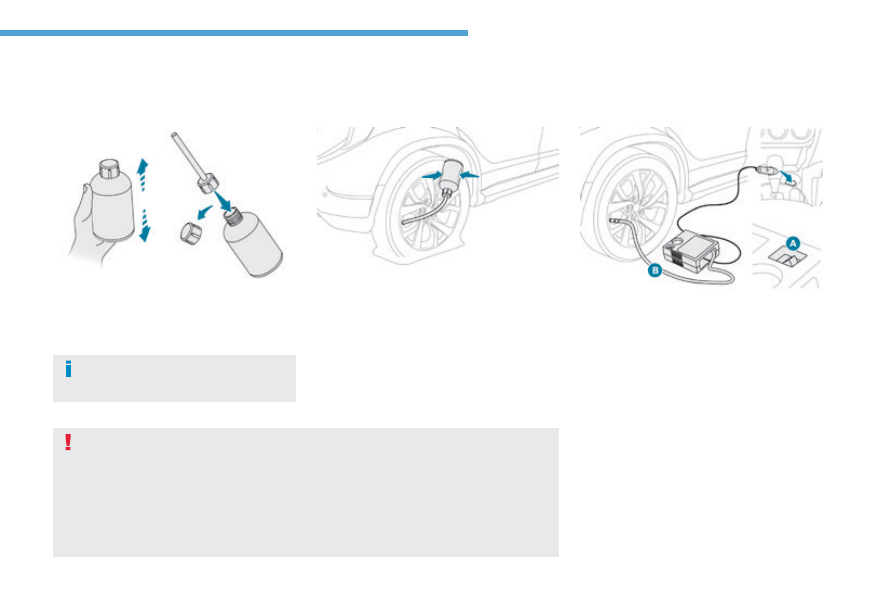
F  Connect the injection end-piece to the 

valve of the tyre to be repaired.

F  Press several times on the sealant 

cartridge (top down) with your hand, to 
inject 

all of the product into the tyre.

F  Remove the injection end-piece.
F  Refit the valve core and tighten it using the 

tool provided.

take care, this product is harmful if swallowed and causes irritation to the eyes.
Keep it out of reach of children.
the use-by date of the sealant is marked on the cartridge.
After use, do not discard the empty cartridge but take it to a PeugeOt dealer or an 
authorised waste disposal site.
Do not forget to obtain a replacement cartridge; they are available from a PeugeOt dealer 
or a qualified workshop.

F  Check that the compressor switch A is at 

the "OFF" position.

F  uncoil the compressor pipe B fully.
F  Connect this pipe to the valve of the 

repaired wheel.

F  Connect the compressor's electric plug to 

the vehicle's 12 V socket (ignition switch in 
position "ACC" or ACC mode).

F  Start the compressor by turning the 

switch A to the "ON" position to inflate the 
tyre to the pressure indicated on the tyre 
pressure label.


For more information about 

Identification 

markings, refer to the corresponding 
section.

Avoid removing any foreign bodies 
which have penetrated into the tyre.

F  Shake the sealant cartridge, remove the 

cap and screw on the injection end-piece.

192

In the event of a breakdown

4008_en_Chap08_en-cas-de panne_ed01-2016

F  If the specified pressure has not been 

reached after about 10 minutes, this means 
that the tyre is not repairable; contact a 
PeugeOt dealer or a qualified workshop 
for roadside assistance.

F  Remove the compressor and stow the kit.

Do not operate the compressor for more 
than 10 minutes continuously.
If the compressor seems extremely 
hot, switch it off and disconnect it 
immediately. Leave it to cool for at least 
30 minutes.

As soon as possible after a repair using 
the kit, go to a PeugeOt dealer or a 
qualified workshop.
Make sure that you tell the technician 
that you have used the kit. After 
checking, the technician will advise you 
whether the tyre can be repaired or if it 
must be replaced.

If the vehicle is fitted with under-
inflation detection, the under-inflation 
warning lamp remains on until the 
system has been reinitialised.
For more information on 

Under-

inflation detection, refer to the 
corresponding section.

F  Affix the speed restriction sticker to the 

centre of the steering wheel.

F  Drive off straight away at reduced speed 

(50 mph (80 km/h) max) to spread the 
sealant product within the tyre.

F  After about 6 miles (10 km) or 5 minutes, 

stop and check the repair and the tyre 
pressure using the compressor. If the 
pressure has dropped slightly, inflate the 
tyre again to the specified figure. Carry 
out the same check after another 6 miles 
(10 km) or 5 minutes: if the pressure 
has not held at the specified figure, this 
indicates that the puncture repair has not 
sealed; contact a PeugeOt dealer or a 
qualified workshop for roadside assistance.

If the pressure is correct, carefully tighten the 
tyre valve cap. You can drive at reduced speed 
(50 mph (80 km/h) max) to go to a PeugeOt 
dealer or a qualified workshop.

193

8

In the event of a breakdown

4008_en_Chap08_en-cas-de panne_ed01-2016

Changing a wheel

the tools are stowed in the boot under the 
floor.
to gain access to them:
F  Open the boot.
F  Lift and remove the boot floor.

Access to the tools

List of tools

these tools are specific to your vehicle. Do not 
use them for anything else.
1. Wheelbrace.
 

used to remove the wheel trim and the 
wheel fixing bolts.

2. Jack.
 

used to raise the vehicle.

3. Handle.
 

used to operate the jack.

4.  Removable towing eye.
 

For more information on Towing the 
vehicle
, refer to the corresponding section.

5.  Socket for security wheel bolts (available 

as an accessory).


used to adapt the wheelbrace to the 
special "security" wheel bolts.

Procedure for replacing a faulty wheel with the spare wheel using the tools supplied with the vehicle.

Wheel with trim

When removing the wheel, remove the 
trim first using the handle 3, pulling at 
the cut-out.
When refitting the wheel, refit the trim 
starting by placing its cut-out opposite 
the valve and press on its outer edge 
with the palm of your hand.

194

In the event of a breakdown

4008_en_Chap08_en-cas-de panne_ed01-2016

the spare wheel is installed in the boot under 
the floor.
Depending on version, the spare wheel may be 
a standard size steel or alloy wheel, or for some 
countries it is the "space saver" type.
For access to the spare wheel, see "Access to 
the tools".

Access to the spare wheel

Taking out the standard wheel

F  unscrew the central bolt A.
F  Raise the spare wheel towards you from 

the rear.

F  take the wheel out of the boot.

Putting the standard wheel 

back in place

F  Put the wheel back in its housing.
F  Put the central bolt A in place in the centre 

of the wheel.

F  tighten fully to retain the wheel correctly.

195

8

In the event of a breakdown

4008_en_Chap08_en-cas-de panne_ed01-2016

Removing a wheel

Parking the vehicle

Immobilise the vehicle where it does 
not block traffic; if possible, the ground 
must be level, stable and not slippery.
Apply the parking brake, switch off the 
ignition and engage first gear to block 
the wheels.
Never go underneath a vehicle raised 
using a jack; use an axle stand.

List of operations

F  If your vehicle has security bolts (available 

as an accessory), fit the security bolt 
socket 5 to the wheelbrace 

1 to slacken the 

security bolt.

F  Slacken the other bolts using the 

wheelbrace 

1 only.

Never use:

the jack for anything other than 
lifting the vehicle,

a jack other than the one provided 
by the manufacturer.

the jack must only be used to change a 
wheel with a damaged tyre.
the jack does not require any 
maintenance.

the jack meets the european standard 
as defined in Directive 2006/42/Ce on 
machinery.
the declaration of conformity can be 
found at the end of this document.
the name and complete address of 
the manufacturer or, as appropriate, 
their representative, together with the 
designation of the jack are given in this 
certificate of conformity.

196

In the event of a breakdown

4008_en_Chap08_en-cas-de panne_ed01-2016

F  Place the foot of the jack 

2 on the ground 

and ensue that it is directly below the 
front A or rear B jacking point provided on 
the underbody, whichever is closest to the 
wheel to be changed.

F  extend the jack 

2 until it comes into contact 

with the jacking point A or B used; the 
contact area A or B on the vehicle must be 
correctly inserted into the central part of 
the head of the jack.

F  Raise the vehicle until there is sufficient 

space between the wheel and the ground 
to admit the spare (not punctured) wheel 
easily.

ensure that the jack is stable.
If the ground is slippery or loose, the 
jack may slip or drop - Risk of injury!
ensure that the jack is positioned only 
at the jacking point A or B under the 
vehicle, ensuring that the contact area 
on the vehicle is correctly centred on 
the head of the jack. Otherwise there 
is a risk of damage to the vehicle and/
or of the jack dropping or slipping - Risk 
of injury!

F  Remove the bolts and store them in a clean 

place.

F  Remove the wheel.

197

8

In the event of a breakdown

4008_en_Chap08_en-cas-de panne_ed01-2016

Fitting the wheel

After changing a wheel

When using the "space-saving" spare 
wheel, do not exceed 50 mph (80 km/h).
Have the tightening of the bolts and the 
pressure of the spare wheel checked 
by a PeugeOt dealer or a qualified 
workshop without delay.
Have the punctured wheel repaired 
and refitted on the vehicle as soon as 
possible.

List of operations

F  Put the wheel in place on the hub.
F  tighten the bolts fully by hand.
F  Pre-tighten the anti-theft bolt using the 

wheelbrace 

1 fitted with the anti-theft 

socket 5 (if your vehicle has one).

F  Pre-tighten the other bolts using only the 

wheelbrace 

1.

Fitting snow tyres

If you fit your vehicle with snow tyres 
fitted on steel rims, it is essential to use 
special bolts available from PeugeOt 
dealers or a qualified workshop.

If the replacement of a tyre is 
necessary on 4-wheel drive versions, 
it is recommended that all four tyres be 
replaced at the same time, ensuring 
that the same make, model and size is 
used on all wheels.
this is because using tyres of different 
sizes, structure or rate of wear could 
damage transmission components.

198

In the event of a breakdown

4008_en_Chap08_en-cas-de panne_ed01-2016

F  Lower the vehicle fully.
F  Fold the jack 

2 and remove it.

F  Lock the anti-theft bolt using the 

wheelbrace 

1 fitted with the anti-theft 

socket 5 (if your vehicle has one).

F  Lock the other bolts using only the 

wheelbrace 

1.

F  Stow the tools (for more information, refer 

to the corresponding section).

199

8

In the event of a breakdown

4008_en_Chap08_en-cas-de panne_ed01-2016

Changing a bulb

For bulbs that have alignment lugs 
(H1, H7...) ensure that they are 
fitted correctly for the best lighting 
performance.

the headlamps have polycarbonate 
lenses with a protective coating:

do not clean them using a dry 
or abrasive cloth, nor with a 
detergent or solvent product,

F  use a sponge and soapy water,
F  when using a high pressure washer 

on persistent marks, do not keep 
the lance directed towards the 
lamps or their edges for too long, 
so as not to damage their protective 
coating and seals.

F  Do not touch the bulb directly with 

your fingers, use lint-free cloths.

Changing a bulb should only be done 
after the headlamp has been switched 
off for several minutes (risk of serious 
burns).
It is imperative to use only anti-
ultraviolet (uV) type bulbs in order not 
to damage the headlamp.
Always replace a failed bulb with a 
new bulb with the same type and 
specification.

Risk of electrocution

Replacement of the xenon bulbs 
(D1S-35W) must be carried out by 
a PeugeOt dealer or a qualified 
workshop.

Front lamps

1.  Direction indicators (WY21W-21W).

2.  Main beam headlamps (H1-55W).
3.
 

Dipped beam headlamps (H11-55W) 

 or 
 

Xenon bulb (D1S-35W).

4. 

Sidelamps (W5W-5W).

5. 

Daytime running lamps (P13W-13W).

6.  Daytime running lamps / sidelamps 

(light emitting 

diodes-LEDs).

7. 

Front foglamps (H11-55W).

200

In the event of a breakdown

4008_en_Chap08_en-cas-de panne_ed01-2016

Carry out the following operations for access 
the bulb protective covers:
F  Remove the retaining pins A.
F  Remove the protective cover B.

Access to bulbs

Changing direction indicator 

bulbs (1)

F  turn the bulb holder a quarter of a turn to 

the left and pull it out.

F  Pull out the bulb and change it.

Rapid flashing of the direction indicator 
warning lamp (right or left) indicates the 
failure of a bulb on that side.

to reassemble, carry out these 
operations in reverse order.
Amber coloured bulbs, such as the 
direction indicators, must be replaced 
with bulbs of identical specifications 
and colour.

201

8

In the event of a breakdown

4008_en_Chap08_en-cas-de panne_ed01-2016

Changing sidelamp 

bulbs (4)

F  Remove the protective plastic cover.
F  turn the bulb holder to the left and pull it 

out.

F  Remove the bulb and its base by pressing 

on the lug at the bottom.

F  Change the bulb.
For reassembly, carry out these operations in 
reverse order.

Changing main beam headlamp 

bulbs (2)

F  turn the bulb holder a quarter turn to the 

left and pull it out.

F  Pull out the bulb and replace it.
to reassemble, carry out these operations in 
reverse order.

Changing the daytime 

running lamps / sidelamps 

(light-emitting diodes - LEDs) (6)

For the replacement of this type of LeD lamp, 
contact a PeugeOt dealer or a qualified 
workshop.

Changing dipped headlamp 

bulbs (3)

For the replacement of these bulbs, contact a 
PeugeOt dealer or a qualified workshop.

to replace these bulbs contact a PeugeOt 
dealer or a qualified workshop.

Changing front foglamp bulbs (7) / 

daytime running lamp bulbs (5)

202

In the event of a breakdown

4008_en_Chap08_en-cas-de panne_ed01-2016

F  Push the repeater towards the rear to disengage it.
F  Disconnect the repeater connector.
F  Change the repeater unit.
to reassemble, carry out these operations in reverse order.
Contact a PeugeOt dealer or a qualified workshop to obtain replacement repeaters.

Changing direction indicator side repeaters

Door mirror spotlamps

You should contact a PeugeOt dealer or a qualified workshop for the replacement of the light 
emitting diode - LeD.

203

8

In the event of a breakdown

4008_en_Chap08_en-cas-de panne_ed01-2016

1.  Third brake lamp (LEDs).

2.  Number plate lamps (W5W-5W).
3.
 

Rear foglamp (W21W-21W or reversing 

lamp (W16W- 16W)*

4.  Reversing lamp (W16W-16W).

5.  Direction indicators (WY21W-21W).

6.  Sidelamps (P21-5W).

7.  Sidelamps / brake lamps (W21-5W).

Rear lamps

Amber coloured bulbs, such as the 
direction indicators, must be replaced 
with bulbs of identical specification and 
colour.

these bulbs are changed from outside 
the boot.
F  Open the boot.
F  Remove the two fixing screws.
F  unclip the lamp unit carefully extract it 

pulling it towards the rear.

F  turn the bulb holder a quarter of a turn to 

the left and pull it out.

F  Pull the bulb out and change it.
to reassemble, carry out these operations in 
reverse order.
take care to align the pins on the lamp unit with 
the locations on the bodywork.

Changing sidelamp / 

brake lamp (7) and direction 

indicator (5) bulbs

F  Open the boot.
F  Insert a screwdriver into the aperture of the 

cover and lever it open.

F  turn the bulb holder a quarter of a turn to 

the left.

F  Pull the bulb out and change it.
to reassemble, carry out these operations in 
reverse order.
You can also contact a PeugeOt dealer or 
a qualified workshop for the replacement of 
these bulbs.

Changing sidelamp 

bulbs (6)

* Depending on country of sale

204

In the event of a breakdown

4008_en_Chap08_en-cas-de panne_ed01-2016

Changing number plate lamp 

bulbs (2)

F  Push the lens to the left and then down.
F  turn the bulb holder a quarter turn to the 

left and pull it out.

F  Remove the bulb and change it.
to refit, carry out these operations in reverse 
order and press on the lens to clip it in place.

Third brake lamp (light emitting 

diodes - LEDs) (1)

Contact a PeugeOt dealer or qualified 
workshop for the replacement of this type 
of lamp.

Changing a foglamp or reversing 

lamp bulb (3)*

* Depending on country of sale

Changing a reversing lamp bulb (4)

Access is by passing a hand under the bumper.
F  turn the bulb holder a quarter of a turn and 

pull it out.

F  Disconnect the connector on the bulb 

holder.

F  Pull the bulb out and change it.
to refit, carry out these operations in reverse 
order.
You can also contact a PeugeOt dealer or a 
qualified workshop for the replacement of this 
bulb.

You can also contact a PeugeOt dealer or 
a qualified workshop for the replacement of 
this bulb.
Access is by passing your hand under the 
bumper.
F  turn the bulb holder a quarter of a turn and 

pull it out.

F  Disconnect the bulb holder.
F  Pull the bulb out and change it.
to reassemble, carry out these operations in 
reverse order.

205

8

In the event of a breakdown

4008_en_Chap08_en-cas-de panne_ed01-2016

Changing a fuse

the extraction tweezer and spare fuses are 
located in the engine compartment fusebox.
to gain access to them:
F  Open the bonnet.
 

For more information about the Bonnet
refer to the corresponding section.

F  unclip and remove the cover.
F  Remove the tweezer.
F  Carefully close the cover to ensure correct 

sealing of the fusebox.

Access to the tools

Before changing a fuse, the cause of the failure 
must be identified and rectified.
F  Check that the switch is in the "LOCK

position or that the vehicle mode is "OFF".

F  Identify the faulty fuse by checking the 

condition of its filament.

F  use the special tweezer to extract the fuse 

from its location.

F  Always replace the faulty fuse with a fuse 

of the same rating.

F  Check that the number etched on the box, 

the rating etched on the top and the tables 
below all agree.

Changing a fuse

Good

Failed

PeugeOt will not accept responsibility 
for the cost incurred in repairing your 
vehicle or for rectifying malfunctions 
resulting from the installation of 
accessories not supplied and not 
recommended by PeugeOt and 
not installed in accordance with its 
instructions, in particular when the 
consumption of all of the additional 
equipment connected exceeds 
10 milliamperes.

Your vehicle's electrical system is 
designed to operate with standard or 
optional equipment.
Before installing other electrical 
equipment or accessories on your 
vehicle, contact a PeugeOt dealer or 
a qualified workshop.

the replacement of a fuse not 
mentioned in the following tables may 
cause a serious fault on your vehicle. 
Contact a PeugeOt dealer or a 
qualified workshop.

206

In the event of a breakdown

4008_en_Chap08_en-cas-de panne_ed01-2016

Dashboard fuses

the fusebox is located in the lower dashboard 
(left-hand side).

Access to the fuses

F  unclip the cover and remove it completely 

by pulling it towards you.

Fuse N°

Rating

Functions

1*

30 A

Cabin fan.

2

15 A

Brake lamps, third brake lamp.

3

10 A

Rear foglamp.

4

30 A

Windscreen wiper, screenwash.

6

20 A

Central locking, electric door mirrors.

7

15 A

Audio equipment, telematics, uSB unit, hands-free system.

8

7.5 A

Remote control key, air conditioning control unit, instrument 
panel, electric windows, rain and sunshine sensors, alarm, 
switch panel, steering mounted controls.

9

15 A

Instrument panel and interior lighting.

10

15 A

Hazard warning lamps.

11

15 A

Rear wiper.

12

7.5 A

Instrument panel, multifunction screen, parking sensors, 
heated seats, heated rear screen, electric blind, automatic 
headlamp adjustment.

13

15 A

Cigarette lighter, accessory socket.

15

20 A

electric blind.

16

10 A

Door mirrors, audio equipment.


Content   ..  11  12  13  14   ..