Peugeot 3008 Dag (2010.5). Instruction - part 17
 

  Index      Peugeot     Peugeot 3008 Dag 2010.5 - instruction in english


Search            


Content   ..  15  16  17  18   ..


Peugeot 3008 Dag (2010.5). Instruction - part 17


236

07

2

ABC

3

DEF

5

JKL

4

GHI

6

MNO

8

TUV

7

PQRS

9

WXYZ

0

*

#

1

RADIO

MEDIA

NAV

ESC

TRAFFIC

SETUP

ADDR
BOOK

1

3

RADIO

NAV

ESC

TRAFFIC

MEDIA

MEDIA

2

ABC

3

DEF

5

JKL

4

GHI

6

MNO

8

TUV

7

PQRS

9

WXYZ

0

*

#

1

RADIO

MEDIA

NAV

ESC

TRAFFIC

SETUP

ADDR
BOOK

2

1

3

4

2

RADIO

NAV

ESC

TRAFFIC

MEDIA

MEDIA

2

ABC

3

DEF

5

JKL

4

GHI

6

MNO

8

TUV

7

PQRS

9

WXYZ

0

*

#

1

RADIO

MEDIA

NAV

ESC

TRAFFIC

SETUP

ADDR
BOOK

2

ABC

3

DEF

5

JKL

4

GHI

6

MNO

8

TUV

7

PQRS

9

WXYZ

0

*

#

1

RADIO

MEDIA

NAV

ESC

TRAFFIC

SETUP

ADDR
BOOK

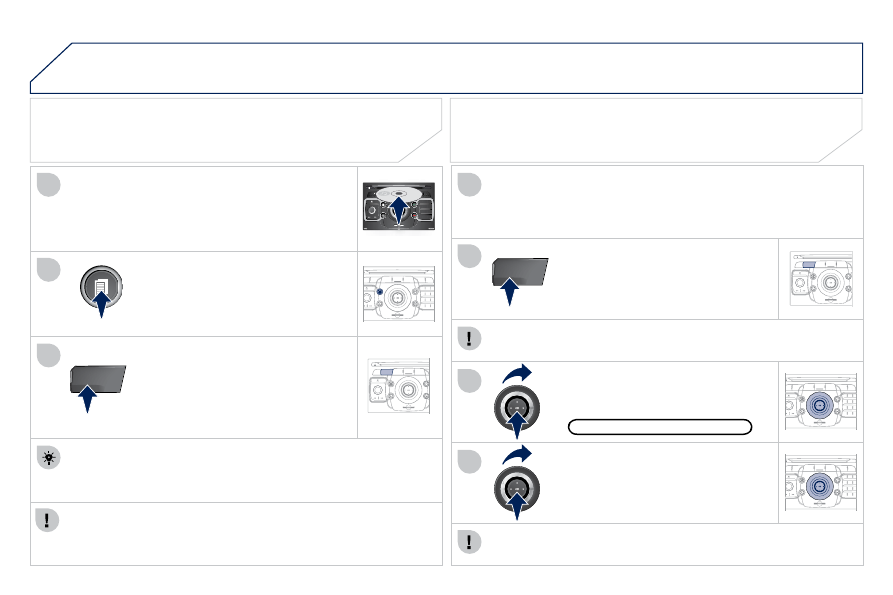
 Connect the portable device (MP3 player, camcorder, camera…) to 

the RCA socket (white and red for audio; red and yellow for video) 

in the glove box using a JACK/RCA audio cable. 

 Press the MEDIA button then press 
it again or select the "Media" Menu 

function and press OK to confi rm. 

 Select the AUX music source and 

press OK to confi rm. Play begins 

automatically. 

 Select "Select media" then "External 

device (AV)" and press OK to 
activate it. 

External device

 The display and management of the controls is via the portable 

device.  

             USING AN EXTERNAL DEVICE (AUX)  
AUDIO/VIDEO/RCA CABLE NOT 
SUPPLIED 

 If the external input is not activated, select "Ext. Device (Aux) 

management" to activate it. 

  VIEWING A VIDEO DVD 

  Select the video source required ("DVD-Video", "External device 

(AV)"). Press OK to confi rm. Play begins.   

  Press the MEDIA button to gain 

access to the DVD menu at any time, 

or to the functions of the Media Menu 
which adjust the video (brightness/

contrast, image format...).  

  If the DVD does not appear on the 
screen, press the MODE button to 
gain access to the "MEDIA" screen 
which displays the DVD screen.  

  Insert the DVD in the player. Play begins 

automatically.  

  The 4-direction navigator and the chromed ring allow you to move the 

DVD selection cursor. Change chapter by pressing the    or   

 button.  

 MUSIC MEDIA PLAYERS 

237

08

1

2

ABC

3

DEF

5

JKL

4

GHI

6

MNO

8

TUV

7

PQRS

9

WXYZ

0

*

#

1

RADIO

MEDIA

NAV

ESC

TRAFFIC

SETUP

ADDR
BOOK

2

2

ABC

3

DEF

5

JKL

4

GHI

6

MNO

8

TUV

7

PQRS

9

WXYZ

0

*

#

1

RADIO

MEDIA

NAV

ESC

TRAFFIC

SETUP

ADDR
BOOK


CHOOSING BETWEEN THE BLUETOOTH 

TELEPHONE/INTERNAL TELEPHONE 

  To activate the Bluetooth telephone 
or the internal telephone, press PICK 
UP TEL.  

 USING THE TELEPHONE 

  Select Phone menu, then "Select 

phone" then choose between 
"Telephone off", "Use Bluetooth 
phone" or "Use internal phone". Press 

OK at each step to confi rm.  

  The system can only be connected to one Bluetooth telephone and 

one SIM card (Internal telephone) at the same time. 
 In this case, the phone book is synchronised with the Bluetooth 
telephone.   

238

08

1

4

5

2

ABC

3

DEF

5

JKL

4

GHI

6

MNO

8

TUV

7

PQRS

9

WXYZ

0

*

#

1

RADIO

MEDIA

NAV

ESC

TRAFFIC

SETUP

ADDR
BOOK

2

ABC

3

DEF

5

JKL

4

GHI

6

MNO

8

TUV

7

PQRS

9

WXYZ

0

*

#

1

RADIO

MEDIA

NAV

ESC

TRAFFIC

SETUP

ADDR
BOOK

3

2

ABC

3

DEF

5

JKL

4

GHI

6

MNO

8

TUV

7

PQRS

9

WXYZ

0

*

#

1

RADIO

MEDIA

NAV

ESC

TRAFFIC

SETUP

ADDR
BOOK

2

2

ABC

3

DEF

5

JKL

4

GHI

6

MNO

8

TUV

7

PQRS

9

WXYZ

0

*

#

1

RADIO

MEDIA

NAV

ESC

TRAFFIC

SETUP

ADDR
BOOK

2

ABC

3

DEF

5

JKL

4

GHI

6

MNO

8

TUV

7

PQRS

9

WXYZ

0

*

#

1

RADIO

MEDIA

NAV

ESC

TRAFFIC

SETUP

ADDR
BOOK

2

ABC

3

DEF

5

JKL

4

GHI

6

MNO

8

TUV

7

PQRS

9

WXYZ

0

*

#

1

RADIO

MEDIA

NAV

ESC

TRAFFIC

SETUP

ADDR
BOOK

  *    The services available via the telephone depend on the network, the 

SIM card and the compatibility of the Bluetooth equipment used. Refer to 

your telephone's manual and your operator to check which services you 

have access to. A list of mobile telephones which offer the best range of 

services is available from dealers.  

 USING THE TELEPHONE 

  CONNECTING A BLUETOOTH 
TELEPHONE   

  For safety reasons and because they require prolonged attention 
on the part of the driver, the operations for pairing the Bluetooth 

mobile telephone to the hands-free system of the Peugeot Connect 

Media must be carried out with the vehicle stationary and the 

ignition on.  

  Activate the telephone's Bluetooth function. 
 The last telephone connected is reconnected 

automatically.  

  If no telephone is connected, the 

system prompts you to "Connect 

phone". Select "Yes" and press OK to 

confi rm.  

  Enter the authentication code on the 
telephone. The code to be entered is 
displayed on the screen.  

  To change the telephone connected, 
press the TEL button, then select 

Phone menu, then "Select phone" 

then "Connect Bluetooth phone" 
then select the telephone required or 
"Search phone". 
 Press OK at each step to confi rm.   

  Once the telephone has been connected, the Peugeot Connect 
Media can synchronise the address book and the call list. This 

synchronisation may take a few minutes * .  

  The list of telephones connected previously (4 maximum) appears 

in the multifunction screen. Select the telephone required then 

select "Connect phone" for a new connection. Select "Delete 
pairing" to cancel the connection to the telephone.  

  Press the TEL button.  

  For a fi rst connection, select 

"Search phone" and press OK to 

confi rm. Then select the name of the 

telephone. 

Search phone

Search phone

239

08

1

4

5

2

ABC

3

DEF

5

JKL

4

GHI

6

MNO

8

TUV

7

PQRS

9

WXYZ

0

*

#

1

NAV

ESC

TRAFFIC

ADDR
BOOK

2

ABC

3

DEF

5

JKL

4

GHI

6

MNO

8

TUV

7

PQRS

9

WXYZ

0

*

#

1

SETUP

2

ABC

3

DEF

5

JKL

4

GHI

6

MNO

8

TUV

7

PQRS

9

WXYZ

0

*

#

1

3

2

ABC

3

DEF

5

JKL

4

GHI

6

MNO

8

TUV

7

PQRS

9

WXYZ

0

*

#

1

RADIO

MEDIA

NAV

ESC

TRAFFIC

SETUP

ADDR
BOOK

2

  Extract the holder by 
pressing the eject 
button.  

  Install the SIM card in the holder 
and then insert it in the slot.  

  To remove the SIM card, repeat step 1.  

  For safety reasons and because they require prolonged attention 

on the part of the driver, the SIM card installation operations must 

be carried out when stationary.  

  Enter the PIN code on the keypad 

then select OK and confi rm. 

  The system asks "Do you want 

to switch to the internal phone?", 
select "Yes" if you wish to use your 
SIM card for your personal calls. 

Otherwise, only the emergency call 

and the services will use the SIM 
card.  

Remember PIN

  When entering your PIN code, tick the "Remember PIN" tab to 

allow use of the telephone without having to enter this code when it 
is used subsequently.  

          USING THE INTERNAL TELEPHONE 

WITH A SIM CARD 

 USING THE TELEPHONE 

  Once the SIM card has been installed, the system can synchronise 

the address book and the call list. 
 This synchronisation may take a few minutes.   

 If you have declined to use the internal telephone for personal calls, you 

can still connect a Bluetooth telephone to receive your calls on the vehicle's 

audio system. 

240

08

1

2

2

ABC

3

DEF

5

JKL

4

GHI

6

MNO

8

TUV

7

PQRS

9

WXYZ

0

*

#

1

RADIO

MEDIA

NAV

ESC

TRAFFIC

SETUP

ADDR
BOOK

2

ABC

3

DEF

5

JKL

4

GHI

6

MNO

8

TUV

7

PQRS

9

WXYZ

0

*

#

1

RADIO

MEDIA

NAV

ESC

TRAFFIC

SETUP

ADDR
BOOK

2

ABC

3

DEF

5

JKL

4

GHI

6

MNO

8

TUV

7

PQRS

9

WXYZ

0

*

#

1

RADIO

MEDIA

NAV

ESC

TRAFFIC

SETUP

ADDR
BOOK

3

1

3

2

ABC

3

DEF

5

JKL

4

GHI

6

MNO

8

TUV

7

PQRS

9

WXYZ

0

*

#

1

RADIO

MEDIA

NAV

ESC

TRAFFIC

SETUP

ADDR
BOOK

2

2

ABC

3

DEF

5

JKL

4

GHI

6

MNO

8

TUV

7

PQRS

9

WXYZ

0

*

#

1

RADIO

MEDIA

NAV

ESC

TRAFFIC

SETUP

ADDR
BOOK

   Press the end of the steering mounted control to 

accept the call or end the call in progress.   

 Select the "Yes" tab to accept or "No" 

to refuse and confi rm by pressing 

OK. 

  RECEIVING A CALL 

  MAKING A CALL 

 An incoming call is announced by a ring and a superimposed 

display in the screen. 

 To hang up, press the HANG UP TEL 
button or press OK and select "End 

call" then confi rm by pressing OK. 

End call

 Press the PICK UP TEL button. 

 It is also possible to select a number from the address book. You 

can select "Dial from address book". The Peugeot Connect Media 

can record up to 4 096 entries.  

 Select "Dial number", then dial the 

telephone number using the virtual 

keypad. 

 Select the "Phone" menu function 

and press OK to confi rm. 

Dial number

"Phone" menu

 The list of the last 20 calls made and received in the vehicle 

appears under "Phone" menu. You can select a number and press 

OK to make the call. 

Yes

No

 The PICK UP TEL button accepts, the HANG UP TEL button 

refuses the incoming call. 

 USING THE TELEPHONE 

241

09

1

4

5

2

ABC

3

DEF

5

JKL

4

GHI

6

MNO

8

TUV

7

PQRS

9

WXYZ

0

*

#

1

RADIO

MEDIA

NAV

ESC

TRAFFIC

SETUP

ADDR
BOOK

3

2

ABC

3

DEF

5

JKL

4

GHI

6

MNO

8

TUV

7

PQRS

9

WXYZ

0

*

#

1

RADIO

MEDIA

NAV

ESC

TRAFFIC

SETUP

ADDR
BOOK

2

ABC

3

DEF

5

JKL

4

GHI

6

MNO

8

TUV

7

PQRS

9

WXYZ

0

*

#

1

NAV

ESC

TRAFFIC

ADDR
BOOK

SETUP

SETUP

2

ABC

3

DEF

5

JKL

4

GHI

6

MNO

8

TUV

7

PQRS

9

WXYZ

0

*

#

1

RADIO

MEDIA

NAV

ESC

TRAFFIC

SETUP

ADDR
BOOK

2

6

2

ABC

3

DEF

5

JKL

4

GHI

6

MNO

8

TUV

7

PQRS

9

WXYZ

0

*

#

1

RADIO

MEDIA

NAV

ESC

TRAFFIC

SETUP

ADDR
BOOK

2

ABC

3

DEF

5

JKL

4

GHI

6

MNO

8

TUV

7

PQRS

9

WXYZ

0

*

#

1

RADIO

MEDIA

NAV

ESC

TRAFFIC

SETUP

ADDR
BOOK

                SETTING THE DATE AND TIME 

  Make the adjustments using the ring 

and move on to the next using the 

4-direction navigator. 

 Press OK to confi rm.  

  Select the "Date format" function and 

press OK to confi rm. 

 Select the format required using the 

ring and press OK to confi rm.  

  Select the "Set date & time" function 

and press OK to confi rm. 

  Pressing the SETUP button for more than 2 seconds permits 

access to: 

  This setting operation must be carried out if the battery has been 

disconnected.  

  Press the SETUP button.  

  Select the "Time format" function and 

press OK to confi rm. 

 Select the format required using the 

ring and press OK to confi rm.  

Set date & time

  Select the "Date & Time" function 

and press OK to confi rm. 

Description of the unit

Description of the unit

GPS coverage

GPS coverage

Demo mode

Date & Time

 Principle of GPS synchronisation (GMT): 

   1.   Confi rm the "Synchronise with GPS" selection, the time is then set to 

GMT universal time, the date is also updated. 

  2.   Using the 4-direction navigator, move the cursor to the time fi elds and 

press OK. 

  3.   You can then use the ring to set the time to the time zone of your choice.   


Note that when changing between summer/winter time, the time zone 

must be changed again manually.    

242

10

MEDIA

TRAFFIC

 SCREEN MENU MAP 

             MAIN FUNCTION 

  OPTION A 

  OPTION B...   

option A1

option A2

1

2

3

2

3

  "Traffic" Menu 

Messages on route

  Select preferred list 

1

2

3

 Deactivate PIN 

4

Only warnings on route

3

All warning messages

3

All messages

3

Geo. Filter

3

 Within 2 miles (3 km) 

4

 Within 3 miles (5 km) 

4

 Within 6 miles (10 km) 

4

 Within 30 miles (50 km)  

4

On confi rmation

  Read out settings 

2

3

Incoming messages

3

  TMC station information   

2

  "Media" Menu 

Audio CD/MP3-Disc / DVD-Audio / DVD-Video  

  Select media 

1

2

3

Jukebox (Folders & Files)

3

SD-Card

3

USB

3

External device (audio/AV)

3

Add fi les

  Jukebox management 

2

3

 Folders & Files 

4

Create folder

3

Modify content

3

Edit playlist

3

Play options

3

 Playlists 

4

Memory capacity

3

Refer to the "Sound settings" menu details 
of which are shown on the next page.
   

  Sound settings 

2

3

Aspect ratio

  Video settings 

2

3

Menu language

3

Display

3

 Brightness 

4

 Contrast 

4

 Colour 

4

243

NAV

RADIO

AUX standard

3

Reset video settings

3

Off/Audio/Audio and Video (AV)

  Ext. Device (Aux) management 

2

3

  "Radio" Menu 

FM

  Waveband 

1

2

3

AM

3

  Manual tune  

2

Refer to the "Sound settings" menu 
below.

  Sound settings 

2

3

  "Sound settings" Menu 

  Balance/Fader  

1

2

  Bass/Treble  

2

  Equalizer 

2

Linear

3

Classic

3

Jazz

3

Rock/Pop

3

Techno

3

Vocal

3

  Mute rear speakers  

2

  Loudness  

2

  Speed dependent volume  

2

  Reset sound settings   

2

  "Navigation" Menu 

  Abort guidance/Resume guidance  

1

2

  Destination input 

2

Address input

3

 Country 

4

 City 

4

 Street 

4

 House number 

4

 Start route guidance 

4

 Postal code 

4

 Save to address book 

4

 Intersection 

4

 City district 

4

 Geo position 

4

 Map 

4

Navigate HOME

3

Choose from last destinations

3

Choose from address book

3

  Stopovers 

2

Add stopover

3

 Address input 

4

 Navigate HOME 

4

 Choose from address book 

4

 Choose from last destinations 

4

Rearrange route

3

Replace stopover

3

Delete stopover

3

244

ADDR
BOOK

Recalculate

3

 Fast route 

4

 Short route 

4

 Optimized route  

4

POI nearby

  POI search 

2

3

POI near destination

3

POI in city

3

POI in country

3

POI near route

3

Route type

  Route options 

2

3

 POI near destination 

4

 Short route 

4

 Optimized route 

4

 Subscr. service  

4

Route dynamics

  Settings 

2

3

 Traffi c independent 

4

 Semi-dynamic 

4

 Dynamic 

4

Avoidance criteria

3

 Avoid motorways 

4

 Avoid toll roads 

4

 Avoid tunnels 

4

 Avoid ferries 

4

Recalculate

3

  "Address book" Menu 

  Create new entry  

1

2

  Show memory status  

2

  Export address book  

2

  Delete all voice entries  

2

  Delete all entries  

2

  Delete folder "My Addresses"   

2

  "Phone" menu 

  Dial number  

1

2

  Dial from address book  

2

  Call lists  

2

  Messages  

2

  Select phone 

2

 Search phone 

4

Telephone off

3

Use Bluetooth phone

3

Use internal phone

3

Connect Bluetooth phone

3

 Disconnect phone 

5

 Rename phone 

5

 Delete pairing 

5

 Delete all pairings 

5

 Show details  

5

245

SETUP

  Settings 

2

Automatic answering system

3

Select ring tone

3

Phone/Ring tone volume

3

Enter mailbox number

3

Internal phone settings

3

Automatically accept call

3

Signal waiting call (?)

3

Show status

3

Activate waiting call

3

Deactivate waiting call

3

Call forward (?)

3

Show status

3

Activate call forward

3

Deactivate call forward

3

Suppress own number

3

Select network

3

Set network automatically

3

Set network manually

3

Search for networks

3

PIN settings

3

Change PIN

3

 Activate PIN 

4

 Deactivate PIN 

4

Remember PIN

3

SIM-card memory status

3

  "SETUP" Menu 

Menu language

  Language & Speech 

1

2

3

 Deutsch 

4

 English 

4

 Español 

4

 Français 

4

 Italiano 

4

 Nederlands 

4

 Polski 

4

Voice control

3

 Voice control active 

4

 Tutorial 

4

 Portuguese 

4

 Basics 

5

 Examples 

5

 Tips 

5

 Speaker adaptation 

4

 New speaker adaptation 

5

 Delete speaker adaptation 

5

Voice output volume

3

  Date & Time 

2

Set date & time

3

Date format

3

Time format

3

246

  Display 

2

Brightness

3

Colour

3

 Steel 

4

 Blue light (only in day mode) 

4

 Orange Ray 

4

 Blue Flame 

4

Map colour

3

 Day mode for Map 

4

 Night mode for Map 

4

 Auto. Day/Night for Map  

4

  Units 

2

Temperature

3

 Celsius 

4

 Fahrenheit 

4

Metric/Imperial

3

 km 

4

 Miles  

4

  System 

2

Factory reset

3

Software version

3

Automatic scrolling

3

247

 FREQUENTLY ASKED QUESTIONS 

QUESTION

ANSWER

SOLUTION

   There is a difference in 
sound quality between 
the different audio 
sources (radio, CD...). 

   For optimum sound quality, the audio settings (Volume, Bass, Treble, 

Ambience, Loudness) can be adapted to the different sound sources, 

which may result in audible differences when changing source (radio, 

CD...). 

   Check that the audio settings (Volume, Bass, 

Treble, Ambience, Loudness) are adapted to 

the sources listened to. It is advisable to set 

the AUDIO functions (Bass, Treble, Front-Rear 

Balance, Left-Right Balance) to the middle 

position, select the musical ambience "Linear" and 

set the loudness correction to the "Active" position 

in CD mode or to the "Inactive" position in radio 

mode. 

 The CD is ejected 

automatically or is not 

played by the player. 

 The CD is inserted upside down, is unplayable, does not contain any 

audio data or contains an audio format which the player cannot play. 

 The CD is protected by an anti-pirating protection system which is not 

recognised by the audio equipment. 

   -   Check that the CD is inserted in the player the 

right way up. 

  -   Check the condition of the CD: the CD cannot 

be played if it is too damaged. 

  -   Check the content in the case of a recorded 

CD: consult the advice in the "Audio" section. 

  -   The audio equipment's CD player does not 

play DVDs. 

  -   Due to inadequate quality, certain recorded 

CDs will not be played by the audio system.  

 The CD player sound is 
poor. 

 The CD used is scratched or of poor quality. 

 Insert good quality CDs and store them in suitable 

conditions. 

 The audio equipment settings (bass, treble, ambiences) are unsuitable. 

 Set the treble or bass level to 0, without selecting 

an ambience. 

248


QUESTION


ANSWER


SOLUTION

 The stored stations do 
not function (no sound, 
87.5 Mhz is displayed...). 

 An incorrect waveband is selected. 

 Press RADIO, select Radio Menu then 
"Waveband" to return to the waveband on which 
the stations are stored. 

 The quality of reception 
of the radio station 
listened to gradually 
deteriorates or the stored 
stations do not function 
(no sound, 87.5 Mhz is 
displayed...). 

 The vehicle is too far from the transmitter used by the station listened 

to or there is no transmitter in the geographical area through which the 

vehicle is travelling. 

 Activate the "RDS" function by means of the 

short-cut menu to enable the system to check 

whether there is a more powerful transmitter in the 

geographical area. 

 The environment (hills, buildings, tunnels, basement car parks...) block 

reception, including in RDS mode. 

 This phenomenon is normal and does not indicate 

a failure of the audio equipment. 

 The aerial is absent or has been damaged (for example when going 

through a car wash or into an underground car park). 

 Have the aerial checked by a PEUGEOT dealer. 

 Sound cut-outs of 1 to 

2 seconds in radio mode. 

 During this brief sound cut-out, the RDS searches for any frequency 

permitting better reception of the station. 

 Deactivate the "RDS" function by means of the 

short-cut menu if the phenomenon is too frequent 

and always on the same route. 

 With the engine off, the 

system switches off after 

a few minutes of use. 

 When the engine is switched off, the system's operating time depends on 

the battery charge. 
 The switch-off is normal: the system switches to economy mode and 

switches off to prevent discharging of the vehicle's battery. 

 Start the vehicle's engine to increase the battery 

charge. 

249

QUESTION

ANSWER

SOLUTION

 "TA" is selected. 

However, certain traffi c 

jams along the route are 

not indicated in real time. 

 On starting, it is several minutes before the system begins to receive the 

traffi c information. 

 Wait until the traffi c information is being received 

correctly (displaying of the traffi c information 

symbols on the map). 

 In certain countries, only major routes (motorways...) are listed for the 

traffi c information. 

 This phenomenon is normal. The system is 

dependent on the traffi c information available. 

 The time taken to calculate 

a route sometimes seems 

longer than usual. 

 The performance of the system may slow down temporarily if a CD/DVD 

is being copied onto the Jukebox at the same time as a route is being 

calculated. 

 Wait until the CD/DVD has been copied or stop 
the copying before starting the guidance function. 

 I receive a speed camera 

alert for a speed camera 

which is not on my route. 

 The system announces all speed cameras positioned in a cone located 

in front of the vehicle. It may detect speed cameras located on nearby or 

parallel roads. 

 Zoom in on the map to view the exact position of 

the speed camera. 

 The speed camera 

audible warning does not 
work. 

 The audible warning is not active. 

 Activate the audible warning on Navigation Menu, 

Settings, Set parameters for risk areas. 

 The alert volume is set to minimum. 

 Increase the volume of the alert when passing a 

speed camera. 

 Does the emergency call 

function work without a 
SIM card? 

 No, as certain national regulations impose the presence of a SIM card in 

order to make an emergency call. 

 Insert a valid SIM card in the slot. 

 The altitude is not 
displayed. 

 On starting, the initialisation of the GPS may take up to 3 minutes to 

receive more than 4 satellites correctly. 

 Wait until the system has started up completely. 

Check that there is a GPS coverage of at least 
4 satellites (long press on the SETUP button, then 
select "GPS coverage"). 

 Depending on the geographical environment (tunnel...) or the weather, 

the conditions of reception of the GPS signal may vary. 

 This phenomenon is normal. The system is 

dependent on the conditions of reception of the 
GPS signal. 

250

QUESTION

ANSWER

SOLUTION

 The route calculation is 
not successful. 

 The exclusion criteria may confl ict with the current location (exclusion of 

toll roads on a toll motorway). 

 Check the exclusion criteria on the Navigation 

Menu ("Route options" - "Avoidance criteria"). 

 There is a long waiting 
period following the 
insertion of a CD. 

 When a new medium is inserted, the system reads a certain amount of 

data (directory, title, artist, etc.). This may take a few seconds. 

 This phenomenon is normal. 

 I cannot connect my 

Bluetooth telephone. 

 The telephone's Bluetooth function may be switched off or the equipment 

may not be visible. 

   -   Check that your telephone's Bluetooth 

function is switched on. 

  -   Check that your telephone is visible.  

 The Bluetooth telephone is not compatible with the system. 

 A list of compatible Bluetooth mobile telephones is 

available from the dealer network. 

 The volume of the 

telephone connected 

in Bluetooth mode is 

inaudible. 

 The volume depends both on the system and on the telephone. 

 Increase the volume of the Peugeot Connect 

Media, to maximum if required, and increase the 

volume of the telephone if necessary. 

 The system does not play 

the DVD. 

 The region protection may not be compatible. 

 Insert DVDs which have compatible region 

protection. 

 I cannot copy the CD to 
the Jukebox. 

 The wrong source is selected. 

 Change the active source to CD. 

 The CD is copy-protected. 

 It is normal that a protected CD cannot be copied. 

251

QUESTION

ANSWER

SOLUTION

 The system does not 

receive SMS. 

 The Bluetooth mode does not permit sending of the SMS to the system. 

 Use your SIM card and the internal telephone. 

 The SIM card used is a twin card. 

 Use the original SIM card to receive the SMS. 

 I cannot update the risk 
area POIs. 

 The Navigation Menu - "Update personal POI" is not displayed. 

 Check that the medium used for the update (SD 

card or USB memory stick) is inserted correctly. 

 An error message is displayed at the end of the procedure. 

   -   Start the procedure again in full. 

  -   Consult a PEUGEOT dealer if the problem 

persists. 

  -   Check that the data on the MEDIUM is 

supplied by an offi cial partner of PEUGEOT.  

 The voice frequencies 
(DTMF) are not 

active when I am 

communicating and I 

press numbers on the 

keypad. 

 The numeric buttons on the keypad are only active for calls if the display 

is in telephone mode. 

 To activate them, press the MODE button until the 

telephone is displayed on the screen. 

 An accident area which 

does not concern me is 

displayed on the screen. 

 The accident areas are displayed near a point defi ned on the map and in 

relation to a direction of travel. 

 The alert may be triggered when travelling under a 

road or near a road which has a speed camera. 


Content   ..  15  16  17  18   ..