Peugeot 1007 Dag (2008.5). Instruction - part 6
 

  Index      Peugeot     Peugeot 1007 Dag 2008.5 - instruction in english


Search            


Content   ..  4  5  6  7   ..


Peugeot 1007 Dag (2008.5). Instruction - part 6


4

82

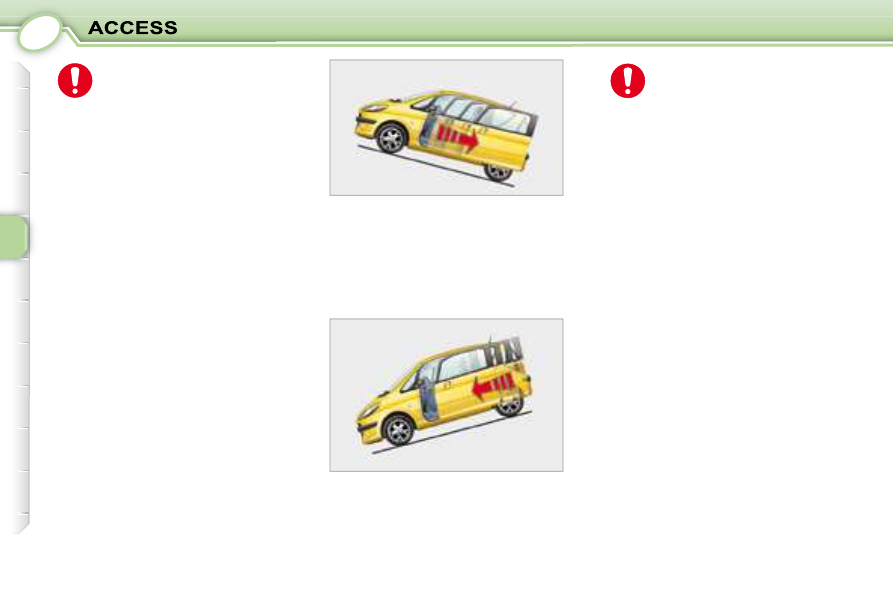
  Behaviour in the case of a 
steep slope 

 It  is  possible  to  open  and  close  the 
doors electrically up to a gradient of 
20 %. 

 In the case of a steep slope, 
the door may be driven by its 
own weight and as a conse-
quence  may  open  or  close 
sharply. Therefore: 

       There  would  not  be  time  for 

operation  of  one  of  the  electric 
controls 

to 

be 

taken 

into 

account. 

      There would not be time for the 

obstacle  detection  system  to  be 
triggered.  

 Take care not to leave the vehicle on 
a  steep  slope  with  the  door(s)  open 
without  supervision.  If  this  advice  is 
not followed, injuries or damage may 
occur if a part of the body or an ob-
ject is trapped or caught.  

  In the event of an impact 

 The electric controls are deactivated 
in  the  event  of  an  impact.  Manual 
opening and closing is still possible.  

  Special features of operation 

 With the ignition off, 
       doors  open,  power  consuming 

equipment on (radio, lights…),  

 or 
       doors in an intermediate position 

(door neither fully open nor fully 
closed).  

 After  30  minutes,  the  vehicle  auto-
matically switches to energy economy 
mode. 

 However, if your vehicle is on a slope, 
with the front of the vehicle facing up, 
open  the  door  with  care.  The  door 
may open more quickly due to the in-
cline of the ground. 

 However, if your vehicle is on a slope, 
with  the  front  of  the  vehicle  facing 
down,  the  door  may  not  stay  open 
and may close again sharply with the 
risk of injury. 

 Before any opening or closing 
and  during  any  movement 
of  the  doors,  ensure  that  no 
person,  animal  or  object  is 

preventing  the  required  manoeuvre, 
either  inside  or  outside  the  vehicle. 
If  this  advice  is  not  followed,  inju-
ries  or  damage  may  occur  if  a  part 
of  the  body  or  an  object  is  trapped 
or caught. 
 Electric  closing  and  opening  of  the 
doors  is  not  possible  above  3  mph 
(5 km/h): 
       If  you  set  off  with  the  door(s) 

open,  you  must  slow  down  to 
below  the  threshold  of  3  mph 
(5  km/h)  in  order  to  close  the 
door(s). 

      Any  attempt  to  open  a  door 

electrically  using  the  interior 
handle,  while  driving,  results  in 
the  door  opening  partially  and, 
as  a  safety  measure,  locking  in 
this  position  immediately.  The 
audible  warning,  the  lighting 
of  the  "door  open"  warning 
light  and  the  message  on  the 
multifunction display accompany 
this situation. In order to release 
the door and be able to operate 
it again,  you  must slow down  to 
below  the  threshold  of  3  mph 
(5 km/h) again.   

4

83

                     TAILGATE  

  Tailgate release 

 This  enables  the  tailgate  to  be  un-
locked in the event of a central locking 
fault. 
   -  

Fold back the rear seats to gain 
access  to  the  lock  from  inside 
the boot, 

  -  

Insert  a  small  screwdriver  into 
hole   A   of  the  lock  to  unlock  the 
tailgate.   

  "Tailgate open" warning 

 In this case, or following reconnection 
of the battery, with the doors open, it 
may be necessary to close the doors 
manually, in order to reinitialise them, 
and start the engine. 

 If  the  tailgate  is  not  closed 
properly, you are warned: 

   -  

 with 

the 

engine 

running,  

by  lighting  of  the  "door  open" 
warning light, accompanied by a 

message displayed briefl y on the 

multifunction display. 

  -  

 when  the  vehicle  is  moving,  
by  lighting  of  the  "door  open" 
warning 

light, 

accompanied 

by  an  audible  signal  and  a 

message displayed briefl y on the 

multifunction display.    

 The  tailgate  locks  automati-
cally when the vehicle speed 
reaches  6  mph  (10  km/h). 
It  unlocks  when  one  of  the 

doors is opened if the speed is below 
3  mph  (5  km/h)  or  when  the  central 
locking button on the centre console 
is pressed.  

  When the door has stopped in an 
intermediate position (neither fully 
open nor fully closed), only the re-
mote  control  or  the  controls  per-
mit electric operation of the door.
  
 When  closing  requests  are  made 
when  the  door  is  in  a  partially  open 
position,  the  door  may  open  slightly 
before closing. 
 When closing a door electrically when 
the battery is low, you are advised to 
guide  the  door  manually.  Recharge 
the battery as soon as possible. 
 If the electric controls (remote control 
or controls) no longer operate,  reini-
tialise the door(s) as follows:
  
   1.   Start the engine. 
  2.   Manually open the door(s) fully. 
  3.   Close the door(s) fully.  
 On  completion  of  this  procedure, 
electric  operation  of  the  doors  is 
restored. 
 However,  if  a  problem  persists 
following  this  procedure,  contact  a 
 PEUGEOT  dealer.  

  Simultaneous locking 
or unlocking of the tailgate 
and the doors 
 The tailgate is locked or unlocked by 
the remote control or from the driver's 
door lock. 
 To  open,  press  the  control   1   and  lift 
the tailgate. 

4

83

                     TAILGATE  

  Tailgate release 

 This  enables  the  tailgate  to  be  un-
locked in the event of a central locking 
fault. 
   -  

Fold back the rear seats to gain 
access  to  the  lock  from  inside 
the boot, 

  -  

Insert  a  small  screwdriver  into 
hole   A   of  the  lock  to  unlock  the 
tailgate.   

  "Tailgate open" warning 

 In this case, or following reconnection 
of the battery, with the doors open, it 
may be necessary to close the doors 
manually, in order to reinitialise them, 
and start the engine. 

 If  the  tailgate  is  not  closed 
properly, you are warned: 

   -  

 with 

the 

engine 

running,  

by  lighting  of  the  "door  open" 
warning light, accompanied by a 

message displayed briefl y on the 

multifunction display. 

  -  

 when  the  vehicle  is  moving,  
by  lighting  of  the  "door  open" 
warning 

light, 

accompanied 

by  an  audible  signal  and  a 

message displayed briefl y on the 

multifunction display.    

 The  tailgate  locks  automati-
cally when the vehicle speed 
reaches  6  mph  (10  km/h). 
It  unlocks  when  one  of  the 

doors is opened if the speed is below 
3  mph  (5  km/h)  or  when  the  central 
locking button on the centre console 
is pressed.  

  When the door has stopped in an 
intermediate position (neither fully 
open nor fully closed), only the re-
mote  control  or  the  controls  per-
mit electric operation of the door.
  
 When  closing  requests  are  made 
when  the  door  is  in  a  partially  open 
position,  the  door  may  open  slightly 
before closing. 
 When closing a door electrically when 
the battery is low, you are advised to 
guide  the  door  manually.  Recharge 
the battery as soon as possible. 
 If the electric controls (remote control 
or controls) no longer operate,  reini-
tialise the door(s) as follows:
  
   1.   Start the engine. 
  2.   Manually open the door(s) fully. 
  3.   Close the door(s) fully.  
 On  completion  of  this  procedure, 
electric  operation  of  the  doors  is 
restored. 
 However,  if  a  problem  persists 
following  this  procedure,  contact  a 
 PEUGEOT  dealer.  

  Simultaneous locking 
or unlocking of the tailgate 
and the doors 
 The tailgate is locked or unlocked by 
the remote control or from the driver's 
door lock. 
 To  open,  press  the  control   1   and  lift 
the tailgate. 

4

84

           PANORAMIC SUNROOF 

 This sunroof is a panoramic assembly 
which  provides  maximum  brightness 
and  visibility  in  the  passenger  com-
partment. 
 It consists of two parts: 
   -  

a fi xed rear part, 

  -  

a moving front part.  

 Each part has an independent manual 
shutter. 
 The  sunroof  is  controlled  electrically 
by a dial with 9 opening positions. 

  Operation 

  To open:  turn the dial to the left (nine 
possible settings). 
 Once the roof is open, the front shutter 
cannot be closed. 
  To  close:   return  the  control  to  the 
initial position  "O" . 

  Reinitialisation 

 Following  reconnection  of  the  bat-
tery, in the event of a malfunction or 
in the event of unwanted opening of 
the  roof  on  closing,  the  safety  auto-
reverse must be reinitialised: 
   -  

place  the  dial  in  the  fully  closed 
position (initial position  "O" ), 

  -  

press the dial immediately, 

  -  

continue to press until the roof is 
fully closed.  

 Always  remove  the  ignition 
key  when  leaving  the  vehi-
cle, even for a short time. 
 In the event of contact during 

operation  of  the  roof,  the  movement 
of  the  roof  must  be  reversed.  To  do 
this, operate the control concerned. 
 When  the  driver  operates  the  roof 
control,  he  must  ensure  that  no  one 
is  preventing  the  roof  from  closing 
correctly. 
 The driver must ensure that the pas-
sengers use the sunroof correctly. 
 Be aware of children when operating 
the roof. 
 Check that the slides are clean to en-
sure that the sunroof slides correctly.  

  Safety auto-reverse 
 When  the  roof  meets  an  obstacle 
while closing, it partially opens again. 

 You  can  close  the  sunroof 
using  the  remote  control 
when  locking  (refer  to  the 
corresponding chapter).   

  The  safety  auto-reverse  function  is 
not operational during this operation.
  

4

85

 The tank must be fi lled with fuel with 

 the engine off.  
   

   Open the fuel fi ller fl ap. 

     Insert  the  key  then  turn  it  to  the 

left. 

     Remove the cap and attach it to 

the  clip  located  on  the  inside  of 

the fl ap.  

 A label on the inside of the fl ap indi-

cates which type of fuel to use. 
 If  you  fi ll  your  tank,  do  not  continue 

after  the  third  cut-off  of  the  pump 
nozzle.  This  could  result  in  vehicle 
malfunctions. 
  The capacity of the tank is approxi-
mately 9 gallons (40 litres).
  
   

   After fi lling the tank, lock the cap 

and close the fl ap.  

  You have enough fuel left to cover 
approximately 30 miles (50 km).
  

 The  electric  opening  of  the 
left-hand  door  is  inhibited 

when  the  fuel  fi ller  fl ap  is 

open. 

 The key cannot be removed from the 

cap's lock until the cap is refi tted on 

the tank.   

                     FILLING THE FUEL TANK  

 When  the  tank's  minimum 
level is reached, this warning 
light comes on, accompanied 
by  a  message  on  the  multi-
function display. 

  Low fuel level 

5

86

                             LIGHTS STALK 

 Lights off 

 Automatic switching on 
of lights. 

 Side lights 

 Dipped/main beam 
headlamps 

  Dipped/Main beam change 
 Pull the stalk fully towards you.  

  Front fog lamps and rear 
fog lamp 

 Rotate  the  ring   B   or   C   forwards  to 
switch  on  and  backwards  to  switch 
off. The status is displayed by the in-
dicator light on the instrument panel. 

  Vehicles fi tted with a rear fog 

lamp (ring B) 

 Rear fog lamp 

  Vehicles fi tted with front fog 

lamps and a rear fog lamp (ring C) 

 Front fog lamps (1st rotation 
of the ring forwards) 

 These  operate  with  the  side  lights 
and dipped headlamps.  

  Lights on 
 With the ignition off, a buzzer sounds 
when  the  driver's  door  is  opened,  if 
you have left your lights on. 
 If  the  dipped  headlamps  remain 
on,  with  the  ignition  off,  they  will 
be  switched  off  automatically  after 
thirty  minutes  maximum  to  prevent 
discharging of the battery.   

 This can only operate with the dipped 
and main beam headlamps.  

  Front and rear lights 

 Selection is by turning ring  A . 

5

87

 Front fog lamps and rear 
fog  lamp  (2nd  rotation  of 
the ring forwards). 
  Note :  to  switch  off  the 

rear  fog  lamp  and  the  front  fog 
lamps, turn the ring backwards twice 
in succession. 

  Notes: 
 When the main beam headlamps are 
switched on, the front fog lamps are 
switched off. 
 When the lights are switched off au-
tomatically,  with  the  engine  running, 
the front fog lamps and the side lights 
will  remain  on  (turn  the  ring  back-
wards to switch the fog lamps off). 

  Direction indicators (fl ashers) 

  Left : downwards. 
  Right : upwards.  

  When the lights are switched 
off  automatically  or  when 
the  dipped  headlamps  are 
switched  off  manually,  with 
the  engine  running,  the  fog 
lamps  and  the  side  lights 
will remain on. 

 In  good  or  rainy  weather,  both  day 
and  night,  the  front  fog  lamps  and 
the  rear  fog  lamp  are  dazzling  and 
are prohibited. 
 Do not forget to switch them off when 
they are no longer needed.  

  Follow me home lighting 
 Leaving  the  dipped  headlamps  on 
temporarily,  after  switching  off  the 
ignition,  facilitates  the  driver's  exit 
from  the  vehicle  when  the  light  is 
poor.  

  Switching on 
   

   With  the  ignition  off,  "fl ash"  the 

headlamps. 

  

   A  second  "headlamp  fl ash" 

switches the function off.   

  Switching off 
 The  follow  me  home  lighting  is 
switched  off  automatically  following 

locking of the doors, after a specifi ed 

time.   

5

88

  Daytime lights *  

 On vehicles which are equipped with 
daytime lights, the dipped headlamps 
come on when the vehicle is started. 

  Automatic switching on of 

lights 

 The  side  lights  and  dipped  beam 
headlamps switch on automatically if 
the light is poor and when the wind-
screen  wipers  operate  continuously. 
They  switch  off  when  the  light  be-
comes  bright  enough  or  the  wind-
screen wipers are switched off. 

In  foggy  weather  or  in 

snow, the brightness sen-

sor  can  detect  suffi cient 

light,  the  lights  will  not 

come on automatically.  

Do  not  cover  the  brightness 

sensor,  coupled  with  the  rain 

sensor,  located  in  the  centre  of 

the windscreen behind the interior 

mirror.  It  is  used  for  automatic 

switching on of the lights.

  Coupling with the Follow Me 

Home lighting 
 The  association  with  the  automatic 
lighting  function  provides  the  follow 
me  home  lighting  with  the  following 
additional options: 
-  

selection  of  maintaining  of  the 
lighting  for  a  duration  of  15,  30 
or  60  seconds  in  the  vehicle 
parameters  of  the  multifunction 

display 

confi guration 

menu 

(except  in  the  case  of  the 
monochrome  display  A   for 
which the duration is pre-set), 

-  

automatic activation of the follow 
me  home  lighting  when  the 
automatic  lighting  function  is  in 
operation.   

  Activation 
 Turn  the  lighting  control  to  the 
" AUTO " position.  

  Disarming 
 Turn the lighting control to a position 
other than " AUTO ".  

  Operating fault 
 If  the  brightness  sensor  does  not 
function correctly, the lights come on 
accompanied by the service warning 
light, an audible signal and a message 
on the multifunction display. 
  Consult a PEUGEOT dealer.  

  Operating fault 
 If  the  brightness  sensor  does  not 
function correctly, the lights come on 
accompanied by the service warning 
light, an audible signal and a messa-
ge on the multifunction display. 
 Contact a  PEUGEOT  dealer. 

 Do not cover the brightness 
sensor, coupled with the rain 
sensor, located in the centre 
of  the  windscreen  behind 
the  interior  mirror;  the  as-
sociated functions would no 
longer be controlled.  

 This warning light comes on 
on the instrument panel. 

 The  instruments  and  controls  (ins-
trument  panel,  multifunction  display, 
air conditioning control panel, ...) are 
only  lit  on  switching  to  the  automa-
tic switching on of the lights mode or 
when the lights are switched on ma-
nually.  

  *   According to country.  

5

88

  Daytime lights *  

 On vehicles which are equipped with 
daytime lights, the dipped headlamps 
come on when the vehicle is started. 

  Automatic switching on of 

lights 

 The  side  lights  and  dipped  beam 
headlamps switch on automatically if 
the light is poor and when the wind-
screen  wipers  operate  continuously. 
They  switch  off  when  the  light  be-
comes  bright  enough  or  the  wind-
screen wipers are switched off. 

In  foggy  weather  or  in 

snow, the brightness sen-

sor  can  detect  suffi cient 

light,  the  lights  will  not 

come on automatically.  

Do  not  cover  the  brightness 

sensor,  coupled  with  the  rain 

sensor,  located  in  the  centre  of 

the windscreen behind the interior 

mirror.  It  is  used  for  automatic 

switching on of the lights.

  Coupling with the Follow Me 

Home lighting 
 The  association  with  the  automatic 
lighting  function  provides  the  follow 
me  home  lighting  with  the  following 
additional options: 
-  

selection  of  maintaining  of  the 
lighting  for  a  duration  of  15,  30 
or  60  seconds  in  the  vehicle 
parameters  of  the  multifunction 

display 

confi guration 

menu 

(except  in  the  case  of  the 
monochrome  display  A   for 
which the duration is pre-set), 

-  

automatic activation of the follow 
me  home  lighting  when  the 
automatic  lighting  function  is  in 
operation.   

  Activation 
 Turn  the  lighting  control  to  the 
" AUTO " position.  

  Disarming 
 Turn the lighting control to a position 
other than " AUTO ".  

  Operating fault 
 If  the  brightness  sensor  does  not 
function correctly, the lights come on 
accompanied by the service warning 
light, an audible signal and a message 
on the multifunction display. 
  Consult a PEUGEOT dealer.  

  Operating fault 
 If  the  brightness  sensor  does  not 
function correctly, the lights come on 
accompanied by the service warning 
light, an audible signal and a messa-
ge on the multifunction display. 
 Contact a  PEUGEOT  dealer. 

 Do not cover the brightness 
sensor, coupled with the rain 
sensor, located in the centre 
of  the  windscreen  behind 
the  interior  mirror;  the  as-
sociated functions would no 
longer be controlled.  

 This warning light comes on 
on the instrument panel. 

 The  instruments  and  controls  (ins-
trument  panel,  multifunction  display, 
air conditioning control panel, ...) are 
only  lit  on  switching  to  the  automa-
tic switching on of the lights mode or 
when the lights are switched on ma-
nually.  

  *   According to country.  

5

89

     HEADLAMP ADJUSTMENT 

 To avoid causing a nuisance to other 
road  users,  the  height  of  the  head-
lamps should be adjusted in relation 
to the load in the vehicle. 
  0.   1 or 2 people in the front seats. 
  

-.   3 people. 
  1.   4 people. 
  2.   4 people + maximum 

authorised load. 

  3.   Driver + maximum 

authorised load. 

 The initial setting is position  "0" . 

         WINDSCREEN WIPER STALK 

  Front windscreen wiper with 

automatic wipe 

  2   

Fast wipe (heavy rain). 

  1   

Normal wipe (moderate 
rain). 

  I   

Intermittent wipe. 

  0   

Off. 

  AUTO      Automatic or single  

wipe (press downwards). 

 In the  I ntermittent position, the wiping 
speed is in proportion to the speed of 
the vehicle. 
 In  AUTO  mode, the wiping speed is in 
proportion to the intensity of the rainfall. 

The fi rst press of the stalk downwards 

activates the automatic wipe. 
 Subsequent presses trigger a single 
wipe.  

  Front windscreen wiper with 

intermittent wipe 

  2    Fast wipe (heavy rain). 
  1    Normal wipe (moderate rain). 
  I   

Intermittent wipe. 

  0    Off. 
      Single wipe (press downwards). 
 In the  I ntermittent position, the wiping 
speed  is  in  proportion  to  the  vehicle 
speed.  

5

89

     HEADLAMP ADJUSTMENT 

 To avoid causing a nuisance to other 
road  users,  the  height  of  the  head-
lamps should be adjusted in relation 
to the load in the vehicle. 
  0.   1 or 2 people in the front seats. 
  

-.   3 people. 
  1.   4 people. 
  2.   4 people + maximum 

authorised load. 

  3.   Driver + maximum 

authorised load. 

 The initial setting is position  "0" . 

         WINDSCREEN WIPER STALK 

  Front windscreen wiper with 

automatic wipe 

  2   

Fast wipe (heavy rain). 

  1   

Normal wipe (moderate 
rain). 

  I   

Intermittent wipe. 

  0   

Off. 

  AUTO      Automatic or single  

wipe (press downwards). 

 In the  I ntermittent position, the wiping 
speed is in proportion to the speed of 
the vehicle. 
 In  AUTO  mode, the wiping speed is in 
proportion to the intensity of the rainfall. 

The fi rst press of the stalk downwards 

activates the automatic wipe. 
 Subsequent presses trigger a single 
wipe.  

  Front windscreen wiper with 

intermittent wipe 

  2    Fast wipe (heavy rain). 
  1    Normal wipe (moderate rain). 
  I   

Intermittent wipe. 

  0    Off. 
      Single wipe (press downwards). 
 In the  I ntermittent position, the wiping 
speed  is  in  proportion  to  the  vehicle 
speed.  

5

90

   Windscreen and headlamp wash 
 Pull  the  windscreen  wiper  stalk  to-
wards  you.  The  windscreen  wash 
then  the  windscreen  wipers  operate 

for a fi xed period. 
 The headlamp wash is also activated, 
 if the headlamps are on.    

   Low wash-wipe/headlamp wash 

fl uid level 

 On  vehicles  fi tted  with  headlamp 

washers, this is indicated by an audible 
signal or a message on the multifunction 
display. 
 This  information  is  given  each  time 
the front or rear wash-wipe control is 

operated, until the reservoir is fi lled. 

 When  you  stop,  fi ll  the  wash-wipe/

headlamp  wash  reservoir  or  have  it 

fi lled.   

 Do not cover the rain sensor 
located  on  the  windscreen 
behind the interior mirror. 
 When  using  an  automatic 

car wash, switch off the ignition. 
 In winter, it is advisable to wait for the 
windscreen to completely clear of ice 
before operating the automatic wipe.  

  Rear windscreen wiper 

 Turn ring  A

  to the fi rst notch 

for intermittent wiping. 

 When reverse gear is engaged, if the 
windscreen  wipers  are  in  operation, 
the rear wiper will start wiping. 

 Turn  ring   A

   past  the  fi rst 

notch; the windscreen wash 
then  the  windscreen  wiper 

operate for a fi xed period.   

  Automatic windscreen wipers 

 In   AUTO   mode,  the  windscreen 
wipers  operate  automatically  and 
adapt  their  speed  to  the  intensity 
of the rainfall
 . 

  Activation 
 Activation  of  the  function  is  accom-
panied  by  a  message  on  the  multi-
function display. 
The automatic windscreen wipers 

function must be reactivated if the 

ignition has been switched off for 

more  than  one  minute,  by  pres-

sing the stalk downwards.

  Deactivation 
 Deactivation  of  the  function  is  ac-
companied  by  a  message  on  the 
multifunction display. 
 The function is deactivated when the 
windscreen wipers stalk is moved to 
position  I ,  1  or  2 . 
In  the  event  of    

event  of

of malfunction   of  the 

automatic  windscreen  wipers,  the 
windscreen wipers will operate in in-
termittent mode. 
 Contact a  PEUGEOT  dealer to have 
the system checked. 

  Rear windscreen wash 

 To  activate  or  deactivate 
this function, go to the multi-

function  display  confi gura-

tion menu. 
 If there is a signifi cant ac-

cumulation of snow or ice 
and when using a bicycle 

carrier on the tailgate, deactivate the 
automatic rear wiping by going to the 

multifunction  display  confi guration 

menu. 

   Special position of the front 

windscreen wiper 
 In  the  minute  following  switching  off 
of the ignition, any action on the stalk 
positions  the  wipers  in  the  centre  of 
the windscreen. 
 This  action  enables  you  to  position 
the  wiper  blades  for  winter  parking, 
cleaning or replacement (See corre-
sponding section). 
 To park the wipers after this has been 
done,  switch  on  the  ignition  and  ope-
rate the stalk.   

5

90

   Windscreen and headlamp wash 
 Pull  the  windscreen  wiper  stalk  to-
wards  you.  The  windscreen  wash 
then  the  windscreen  wipers  operate 

for a fi xed period. 
 The headlamp wash is also activated, 
 if the headlamps are on.    

   Low wash-wipe/headlamp wash 

fl uid level 

 On  vehicles  fi tted  with  headlamp 

washers, this is indicated by an audible 
signal or a message on the multifunction 
display. 
 This  information  is  given  each  time 
the front or rear wash-wipe control is 

operated, until the reservoir is fi lled. 

 When  you  stop,  fi ll  the  wash-wipe/

headlamp  wash  reservoir  or  have  it 

fi lled.   

 Do not cover the rain sensor 
located  on  the  windscreen 
behind the interior mirror. 
 When  using  an  automatic 

car wash, switch off the ignition. 
 In winter, it is advisable to wait for the 
windscreen to completely clear of ice 
before operating the automatic wipe.  

  Rear windscreen wiper 

 Turn ring  A

  to the fi rst notch 

for intermittent wiping. 

 When reverse gear is engaged, if the 
windscreen  wipers  are  in  operation, 
the rear wiper will start wiping. 

 Turn  ring   A

   past  the  fi rst 

notch; the windscreen wash 
then  the  windscreen  wiper 

operate for a fi xed period.   

  Automatic windscreen wipers 

 In   AUTO   mode,  the  windscreen 
wipers  operate  automatically  and 
adapt  their  speed  to  the  intensity 
of the rainfall
 . 

  Activation 
 Activation  of  the  function  is  accom-
panied  by  a  message  on  the  multi-
function display. 
The automatic windscreen wipers 

function must be reactivated if the 

ignition has been switched off for 

more  than  one  minute,  by  pres-

sing the stalk downwards.

  Deactivation 
 Deactivation  of  the  function  is  ac-
companied  by  a  message  on  the 
multifunction display. 
 The function is deactivated when the 
windscreen wipers stalk is moved to 
position  I ,  1  or  2 . 
In  the  event  of    

event  of

of malfunction   of  the 

automatic  windscreen  wipers,  the 
windscreen wipers will operate in in-
termittent mode. 
 Contact a  PEUGEOT  dealer to have 
the system checked. 

  Rear windscreen wash 

 To  activate  or  deactivate 
this function, go to the multi-

function  display  confi gura-

tion menu. 
 If there is a signifi cant ac-

cumulation of snow or ice 
and when using a bicycle 

carrier on the tailgate, deactivate the 
automatic rear wiping by going to the 

multifunction  display  confi guration 

menu. 

   Special position of the front 

windscreen wiper 
 In  the  minute  following  switching  off 
of the ignition, any action on the stalk 
positions  the  wipers  in  the  centre  of 
the windscreen. 
 This  action  enables  you  to  position 
the  wiper  blades  for  winter  parking, 
cleaning or replacement (See corre-
sponding section). 
 To park the wipers after this has been 
done,  switch  on  the  ignition  and  ope-
rate the stalk.   

5

91

         COURTESY LIGHT 

   1.    Front courtesy light  
  2.    Map reading lights   

 In  the  permanently  on  posi-
tion, there are different dura-
tions of lighting: 

  Boot light 

 The  boot  light  is  located  in  the  left 
boot trim. 
 It  comes  on  automatically  when  the 
boot is opened and switches of auto-
matically when the boot is closed.  

  Front courtesy light 

 Permanently off. 

 Permanently on. 

 In this position, the courtesy 
light comes on gradually: 

   -  

when the vehicle is unlocked, 

  -  

when the key is removed from 
the ignition, 

  -  

when the remote control locking 
button is pressed, in order to 
locate your vehicle.  

 It switches off gradually: 
   -  

when the vehicle is locked, 

  -  

when the ignition is switched on, 

  -  

30 seconds after the last door is 
closed.  

  Map reading lights 

 With  the  ignition  on,  press 
the corresponding switch  2 .  

   -  

when the ignition is off, approxi-
mately ten minutes, 

  -  

in  energy  economy  mode,  ap-
proximately thirty seconds, 

  -  

when  the  engine  is  running,  no 
limit.   

6

92

       HORN 

 Press  one  of  the  spokes  of  the 
steering wheel. 

     HAZARD WARNING LIGHTS 

 Press the button, the direction indica-

tors fl ash. 
 They can operate with the ignition off. 

  Automatic lighting of hazard 
warning lights 

 When  braking  in  an  emergency,  de-
pending on the force of deceleration, 
the hazard warning lights come on au-
tomatically. They switch off automati-

cally the fi rst time you accelerate. 
 It  is  also  possible  to  switch  them  off 
by pressing the button on the fascia.  

       TYRE UNDER-INFLATION 
DETECTION 

 Sensors  fi tted  in  each  valve  check 

the  pressure  of  the  tyres  while  driv-

ing and trigger a warning in the event 

of malfunction (speed above 12 mph 

(20 km/h)). 
 The  tyre  under-infl ation  detection 

system is an aid to driving which does 

not replace the need for the driver to 

be vigilant or to drive responsibly.  

  Flat tyre 

  This  warning  light  comes 

on  on  the  instrument  panel, 

accompanied  by  an  audible 

signal and a message on the 

multifunction display locating 

the wheel concerned. 

      Check  the  tyre  pressures  as 

soon as possible.  

 This check must be carried out when 

the tyres are cold.  

6

92

       HORN 

 Press  one  of  the  spokes  of  the 
steering wheel. 

     HAZARD WARNING LIGHTS 

 Press the button, the direction indica-

tors fl ash. 
 They can operate with the ignition off. 

  Automatic lighting of hazard 
warning lights 

 When  braking  in  an  emergency,  de-
pending on the force of deceleration, 
the hazard warning lights come on au-
tomatically. They switch off automati-

cally the fi rst time you accelerate. 
 It  is  also  possible  to  switch  them  off 
by pressing the button on the fascia.  

       TYRE UNDER-INFLATION 
DETECTION 

 Sensors  fi tted  in  each  valve  check 

the  pressure  of  the  tyres  while  driv-

ing and trigger a warning in the event 

of malfunction (speed above 12 mph 

(20 km/h)). 
 The  tyre  under-infl ation  detection 

system is an aid to driving which does 

not replace the need for the driver to 

be vigilant or to drive responsibly.  

  Flat tyre 

  This  warning  light  comes 

on  on  the  instrument  panel, 

accompanied  by  an  audible 

signal and a message on the 

multifunction display locating 

the wheel concerned. 

      Check  the  tyre  pressures  as 

soon as possible.  

 This check must be carried out when 

the tyres are cold.  


Content   ..  4  5  6  7   ..