Peugeot 807 (2013 year). Instruction - part 5


  Index      Peugeot     Peugeot 807 - instruction 2013 year in english


Search            


Content   ..  3  4  5  6   ..


Peugeot 807 (2013 year). Instruction - part 5


EASE OF USE and COMFORT

3

63

Seats

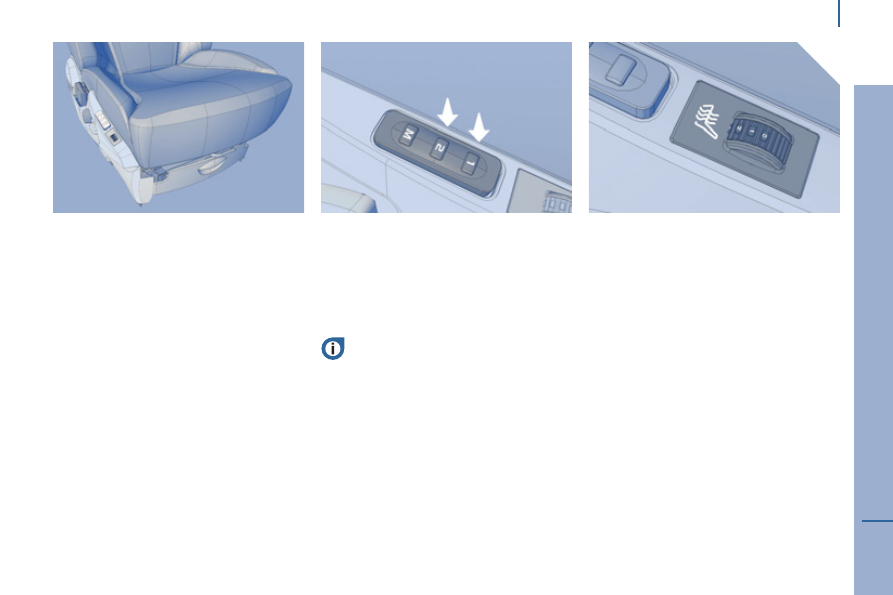
  Memorising seat positions 

 Two driving positions can be 

memorised, using  buttons M/1  and 

 M/2 . 
 These are located on the side of the 

seat: 
  -    Place the ignition key in the 

"running" position (2nd notch), 

-      Adjust your seat, 
-      Press button  M , then button  1  for 

a fi rst driving position within four 

seconds. 

 Repeat the same actions on buttons  M  

and   to store another driving position. 
 An audible signal confi rms that a 

position has been memorised. 
 Memorising a new position cancels the 

previous one.  

  Activating a memorised driving 

position 

  Front heated seat controls 

 When the engine is running, the front 

seats can be heated separately. 
 Use the adjustment controls located on 

the side of each front seat to switch on 

and select the self-regulated level of 

heating: 
  1:    Low. 
  2:    Medium. 
  3:    High. 
  0:    Off.  

 After recalling a memorised 

position fi ve times in succession, 

the function will be cancelled until 

the engine is started.  

  Engine running 
-    Keep button  1  or  2  pressed down 

until the end of setting of the 

corresponding memorised position.   

  Engine off 
-    Briefl y press button  1  or  2  to recall 

the corresponding memorised 

position. 

64

   Seats   

  Rear bench seat 

 One three-seat bench seat, row 3.  

  Rear side seats 

 Two rear passenger seats, left and right side position, 

rows 2 and 3.  

  Rear centre seat 

 One rear passenger seat, row 2 central position and 

row 3 left side position. Integrated seat belt. Plastic shell 

trim. Folds to the low table position.  

EASE OF USE and COMFORT

3

65

Seats

 REAR SIDE SEATS

  Forwards/backwards adjustment 
 Lift bar  A  and slide the seat forwards 

or backwards.  

  Handling the side seat  

  Adjusting the angle of the seat back 
 Push lever  B  upwards and adjust the 

angle as required. 
 Release the lever to lock.  

  Access to row 3 
   1.   Place the head restraint in the low 

position. 

  2.   Push lever  B  upwards as far as 

possible. 

  Exit from row 3 
   1.   Place the head restraint in the low 

position. 

  2.   Pull control  C . 
  3.   Guide the tilting of the seat back 

forwards until the rear anchorages 

are unlocked. If you experience any 

diffi culty, use the red emergency 

control to unlock the anchorages. 

  4.   Place the seat in the vertical closed 

position.  

  Following each entry or exit, 

reposition the raised seat guiding 

it until the rear anchorages lock in 

their rails.  

  3.   Fold the seat back onto the seat 

cushion and guide the tilting of the 

seat back forwards until the rear 

anchorages are unlocked. If you 

experience any diffi culty, use the 

emergency control to unlock the 

anchorages. 

  4.   Place the seat in the vertical closed 

position.   

66

   Seats   

  Control for sliding the rear side 

seats from row 3 or the boot 
 Pull the strap (marked with the arrow 

symbol) to slide the seat in front of you.  

  Removing the side seat 

   1.   Tilt the seat back forwards to 

detach the rear anchorages. 

  2.   Grab the red strap which appears 

and pull it upwards, the front 

anchorages unlock  . 

  3.   The strap, like the handle, enables 

you to remove the seat.   

  Refi tting the side seat 

  Check that there is no obstacle 

obstructing the slides or 

preventing correct locking of the 

seat anchorages. 

   1.   Place the front anchorages at the 

front stop in the slides. Support the 

strap fi rmly for easier positioning of 

the seat. 

  2.   Tilt the folded seat towards the rear. 

The rear anchorages lock. 

  3.   Raise the seat back. 
  4.   Slide the seat  .    

EASE OF USE and COMFORT

3

67

Seats

 ROW 2 CENTRE SEAT

 This can be placed in row 3, on the left.  

  "Low table" position 
   1.   Place the head restraint in the low 

position. 

  2.   At the top (at the back of the seat), 

lift the handle identifi ed by the 

symbol and guide the tilting of the 

seat back towards its seat cushion. 

  3.   You have a "low table". To return to 

the seat position, lift the handle and 

guide the raising of the seat back.   

  Removing the centre seat 
   1.   Place the seat in the "low table" 

position. 

  2.   Using the control which you pull, tilt 

the seat back forwards so releasing 

the rear anchorages from the 

slides. 

  3.   Grab the red strap which appears 

and pull it upwards, the front 

anchorages unlock  . 

  4.   The strap, like the handle, enables 

you to remove the seat.   

68

   Seats   

  Rear head restraints 

 The rear head restraints can be 

removed and have two positions: 
  -    high, position for use, 
  -    low, storage position. 

 To raise or lower a head restraint, pull 

it forwards sliding it at the same time. 
 To remove it, place it in the high 

position, push the lug and pull it 

forwards and upwards. 
 To refi t it, engage the head restraint 

rods in the holes taking care to remain 

in the centreline of the seat back. 

 Never drive with the head 

restraints removed, they must be 

in place and correctly adjusted.  

  Refi tting the centre seat 

 Check that there is no obstacle 

obstructing the slides or 

preventing correct locking of the 

seat anchorages. 

   1.   Place the front anchorages at the 

front stop in the slides. Support the 

strap fi rmly for easier positioning of 

the seat. 

  2.   Tilt the folded seat towards the rear. 

The rear anchorages lock. 

  3.   Raise the seat back and slide the 

seat.   

  Turning a rear seat round 
 The rear seats can be placed in a "face 

to face" position. 
 Carry out the operations described for 

 removal  then turn the seat round and 

resume with the procedure for  refi tting  

the seat  . 

 This turning operation must be 

carried out when stationary. 

 Driving with a passenger seated facing 

the rear is prohibited. 
 When the vehicle is being driven, 

placing a row 2 seat in the closed 

position while a passenger is sitting in 

row 3 is prohibited.   

EASE OF USE and COMFORT

3

69

Seats

REAR BENCH SEAT 

 From the boot, you can pull 

on strap  B  and slide the seat 

forwards to make it easier to load 

the vehicle. 

 The rear bench seat must only be 

fi tted in row 3. 

  Seat back folded position 
   1.   Place the head restraints in the low 

position. 

  2.   Pull the strap   C  upwards, from the 

tailgate. 

  3.   Tilt the seat back on the seat 

cushion.   

  Vertical position of the bench seat 
   1.   Place the head restraints in the low 

position. 

  2.   Pull the strap  C  upwards, from the 

tailgate. 

  3.   Fold the seat back onto the seat 

cushion. 

  4.   Pull the lever  D  to unlock the rear 

anchorages. 

  5.   Place the seat in the vertical 

"folded" position.  

 When driving, attach the retaining 

straps to the handles.  

  Forwards/backwards 

adjustment 

 From the seat cushion, lift bar  A  and 

slide the seat towards the front or the 

rear. 

70

   Seats   

  Removing the bench seat 
   1.   Fold the seat to the vertical 

position. 

  2.   Grasp the two bars  E  underneath 

the seat. 

  3.   The front anchorages unlock.  

  Refi tting the bench seat 

 For removal and refi tting, pass the 

rear seat, in the "folded" position, 

through the sliding side doors.  

 Check that there is nothing 

blocking the runners which could 

prevent correct locking of the 

bench seat anchorages. 

   1.   Position the front anchorages at the 

front stop of the runners. 

  2.   Tilt the folded seat rearwards. 
  3.   The rear anchorages then lock. 
  4.   Unlock the seat back and lift it 

using the strap  C .    

  Good practice 

 When the vehicle is being driven, it is 

prohibited for a passenger to sit: 
   -  

in row 3 if the seat back in front 

(row 2) is in the table position. 

  -  

in row 3 if the seat/bench in front 

(row 2) is in the vertical folded 

position. 

  -  

in the centre seat if the right-hand 

side seat is in the vertical folded 

position.   

EASE OF USE and COMFORT

3

71

Seats

 The centre seat may be installed 

in the central position in row 2 and 

in the left side position in row 3.  

 MODULARITY AND POSSIBLE SEAT CONFIGURATIONS

  Examples of various 

arrangements combining 

pleasure and practicality: 

 The various operations modifying 

the existing confi guration must 

be carried out with the engine 

switched off (See section on "Seats"). 
 It is prohibited to be in a rearwards 

facing position when the vehicle is 

being driven. 
 The rotating of the seats depends on 

the vehicle equipment and the country. 

  5 seats with picnic position when 

parked  

  5 seat arrangements 

72

   Seats   

  7 seats with access to row 3  

  8 seats with bench seat  

EASE OF USE and COMFORT

3

73

Seats

  "Cargo"/Transportation of long objects confi guration   

EASE OF USE and COMFORT

3

75

   Practical information   

FRONT SEAT LAYOUT

  Storage drawers 
 There is a storage drawer under each 

front seat. 
   -  

To open it, lift and pull. 

  -  

To take it out, open it to its full 

extent, lift the two tabs on either 

side of the drawer, then remove it 

completely.   

PRACTICAL INFORMATION 

  'Aircraft' type table 
 You have an 'aircraft' type table with a 

rim, equipped with a cup holder, fi tted 

to the rear of each front seat. 
 Do not forget to fold this before pivoting 

the seat. 

  12V socket 
 You have a 12 V accessory socket 

(120 W) at the foot of the driver's seat, 

which is accessible to passengers of 

row 2.  

  Front and rear armrests  

  To place the armrest in its rest 

position: 
   -  

Lift the armrest until it is aligned 

with the seat back.       

 Each front seat also has a storage 

pocket on the seat back.  

  To place the armrest in the position 

in which it is used: 
   -  

Push it towards the rear, 

  -  

Fold it down completely, 

  -  

Raise it slowly to the required 

position, 

  -  

If you lift it past the required 

position, restart the above 

operations.    

76

   Practical information   

EASE OF USE and COMFORT

3

77

   Practical information   

  1. Driver's upper glove box  

 FRONT INTERIOR LAYOUT  

 This is fi tted with a lock. 
 To open the glove box, lift the handle. 
 The light comes on when the cover is 

opened. 
 It contains three sockets for the 

connection of video equipment and 

access to the fascia fuse box. 
 It includes special compartments for 

storing maps, a packet of cigarettes, 

an A4 document etc. 
 RCA sockets.   

 This permits the connection of a mobile 

telephone charger, a baby's bottle 

warmer, etc.   

 To open, press the button. 
 To close, press the cover. 
 It includes special compartments for 

storing a pen, a mobile telephone, 

coins or tokens and credit cards. 


  2. Audio equipment concealing fl ap  

 Lower the fl ap fully to lock it in place. 
 Press the fl ap to raise it.   

  3. Central storage compartment    

  4. Passenger's upper glove box  

 To open, press the button. 
 To close, press the cover. 
 It includes special compartments for 

storing a pair of spectacles, keys, fi ve 

CDs and four audio cassettes or nine 

audio CDs.   

  5. Passenger's lower glove box  

  6.  Lighter or 12 V socket for 

accessories (120 W)  

   12. Mat fi tting/removal 
 When removing the front mat, push 

the seats as far back as possible and 

remove the fi xings. 
 When refi tting, position the mat 

correctly on the pins and clip the 

fi xings.   Check that the mat is secured 

correctly. 
 To prevent the mat from becoming 

caught under the pedals: 
   -  

only use mats suited to the fi xings 

already present in the vehicle.   It 

is imperative that these fi xings are 

used. 

  -  never 

fi t one mat on top of another.    

  7. Cooled compartment  

 It can hold up to three cans. 
 Slide the closer, located on the right, to 

open (upwards) or close (downwards) 

the air inlet.   

  8. Can holder and ashtray  

 This retractable and lit support contains 

up to two can holders, a removable 

ashtray and a location for the lighter 

when it is used as a 12 V socket 

(120 W).   

  9.  Storage compartment or 

additional telematics control  

 The storage compartment must not be 

used as an ashtray. 
 If fi tted on your vehicle, the additional 

telematics control is located on the 

centre console.   

  10. Storage compartment    

  11.  Door tray with space for a bottle 

of water   

  Bluetooth.  

78

   Practical information   


Content   ..  3  4  5  6   ..