Peugeot 508 Dag (2010.5). Instruction - part 7
 

  Index      Peugeot     Peugeot 508 Dag 2010.5 - instruction in english


Search            


Content   ..  5  6  7  8   ..


Peugeot 508 Dag (2010.5). Instruction - part 7


3

87

Comfort

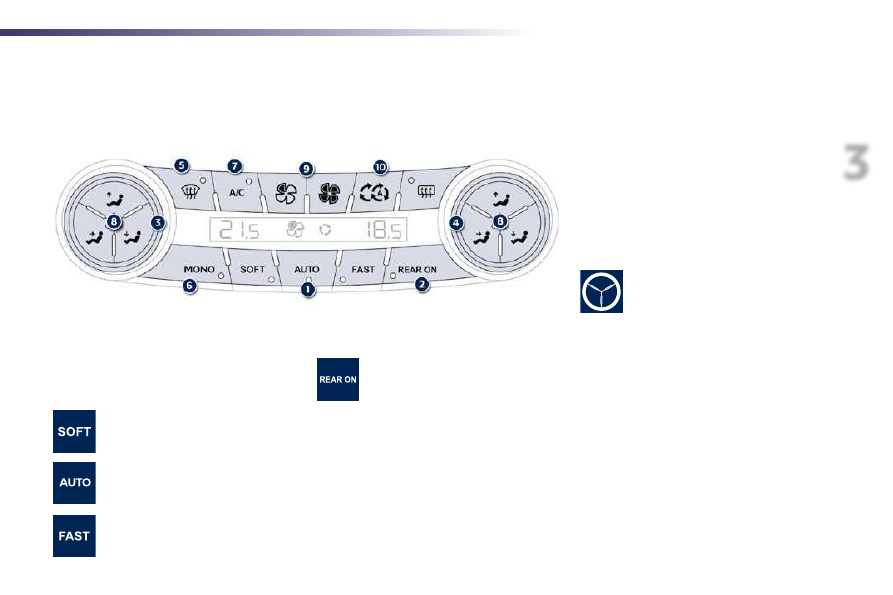
      Quad-zone digital air conditioning 

 The air conditioning system operates when the engine is running. 

  Automatic operation 

  1. Automatic comfort programme 

 The Soft/Auto/Fast modes allow the driver 
and front seat passenger to select their 
desired comfort settings for the passenger 
compartment: 

  2.  Activating/deactivating the 

rear air conditioning 

  3 - 4.  Driver-passenger side 

adjustment 

 The driver and front passenger can each adjust 
the temperature to their requirements. 
 The value indicated on the display corresponds 
to a level of comfort and not to a temperature in 
degrees Celsius or Fahrenheit. 

 Favours optimum gentle and silent 
operation by limiting the air flow. 

 Offers the best compromise between 
thermal comfort and silence of 
operation. 

 Favours dynamic and effective air 
flow.  

 Press this button to deactivate the 
rear air conditioning and lock the 
system. A padlock appears in the 
LCD screen. When the rear system 

is reactivated, automatic mode is selected with 
the last temperature settings used.  

   Turn control  3  or  4  to the left 

(blue) or to the right (red) 
respectively to decrease or 
increase this value.  

 A setting around the value 21 provides 
optimum comfort. However, depending on 
your requirements, a setting between 18 and 
24 is normal. 
 It is recommended that the difference between 
left and right should not be greater 3.  

88

i

i

i

Comfort

  5.  Automatic visibility 

programme 

  6. Mono-zone/Quad-zone 

  7. Air conditioning On/Off 

  Manual operation 

 If you wish, you can change one of settings 
provided by the system. The other functions will 
still be controlled automatically. 
 Press one of the Soft/Auto/Fast buttons to 
return to fully automatic operation. 

  On entering the vehicle, if the interior 
temperature is much colder or warmer 
than the comfort value, there is no 
need to change the value displayed in 
order to obtain the comfort required. 
The system corrects the difference 
in temperature automatically and as 
quickly as possible.  

 See "Front demisting-defrosting".  

 Press this button to apply the driver's 
comfort setting value to the front and 
rear passengers (mono-zone). The 
indicator lamp on the button comes on.  

 The air conditioning is designed to 
operate effectively in all seasons, 
with the windows closed. 
 It allows you: 

   -  

in summer, to lower the temperature, 

  -  

in winter, above 3 °C, to improve demisting 
performance.  

Switching on
   Press the  "A/C"  button, the associated 

green indicator lamp comes on.  

The air conditioning does not operate when 
the air flow control is set to off.

Switching off
   Press the  "A/C"  button again, the 

associated green indicator lamp goes off.  

 Switching off the air conditioning may result in 
some discomfort (humidity, misting).  

 For maximum cooling or heating of the 
passenger compartment, it is possible 
to exceed the minimum value 14 or the 
maximum value 28. 
   Turn the dial  3  or  4  to the left until 

"LO"  is displayed or to the right 
until  "HI"  is displayed.   

With Stop & Start, when demisting has 
been activated, the STOP mode is not 
available.  

3

89

Comfort

   Press this  "full fan"  button to 

increase the air flow.  

   Press the corresponding button for:  

 Windscreen and side windows. 

 Centre and side vents. 

 Footwells. 

 To suit your requirements, you can 
combine two distribution buttons or 
select the three distribution modes 
simultaneously.  

   Press  "empty fan"  button to 

reduce the air flow.   

   Press this  "empty fan"  air 

flow button until the fan symbol 
disappears and  "--"  appears.  

Automatic air intake mode
It is activated by default with 
automatic comfort regulation. 

  9. Air fl ow adjustment 

The symbol for air flow, the fan, fills 
progressively according to the value requested. 

  Switching the system off 

 This action switches off all of the functions of 
the air conditioning system. 
 Temperature related comfort is no longer 
assured but a slight flow of air, due to the 
forward movement of the vehicle, can still be felt. 
 Avoid driving for long periods with the system 
off (risk of condensation and deterioration of 
the air quality). Pressing the  "full fan"  button 
reactivates the system with the values in use at 
the time it was switched off.  

  10. Air intake/Air recirculation 

 Air recirculation enables the passenger 
compartment to be isolated from exterior 
odours and smoke. It is activated automatically 
when operating the screenwash. It is inactive 
when the ambient temperature is below 5 °C to 
guard against the risk of misting in the vehicle. 
   As soon as possible, press this button 

again to permit the intake of outside air and 
prevent the formation of condensation. The 
indicator lamp in the button goes off.    

90

Comfort

Adjusting the rear passenger comfort level 

  1.  Automatic comfort 

programme 

   Press the  "AUTO"  button. The 

lamp in the button comes on.  

 We recommend that you use this mode. It 
automatically adjusts all settings to provide 
optimum operation for the comfort level chosen: 
passenger compartment temperature, air flow 
and air distribution. 
 This system is designed to operate effectively 
in all seasons, with the windows closed.  

  2. Air distribution adjustment 

  3.  Temperature adjustment, left 

and right 

 Press the corresponding button successively 
for: 

 The left and rear passengers can each adjust 
their temperature setting independently. 
 The value indicated in the screen is a level 
of comfort and not a temperature in degrees 
Celsius or Fahrenheit. 

   Turn the dial to the left to lower the 

value and to the right to raise it.  

   -  

Footwell and centre vent. 

  -  

Centre vent. 

  -  

Automatic control of air 
distribution.   

 The rear air conditioning controls only operate 
if, from the front: 
   -  

the  REAR  button is activated, 

  -  

the automatic visibility programme is not 
activated.  

 A setting around 21 provides an optimum 
level of comfort. However, depending on your 
requirements, a setting between 18 and 24 is 
normal. 
 It is recommended that the difference between 
left and right should not be greater 3. 
 Ensure that the air grilles and vents on the floor 
are not obstructed.  

3

91

Comfort

  4. Air fl ow adjustment 

   Press this "full fan" button to 

increase the air flow.  

   Press this "empty fan" button to 

reduce the air flow.   

The air flow symbol, the fan, fills progressively 
as the fan speed increases.  

  Deactivating the system 

   Press the "empty fan" air flow 

button until the fan disappears 
and  "- -"  appears.  

 This action stops all of the functions of the air 
conditioning system. 
 Thermal comfort is no longer controlled. However, 
a slight air flow may still be felt, resulting from the 
forward movement of the vehicle.   

92

i

Comfort

   Switch off the demisting/defrosting 

of the rear screen and door mirrors 
as soon as appropriate, as lower 
current consumption results in 
reduced fuel consumption.   

 Front Demist - 
Defrost   

         Rear screen 
demist - defrost 

 The control button is located on the 
air conditioning system control panel. 

  With manual air 
conditioning 

   Select this programme to demist 

or defrost the windscreen and 
side windows as quickly as 
possible.  

With dual-zone and quad-
zone digital air conditioning 

  Automatic visibility programme 

  Switching on 

 The rear screen demisting/defrosting can only 
operate when the engine is running. 
   Press this button to demist/defrost the rear 

screen and (depending on version) the door 
mirrors. The indicator lamp associated with 
the button comes on.   

With Stop & Start, when demisting has 
been activated, the STOP mode is not 
available.  

  Switching off 

 The demisting/defrosting switches off 
automatically to prevent an excessive 
consumption of current. 
 It is possible to stop the demisting/defrosting 

operation before it is switched off automatically 
by pressing the button again. The indicator 
lamp associated with the button goes off.  

 The system automatically manages the air 
conditioning, air flow and air intake, and 
provides optimum distribution towards the 
windscreen and side windows. 
 Adjust the temperature control to quickly demist/
defrost the windows. 
 To switch it off, press the "visibility" button 
again, the warning lamp in the button goes off 
and the system reverts to the previous settings.   

   Select this programme to demist 

or defrost the windscreen and 
side windows as quickly as 
possible.  

 The system automatically manages the air 
conditioning, air flow and air intake, and 
provides optimum distribution towards the 
windscreen and side windows. 
 With the quad-zone digital air conditioning, 
pressing this button deactivates and locks the 
rear air conditioning. 
   To stop the programme, press either the 

"visibility"  button again or  "AUTO" , the 
warning lamp on the button goes off and 
the warning lamp in the  "AUTO"  button 
comes on.  

 The system reverts to the previous settings.   

3

93

i

Comfort

  Programmable heating 
mode 

 This is an additional and separate system 
which heats the engine hot water circuit 
to improve defrosting and to preheat the 
passenger compartment. 

 This indicator lamp comes on if the 
system is programmed in preheating 
mode.  

 Use the left hand steering mounted 
thumbwheel to navigate through the menus. 

  Programming 

   In the "Main menu", select "Pre-heating/

Pre-ventilation", 

   Select "Activation" and if necessary for 

programming, "Parameters", 

   Select "Heating" to preheat the engine or 

passenger compartment or "Ventilation" to 
ventilate the passenger compartment, 

   Select: 

   -   immediate to start the heating ("OK" once), 
  -   the first clock to programme/store a 

starting time, 

  -   the second clock to programme/store 

another starting time.   

      Programmable Heating/Ventilation 

  Programmable Ventilation 
mode 

 This mode allows ventilation of the passenger 
compartment to improve the temperature 
experienced on entering the vehicle in summer.  

 Using these two clocks and according 
to season you can, for example, select 
one or the other starting time. 
 A message in the instrument panel 
screen confirms your choice.  

94

i

!

i

i

Driving

         Starting-switching off the engine 

 With a  manual gearbox , put the gear lever in neutral. 
 With an  electronic gear control gearbox , put the gear lever in  N . 
 With an  automatic gearbox , put the gear lever in  P  or  N . 

   Insert the key in the ignition switch. 
   Turn the key fully towards the dashboard to 

position  3 (Starting) . 

   When the engine starts, release the key.   

  Starting using the key 

  Switching off using the key 

   Immobilise the vehicle. 
   Turn the key fully towards you to 

position  1 (Stop) . 

   Remove the key from the ignition switch.  

 For Diesel vehicles, in very cold weather 
the engine will not start until the preheater 
warning lamp has gone off. 

  Key left in the ignition 

 If the key is left in the ignition switch, 
there is an audible signal on opening 
the driver's door.   

 If one of the starting conditions is not met, a 
reminder message appears in the instrument 
panel screen. In some circumstances, it is 
necessary to turn the steering wheel slightly 
while pressing the "START/STOP" button to 
assist unlocking of the steering; a message 
warns you when this is needed.  

  If the vehicle is not immobilised, the 
engine will not stop.  

   With the electronic key inside the vehicle, 

press the brake pedal for vehicles with 
automatic or electronic gear control 
gearbox, or declutch fully for vehicles with 
a manual gearbox. 

  Starting using the 
electronic key 

   Press the " START/STOP " button.  

  Switching off using the 
electronic key 

   Immobilise the vehicle. 

   With the electronic key inside 

the vehicle, press the " START/
STOP
 " button.  

 The engine stops and the steering column is 
locked. 

  Accessory position 

 With the electronic key inside the 
vehicle, press the "START/STOP" 
button, with no action on the pedals, 
to switch the ignition on or off and so 
activate accessories.   

4

95

i

Driving

            Anti-theft protection  

 The keys contain an electronic chip which has 
a secret code. When the ignition is switched 
on, this code must be recognised in order for 
starting to be possible. 
 This electronic engine immobiliser locks the 
engine management system a few minutes 
after the ignition is switched off and prevents 
starting of the engine by anyone who does not 
have the key. 

 In the event of a malfunction, you are informed 
by a message in the instrument panel screen. 
 In this case, your vehicle does not start; contact 
a PEUGEOT dealer or a qualified workshop as 
soon as possible.   

   Emergency starting with the 
electronic key 

 When the electronic key is in the defined zone 
and your vehicle does not start after pressing 
the "START/STOP" button: 
   Open the housing below the "START/

STOP" button. 

   Insert the electronic key in the location  A . 
   Press the "START/STOP" button.  

 Once the engine has started, you can 
remove the electronic key and close the 
housing.  

  Emergency switch-off using the 
electronic key 

 In the event of an emergency only, the engine 
can be switched of without conditions. To do 
this, press and hold the "START/STOP" button 
for about 3 seconds. 
 In this case the steering column locks as soon 
as the vehicle stops. 
 if the electronic key is no longer in the defined 
zone when you request switching off the 
engine, a message appears in the instrument 
panel. 
   Press and hold the "START/STOP" button 

for about 3 seconds if you want to force 
switching off the engine (note that restarting 
will not be possible without the key).    

96

!

!

Driving

  It is recommended that you do not 
apply the parking brake in very cold 
conditions (ice) and during towing 
(breakdown, caravan...). Deactivate the 
automatic functions and release the 
parking brake manually.   

  Before leaving the vehicle, check that 
parking brake warning lamps in the 
instrument panel and the control lever  A
are on, not flashing.   

  The electric parking brake combines 
2 operating modes: 
   -  

 Automatic Application/Release 


Application is automatic when the engine 
stops, release is automatic on use of the 
accelerator (this mode is activated by 
default), 

  -  

 Manual Application/Release


Manual application of the parking brake is 
done by pulling control lever  A.   


manual release is done by pushing and 
releasing the control lever, while pressing 
the brake pedal.  

 When the driver's door is opened, there is an 
audible signal and a message is displayed if the 
brake is not applied.   

  Programming the mode 

 Depending on the country of sale of the vehicle, 
the automatic application when the engine is 
switched off and the automatic release when 
you press the accelerator can be deactivated. 

 With the vehicle stationary, to apply the parking 
brake whether the engine is running or off,  pull
control lever  A . 

  Manual application 

 Activation/deactivation is done via 
the menu in the instrument panel 
screen. 

 The parking brake is then applied and released 
manually. 

 The application of the parking brake is 
confirmed by: 

   -  

lighting of the braking warning 
lamp and of the  P  warning lamp 
in the control lever  A , 

  -  

display of the message 
"Handbrake on".  

 When the driver’s door is opened with the 
engine running, there is an audible signal and a 
message is displayed if the parking brake has 
not been applied, unless the selector lever is 
in position  P  (Park) in the case of an automatic 
gearbox. 

         Electric parking brake 

 If this warning lamp comes on in the 
instrument panel, the automatic mode 
is deactivated.  

4

97

!

i

Driving

 With the ignition on or the engine running, to 
release the parking brake,  press  the  brake 
pedal
 ,  pull  then release control lever  A . 
 The full release of the parking brake is 
confirmed by: 

  Manual release 

   -  

extinction of the braking warning 
lamp and of the  P  warning lamp 
in the control lever  A , 

  -  

display of the message 
"Handbrake off".  

 If you pull the control lever  A  without pressing 
the brake pedal, the parking brake will not 
be released and a message appears in the 
instrument panel.   

 If necessary, you can utilise  maximum 
application
  of the parking brake. It is obtained 
by means of a  long pull  on control lever  A , 
until you see the message “Parking brake 
applied fully” and an audible signal is heard. 
Maximum application is essential:
   -  

in the case of a vehicle towing a caravan 
or a trailer, if the automatic functions are 
activated but you are applying the parking 
brake manually, 

  -  

when the slope you are parked on may 
vary (e.g. on a ferry, on a lorry, during 
towing).   

  Maximum application 

  Before leaving the vehicle, check that 
parking brake warning lamps in the 
instrument panel and in the control 
lever  A  are on fixed (not flashing). 
 Never leave a child alone inside the 
vehicle with the ignition on, as they 
could release the parking brake.   

  Automatic application,   
engine off 

   -  

illumination of the braking warning 
lamp and of the  P  warning lamp in 
the control lever  A , 

  -  

display of the message 
"Handbrake on".  

 With the vehicle stationary, the parking brake 
is automatically applied when the engine is 
switched off
.  
 The application of the parking brake is 
confirmed by: 

  In the case of towing, a loaded vehicle 
or parking on a gradient, make a 
maximum application of the parking 
brake then turn the front wheels towards 
the pavement and engage a gear when 
you park. 
 After a maximum application, the 
release time will be longer.   

98

!

!

Driving

  Automatic release 

 The electric parking brake  releases 
automatically and progressively 
 when you 
press the accelerator: 
    Manual gearbox:  press down fully on the 

clutch pedal, engage first gear or reverse, 
press on the accelerator pedal and move 
off. 

    Electronic gear control gearbox : select 

position  A ,  M  or  R  then press on the 
accelerator pedal. 

    Automatic gearbox:  select position  D ,  M

or  R  then press on the accelerator pedal.  

 Full release of the parking brake is confirmed by: 

   -  

the braking warning lamp and of 
the   warning lamp in the control 
lever  A  going off, 

  -  

display of the message 
"Handbrake off".  

  When stationary, with the engine running, do 
not press the accelerator pedal unnecessarily, 
as you may release the parking brake.    

  Before leaving the vehicle, check that 
parking brake warning lamps in the 
instrument panel and the control lever  A
are on fixed, not flashing.    

  Immobilising the vehicle,   
engine running 

 With the engine running and the vehicle 
stationary, in order to immobilise the vehicle 
it is essential to  manually  apply the parking 
brake by  pulling  control lever  A . 
 The application of the parking brake is 
confirmed by: 

   -  

illumination of the braking warning 
lamp and of the  P  warning lamp in 
the control lever  A , 

  -  

display of the message 
"Handbrake on".  

 When the driver’s door is opened, a loud beep 
is heard and a message is displayed if the 
parking brake has not been applied, unless the 
selector lever is in position  P  (Park) in the case 
of an automatic gearbox.  

  Particular situations 

 In certain situations (e.g. starting the engine), 
the parking brake can automatically alter its 
force. This is normal operation. 
 To advance your vehicle a few centimetres 
without starting the engine, but with the ignition 
on, press on the brake pedal and release the 
parking brake  by pushing  then  releasing
control lever  A . The full release of the parking 
brake is confirmed by the warning lamps 
in the control lever  A  and in the instrument 
panel going off and display of the message 
"Handbrake off". 
 If a parking brake fault occurs  while applied  or 
if the battery runs flat, an emergency release is 
always possible. 
 In order to ensure correct operation and 
so your safety, the number of successive 
application/release operations of the parking 
brake is limited to eight. 
 In the event of abuse, you are alerted by a 
message "Parking brake faulty" and a warning 
lamp flashes.   

4

99

!

Driving

  Emergency braking 

 In the event of a failure of the main service 
brake or in an exceptional situation (e.g. driver 
taken ill, under instruction, etc) a continuous 
pull on the control lever  A  will stop the vehicle. 
 The electronic stability programme (ESP) 
provides stability during emergency braking. 
 If the emergency braking malfunctions, the 
message "Parking brake control faulty" will be 
displayed. 

  If a failure of the ESP system is 
signalled by the lighting of this 
warning lamp, then braking stability is 
not guaranteed. 

 In this event, stability must be assured by the 
driver by repeating alternate "pull-release" 
actions on the control lever  A .  

Emergency parking brake release 

   if your vehicle has one, take out the vehicle 

chock  B , located under the boot floor. 

   On a slope, immobilise the vehicle by 

placing a chock in front or behind one of 
the front wheels, opposing the slope.  


On level ground, immobilise the vehicle by 
placing a chock in front or behind one of 
the front wheels. 

 In the event of fault with the electric parking 
brake or a battery failure, an emergency 
mechanical control can be used to  manually 
release
  the parking brake. 
   Immobilise the vehicle (or chock it if the 

brake pedal has not been released), with 
the engine running, by engaging first gear 
(manual gearbox, position  P  (automatic 
gearbox) or  M  or  R  (electronic gear control 
gearbox). 

   Switch of the engine, but leave the ignition 

on. If you are unable to immobilise the 
vehicle, do not operate this control and 
contact a PEUGEOT dealer or a qualified 
workshop as soon as possible. 

  The emergency braking must only be 
used in exceptional circumstances.   

100

!

Driving

   Pass your fingers under the edge of the 

gaiter below the gear lever gate. 

   Unclip the gate by spreading the tongues 

(located below) then pull away the 
assembly of selector gate and gaiter. 

  With an emergency release, 
immobilisation of the vehicle is no 
longer be assured once the mechanical 
release has started and the mechanical 
control cannot be used to apply the 
parking brake again. 
 Do not carry out any action on lever  A , 
or stop/start the engine while the release 
control is engaged. 
 Have it checked by aPEUGEOT dealer 
or a qualified workshop. 
 The control  C  cannot be used to apply 
the parking brake. 
 To re-engage the electric parking brake 
(after correction of the fault or battery 
failure), make a long pull on the control 
lever  A  until the parking brake warning 
lamp (!) flashes in the instrument panel, 
then make a second long pull until 
this warning lamp comes on fixed (not 
flashing).   

   Turn the selector gate/gaiter assembly for 

access to the lever. 

   Pull hard on the control  C  to release the 

parking brake. A loud knock confirms the 
release of the brake. 

   Take care to refit the control in its housing. 
   Replace the selector gate/gaiter assembly.   

4

101

Driving

  Operating faults 

 If the electric parking brake fault warning lamp comes on together with one or more of the warning lamps presented in these tables, place the vehicle in 
a safe condition (on level ground, gear engaged) and contact a PEUGEOT dealer or a qualified workshop without delay. 

Situations

Consequences

 Display of the message " Parking brake fault " and of the following 
warning lamps: 

   -  

The automatic functions are deactivated. 

  -  

Hill start assist is not available. 

  -  

The electric parking brake can only be used manually.  

 Display of the message " Parking brake fault " and of the following 
warning lamps: 

   -  

Manual release of the electric parking brake is only available by 
pressing the accelerator pedal and releasing the control lever. 

  -  

Hill start assist is not available. 

  -  

The automatic functions and the manual application are still 
available.  

 Display of the message " Parking brake fault " and of the following 
warning lamps: 

   -  

The automatic functions are deactivated. 

  -  

Hill start assist is not available.  

102

Driving

Consequences

 To apply the electric parking brake: 
   immobilise the vehicle and switch off the ignition. 
   pull the control for at least 5 seconds or until application is complete. 
   switch on the ignition and check that the electric parking brake 

warning lamps come on.  

 The application is slower than during normal operation. 
 To release the electric parking brake: 
   switch on the ignition. 
   push the control lever and hold it for approximately 3 seconds then 

release it.  

 If the braking warning lamp is flashing or if the warning lamps do not 
come on with the ignition on, these procedures will not work. Place the 
vehicle on level ground and have it checked by a PEUGEOT dealer or a 
qualified workshop. 

 and possibly 

 flashing 

 Display of the message " Parking brake fault " and of the following 
warning lamps: 

   -  

Only the automatic application on switching off the engine and 
automatic release on acceleration functions are available. 

  -  

The manual application/release of the electric parking brake and the 
emergency braking are not available.  

 and possibly 

 flashing 

 Display of the message " Battery charge fault: Stop the vehicle ". 

   -  

You must stop as soon as it is safe to do so. Switch off and 
immobilise your vehicle (if necessary, place the a chock under a 
wheel). 

  -  

Apply the electric parking brake before switching off the engine.  


Content   ..  5  6  7  8   ..