Peugeot 508 Dag (2010.5). Instruction - part 6
 

  Index      Peugeot     Peugeot 508 Dag 2010.5 - instruction in english


Search            


Content   ..  4  5  6  7   ..


Peugeot 508 Dag (2010.5). Instruction - part 6


3

73

i

Comfort

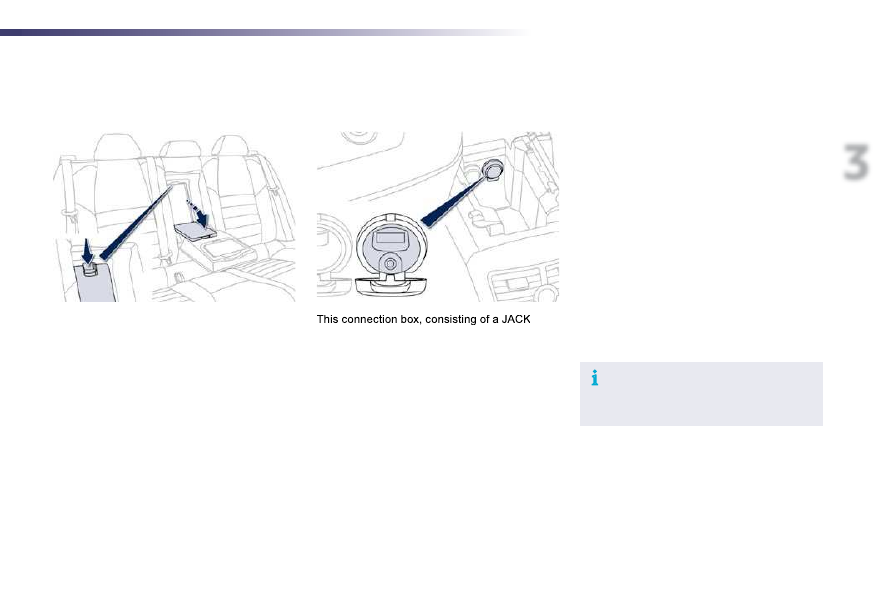
            Peugeot Connect USB 

auxiliary socket and a USB port, is located in 
the front armrest (under the cover). 
 It permits the connection of portable device, 
such as a digital audio player of the iPod 

®

  type 

®

or a USB memory stick. 
 It reads the audio file formats (MP3, OGG, 
WMA, WAV, ...) which are transmitted to your 
audio equipment and played via the vehicle's 
speakers. 
 You can manage these files using the steering 
mounted controls or the audio system control 
panel and display them in the instrument panel 
screen.  

  When the USB port is used, the portable device 
charges automatically.  

  For more information on the use of 
this system, refer to the "Audio and 
Telematics" section.  

Ski flap 

 Device for storing and transporting long 
objects. 

  Opening 

   Lower the armrest. 
   Press the flap opening control. 
   Lower the flap. 
   Load the objects from inside the boot.    

72

!

Comfort

         Mats 

 Removable carpet protection. 

 When fitting the mat for the first time, on the 
driver's side use only the fixings provided in the 
wallet attached. 
 The other mats are simply placed on the 
carpet.  

  Fitting 

  Removal 

 To remove the mat on the driver's side: 
   move the seat as far back as possible, 
   unclip the fixings, 
   remove the mat.   

  Refitting 

 To refit the mat on the driver's side: 
   position the mat correctly, 
   refit the fixings by pressing, 
   check that the mat is secured correctly.  

  To avoid any risk of jamming of the 
pedals: 
   -  

only use mats which are suited to 
the fixings already present in the 
vehicle; these fixings must be used, 

  -  

never fit one mat on top of another.  

 The use of mats not approved by 
PEUGEOT may interfere with access to 
the pedals and hinder the operation of 
the cruise control/speed limiter.   

   Lower the rear armrest for a more 

comfortable position.  

 It has cup holders and also gives access to the 
ski flap. 

         Rear armrest 

3

73

i

Comfort

            Peugeot Connect USB 

auxiliary socket and a USB port, is located in 
the front armrest (under the cover). 
 It permits the connection of portable device, 
such as a digital audio player of the iPod 

®

  type 

®

or a USB memory stick. 
 It reads the audio file formats (MP3, OGG, 
WMA, WAV, ...) which are transmitted to your 
audio equipment and played via the vehicle's 
speakers. 
 You can manage these files using the steering 
mounted controls or the audio system control 
panel and display them in the instrument panel 
screen.  

  When the USB port is used, the portable device 
charges automatically.  

  For more information on the use of 
this system, refer to the "Audio and 
Telematics" section.  

Ski flap 

 Device for storing and transporting long 
objects. 

  Opening 

   Lower the armrest. 
   Press the flap opening control. 
   Lower the flap. 
   Load the objects from inside the boot.    

74

Comfort


Boot fi ttings (Saloon) 

    Retractable hooks

2.    Storage trays
 

With towing eye, a wheel chock and a 
temporary puncture repair kit (according to 
destination country and equipment). 

3.    Stowing rings
4.
    Retaining straps
5.
    Boot lamp
6.
    Boot floor
 

For access to the storage compartments or 
the spare wheel (according to destination 
country), raise the floor 

7.    Adjustable divider

3

75

Comfort


Boot fi ttings (SW) 

1.    Boot lamps
2.
    Rear seats folding controls
3.
    Retractable hooks
4.
    12 V accessory socket (120 W max)
5.
    Storage trays
 

With towing eye, a wheel chock and a 
temporary puncture repair kit (according to 
destination country and equipment). 

6.    Stowing rings
7.
    Load space cover
 

(see following page) 

8.    Boot floor
 

For access to the storage compartments or the 
spare wheel (according to destination country), 
position the floor vertically in its guide.   

76

Comfort

      Luggage cover (SW) 

  To reel in 

  To remove 

  To install 

   Gently push on the (PRESS) handle, the 

luggage cover reels in automatically.  

 The moving part  A  can be folded against the 
rear bench seat backrest.  

 Compress the control  1  and lift the luggage 

cover on the right then on the left to remove it.   

   Position the left-hand end of the luggage 

cover roller in its location  B  behind the rear 
bench seat. 

   Compress the roller control  1  and put the 

roller in place in its location  C  on the right. 

   Release the control to secure the luggage 

cover. 

   Unreel it to its fastening on the rear pillar.   

3

77

!

i

Comfort

            Warning triangle (stowing) 

 Before leaving your vehicle to set up 
and install the triangle, put on your high 
visibility vest. 

  The dimensions of the triangle (once folded) or 
its storage box must be : 
   -  

 A : length =  438  mm, 

  -  

 B : height =  56  mm, 

  -  

 C : width =  38  mm.  

 To use the triangle, refer to the manufacturer's 
instructions.  

  Saloon 

   Press the lug  1  and pull the assembly 

towards you.   

  SW 

   Turn the knob  2  to remove the cover. 
   Hold the cover and the triangle so that they 

do not fall.   

  The location for a folded triangle is in the inner 
trim panel of the boot lid. 

  Placing the triangle in the road 

   Place the triangle at a distance behind 

the vehicle, as shown in the table below, 
according to the type of road and the level 
of ambient light.  

Distance from your vehicle (in metres)

Route

Motorway

Day

Night

  50 m  

  80 m  

  150 m  

 These are the internationally recognised 
values. 
 Use the triangle in line with local driving 
regulations.  

  The triangle is available as an accessory, 
contact a PEUGEOT dealer or a qualified 
workshop.   

78

i

Comfort

      High load retaining net (SW)  

  Hooked onto the special upper and lower 
fixings, this allows the use of the entire loading 
volume up to the roof: 
   -  

behind the front seats (row 1) when the rear 
seats are folded. 

  -  

behind the rear seats (row 2).   

  Never reposition the rear seats if the 
net's roller is attached to the backs of 
the folded seats.  

   position the net's roller above the two rails 

(located on the back of the folded rear 
seats), 

   the two grooves  a  must be placed above 

the two rails  b . Slide the two rails  b  in the 
grooves  a  and push the roller (lengthwise) 
from right to left to secure it, 

   check that the net is hooked and tightened 

correctly, 

   fold the rear seats, 
   unroll the high load retaining net without 

stretching it, 

   position one of the ends of the net's metal 

bar in the corresponding upper fixing  1 , 

   pull the net's metal bar to position the other 

end in the other upper fixing  1 .   

  Row 1 

3

79

Comfort

   reel in then remove the load space cover, 
   position the left hand end of roller  2  in the 

load space cover support, 

   position the right hand end of roller  2  in the 

load space cover support, then lock the 
position (red indicator), 

   from the rear bench seat, unroll the high 

load retaining net by pushing to disengage 
the retaining hooks, 

   position one of the ends of the net's metal 

bar in the corresponding upper fixing  3 , 

   pull on the net's metal bar to position the 

other end in the other upper fixing  3 , 

   check that the net is hooked and tensioned 

correctly.    

  Row 2 

80

Comfort

         Heating and Ventilation 

 The air circulating in the passenger compartment 
is filtered and originates either from the outside 
via the grille located at the base of the windscreen 
or from the inside in air recirculation mode.  

  Controls 

 The incoming air follows various routes 
depending on the controls selected by 
the driver, the front passenger and rear 
passengers, according to the level of 
equipment. 
 The temperature control enables you to obtain 
the level of comfort required by mixing the air of 
the various circuits. 
 The air distribution control enables you to 
select the air vents used in the passenger 
compartment by the combined use of the 
associated buttons. 
 The air flow control enables you to increase or 
reduce the speed of the ventilation fan. 
 These controls are grouped together on control 
panel  A  on the centre console.  

1.   Windscreen demisting/defrosting vents. 
2.   Front side window demisting/defrosting 

vents. 

3.   Side adjustable air vents. 
4.   Central adjustable air vents. 

5.   Air outlets to the front footwells. 
6.   Adjustable air vents for the rear 

passengers. 

7.   Air outlets to the rear footwells.   

  Air distribution 

 System which creates and maintains good 
conditions of comfort and visibility in the 
vehicle's passenger compartment. 

3

81

i

Comfort

 In order for these systems to be fully effective, follow the operation and maintenance 
guidelines below: 

   If the interior temperature remains very high after the vehicle has been parked in the sun 

for a considerable time, first ventilate the passenger compartment for a few minutes.  


Place the air flow control at a sufficient level to provide an adequate renewal of air in the 
passenger compartment. 

   To obtain an even air distribution, take care not to obstruct the exterior air intake grilles 

located at the base of the windscreen, the nozzles, the vents and the air outlets, as well 
as the air extractor located in the boot. 

   Use in preference the intake of exterior air as prolonged use of the air recirculation may 

cause misting of the windows and side windows. 

   Do not cover the sunshine sensor, located on the dashboard; this is used for regulation 

of the automatic air conditioning system. 

   Operate the air conditioning system for 5 to 10 minutes, once or twice a month to keep it 

in good working order. 

   Ensure that the passenger compartment filter is in good condition and have the filter 

elements replaced regularly (refer to the "Checks" section).  


We recommend the use of a combined passenger compartment filter. Thanks to its second special 
active filter, it contributes to the purification of the air breathed by the occupants and the cleanliness 
of the passenger compartment (reduction of allergic symptoms, bad odours and greasy deposits). 

   The air conditioning uses power from the engine while operating. This results in an 

increase in the vehicle's fuel consumption.  
When towing at or near maximum capacity or on steep slopes in high ambient temperatures, 
switching off the air conditioning saves engine power and so improves towing capacity.  


Condensation created by the air conditioning results in a discharge of water under the 
vehicle when stationary, which is perfectly normal. 

   To ensure correct operation of the air conditioning system, you are also advised to have 

it checked regularly. 

   If the system does not produce cold air, do not use it and contact a PEUGEOT dealer or 

a qualified workshop.  

Recommendations for ventilation and air conditioning 

  The air conditioning system does not 
contain chlorine and does not present 
any danger to the ozone layer.   

82

Comfort

 Manual air conditioning 

The air conditioning system operates with the engine running.  

  1. Temperature adjustment 

   Turn the dial from left (cold) 

to right (hot) to adjust 
the temperature to your 
requirements.   

  2. Air fl ow adjustment 

   Press the  "full fan"  button to 

increase the air flow.  

   Press the  "empty fan"  button to 

reduce the air flow.   

  3. Air distribution adjustment 

   press the corresponding button for:  

 Windscreen and side windows. 

 Central and side vents. 

 Footwells. 

 Depending on your requirements, you 
can combine two distribution buttons 
or select the three distribution modes 
simultaneously.  

According to the value selected, the associated 
line of LEDs fills progressively. 

3

83

Comfort

  4. Air intake/Air recirculation 

   Press this button to recirculate 

the interior air. The indicator 
lamp comes on to confirm this. 

   Press the button again to 

permit the intake of exterior air. 
The indicator lamp goes off to 
confirm this.   

 The intake of exterior air prevents the formation 
of mist on the windscreen and side windows. 
 The recirculation of interior air isolates the 
passenger compartment from exterior odours 
and smoke. 
 Return to exterior air intake as soon as possible 
to prevent deterioration of the the air quality 
and the formation of mist. 

  6.  Automatic visibility 

programme 

5. Air conditioning On/Off 

 The air conditioning is designed to 
operate effectively in all seasons, 
with the windows closed. 

 It enables you to: 
   -  

lower the temperature, in summer, 

  -  

increase the effectiveness of the demisting 
in winter, above 3 °C.   

  Switching on 

   Press the  "A/C"  button, the associated 

green indicator lamp comes on.  

The air conditioning does not operate when 
the air flow adjustment is set to off.

  Switching off 

   Press the  "A/C"  button again, the 

associated green indicator lamp switches 
off.  

 Switching off may result in some discomfort 
(humidity, misting).   

 See "Front demisting - Defrosting".   

84

i

Comfort

      Dual-zone digital air conditioning 

 The air conditioning system operates when the engine is running. 

  Automatic operation 

  1.  Automatic comfort 

programme 

   Press this  "AUTO"  button. The 

indicator lamp comes on.  

 We recommend that you use this mode. It 
automatically adjusts all settings to provide 
optimum operation for the comfort level chosen: 
passenger compartment temperature, air flow, 
air distribution and air recirculation. 
 This system is designed to operate effectively 
in all seasons, with the windows closed.  

  When the engine is cold, to prevent 
too great a distribution of cold air, the 
air flow will reach its optimum level 
gradually. 
 In cold weather, it favours the distribution 
of warm air to the windscreen, side 
windows and footwells only.  

  2 - 3.  Driver-passenger side 

adjustment 

 The driver and front passenger can each adjust 
the temperature to their requirements. 
 The value indicated on the display corresponds 
to a level of comfort and not to a temperature in 
degrees Celsius or Fahrenheit. 

   Turn control  2  or  3  to the left 

(blue) or to the right (red) 
respectively to decrease or 
increase this value.  

 A setting around the value 21 provides 
optimum comfort. However, depending on 
your requirements, a setting between 18 and 
24 is normal. 
 It is recommended that the difference between 
left and right should not be greater 3.  

3

85

i

i

i

Comfort

  On entering the vehicle, if the interior 
temperature is much colder or warmer 
than the comfort value, there is no 
need to change the value displayed in 
order to obtain the comfort required. 
The system corrects the difference 
in temperature automatically and as 
quickly as possible.  

  4.  Automatic visibility 

programme 

 For maximum cooling or heating of the 
passenger compartment, it is possible 
to exceed the minimum value 14 or the 
maximum value 28. 
   Turn control  2  or  3  to the left 

until  "LO"  is displayed or to the 
right until  "HI"  is displayed.  

 See "Front demisting-defrosting".  

   Press this button to equalise the 

comfort value on the passenger's 
side with that on the driver's side 
(mono-zone). The indicator lamp 
on the button comes on.   

 If you wish, you can change one of settings 
provided by the system. The other functions will 
still be controlled automatically. 
   Pressing the  "AUTO"  button returns the 

system to completely automatic operation.  

  Manual operation 

  5. Mono-zone/Dual-zone 

 The air conditioning is designed to 
operate effectively in all seasons, 
with the windows closed. 

  6. Air conditioning On/Off 

 It allows you: 
   -  

in summer, to lower the temperature, 

  -  

in winter, above 3 °C, to improve demisting 
performance.  

  7. Maximum air conditioning 

 If you want to temporarily refresh the 
air in the passenger compartment, 
press this button and   "LO"  is 
displayed. 

 To return to the previous settings, press the 
button again.   

With Stop & Start, when demisting has 
been activated, the STOP mode is not 
available.  

Switching on
   Press the  "A/C"  button, the associated 

green indicator lamp comes on.  

The air conditioning does not operate when 
the air flow control is set to off.

Switching off
   Press the  "A/C"  button again, the 

associated green indicator lamp goes off.  

 Switching off the air conditioning may result in 
some discomfort (humidity, misting).  

86

!

Comfort

  8. Air distribution adjustment 

   Press the corresponding button for:  

 Windscreen and side windows. 

 Centre and side vents. 

 Footwells. 

 To suit your requirements, you can 
combine two distribution buttons or 
select the three distribution modes 
simultaneously.  

  9. Air fl ow adjustment 

   Press this  "full fan"  button to 

increase the air flow.  

   Press  "empty fan"  button to 

reduce the air flow.   

  10. Air intake/Air recirculation 

   Press this  "empty fan"  air 

flow button until the fan symbol 
disappears and  "--"  appears.  

  Switching the system off 

   Press this button for recirculation 

of the interior air. The indicator 
lamp on the button comes on.  

 Air recirculation enables the passenger 
compartment to be isolated from exterior 
odours and smoke. It is activated automatically 
when operating the screenwash. 

  Avoid driving for long periods with the 
system off (risk of condensation and 
deterioration of the air quality). 
 Pressing the  "full fan"  button 
reactivates the system with the values 
in use at the time it was switched off.  

The air flow symbol, the fan, fills progressively 
according to the value requested. 

 This action switches off all of the functions of 
the air conditioning system. 
 Temperature related comfort is no longer 
guaranteed but a slight flow of air, due to the 
forward movement of the vehicle, can still be felt.  

   As soon as possible, press this button 

again to permit the intake of outside air and 
prevent the formation of condensation. The 
indicator lamp in the button goes off.    


Content   ..  4  5  6  7   ..