Peugeot 206 S Dag (2008 year). Instruction - part 5
 

  Index      Peugeot     Peugeot 206 S Dag - instruction 2008 year in english


Search            


Content   ..  3  4  5  6   ..


Peugeot 206 S Dag (2008 year). Instruction - part 5


63

VISIBILITY -

         ELECTRIC WINDOWS  

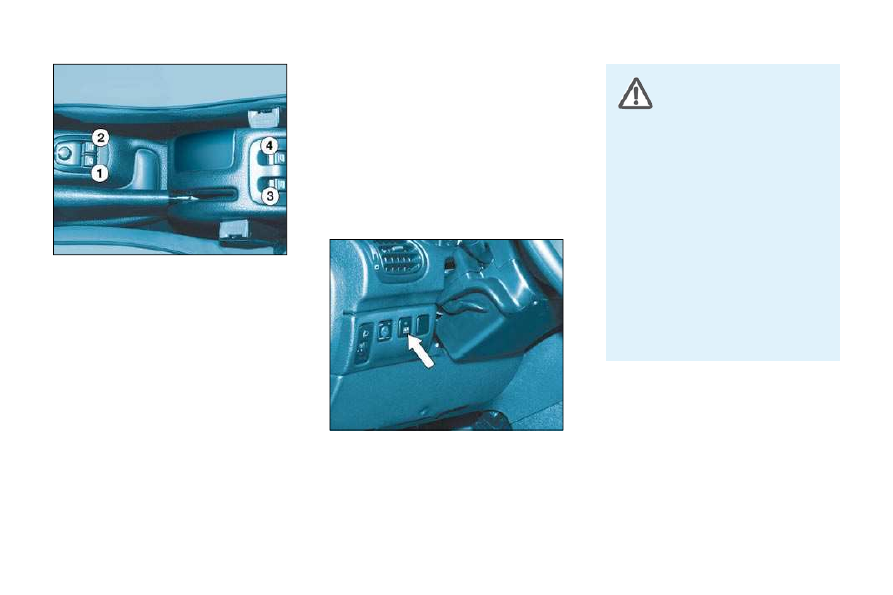
  2.  Passenger’s electric window 

switch.  

 This switch enables the rear windows 
to be locked whatever their position. 
 A  1st  press  activates  the  control  (the 
indicator light on the button comes on) 
and a 2nd press deactivates it (the in-
dicator light on the button goes out). 

  Temporary disarming of the 

rear windows (child safety) 

 Always  remove  the  key 
from  the  ignition  when 
leaving  the  vehicle,  even 
for a short time. 

 If  an  obstacle  is  detected  when 
operating  the  electric  windows, 
you  must  reverse  the  movement 
of  the  window.  To  do  this,  press 
the control concerned. 
 When the driver operates the pas-
senger  electric  window  controls, 
he must ensure that no one is pre-
venting correct closing of the win-
dows. 
 The  driver  must  ensure  that  pas-
sengers  use  the  electric  windows 
correctly. 
 Be aware of children when operat-
ing the windows.  

  1. Driver’s electric window switch 

   -  


Manual operation:    


Press or pull switch  1  gently. The 
window  stops  as  soon  as  the 
switch is released. 

  -  


Automatic operation:    


Press or pull switch  1

  fi rmly. One 

touch completely opens or closes 
the window.  

 Automatic  closing  only  operates 
when the engine is running and only 
on the driver’s electric window.  

  3.  Rear left electric window 

switch.  

  4.  Rear right electric window 

switch.   

64 -

  Manual interior mirror 

 The interior mirror has two positions: 
   -  

day (normal), 

  -  

night (anti-dazzle).  

 To  change  from  one  to  the  other, 
push  or  pull  the  lever  on  the  lower 
edge of the mirror.  

   Manual exterior mirrors 
 Move  the  lever  in  all  four  directions 
to adjust. 
 When  the  vehicle  is  parked,  the  ex-
terior  mirrors  can  be  folded  back 
manually.  

     ELECTRIC EXTERIOR 

MIRRORS 

 Turn knob  1  to the right or to the left 
to select the corresponding mirror. 
 Move knob  1  in all four directions to 
adjust. 

 The exterior mirror on the 
driver’s  side  is  convex 
in  order  to  eliminate  the 
"blind spot". 

 Furthermore,  objects  observed  in 
the  driver’s  and  passenger’s  mir-
rors are in reality closer than they 
appear. 
 This must be taken into account to 
judge correctly the distance of ve-
hicles approaching from behind. 

65

LAYOUT -

       HEADLAMP ADJUSTMENT 

 Depending on the load in your vehi-
cle, it is recommended that the head-
lamp beam is adjusted. 
  0.   1 or 2 people in the front seats. 
  -.   3 people. 
  1.   5 people. 
  2.   5 people + maximum authorised 

load. 

  3.   Driver + maximum authorised 

load. 

       STEERING WHEEL HEIGHT 
ADJUSTMENT 

 When stationary, lower the handle to 
unlock the steering wheel. 
 Adjust  to  the  desired  height  and 
lift  the  handle  to  lock  the  steering 
wheel. 

 HORN 

 Press  one  of  the  spokes  of 
the steering wheel. 

  Initial setting is position 0.  

LAYOUT

66 -

     GLOVE BOX 

 To open the glove box, lift the handle. 
 The  light  comes  on  when  the  cover 
is opened. 
   1.   Handbook pack storage. 
  2.   Can holder. 
  3.   Pen holder. 
  4.   Spectacles storage. 
  5.   Map storage. 
  6.   Coin storage.  

     FRONT ASHTRAY 

 To empty, close the cover. 
 Pull  the  lug  and  release  the  ashtray 
upwards. 

     LIGHTER 

 Press and wait a few moments until it 
springs out automatically. 
 It is supplied with power with the igni-
tion  key  in  the  accessories  position 
(1st notch). 

     COURTESY LIGHT 

         SUN VISOR 

 The sun visors are fi tted with a vanity 

mirror, with a concealing fl ap on the 

driver's side. 

 In  this  position,  it  comes  on 
for about 30 seconds: 

 Permanently off 

 Permanently  on  when  the 
key is in the accessories po-
sition or with the ignition on. 

   -  

on unlocking the vehicle, 

  -  

when opening a door, 

  -  

when opening the boot, 

  -  

on switching off the ignition.  

 It switches off on locking the vehicle. 
 The courtesy light fl ashes while driv-

ing if a door or the boot is not closed 
correctly. 

67

LAYOUT -

  Luggage retaining net *  
 Use  the  stowing  rings  on  the  boot 

fl oor and on the back of the rear seat 

to  hook  on  your  luggage  retaining 
net.  

         BOOT LAYOUT  

  *   According to version.  

  Side storage compartments 
 The  side  storage  compartments  in 

the boot are fi tted with a strap which 

enables  you  to  secure  various  ob-

jects (cans, fi rst aid kit, etc.).   

DRIVING

68 -

           'PORSCHE TIPTRONIC 
SYSTEM' AUTOMATIC 
GEARBOX 

 The  four  speed   automatic   gearbox 
offers  a  choice  between  the  comfort 
of  integral automatic operation , en-
hanced  by  a   sport   and  a   snow   pro-
gramme, or  manual gear changing . 

  Gear selection gate 

      Move the lever in the gate to se-

lect a position.  


 The indicator light corresponding 
to  the  position  selected  appears 
on the instrument panel screen. 

  P ark: to  immobilise the vehicle  and 
to   start  the  engine ,  with  the  hand-
brake on or off. 

  R everse:  to   reverse   (select  this
position  with  the  vehicle  stationary, 
engine at idle). 

  N eutral:  to   start  the  engine   and  to 
 park , with the handbrake on. 
 If position  N  is inadvertently engaged 
while driving, allow the engine to re-
turn to idle before engaging position 
 D  to accelerate. 

  D rive: for  driving  in automatic mode. 

  M anual: for  selection  of gears. 

  S : sport programme. 

   : snow programme.  

  Moving Off 

 With the engine running, to move off 
from position  P : 
       it is essential to press the brake 

pedal to exit position P , 

     select  position   R,  D   or   M ,  then 

gradually  release  the  pressure 
on  the  brake  pedal;  the  vehicle 
moves off immediately.  

 You can also move off from position  N : 
      release the handbrake, with your 

foot on the brake, 

     select  position   R,  D   or   M ,  then 

gradually  release  the  pressure 
on  the  brake  pedal;  the  vehicle 
moves off immediately.  

  Starting the engine 

      with the handbrake on, select po-

sition  P  or  N  in the gate, 

     turn  the  ignition  key  to  the   Start  

position.   

  WARNING  
 When the engine is at idle, brakes not 
applied,  if  position   R,  D   or   M   is  se-
lected, the vehicle moves even with-
out the accelerator being pressed. 
 For  this  reason,   do  not  leave  chil-
dren 

unsupervised 

inside 

the

vehicle, with the engine running.  
 When maintenance operations need 
to be carried out with the engine run-
ning, apply the handbrake and select 
position  P .  

69

DRIVING -

  Automatic operation 

  Automatic   changing  of  the  four 
gears: 
      select position  D  in the gate.  
 The gearbox always selects the most 
suitable gear according to the follow-
ing parameters: 
   -   the road profi le, 
  -  

the vehicle load.  

 The  gearbox  is  then  operating  in 
auto-adaptive mode, without any ac-
tion on your part. 

 If  you  take  your  foot  off  the  accel-
erator suddenly, the gearbox will not 
change to a higher gear for reasons 
of safety.  

  Manual operation 

  Manual  changing of the four gears: 
      select position  M  in the gate, 
     push  the  lever  to  the   +   sign  to 

change to a higher gear, 

     pull  the  lever  to  the   -   sign  to 

change to a lower gear.  

 You  can  change  from  position   D  
(driving  in  automatic  mode)  to  posi-
tion   M   (driving  in  manual  mode)  at 
any time. 

  WARNING  
 Never select position  N  when the ve-
hicle is moving. 
 Never select positions  P  or  R  unless 
the vehicle is stationary. 
 Never  change  between  positions  to 
optimise  braking  on  a  slippery  sur-
face. 

  Notes  
 For  immediate  maximum  accelera-
tion  without  touching  the  gear  lever, 
press the accelerator pedal down as 
far as it will go (kickdown). The gear-
box  will  automatically  change  down 
or  maintain  the  gear  selected  until 
maximum engine speed is reached. 
 When the brake is applied, the gear-
box  will  automatically  change  down 

in  order  to  provide  effi cient  engine 

braking. 

  Sport and snow programmes 

 In  addition  to  the  auto-adaptive
programme,  there  are  two  special 
programmes. 
 The  programme  is  displayed  on  the 
instrument panel screen.  

  Sport programme 

      Press  button   S   once  the  engine 

has been started.  

 The  gearbox  automatically  favours 
sporty driving and more dynamic ac-
celeration.  

  Snow programme 

 This  programme  improves  starting 
and drive when traction is poor. 
      Press  button      once  the  engine 

has been started.  

 The  gearbox  adapts  to  driving  on 
slippery roads. 

  Notes  
 It is only possible to change from one 
gear  to  another  if  the  vehicle  speed 
and  engine  speed  permit.  If  they  do 
not,  the  vehicle  will  operate  tempo-
rarily in automatic mode. 
 When  the  vehicle  is  stationary  or 
moving very slowly, the gearbox au-
tomatically selects gear  M1 . 
 Programmes  S  (sport) and    (snow) 
do not operate in manual mode.  

  Note:   you  can  return  to  the  auto-
adaptive programme at any time. 
      Press button  S  or    again to switch 

off the programme you are in.   

DRIVING

70 -

     HANDBRAKE  

  Operating abnormality 

 Any  operating  abnormality  is  indi-
cated  by  an  audible  signal,  accom-
panied  by  the  message   'Automatic 
gear fault'
  on the multi-function dis-
play,  by  a   "-"

   and  fl ashing  of  the 

Sport and Snow warning lights on the 
instrument panel display. 
 In  this  situation  the  gearbox  oper-
ates  in  downgrade  mode  (locked  in 
3rd  gear).  You  may  feel  a  substan-
tial  knock  when  changing  from   P   to 
 R  and from  N  to  R  (this will not cause 
any damage to the gearbox). 
 Do  not  exceed  60  mph  (100  km/h), 
respecting local speed limits. 
  Consult a PEUGEOT dealer.  

 Illumination of this warning light 
and  of  the   STOP   warning  light, 
accompanied by an audible sig-
nal  (while  the  vehicle  is  being 
driven) and the message  "hand-

brake  on"   on  the  multifunction  display, 
indicates that the handbrake is still on or 
has not been properly released. 

  Releasing 
 Pull on the handle and press the but-
ton to release the handbrake. 

 If the battery is fl at and the 

lever is in position  P , it will 
be  impossible  to  change 
to another position. 
 In  particular,  do  not  force 

the lever or there is a risk the gear-
box may be damaged.  

 When parking on a slope, 
direct your wheels towards 
the pavement and pull the 
handbrake.   

  Applying 
 Pull  the  handbrake  to  immobilise 
your vehicle.  

DRIVING

70 -

     HANDBRAKE  

  Operating abnormality 

 Any  operating  abnormality  is  indi-
cated  by  an  audible  signal,  accom-
panied  by  the  message   'Automatic 
gear fault'
  on the multi-function dis-
play,  by  a   "-"

   and  fl ashing  of  the 

Sport and Snow warning lights on the 
instrument panel display. 
 In  this  situation  the  gearbox  oper-
ates  in  downgrade  mode  (locked  in 
3rd  gear).  You  may  feel  a  substan-
tial  knock  when  changing  from   P   to 
 R  and from  N  to  R  (this will not cause 
any damage to the gearbox). 
 Do  not  exceed  60  mph  (100  km/h), 
respecting local speed limits. 
  Consult a PEUGEOT dealer.  

 Illumination of this warning light 
and  of  the   STOP   warning  light, 
accompanied by an audible sig-
nal  (while  the  vehicle  is  being 
driven) and the message  "hand-

brake  on"   on  the  multifunction  display, 
indicates that the handbrake is still on or 
has not been properly released. 

  Releasing 
 Pull on the handle and press the but-
ton to release the handbrake. 

 If the battery is fl at and the 

lever is in position  P , it will 
be  impossible  to  change 
to another position. 
 In  particular,  do  not  force 

the lever or there is a risk the gear-
box may be damaged.  

 When parking on a slope, 
direct your wheels towards 
the pavement and pull the 
handbrake.   

  Applying 
 Pull  the  handbrake  to  immobilise 
your vehicle.  

71

SAFETY -

  ANTI-LOCK BRAKING 
SYSTEM (ABS) AND THE 
ELECTRONIC BRAKE FORCE 
DISTRIBUTION (EBFD) 

 The  ABS,  in  conjunction  with  the 
electronic  brake  force  distribution, 
increases  the  stability  and  manoeu-
vrability  of  your  vehicle  on  braking, 
in particular on poor or slippery road 
surfaces. 

         EMERGENCY BRAKING 
ASSISTANCE SYSTEM 

 In an emergency, this system enables 
the  optimum  braking  pressure  to  be 
reached  more  quickly,  thus  reducing 
the stopping distance. 
 It is triggered by the speed at which 
the  brake  pedal  is  activated.  The 
effect of this is a reduction in the re-
sistance of the pedal and an increase 

in braking effi ciency. 
 When  braking  in  an  emergency, 

press  fi rmly  without  releasing  the 

pressure. 
 Depending  on  the  force  of  the  de-
celeration, the hazard warning lights 
are  switched  on  automatically.  They 
are  switched  off  automatically  on 
acceleration. 

 When 

this 

warning 

light 

comes  on,  accompanied  by 
a  buzzer  and  a  message,  it 
indicates that there is a mal-

function of the ABS, which can cause 
a loss of control of the vehicle when 
braking. 

 When 

this 

warning 

light 

comes  on,  connected  to  the 
 STOP   warning  light,  accom-
panied  by  a  buzzer  and  a 

message,  it  indicates  that  there  is  a 
malfunction  of  the  electronic  brake 
force  distribution,  which  can  cause 
a loss of control of the vehicle when 
braking. 
  Stop immediately.  
   In  both  cases,  consult  a   PEUGEOT  
dealer. 

  Note:   when  changing  wheels  (tyres 
and rims), make sure that these are 
approved. 

 The anti-lock braking system comes 
into  operation  automatically  when 
there is a risk of wheel lock. 

 Normal  operation  of  the  ABS  may 
make itself felt by slight vibrations of 
the brake pedal. 
  In  emergency  braking,  press  very 

fi rmly without releasing the pressure.   

SAFETY

72 -

       AIR BAGS 

 The air bags have been designed to 
maximise the safety of the occupants 
(with the exception of the rear centre 
passenger)  in  the  event  of  serious 
collisions;  they  work  in  conjunction 
with the force limiting seat belts. 
 In the event of a serious collision, the 
electronic detectors record and ana-
lyse  the  front  and  side  impacts  suf-
fered  in  the  impact  detection  zones 
(see  diagram):  in  the  event  of  a 

serious  impact,  the  air  bags  infl ate 

instantly  and  protect  the  occupants 
of  the  vehicle  (with  the  exception  of 
the rear centre passenger).  

 FRONT AIR BAGS 

 These are folded in the centre of the 
steering  wheel  for  the  driver  and  in 
the  fascia  for  the  front  passenger. 
They  are  deployed  simultaneously, 
except in cases where the air bag is 
disarmed,  in  the  event  of  a  serious 
front  impact  applied  in  the  impact 
zone  A  in the longitudinal centreline, 
on  a  horizontal  plane  and  from  the 
front towards the rear of the vehicle. 

The air bag infl ates between the front 

occupant of the vehicle and the fas-
cia to cushion his forward movement. 
In this way, the air bags limit the risk 
of injury to the head and chest.   

   If  this  warning  light  comes 
on,  accompanied  by  an  au-
dible  signal  and  a  message 
on  the  multifunction  display, 

contact  a   PEUGEOT   dealer  to  have 
the  system  checked.  The  air  bags 
may  no  longer  be  triggered  in  the 
event of a serious impact. 

  Front air bag malfunction 

  A.  Front impact zone. 
  B.  Side impact zone. 

 Immediately after the impact, the air 

bags defl ate rapidly, so that they do 

not  hinder  the  visibility  of  the  occu-
pants nor their possible exit from the 
vehicle. 
 The  air  bags  will  not  be  deployed  in 
collisions which are not serious, rear 
impacts  or  in  certain  roll-over  con-

ditions. The  seat  belt  is  suffi cient  to 

provide maximum protection in these 
situations. 
  

Air bags only operate when the ig-

nition is switched on.  
 This  equipment  will  only  operate 
once.  If  a  second  impact  occurs 
(during  the  same  or  a  subsequent 
accident), the air bag will not operate. 

  Note:   the  triggering  of  an  air  bag  or 
air  bags  is  accompanied  by  a  slight 
discharge  of  harmless  smoke  and 
a  noise,  due  to  the  activation  of  the 
pyrotechnic cartridge incorporated in 
the system. 
 This gas may cause slight irritation. 
 The noise of the detonation may re-
sult  in  a  slight  loss  of  hearing  for  a 
short time.   

  Impact detection zones 

73

SAFETY -

  Disarming the passenger air 

bag 


To ensure the safety of your child, 

it  is  essential  to  disarm  the  pas-

senger air bag when you install a 

rear-facing child seat on the front 

passenger  seat.  Otherwise,  the 

child would risk being killed or se-

riously injured if the air bag were 

to infl ate.  
       

With  the  ignition switched  off , 

insert the key into the passenger 
air  bag  disarming  switch   1 ,  turn 
it to the  "OFF"  position, then re-
move the key keeping the slot in 
this position.  

 The  air  bag  warning  light 
on  the  instrument  panel  is 
lit  throughout  the  period  of 
disarming. 

 In  the   "OFF"   position,  the  passen-
ger air bag will not be triggered in the 
event of an impact. 
 As soon as the child seat is removed, 
turn the air bag slot to the  "ON"  po-
sition  to  re-activate  the  air  bag  and 
thus  ensure  the  safety  of  your  pas-
senger in the event of an impact.   

 With the ignition on (2nd notch), 
illumination of this warning light 
indicates  that  the  passenger 
air  bag  is  disarmed  (switch  in 
the  "OFF"  position). 

  Disarming check 

 This  is  confi rmed  by  an  indicator 

light. 


For  the  front  air  bags 

to  be  fully  effective,  ob-

serve the following safety 

rules:  

       Wear  a  correctly  adjusted  seat 

belt. 

      Sit in a normal upright position. 

      Do not leave anything between 

the  occupants  and  the  air  bags 
(child, animal, object...).  


This  could  hamper  the  opera-
tion of the air bags or injure the 
occupants. 

      All work on the air bag systems 

is  strictly  prohibited  unless  it  is 

carried out by qualifi ed person-

nel of the PEUGEOT network. 

      After an accident or if the vehi-

cle  has  been  stolen  or  broken 
into,  have  the  air  bag  systems 
checked. 

      Do  not  drive  holding  the  steer-

ing wheel by its spokes or rest-
ing  your  hands  on  the  centre 
part of the wheel. 

      Passengers must not place their 

feet on the fascia. 

      Smoke  as  little  as  possible; 

deployment  of  the  air  bags  can 
cause burns or the risk of injury 
from a cigarette or pipe. 

      Never  remove  or  pierce  the 

steering wheel or hit it violently.  

    If the two air bag warning 
lights  are  lit  continuously, 
do not install a rear-facing 
child 

seat. 

 Consult 

PEUGEOT dealer.   

SAFETY

74 -

           SEAT BELTS 


Seat belt height adjustment:  
   -  

to lower: pull the control towards 
you and slide it downwards, 

  -  

to raise: slide the control upwards.   

  To fasten the seat belts 
 Pull the strap, then insert the end into 
the buckle. 
 Check  that  the  seat  belt  is  fastened 
correctly by pulling the strap.  

  Front seat belts with 

pre-tensioner and force limiter 
 Safety  in  the  event  of  front  impacts 
has  been  improved  by  the  introduc-
tion  of  seat  belts  with  pre-tensioner 
and  force  limiter  for  the  front  seats. 
Depending on the seriousness of the 
impact,  the  pre-tensioning  system 
instantly  tightens  the  seat  belts  and 
pulls  them  against  the  bodies  of  the 
occupants. 
 The  pre-tensioning  seat  belts  are 
active when the ignition is on. 
 The  force  limiter  eases  the  pressure 
of  the  seat  belt  on  the  body  of  the 
occupant in the event of an accident.  

  Rear seat belts 
 The  three  rear  seats  are  fi tted  with 

three-point inertia reel seat belts.   

75

SAFETY -

     The  driver  must  ensure 
that  the  passengers  use 
the seat belts correctly and 
that they are all properly re-

strained before setting off. 
 Wherever you are seated in the ve-
hicle,  always  fasten  your  seat  belt, 
even for short journeys. 
 Do  not  invert  the  seat  belt  buckles 

as they will not fulfi l their role fully. 
 If the seats have armrests * , the lap 
part  of  the  seat  belt  must  always 
pass under the armrest. 
 The seat belts are fi tted with an in-

ertia  reel  permitting  automatic  ad-
justment  of  the  length  of  the  strap 
to your size. The seat belt is stored 
automatically when not in use. 
 Before  and  after  use,  ensure  that 
the seat belt is rolled up correctly. 
 The lower part of the strap must be 
positioned  as  low  as  possible  on 
the pelvis. 
 The  upper  part  must  be  positioned 
in the hollow of the shoulder. 
 The  inertia  reels  are  fi tted  with  an 

automatic  locking  device  which 
comes into operation in the event of 
a  collision,  on  emergency  braking 
or if the vehicle rolls over. You can 
release the device by pulling rapidly 
on the strap and releasing it. 

 In order to be effective, a seat belt: 
   -  

must be tightened as close to the 
body as possible, 

  -  

must restrain one adult only, 

  -  

must not bear any trace of cuts or 
fraying, 

  -  

must be pulled in front of you with 
a  smooth  movement,  checking 
that it does not twist, 

  -  

must not be transformed or modifi ed 

to avoid altering its performance.  

   In  accordance  with  current  safety 
regulations,  all  repairs  and  checks 
must be carried out by a  PEUGEOT  
dealer who guarantees that the work 
is carried out correctly. 
   Have  your  seat  belts  checked  regu-
larly by a  PEUGEOT  dealer and par-
ticularly  if  the  straps  show  signs  of 
damage. 
   Clean the seat belt straps with soapy 
water  or  a  textile  cleaning  product, 
sold by  PEUGEOT  dealers. 
 After folding or moving a seat or rear 
bench seat, ensure that the seat belt 
is positioned and rolled up correctly.  

  Recommendations for children: 
   -  

use  a  suitable  child  seat  if  the 
passenger is less than 12 years 
old  or  shorter  than  one  metre 

fi fty, 

  -  

do  not  use  the  strap-guide *  
when a child seat is installed. 

  -  

never use the same seat belt to 
secure more than one person, 

  -  

never  allow  a  child  to  travel  on 
your lap.  


Depending on the nature and se-

riousness of the impacts , the pre-

tensioning   device may be triggered 
before  and  independently  of  the 
air  bags.  Triggering  of  the  pre-ten-
sioners  is  accompanied  by  a  slight 
emission of harmless smoke and a 
noise,  due  to  the  activation  of  the 
pyrotechnic  cartridge  incorporated 
in the system. 
 In  all  cases,  the  air  bag  warning 
light comes on. 
 Following an impact, have the seat 
belts  system  checked,  and  if  nec-
essary  replaced,  by  a   PEUGEOT  
dealer. 

  *   According to model.  

77

CHECKS -

     1.4 LITRE (75 BHP)
PETROL ENGINE 

  1.   Power steering reservoir. 
  2.   Windscreen wash reservoir. 
  3.   Coolant reservoir. 
  4.

   Brake fl uid reservoir. 

  5.   Battery. 
  6.

   Air fi lter. 

  7.   Dipstick. 
  8.   Engine oil reservoir. 

 1.6 LITRE 16V (110 BHP) 
PETROL ENGINE 

   1.   Power steering reservoir. 
  2.   Windscreen wash reservoir. 
  3.   Coolant reservoir. 
  4.

   Brake fl uid reservoir. 

  5.   Battery. 
  6.

   Air fi lter. 

  7.   Dipstick. 
  8.   Engine oil reservoir.  

CHECKS

78 -

                                           CHECKING THE LEVELS 

 There  are  two  marks  on 
the dipstick: 
  A  = maximum 
 Never fi ll past this mark. 
  B  = minimum 
 To  maintain  the  reliability 
of  engines  and  emission 
control  systems,  the  use 
of  additives  in  engine  oil 
is prohibited.  

  Oil change 
 According to the information given in 
the servicing booklet.  

  Brake fluid level 

 The  brake  fl uid  must  be  changed

according to the manufacturer's ser-
vicing schedule. 
 Use  fl uids  recommended  by  the 

manufacturer, which fulfi l DOT4 stan-

dards. 
  Note:

  brake fl uid is harmful to health 

and very corrosive. Avoid all contact 
with the skin.  

  Used oil 

 Avoid used oil coming into prolonged 
contact with the skin. 
 Empty  the  used  oil  into  the  contain-
ers  intended  for  this  purpose  in  the 
PEUGEOT network. 
 Do not dispose of used oil, brake fl uid or 

coolant into drains or onto the ground.  

  Dipstick 

  Viscosity selection 
 In  all  cases,  the  oil  selected  must 
meet  the  manufacturer's  require-
ments.   

  Cooling system 

 Use  the  fl uid  recommended  by  the 

manufacturer. 
 When  the  engine  is  warm,  the  tem-
perature  of  the  coolant  is  controlled 
by the engine fan. As this fan can op-
erate  with  the  ignition  key  removed 
and  because  the  cooling  system  is 
pressurised, wait for at least one hour 
after  the  engine  has  stopped  before 
carrying out any work. 
 Slacken  the  cap  by  two  turns  to  re-
lease  the  pressure  to  prevent  any 
risk  of  scalding.  When  the  pressure 
has  dropped,  remove  the  cap  and 
top up the level. 
  Note:   the  coolant  does  not  need  to 
be changed.  

  Power steering reservoir 

      Open  the  reservoir,  with  the  en-

gine at ambient temperature. The 
level should always be above the 
MIN. mark and close to the MAX. 
mark.   

  Windscreen wash level 

 For  best  quality  cleaning  and  for  your 
safety,  we  would  advise  that  you  use 
products recommended by PEUGEOT.  

  Oil level 

      Check the level regularly and top 

up  between  changes.  The  maxi-
mum  consumption  is  0.5  l  per 
600 miles (1 000 km).  

 Check the level with the vehicle level, 
engine cold, using the oil level gauge 
on  the  instrument  panel  or  the  dip-
stick. 


Content   ..  3  4  5  6   ..