Chrysler Cirrus, Dodge Stratus, Plymouth Breeze Haynes. Manual - part 30
10-12
Chapter 10 Suspension and steering systems
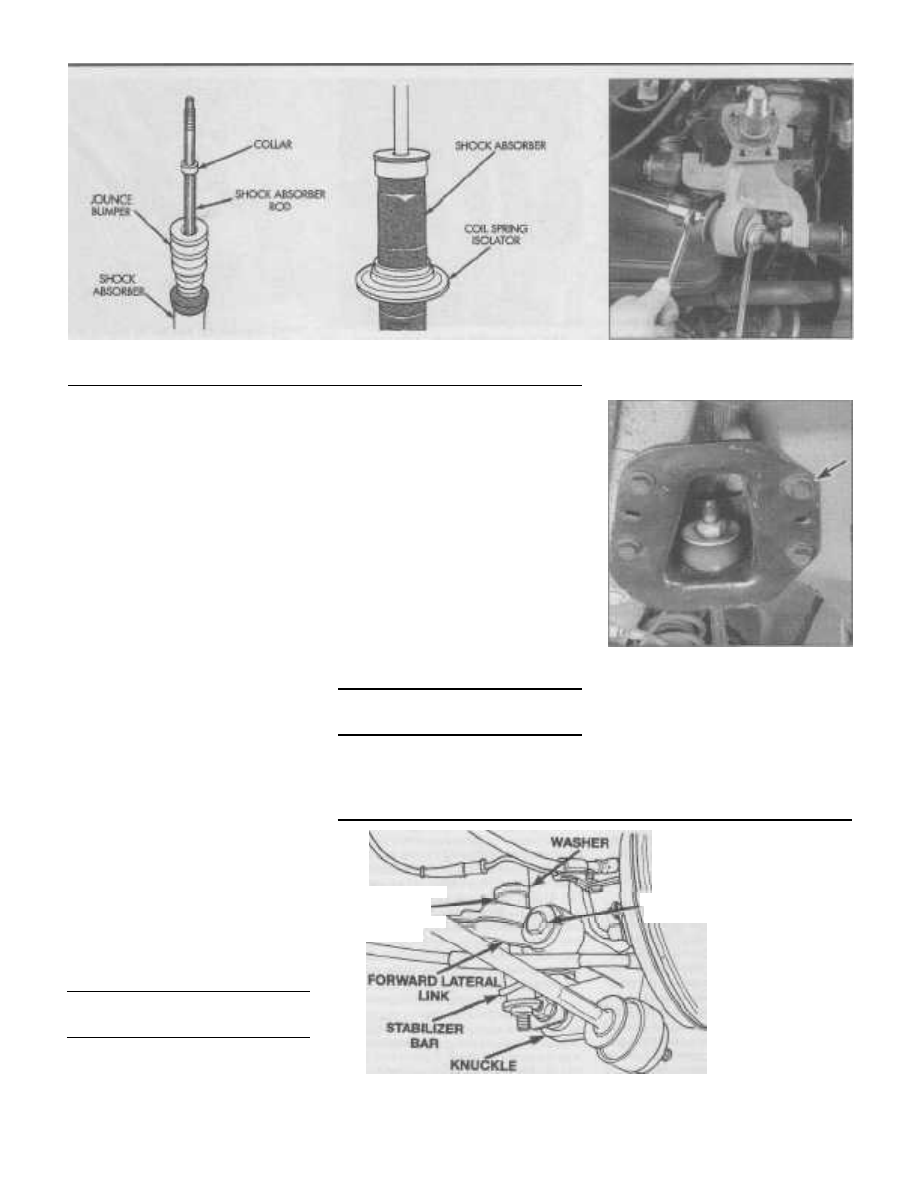
11.18 Slide off the shock absorber rod rubber jounce bumper, collar,
and coil spring isolator
12.2 Use an open-end wrench to hold the
trailing link from rotating while removing
the nut and washer at the knuckle
16
Remove the dust boot from the shock
absorber (see illustration 11.15).
17
Lift the coil spring off of the shock
absorber. Warning:
Keep the
ends
of the
spring pointed away from
your body. Set
the
spring aside in a safe, isolated location.
18
Remove the rubber jounce bumper, col-
lar, and coil spring isolator from the shock
absorber (see illustration).
19
Reassembly is the reverse of removal.
When installing the sleeve on the shock
absorber rod, install it with the undercut side
of the sleeve facing downward. Push the
sleeve tightly onto the rod step until the
sleeve is seated firmly. Reinstall the top
washer on the shock rod with the work TOP
stamped on the washer facing upward (see
illustration 11.13). When reinstalling the
spring, align the studs at the top of the
mounting plate with the hole in the bottom
clevis bracket
before
relieving the spring
force.
Installation
20
Guide the shock absorber into place,
inserting the upper mounting studs through
the holes in the shock tower. Install the nuts,
but don't tighten them yet.
21
Connect the lower end of the shock
absorber to the knuckle, with the bolt head
facing the rear of the vehicle. Tighten the
bolt/nut to the torque listed in this Chapter's
Specifications.
22 Install the wheel and lug nuts. Lower the
vehicle and tighten the lug nuts to the torque
li sted in the Chapter 1 Specifications. Tighten
the upper mounting nuts to the torque listed
in this Chapter's Specifications. Install the
cap.
12 Trailing link (rear) - removal and
installation
Refer
to illustrations 12.2 and 12.3
1
Loosen the rear wheel lug nuts, raise the
vehicle and support it securely on jackstands.
Block the front wheels and remove the rear
wheel.
2
At the rear knuckle, remove the nut,
bushing retainer, and outer trailing link bush-
ing from the trailing link (see illustration).
3
Remove the four bolts from the trailing
li nk bracket which attach the bracket to the
body and frame rail (see illustration).
4
Remove trailing link and mounting
bracket as an assembly from the vehicle.
5
If separating the trailing link from the
mounting bracket, note the location and posi-
tions of the bushings and retainer for correct
reinstallation later.
6
Installation is the reverse of the removal
procedure. Be sure to tighten the bolts and
nuts to the torque listed in this Chapter's
Specifications.
13 Lateral links (rear) - removal and
installation
Refer
to illustrations 13.2, 13.4, 13.6 and 13.7
1
Loosen the rear wheel lug nuts, raise the
rear of the vehicle and support it securely on
jackstands. Remove the rear wheel.
12.3 Unbolt the trailing link bracket bolts
(arrow) to remove the forward end of the
trailing link
Forward lateral link
2
Remove rear stabilizer bar attaching link
from the forward lateral link (see illustration).
3
Remove the nut, bolt and washer
attaching the forward lateral link to the
knuckle (see illustration 11.2).
BOLT AND
13.2 Remove the
WASHER stabilizer bar attaching
li nk bolt/nuts and front
lateral link to knuckle
bolt and washer
STABILIZER
BAR
ATTACHING
LINK