Opel Combo (2018 year). Manual - part 2


  Index      Opel     Opel Combo (2018 year) - manual in english


Search            copyright infringement  


Content      ..      1      2      3      ..


Opel Combo (2018 year). Manual - part 2


22

Keys, doors and windows

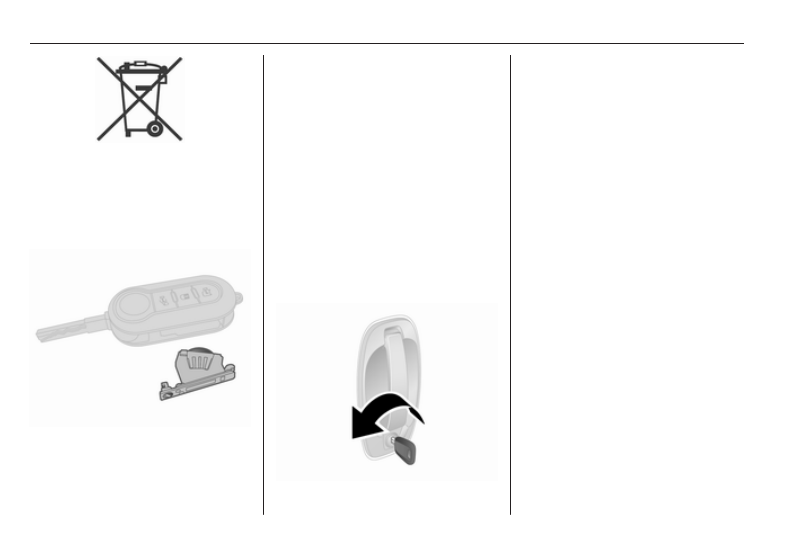
Batteries do not belong in household

waste. They must be disposed of at

an appropriate recycling collection

point.

Key with foldaway key section

Extend the key (to reveal the battery

holder) and remove the battery holder

by undoing the screw with a suitable

screwdriver. Remove the battery

holder from the key and replace the

battery (type CR 2032), paying

attention to the installation position.
Refit the battery holder in the key and

secure with the screw.

Manual door locks

If the power supply has been

interrupted, the vehicle battery

voltage has dropped too low, or there

is a fault in the central locking system,

the door locks cannot be operated

with the remote control.

Unlocking

Manually unlock the driver's door by

inserting the key in the lock cylinder

and turning towards the front of the

vehicle. Open the driver's door by

pulling the exterior handle.
The front passenger door and sliding

side door(s) can then be opened by

operating the exterior or interior

handles.
Manually unlock the rear doors by

turning the key in the lock cylinder (if

available) or open from the inside.

The tailgate cannot be unlocked from

the outside under the conditions

stated above.
Rear doors 3 26.
Emergency tailgate opening from

inside the vehicle 3 28.
Child locks 3 25.

Locking

Close the rear doors/tailgate 3 26

and lock by turning the key in the lock

cylinder (if available).

-------------------------------------------------------------------------------------------------------------------------------------------------------------

Keys, doors and windows

23

Push down inside locking knob on top

of interior handle (if available) on the

sliding side door(s) and/or engage the

manual lock on the sliding side door

(if available), see below. Then close

the door from the outside.

Close front passenger door from

inside then push down inside locking

knob.
Then close the driver's door from

outside and lock it by turning the key

in the lock cylinder towards the rear of

the vehicle. The vehicle is locked.
Mechanical anti-theft locking system

3

 29.

Sliding side door manual lock

To prevent the sliding side door from

being opened from the outside, open

the door and engage the manual lock

(if available).
Using a suitable tool, turn the lock

switch on the door to locked position

1. The door cannot be opened from

outside.

Note

The manual lock on the sliding side

door remains engaged even after

unlocking the vehicle with the

remote control.

-------------------------------------------------------------------------------------------------------------------------------------------------------------

24

Keys, doors and windows

To disengage, open the door from

inside the vehicle then turn the switch

to unlocked position 2.

Central locking system

Unlocks and locks the front doors,

sliding side doors and load

compartment.
A pull on an interior door handle

unlocks and opens the respective

door.
For safety reasons, the vehicle

cannot be locked if the key is in the

ignition switch.

Unlocking

Note

In the event of an accident of a

certain severity, the vehicle unlocks

automatically.

Fuel cut-off system 3 97.

Van

Press Ä: Front doors are unlocked.

Press Å: Rear doors / tailgate and

sliding side doors are unlocked.

Combi, Combo Tour

Press Ä: All doors, including rear

doors / tailgate and sliding side doors

are unlocked.
Press Å: Rear doors / tailgate only

are unlocked.

Note

If engaged, the manual lock on the

sliding side door remains engaged

even after unlocking the vehicle with

the remote control.
Sliding side door manual lock 3 22.

Locking

Close all doors. If the doors are not

closed properly, the central locking

system will not work.

Note

If a door or the tailgate is open,

control indicator ( illuminates in the

instrument cluster 3 91.

-------------------------------------------------------------------------------------------------------------------------------------------------------------

Keys, doors and windows

25

Press e. All doors, including rear

doors / tailgate and sliding side doors

are locked.

Automatic locking

The vehicle can be configured to

automatically lock the doors when

vehicle speed exceeds 20 km/h.
Driver Information Centre 3 91.

Unlocking the load compartment

from inside the vehicle

Available depending on version,

press Å: The load compartment

(rear doors / tailgate and sliding side

doors) are unlocked.
When the load compartment is

locked, the LED in the button is

illuminated.

Child locks

9 Warning

Use the child locks whenever

children are occupying the rear

seats.

Using a suitable tool, turn child lock

switch on the sliding side door (if

available) towards the horizontal

position. The door cannot be opened

from inside.
To deactivate, turn the child lock

switch to the vertical position.

-------------------------------------------------------------------------------------------------------------------------------------------------------------

26

Keys, doors and windows

Doors

Sliding door

Unlock the sliding side door with the

remote control 3 24.

Pull lever on interior handle (if

available) and slide the door.
Depending on version, it may only be

possible to open and close the sliding

side door using the outside handle.

Caution

Ensure the sliding side door is fully

closed and secure before driving

the vehicle.

Central locking system 3 24.

Caution

To avoid damage, do not attempt

to operate the sliding side door

when the fuel filler flap is open.

9 Danger

Do not drive with the sliding side

door open or ajar, e.g. when

transporting bulky objects, since

toxic exhaust gases, which cannot

be seen or smelled, could enter

the vehicle. This can cause

unconsciousness and even death.

Refuelling 3 136.

Rear doors

Unlock the rear doors with the remote

control or by turning the key in the rear

door lock cylinder.
Central locking 3 24.
Manual door locks 3 22.
Always open the left hand door before

the right hand door.

To open the left hand rear door, pull

the exterior handle.

-------------------------------------------------------------------------------------------------------------------------------------------------------------

Keys, doors and windows

27

The door is opened from inside the

vehicle by pressing down the interior

handle.

The right hand rear door is released

using the lever.

9 Warning

The rear lights may be obscured if

the rear doors are open and the

vehicle is parked on the roadside.
Make other road users aware of

the vehicle, by using a warning

triangle or other equipment

specified in the road traffic

regulations.

The doors are retained in the 90º

position by locking stays. To open the

doors to 180º, push the latch and

swing open to the desired position.

9 Warning

Ensure extended opening doors

are secured when fully opened.
Opened doors may slam closed

due to the force of the wind!

Always close the right hand door

before the left hand door.

9 Danger

Do not drive with the rear doors

open or ajar, e.g. when

transporting bulky objects, since

toxic exhaust gases, which cannot

be seen or smelled, could enter

the vehicle. This can cause

unconsciousness and even death.

Central locking system 3 24.

-------------------------------------------------------------------------------------------------------------------------------------------------------------

28

Keys, doors and windows

Load compartment

Tailgate

Opening

Unlock the tailgate with the remote

control 3 24.

Press the button underneath the

tailgate handle.

Closing

Use the interior loop.
Do not press button underneath the

tailgate handle whilst closing as this

will unlock the tailgate again.

Note

To avoid damage, place fingers

through the loop before pulling

downwards.

Ensure tailgate is fully closed before

driving.
Central locking system 3 24.

Emergency tailgate opening from

inside the vehicle

An access hole (arrowed) enables the

tailgate latch to be released using a

suitable tool. Push lever to the right to

unlock and open the tailgate.

9 Danger

Do not drive with the tailgate open

or ajar, e.g. when transporting

bulky objects, since toxic exhaust

gases, which cannot be seen or

smelled, could enter the vehicle.

This can cause unconsciousness

and even death.

-------------------------------------------------------------------------------------------------------------------------------------------------------------

Keys, doors and windows

29

Caution

Before opening the tailgate check

overhead obstructions, such as a

garage door, to avoid damage to

the tailgate. Always check the

moving area above and behind the

tailgate.

Note

The installation of certain heavy

accessories onto the tailgate may

affect its ability to remain open.

Vehicle security

Anti-theft locking system

9 Warning

Do not use the system if there are

people in the vehicle! The doors

cannot be unlocked from the

inside.

The system deadlocks all the doors.

All doors must be closed otherwise

the system cannot be activated.

Activating

Press e on the remote control twice.

Note

Depending on version, turning the

manual key twice in the driver's door

lock cylinder towards the rear of the

vehicle only deadlocks the rear

doors. Manual door locks 3 22.

Deactivating

The system is disabled automatically

on every door when:

● unlocking the doors
● turning the ignition switch to

position 1

Immobiliser

The system is part of the ignition

switch and checks whether the

vehicle is allowed to be started with

the key being used.
The immobiliser is activated

automatically after the key has been

removed from the ignition switch.
If the control indicator d illuminates

when starting, there is a fault in the

system; the engine cannot be started.

Switch off the ignition and repeat the

start attempt.

-------------------------------------------------------------------------------------------------------------------------------------------------------------

30

Keys, doors and windows

If d remains illuminated, attempt to

start the engine using the spare key

and seek the assistance of a

workshop.

Note

Radio Frequency Identification

(RFID) tags may cause interference

with the key. Do not have it placed

near the key when starting the

vehicle.
Note

The immobiliser does not lock the

doors. Always lock the vehicle after

leaving it 3 24.

If control indicator d illuminates

during driving, the system may be

performing a self-test. This process is

normal.
Control indicator d 3 90.

Exterior mirrors

Convex shape

The convex exterior mirror contains

an aspherical area and reduces blind

spots. The shape of the mirror makes

objects appear smaller, which will

affect the ability to estimate

distances.

Manual adjustment

Adjust mirrors by swivelling lever in

required direction.
The lower mirrors are not adjustable.

Electric adjustment

Select the relevant exterior mirror by

turning the control to left _ or right 6.

Then swivel the control to adjust the

mirror.
In position o no mirror is selected.

-------------------------------------------------------------------------------------------------------------------------------------------------------------

Keys, doors and windows

31

Folding mirrors

For pedestrian safety, the exterior

mirrors will swing out of their normal

mounting position if they are struck

with sufficient force. Reposition the

mirror by applying slight pressure to

the mirror housing.

Parking position

The exterior mirrors can be folded in

by pressing gently on the outer edge

of the housing, e.g. when in a

confined parking situation.

Heated mirrors

Operated by pressing Ü.
Heating works with the engine

running and is switched off

automatically after a short time.

Interior mirrors

Manual anti-dazzle

To reduce dazzle, adjust the lever on

the underside of the mirror housing.

-------------------------------------------------------------------------------------------------------------------------------------------------------------

32

Keys, doors and windows

Windows

Windscreen

Windscreen stickers

Do not attach stickers such as toll

road stickers or similar on the

windscreen in the area of the interior

mirror.

Manual windows

The door windows can be opened or

closed with the window winders.

Power windows

9 Warning

Take care when operating the

power windows. Risk of injury,

particularly to children.
If there are children on the rear

seats, switch on the child safety

system for the power windows.

Keep a close watch on the

windows when closing them.

Ensure that nothing becomes

trapped in them as they move.

Switch on ignition to operate power

windows.

Operate the switch for the respective

window by pushing to open or pulling

to close.
Pushing or pulling briefly: window

moves up or down in stages if the

switch is held.

Pushing or pulling firmly and then

releasing: window moves up or down

fully with safety function enabled. To

stop movement, operate the switch

once more in the same direction.
With the ignition key removed or in

position 0, the windows can be

operated for approx. two minutes and

are deactivated as soon as a door is

opened.

Safety function

If the window glass encounters

resistance during automatic closing, it

is immediately stopped and opened

again.
If the safety function is activated

five times in less than a minute, the

safety function is deactivated. The

windows will only close in stages and

not automatically.
Activate the window electronics by

opening the windows. The safety

function is restored and the windows

will operate normally.

-------------------------------------------------------------------------------------------------------------------------------------------------------------

Keys, doors and windows

33

Overload

If the windows are repeatedly

operated within short intervals, the

window operation is disabled for

some time.

Initialising the power windows

If the windows cannot be closed

automatically (e.g. after

disconnecting the vehicle battery),

activate the window electronics as

follows:

1. Close doors.
2. Switch on ignition.
3. Pull switch until the window is

closed and keep pulling for an

additional five seconds.

4. Repeat for each window.

Child safety system for rear

windows

Available depending on version,

press H to deactivate rear door

power windows.
To reactivate, press H again.

Operating windows from outside

Depending on version, the windows

can be operated remotely from

outside the vehicle when locking or

unlocking the vehicle.
Central locking system 3 24.

Press and hold Ä to open windows.
Press and hold e to close windows.
Release button to stop window

movement.

-------------------------------------------------------------------------------------------------------------------------------------------------------------

34

Keys, doors and windows

Rear windows

Opening rear windows

To open, move lever outwards until

the window is fully open.
To close, pull lever then push until

window is fully closed.

Heated rear window

Operated by pressing Ü.
Heating works with the engine

running and is switched off

automatically after a short time.

Sun visors

The sun visors can be folded down or

swivelled to the side to prevent

dazzling.
If the sun visors have integral mirrors,

the cover of the mirrors should be

closed when driving.
A ticket holder is located on the rear

of the sun visor.

-------------------------------------------------------------------------------------------------------------------------------------------------------------

Seats, restraints

35

Seats, restraints

Head restraints ............................ 35
Front seats ................................... 36

Seat position .............................. 36

Seat adjustment ........................ 37

Seat folding ............................... 38

Armrest ...................................... 40

Heating ...................................... 40

Rear seats ................................... 41

Second row seats ...................... 41

Third row seats .......................... 42

Seat belts ..................................... 45

Three-point seat belt ................. 46

Airbag system .............................. 48

Front airbag system ................... 52

Side airbag system .................... 53

Airbag deactivation .................... 53

Child restraints ............................. 55

Child restraint systems .............. 55

Child restraint installation

locations ................................... 58

Head restraints

Position

9 Warning

Only drive with the head restraint

set to the proper position.

The upper edge of the head restraint

should be at upper head level. If this

is not possible for extremely tall

people, set to highest position, and

set to lowest position for small people.

Adjustment

Front head restraints, height

adjustment

Press the release button, adjust

height and engage.

-------------------------------------------------------------------------------------------------------------------------------------------------------------

36

Seats, restraints

Rear head restraints, height

adjustment

Pull the head restraint upwards or

press the release buttons and push

the head restraint downwards.

Removal

Rear head restraints, removal

Press both release buttons, pull the

head restraint upwards and remove.
Stow the removed head restraint

securely in the load compartment. Do

not drive with head restraint removed

if the seat is occupied.

Note

Approved accessories may only be

attached if the seat is not in use.

Front seats

Seat position

9 Warning

Only drive with the seat correctly

adjusted.

9 Danger

Do not sit closer than 25 cm to the

steering wheel, to permit safe

airbag deployment.

9 Warning

Never adjust seats while driving as

they could move uncontrollably.

9 Warning

Never store any objects under the

seats except in the underseat

storage compartment 3 63.

-------------------------------------------------------------------------------------------------------------------------------------------------------------

Seats, restraints

37

● Sit with buttocks as far back

against the backrest as possible.

Adjust the distance between the

seat and the pedals so that legs

are slightly angled when pressing

the pedals. Slide the front

passenger seat as far back as

possible.

● Set seat height high enough to

have a clear field of vision on all

sides and of all display

instruments. There should be at

least one hand of clearance

between head and the roof

frame. Thighs should rest lightly

on the seat without pressing into

it.

● Sit with shoulders as far back

against the backrest as possible.

Set the backrest rake so that it is

possible to reach the steering

wheel with arms slightly bent.

Maintain contact between

shoulders and the backrest when

turning the steering wheel. Do

not angle the backrest too far

back. We recommend a

maximum rake of approx. 25°.

● Adjust seat and steering wheel in

a way that the wrist rests on top

of the steering wheel while the

arm is fully extended and

shoulders on the backrest.

● Adjust the steering wheel 3 71.
● Adjust the head restraint 3 35.
● Adjust the height of the seat belt

3

 46.

● Adjust the lumbar support so that

it supports the natural shape of

the spine 3 37.

Seat adjustment

Drive only with seats and backrests

properly engaged.

Seat positioning

Pull handle, slide seat, release

handle.
Try to move the seat back and forth to

ensure that the seat is locked in place.

-------------------------------------------------------------------------------------------------------------------------------------------------------------


Content      ..      1      2      3      ..