Nissan Sentra (2024 year). Manual in english - page 6
 

  Index      Manuals     Nissan Sentra (2024 year). Manual in english


Search            copyright infringement  


Content      ..     4      5      6      7     ..


Nissan Sentra (2024 year). Manual in english - page 6


CAUTION

Do not allow the immobilizer system
key, which contains an electrical tran-
sponder, to come into contact with wa-
ter or salt water. This could affect sys-
tem function.

When the doors are locked using one of the
following methods, the doors cannot be
opened using the inside or outside door
handles. The doors must be unlocked to
open the doors.

WARNING

Always have the doors locked while
driving. Along with the use of seat
belts, this provides greater safety in
the event of an accident by helping to
prevent persons from being thrown
from the vehicle. This also helps keep
children and others from uninten-
tionally opening the doors, and will
help keep out intruders.

Before opening any door, always look
for and avoid oncoming traffic.

To help avoid risk of injury or death
through unintended operation of the
vehicle and/or its systems, including
entrapment in windows or inadver-
tent door lock activation, do not leave
children, people who require the assis-
tance of others or pets unattended in
your vehicle. Additionally, the tem-
perature inside a closed vehicle on a
warm day can quickly become high
enough to cause a significant risk of
injury or death to people and pets.

LOCKING WITH KEY

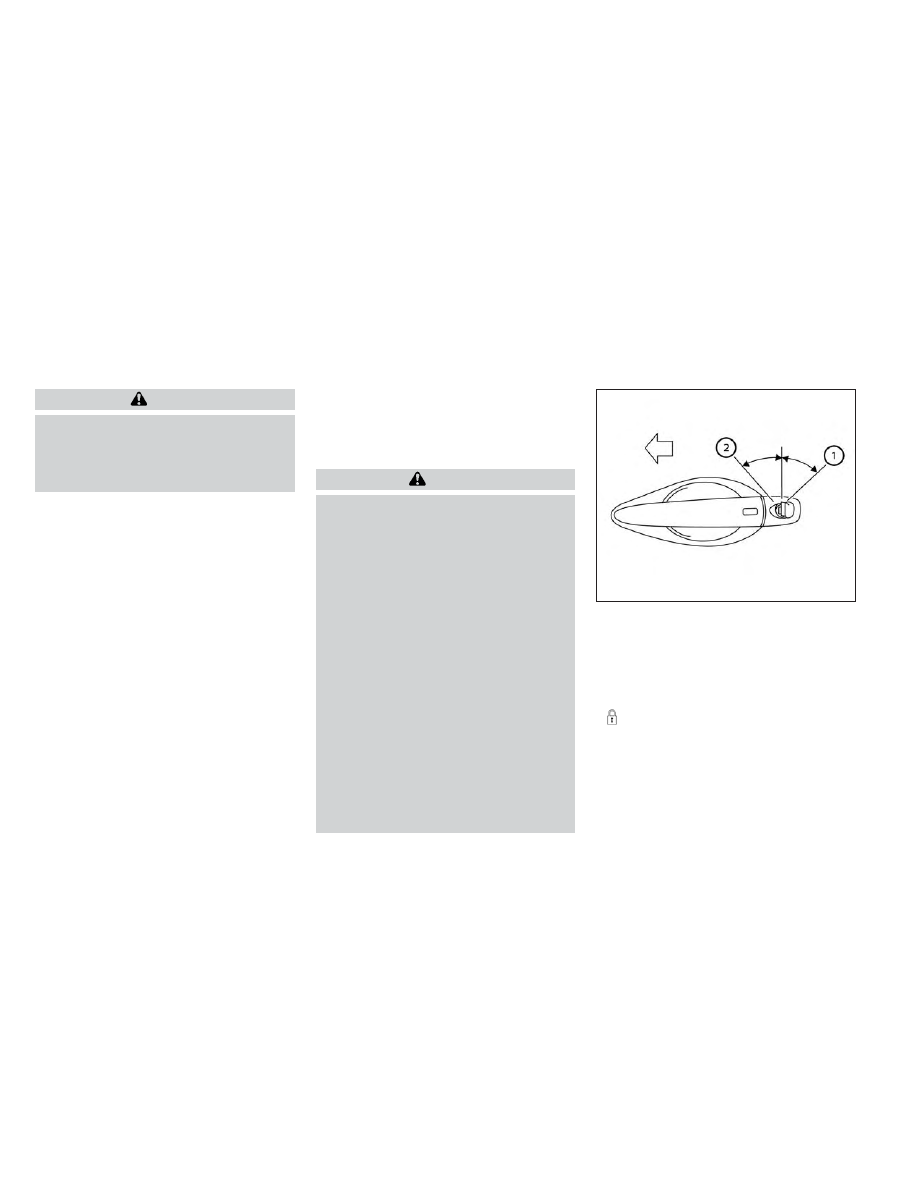
To lock the door using the mechanical key,
turn the key toward the rear of the vehicle

O

1

. This will only lock the corresponding

door and will not activate the security sys-
tem. To arm the security system, press the

button on the Intelligent Key.

To unlock the corresponding door using
the mechanical key, turn the key toward
the front of the vehicle

O

2

. This will only

unlock the corresponding door and will not
disarm the security system.

For additional information, see “Security
systems” (P. 2-54).

LPD2919

Driver's side

DOORS

3-4

Pre-driving checks and adjustments

LOCKING WITH INSIDE LOCK KNOB

To lock the door without the key, move the
inside lock knob to the lock position

O

1

,

then close the door.

To unlock the door without the key, move
the inside lock knob to the unlock position

O

2

.

LOCKING WITH POWER DOOR
LOCK SWITCH

To lock all the doors without a key, push the
door lock switch (driver's or front passen-
ger's side) to the lock position

O

1

. When

locking the door this way, be certain not to
leave the key inside the vehicle.

To unlock all the doors without a key, push
the door lock switch (driver's or front pas-
senger's side) to the unlock position

O

2

.

Lockout protection

When any door is open and the power door
lock switch is moved to the lock position, all
doors will lock. If the Intelligent Key is left in
the vehicle after all the doors are closed, all
doors will unlock automatically and a
chime will sound.
These functions help to prevent the Intelli-
gent Key from being accidentally locked
inside the vehicle.

AUTOMATIC DOOR LOCKS

• All doors lock automatically when the ve-

hicle speed reaches 15 mph (25 km/h).

• Continuously

Variable

Transmission

(CVT) (if so equipped)

– All doors unlock automatically when

the transmission is placed in the P
(Park) or OFF position.

• Manual transmission (if so equipped)

– All doors unlock automatically when the

ignition is placed in the OFF position.

NOTE:
The automatic door unlock function can
be changed using the “Vehicle Settings”
of the vehicle information display.
For additional information, see “Vehicle
information display 4.2 inch (11 cm) Type
A” (P. 2-17) 
or “Vehicle information dis-
play 7 inch (18 cm) Type B” (P. 2-34).

LPD2862

Inside lock

LPD2309

Driver’s and passenger’s side

Pre-driving checks and adjustments

3-5

CHILD SAFETY REAR DOOR LOCK

Child safety locks help prevent the rear
doors from being opened accidentally, es-
pecially when small children are in the
vehicle.

The child safety lock levers are located on
the edge of the rear doors.

When the lever is in the unlock position

O

2

,

the door can be opened from the outside
or the inside.

When the lever is in the LOCK position

O

1

,

the door can be opened only from the
outside.

WARNING

Radio waves could adversely affect
electric medical equipment. Those
who use a pacemaker should contact
the

electric

medical

equipment

manufacturer for the possible influ-
ences before use.

The Intelligent Key transmits radio
waves when the buttons are pressed.
The FAA advises the radio waves may
affect aircraft navigation and com-
munication systems. Do not operate
the Intelligent Key while on an air-
plane. Make sure the buttons are not
operated unintentionally when the
unit is stored for a flight.

Make sure to engage the P (Park) po-
sition and apply the parking brake
when parking your vehicle, entering
or exiting the vehicle or loading lug-
gage. Failure to do so could cause the
vehicle to move or roll away unex-
pectedly and result in serious per-
sonal injury or property damage.

The Intelligent Key system can operate all
the door locks using the remote control
function or pushing the request switch (if
so equipped) on the vehicle without taking
the key out from a pocket or purse. The

operating environment and/or conditions
may affect the Intelligent Key system
operation.

Be sure to read the following before using
the Intelligent Key system.

CAUTION

Be sure to carry the Intelligent Key
with you when operating the vehicle.

Never leave the Intelligent Key in the
vehicle when you leave the vehicle.

The Intelligent Key is always communicat-
ing with the vehicle as it receives radio
waves. The Intelligent Key system trans-
mits weak radio waves. Environmental
conditions may interfere with the opera-
tion of the Intelligent Key system under the
following operating conditions:
• When operating near a location where

strong radio waves are transmitted, such
as a TV tower, power station and broad-
casting station.

• When in possession of wireless equip-

ment, such as a cellular telephone, trans-
ceiver or a CB radio.

• When the Intelligent Key is in contact with

or covered by metallic materials.

LPD3085

NISSAN INTELLIGENT KEY®

3-6

Pre-driving checks and adjustments

• When any type of radio wave remote con-

trol is used nearby.

• When the Intelligent Key is placed near an

electric appliance such as a personal
computer.

• When the vehicle is parked near a parking

meter.

In such cases, correct the operating condi-
tions before using the Intelligent Key func-
tion or use the mechanical key.

Although the life of the battery varies de-
pending on the operating conditions, the
battery’s life is approximately two years. If
the battery is discharged, replace it with a
new one.

Since the Intelligent Key is continuously re-
ceiving radio waves, if the key is left near
equipment which transmits strong radio
waves, such as signals from a TV and per-
sonal computer, the battery life may be-
come shorter.

For information regarding replacement of a
battery, see “Battery replacement” (P. 8-23).

As many as four Intelligent Keys can be
registered and used with one vehicle. For
information about the purchase and use of
additional Intelligent Keys, it is recom-
mended that you visit a NISSAN dealer.

CAUTION

Listed below are conditions or occur-
rences which will damage the Intelli-
gent Key:

Do not allow the Intelligent Key,
which contains electrical compo-
nents, to come into contact with wa-
ter or salt water. This could affect the
system function.

Do not drop the Intelligent Key.

Do not strike the Intelligent Key
sharply against another object.

Do not change or modify the Intelli-
gent Key.

Wetting may damage the Intelligent
Key. If the Intelligent Key gets wet,
immediately wipe until it is com-
pletely dry.

Do not place the Intelligent Key for an
extended period in an area where
temperatures exceed 140°F (60°C).

Do not attach the Intelligent Key with
a key holder that contains a magnet.

Do not place the Intelligent Key near
equipment that produces a magnetic
field, such as a TV, audio equipment
and personal computers.

If an Intelligent Key is lost or stolen, NISSAN
recommends erasing the ID code of that
Intelligent Key from the vehicle. This may
prevent the unauthorized use of the Intelli-
gent Key to operate the vehicle. For infor-
mation regarding the erasing procedure, it
is recommended that you visit a NISSAN
dealer.

Pre-driving checks and adjustments

3-7

OPERATING RANGE

The Intelligent Key functions can only be
used when the Intelligent Key is within the
specified operating range from the request
switch (if so equipped)

O

1

.

When the Intelligent Key battery is dis-
charged or strong radio waves are present
near the operating location, the Intelligent
Key operating range becomes narrower,
and the Intelligent Key may not function
properly.

The operating range is within 31.50 in (80
cm) from each request switch (if so
equipped)

O

1

.

If the Intelligent Key is too close to the door
glass, handle or rear bumper, the request
switches (if so equipped) may not function.

When the Intelligent Key is within the oper-
ating range, it is possible for anyone, even
someone who does not carry the Intelli-
gent Key, to push the request switch (if so
equipped) to lock/unlock the doors.

DOOR LOCKS/UNLOCKS
PRECAUTION

• Do not push the door handle request

switch (if so equipped) with the Intelligent
Key held in your hand as illustrated. The
close distance to the door handle will
cause the Intelligent Key system to have
difficulty recognizing that the Intelligent
Key is outside the vehicle.

• After locking with the door handle re-

quest switch (if so equipped), verify the
doors are securely locked by testing
them.

LPD2402

LPD2554

3-8

Pre-driving checks and adjustments

• To prevent the Intelligent Key from being

left inside the vehicle, make sure you
carry the Intelligent Key with you and then
lock the doors.

• Do not pull the door handle before push-

ing the door handle request switch (if so
equipped). The door will be unlocked but
will not open. Release the door handle
once and pull it again to open the door.

NISSAN INTELLIGENT KEY®
OPERATION

You can lock or unlock the doors and trunk
lid without taking the Intelligent Key out of
your pocket or bag.

When you carry the Intelligent Key with you,
you can lock or unlock all doors and trunk
lid by pushing the door handle request
switch (if so equipped) within the range of
operation.

Locking doors

LPD3086

LPD3385

Pre-driving checks and adjustments

3-9

1. Move the shift lever to the P (Park) posi-

tion (Continuously Variable Transmis-
sion only) or the N (Neutral) position and
apply the parking brake (manual trans-
mission only), place the ignition switch in
the LOCK position and make sure you
carry the Intelligent Key with you.

2. Close all doors.

3. Push any door handle request switch (if

so equipped)

O

1

while carrying the Intel-

ligent Key with you.

4. All doors and the trunk will lock.

5. The hazard warning lights flash twice

and the outside chime sounds twice.

NOTE:
• Doors and trunk lid lock with the door

handle request switch (if so equipped)
while the ignition switch is not in the
LOCK position.

• Doors and trunk lid lock by pushing the

door handle request switch (if so
equipped) while any door is open. Only
driver door lock with mechanical key
even if any door is open.

• Doors do not lock with the door handle

request switch (if so equipped) with
the Intelligent Key inside the vehicle; a
beep sounds to warn you. However,
when an Intelligent Key is inside the
vehicle, doors can be locked with an-
other Intelligent Key.

WARNING

After locking the doors using the re-
quest switch (if so equipped), make
sure that the doors have been securely
locked by operating the door handles.
Failure to follow these instructions may
result in inadvertently unlocking the
doors, which may decrease the safety
and security of your vehicle.

CAUTION

When locking the doors using the re-
quest switch (if so equipped), make
sure to have the Intelligent Key in
your possession before operating
the request switch (if so equipped) to
prevent the Intelligent Key from be-
ing left in the vehicle.

The request switch (if so equipped) is
operational only when the Intelligent
Key has been detected by the Intelli-
gent Key system.

Lockout protection

To prevent the Intelligent Key from being
accidentally locked in the vehicle, lockout
protection is equipped with the Intelligent
Key system.

When the driver’s side door is open, the
doors are locked and then the Intelligent
Key is put inside the vehicle and all the
doors are closed; the lock will automati-
cally unlock. A chime will sound to warn
you. However, if an Intelligent Key is inside
the vehicle with all the doors closed, the
doors can be locked with another Intelli-
gent Key.

LPD2401

3-10

Pre-driving checks and adjustments

NOTE:

The doors may not lock when the Intelli-
gent Key is in the same hand that is op-
erating

the

request

switch

(if

so

equipped) to lock the door. Put the Intel-
ligent Key in a purse, pocket or your
other hand.

CAUTION

The lockout protection may not func-
tion under the following conditions:

When the Intelligent Key is placed on
top of the instrument panel.

When the Intelligent Key is placed on
top of the rear parcel shelf.

When the Intelligent Key is placed in-
side the glove box or a storage bin.

When the Intelligent Key is placed in-
side the door pockets.

When the Intelligent Key is placed on
or under the spare tire area.

When the Intelligent Key is placed in-
side or near metallic materials.

When the Intelligent Key battery is
discharged.

Unlocking doors

Driver’s door

1. Carry the Intelligent Key.

2. Push the door handle request switch (if

so equipped)

O

1

.

3. The hazard warning lights flash once

and the outside chime sounds once.

4. Push the door handle request switch (if

so equipped)

O

1

again within 1 minute to

unlock all doors and the trunk lid.

Except driver’s door

1. Carry the Intelligent Key.

2. Push the door handle request switch (if

so equipped)

O

1

to unlock all doors.

3. The hazard warning lights flash once

and the outside chime sounds once.

If a door handle is pulled while unlocking
the doors, that door may not be unlocked.
Returning the door handle to its original
position will unlock the door. If the door
does not unlock after returning the door
handle, push the door handle request
switch (if so equipped) to unlock the door.

LPD3385

LPD2165

Pre-driving checks and adjustments

3-11

All doors and trunk lid will be locked auto-
matically unless one of the following op-
erations is performed within 30 seconds
after pushing the request switch (if so
equipped):
• Opening any door or the trunk lid.
• Pushing the ignition switch.

Using the interior lights

The interior lights illuminate for a period of
time when a door is unlocked and the inte-
rior lights switch is not in the OFF position.

The interior lights can be turned off without
waiting by performing one of the following
operations:
• Placing the ignition switch in the ON

position.

• Locking the doors with the request

switch (if so equipped) or the Intelligent
Key.

• Switching the interior light switch to the

OFF position.

For additional information, see “Interior
lights” (P. 2-80).

Opening the trunk lid

1. Push the trunk opener request switch (if

so equipped)

O

A

while carrying the Intel-

ligent Key with you.

2. The trunk will unlatch. A chime will

sound three times.

3. Raise the trunk lid to open the trunk.

WARNING

After locking the trunk, make sure that
the trunk has been securely locked by
operating the trunk opener request
switch within three seconds of locking.

Failure to follow these instructions may
result in inadvertently unlocking the
trunk, which may decrease the safety
and security of the vehicle.

HOW TO USE THE REMOTE
KEYLESS ENTRY FUNCTION

The remote keyless entry function can op-
erate all door locks using the remote key-
less function of the Intelligent Key. The re-
mote keyless function can operate at a
distance of 33 ft (10 m) away from the ve-
hicle. The operating distance depends
upon the conditions around the vehicle.

The remote keyless entry function will not
function under the following conditions:
• The Intelligent Key is not within the opera-

tional range.

• The doors or the trunk are open or not

closed securely.

• The Intelligent Key battery is discharged.

CAUTION

When locking the doors using the Intel-
ligent Key, be sure not to leave the key
in the vehicle.

LPD3088

3-12

Pre-driving checks and adjustments

Type A (if so equipped)

1.

(lock) button

2.

(unlock) button

3.

(trunk) button

4.

(panic) button

Type B (if so equipped)

1.

(remote engine start) button

2.

(lock) button

3.

(unlock) button

4.

(trunk) button

5.

(panic) button

Locking doors

1. Place the ignition switch in the LOCK

position.

2. Close all doors.

3. Press the

button on the Intelligent

Key.

4. The hazard warning lights flash twice

and the horn beeps once.

5. All doors and the trunk will be locked.

WARNING

After locking the doors using the Intel-
ligent Key, be sure that the doors have
been securely locked by operating the
door handles. Failure to follow these in-
structions may result in inadvertently
unlocking the doors, which may de-
crease the safety and security of your
vehicle.

LDI3700

LDI3701

Pre-driving checks and adjustments

3-13

Unlocking doors

1. Press the

button on the Intelligent

Key to unlock the driver’s door.

2. The hazard warning lights flash once.

3. Press the

button again within 60

seconds to unlock all doors and trunk.

All doors and trunk lid will be locked auto-
matically unless one of the following op-
erations is performed within 60 seconds
after pressing the

button:

• Opening any doors or trunk lid.
• Pushing the ignition switch.

Using the interior lights

The interior lights illuminate for a period of
time when a door is unlocked and the inte-
rior lights switch is not in the OFF position.

The interior lights can be turned off without
waiting by performing one of the following
operations:
• Placing the ignition switch in the ON

position.

• Locking the doors with the request switch

(if so equipped) or the Intelligent Key.

• Switching the interior light switch to the

OFF position.

For additional information, see “Interior
lights” (P. 2-80).

Releasing the trunk lid

Press the

button for 0.5 seconds to

open the trunk lid. The trunk release button
will not operate when the ignition switch is
placed in the ON position.

Using the panic alarm

If you are near your vehicle and feel threat-
ened, you may activate the panic alarm to
call attention by pressing and holding the

button on the Intelligent Key for

lon-

ger than 0.5 seconds.

The panic alarm and headlights will stay on
for a period of time.

The panic alarm stops when:
• It has run for a period of time.

(unlock) button is pressed on the

Intelligent Key.

Silencing the horn beep feature

If desired, the horn beep feature can be
deactivated using the Intelligent Key.

To deactivate:

Press and hold the

and

buttons

for at least 4 seconds.

The hazard warning lights will flash three
times to confirm that the horn beep fea-
ture has been deactivated.

To activate:

Press and hold the

and

buttons

for at least 4 seconds once

more.

The hazard warning lights will flash once
and the horn will sound once to confirm
that the horn beep feature has been
reactivated.

Deactivating the horn beep feature does not
silence the horn if the alarm is triggered.

WARNING SIGNALS

To help prevent the vehicle from moving
unexpectedly by erroneous operation of
the Intelligent Key or to help prevent the
vehicle from being stolen, a chime or
buzzer sounds from inside and outside the
vehicle and a warning is displayed in the
instrument panel.

When a chime or beep sounds or a warning
is displayed, be sure to check the vehicle
and the Intelligent Key.

For additional information, see “Trouble-
shooting guide” (P. 3-15) and “Vehicle infor-
mation display 4.2 inch (11 cm) Type A”
(P. 2-17) or “Vehicle information display 7
inch (18 cm) Type B” (P. 2-34)

3-14

Pre-driving checks and adjustments

TROUBLESHOOTING GUIDE (Continuously Variable Transmission only)

Verify the location of all Intelligent Keys that are programmed for the vehicle. If another Intelligent Key is in range or inside the vehicle, the
vehicle system may respond differently than expected.

Symptom

Possible Cause

Remedy

When pushing the ignition switch to
stop the engine

The Shift to Park warning message in
the instrument panel illuminates and
the inside chime sounds continuously.

The shift lever is not in the P (Park) po-
sition.

Make sure that the shift lever is in the
P (Park) position.

When pushing the door handle re-
quest switch (if so equipped) to lock
the door

The outside chime sounds for a few
seconds.

The Intelligent Key is inside the vehicle
or the trunk.

Be sure to carry the Intelligent Key with
you.

When closing the doors

The outside chime sounds 3 times.

The ignition switch is in the ACC posi-
tion.

Place the ignition switch in the OFF
position.

The Shift to Park warning message in
the instrument panel illuminates and
the outside chime sounds continu-
ously.

The ignition switch is in the OFF posi-
tion and the shift lever is not in the P
(Park) position.

Make sure that the shift lever is in the
P (Park) position and place the ignition
switch in the OFF position.

Few seconds after closing the driver’s
door, the Rear Door Alert warning mes-
sage appears on the display, the horn
sounds six times, or a Check Rear Seat
for All Articles warning appears on the
display.

The Rear Door Alert is activated.

Check the back seat for all articles,
press the OK button to clear the Rear
Door Alert warning message.

The outside chime sounds for approxi-
mately 3 seconds and all the doors
unlock.

The Intelligent Key is inside the vehicle
or the trunk.

Be sure to carry the Intelligent Key with
you.

When closing the trunk lid

The outside chime sounds for few sec-
onds and the trunk lid opens.

The Intelligent Key is inside the trunk.

Be sure to carry the Intelligent Key with
you.

When pressing the

button on the

Intelligent Key to lock the door

The outside chime sounds for a few
seconds and all the doors unlock.

The Intelligent Key is inside the vehicle
or the trunk.

Be sure to carry the Intelligent Key with
you.

A door is not closed securely.

Close the doors securely.

Pre-driving checks and adjustments

3-15

TROUBLESHOOTING GUIDE (Manual Transmission only)

Verify the location of all Intelligent Keys that are programmed for the vehicle. If another Intelligent Key is in range or inside the vehicle, the
vehicle system may respond differently than expected.

Symptom

Possible Cause

Remedy

When the parking brake is fully applied

The inside warning chime sounds con-
tinuously.

The ignition switch is in the ACC or ON
position.

Place the ignition switch in the OFF
position.

When pushing the door handle re-
quest switch (if so equipped) to lock
the door

The outside chime sounds for a few
seconds.

The Intelligent Key is inside the vehicle
or the trunk.

Be sure to carry the Intelligent Key with

When closing the doors

The outside chime sounds for approxi-
mately 3 seconds and all doors unlock.

The Intelligent Key is inside the vehicle
or the trunk.

Be sure to carry the Intelligent Key with

Few seconds after closing the driver’s
door, the Rear Door Alert warning mes-
sage appears on the display, the horn
sounds six times, or a Check Rear Seat
for All Articles warning appears on the
display.

The Rear Door Alert is activated.

Check the back seat for all articles,
press the OK button to clear the Rear
Door Alert warning message.

The Key System Error warning mes-
sage in the vehicle information display
appears, the outside chime sounds
three times and the inside warning
chime sounds for approximately 3 sec-
onds.

The ignition switch is in the ACC posi-
tion.

Place the ignition switch in the OFF
position.

3-16

Pre-driving checks and adjustments

The

button will be on the NISSAN

Intelligent Key® if the vehicle has Remote
Engine Start. This feature allows the engine
to start from outside the vehicle.

The following features may be affected
when the Remote Engine Start feature is
used:
• Vehicles with a manual climate control

system will default to the last used heat-
ing or cooling mode.

• Vehicles

with

an

automatic

climate

control system may default to either a
heating or cooling mode depending on
outside and cabin temperatures. For ad-
ditional information, see “Remote Engine
Start with Intelligent Climate Control”
(P. 4-42).

Laws in some local communities may re-
strict or prohibit the use of the Remote
Engine Start, or the amount of time a
parked engine may idle. For example, some
laws require a person using Remote Engine
Start to have the vehicle in view or may
restrict idling time except in freezing tem-
peratures. Check local regulations for any
requirements.

Other conditions may affect the function of
the Remote Engine Start feature. For addi-
tional information, see “Conditions the Re-
mote Engine Start will not work” (P. 3-19).

Other conditions can affect the perfor-
mance of the Intelligent Key transmitter.
For additional information, see “NISSAN In-
telligent Key®” (P. 3-6).

REMOTE ENGINE START
OPERATING RANGE

WARNING

To help avoid risk of injury or death
through unintended operation of the
vehicle and/or its systems, including
entrapment in windows or inadver-
tent door lock activation, do not
leave children, people who require
the assistance of others or pets unat-
tended in your vehicle. Additionally,
the temperature inside a closed ve-
hicle on a warm day can quickly be-
come high enough to cause a signifi-
cant risk of injury or death to people
and pets.

Do not use Remote Engine Start in
closed spaces such as a garage. Do
not breathe exhaust gases; they con-
tain colorless and odorless carbon
monoxide. Carbon monoxide is dan-
gerous. It can cause unconscious-
ness or death.

LPD2995

REMOTE ENGINE START (if so
equipped)

Pre-driving checks and adjustments

3-17

CAUTION

When the Intelligent Key battery is dis-
charged or other strong radio wave
sources are present near the operating
location, the Intelligent Key operating
range becomes narrower, and the Intel-
ligent Key may not function properly.

The Remote Engine Start function can only
be used when the Intelligent Key is within
the specified operating range from the
vehicle.

The Remote Engine Start operating range
is approximately 197 ft (60 m) from the
vehicle.

REMOTE STARTING THE VEHICLE

To use the Remote Engine Start feature to
start the engine perform the following:

1. Aim the Intelligent Key at the vehicle.

2. Press the

button to lock all doors.

3. Within 5 seconds press and hold the

button until the turn signal lights

flash and the tail lamps turn on. If the
vehicle is not within view press and hold
the

button for at least 2 seconds.

The following events will occur when the
engine starts:
• The parking lights will turn on and remain

on as long as the engine is running.

• The doors will be locked and the climate

control system may come on.

• The engine will continue to run for 10 min-

utes. Repeat the steps to extend the time
for an additional 10 minutes. For addi-
tional information, see “Extending engine
run time” (P. 3-18).

Press and hold the brake then push the
push-button ignition switch to the ON po-
sition before driving. For additional infor-
mation, see “Driving the vehicle” (P. 5-15).

EXTENDING ENGINE RUN TIME

The Remote Engine Start feature can be
extended one time by performing the
steps listed in “Remote starting the vehicle”
(P. 3-18). Run time will be calculated as
follows:
• The first 10-minute run time will start

when the Remote Engine Start function is
performed.

• The second 10 minutes will start after the

first Remote Engine Start request ends.
For example, if the engine has been run-
ning for 5 minutes, and 10 minutes are
added, the engine will run for a total of 20
minutes.

• Extending engine run time will bring you

to the two Remote Engine Start limit.

A maximum of two Remote Engine Starts,
or a single start with an extension, are al-
lowed between ignition cycles.

The vehicle needs to be driven at speeds of
4 mph (7 km/h) before the Remote Engine
Start procedure can be used again.

3-18

Pre-driving checks and adjustments

CANCELING A REMOTE ENGINE
START

To cancel a Remote Engine Start, perform
one of the following:
• Aim the Intelligent Key at the vehicle and

press

until the parking lights turn off.

• Turn on the hazard warning flashers.
• Cycle the ignition switch on and then off.
• The extended engine run time has

expired.

• The first 10 minute timer has expired.
• The engine hood has been opened.
• The shift lever is moved out of park.
• The alarm sounds due to illegal entry into

the vehicle.

• The ignition switch is pushed without an

Intelligent Key in the vehicle.

• The ignition switch is pushed with an In-

telligent Key in the vehicle but the brake
pedal is not depressed.

• The accelerator pedal is depressed.
• The vehicle moves after a remote engine

start. (The hazard indicator flashers blink
once and the engine is stopped).

CONDITIONS THE REMOTE ENGINE
START WILL NOT WORK

The Remote Engine Start will not operate if
any of the following conditions are present:
• The ignition switch is placed in the ON

position.

• The hood is not securely closed.
• The hazard indicator lights are on.
• The engine is still running. The engine

must be completely stopped. Wait at
least 6 seconds if the engine goes from
running to off. This is not applicable when
extending engine run time.

• The

button is not pressed and held

for at least 2 seconds.

• The

button is not pressed and held

within 5 seconds of pressing the lock
button.

• The brake is pressed.
• The doors are not closed and locked.
• The trunk is open.
• The I-Key System Error warning or any

engine-related warning shows in the ve-
hicle information display.

• The alarm sounds due to illegal entry into

the vehicle.

• Two Remote Engine Starts, or a single

Remote Engine Start with an extension,
have already been used. (To use the Re-
mote Engine Start function again, the ve-
hicle needs to be driven at speeds of 4
mph (7 km/h)).

• The vehicle is not in P (Park).
• There is a detected registered key already

inside of the vehicle.

The Remote Engine Start may display a
warning or indicator in the vehicle informa-
tion display. For additional information, see
“Vehicle information display 4.2 inch (11 cm)
Type A” (P. 2-17) or “Vehicle information dis-
play 7 inch (18 cm) Type B” (P. 2-34).

Pre-driving checks and adjustments

3-19

1. Pull the hood lock release handle

O

1

lo-

cated on the lower door pillar until the
hood springs up slightly.

2. Locate the lever

O

2

in between the hood

and grille and push the lever sideways
with your fingertips.

3. Raise the hood

O

3

.

4. Remove the support rod

O

4

and insert it

into the slot marked by an arrow.

NOTE:

Do not place the support rod in a location
other than the designated slot.

Hold the coated parts when removing or
resetting the support rod. Avoid direct
contact with the metal parts, as they
may be hot immediately after the engine
has been stopped.

When closing the hood, return the support
rod to its original position, lower the hood
to approximately 12 in (30 cm) above the
latch and release it. This allows proper en-
gagement of the hood latch.

WARNING

Make sure the hood is completely
closed and latched before driving.
Failure to do so could cause the hood
to fly open and result in an accident.

If you see steam or smoke coming
from the engine compartment, to
avoid injury do not open the hood.

LPD3084

HOOD

3-20

Pre-driving checks and adjustments

TRUNK LID RELEASE SWITCH

WARNING

Do not drive with the trunk lid open.
This could allow dangerous exhaust
gases to be drawn into the vehicle. For
additional information, see “Exhaust
gas (carbon monoxide)” (P. 5-4).

Closely supervise children when they
are around cars to prevent them
from playing and becoming locked in
the trunk where they could be seri-
ously injured. Keep the car locked,
with the rear seatback and trunk lid
securely latched when not in use, and
prevent children's access to car keys.

To open the trunk lid, push the opener
switch.

To close the trunk lid, lower and push the
trunk lid down securely.

NOTE:

You can open the trunk lid with the Intel-
ligent Key. For additional information,
see “Releasing the trunk lid” (P. 3-14).

INTERIOR TRUNK LID RELEASE

WARNING

Closely supervise children when they
are around cars to prevent them from
playing and becoming locked in the
trunk where they could be seriously in-
jured. Keep the car locked, with the rear
seatback and trunk lid securely latched
when not in use, and prevent children's
access to car keys.

LPD2868

Instrument panel

LPD2081

TRUNK LID

Pre-driving checks and adjustments

3-21

The interior trunk lid release mechanism
provides a means of escape for children
and adults in the event they become
locked inside the trunk.

To open the trunk from the inside, pull the
illuminated release handle until the lock re-
leases and push up on the trunk lid. The
release handle is made of a material that
glows in the dark after a brief exposure to
ambient light.

The handle is located inside the trunk com-
partment on the interior of the trunk lid.

INTERIOR TRUNK ACCESS

The trunk can be accessed from the driv-
er’s side or the passenger side of the rear
seat.

1. Move the front seat to the most forward

position.

2. Pull up on the knob on the rear seatback.

3. Fold down the driver’s or passenger’s

side seatback.

For additional information, see “Folding
rear seat” (P. 1-6).

WARNING

Never allow anyone to ride in the
cargo area or on the rear seat when it
is in the fold-down position. Use of
these areas by passengers without
proper restraints could result in seri-
ous injury or death in an accident or
sudden stop.

Properly secure all cargo with ropes
or straps to help prevent it from slid-
ing or shifting. Do not place cargo
higher than the seatbacks. In a sud-
den stop or collision, unsecured
cargo could cause personal injury.

When returning the seatbacks to the
upright position, be certain they are
completely secured in the latched
position. If they are not completely
secured, passengers may be injured
in an accident or sudden stop.

Closely supervise children when they
are around cars to prevent them
from playing and becoming locked in
the trunk where they could be seri-
ously injured. Keep the car locked,
with the rear seatback and trunk lid
securely latched when not in use, and
prevent children's access to car keys.

OPENER OPERATION

The fuel-filler door release is located below
the instrument panel. To open the fuel-filler
door, pull the release. To lock, close the fuel-
filler door securely.

LPD3090

FUEL-FILLER DOOR

3-22

Pre-driving checks and adjustments

FUEL-FILLER CAP

WARNING

Gasoline is extremely flammable and
highly explosive under certain condi-
tions. You could be burned or seri-
ously injured if it is misused or mis-
handled. Always stop the engine and
do not smoke or allow open flames
or sparks near the vehicle when
refueling.

Do not attempt to top off the fuel
tank after the fuel pump nozzle
shuts off automatically. Continued
refueling may cause fuel overflow,
resulting in fuel spray and possibly a
fire.

Use only an original equipment type
fuel-filler cap as a replacement. It has
a built-in safety valve needed for
proper operation of the fuel system
and emission control system. An in-
correct cap can result in a serious
malfunction and possible injury. It
could also cause the

Malfunc-

tion Indicator Light (MIL) to come on.

Never pour fuel into the throttle body
to attempt to start your vehicle.

Do not fill a portable fuel container in
the vehicle or trailer. Static electricity
can cause an explosion of flammable
liquid, vapor or gas in any vehicle or
trailer. To reduce the risk of serious
injury or death when filling portable
fuel containers:

Always place the container on the

ground when filling.

Do not use electronic devices

when filling.

Keep the pump nozzle in contact

with the container while you are
filling it.

Use only approved portable fuel

containers for flammable liquid.

CAUTION

Do not use E–15 or E–85 fuel in your
vehicle. For additional information,
see “Fuel recommendation” (P. 10-4).

The LOOSE FUEL CAP warning mes-
sage will appear if the fuel-filler cap
is not properly tightened. It may take
a few driving trips for the message to
be displayed. Failure to tighten the
fuel-filler cap properly after the
LOOSE FUEL CAP warning message
appears may cause the

Mal-

function

Indicator

Light

(MIL)

to

illuminate.

Failure to tighten the fuel-filler cap
properly may cause the

Mal-

function Indicator Light (MIL) to illu-
minate. If the

light illuminates

because the fuel-filler cap is loose or
missing, tighten or install the cap and
continue to drive the vehicle. The

light should turn off after a few

driving trips. If the

light does not

turn off after a few driving trips, have
the vehicle inspected. It is recom-
mended that you visit a NISSAN
dealer for this service.

For additional information, see “Mal-
function Indicator Light (MIL)” (P. 2-10).

If fuel is spilled on the vehicle body,
flush it away with water to avoid
paint damage.

Pre-driving checks and adjustments

3-23

To remove the fuel-filler cap:

1. Turn the fuel-filler cap counterclockwise

to remove.

2. Loop the tether strap around the hook

O

1

while refueling.

To install the fuel-filler cap:

1. Insert the fuel-filler cap straight into the

fuel-filler tube.

2. Turn the fuel-filler cap clockwise until a

single click is heard.

LOOSE FUEL CAP warning

The LOOSE FUEL CAP warning appears in
the vehicle information display when the
fuel-filler cap is not tightened correctly af-
ter the vehicle has been refueled. It may
take a few driving trips for the message to
be displayed. To turn off the warning, do the
following:

1. Remove and install the fuel-filler cap

as previously described as soon as
possible.

2. Tighten the fuel-filler cap until it clicks.

3. Press the OK button on the steering

wheel to turn off the Loose Fuel Cap
warning after tightening the fuel-filler
cap.

LPD3091

LPD3029

3-24

Pre-driving checks and adjustments

WARNING

Do not adjust the steering wheel
while driving. You could lose control
of

your

vehicle

and

cause

an

accident.

Do not adjust the steering wheel any
closer to you than is necessary for
proper steering operation and com-
fort. The driver's air bag inflates with
great force. If you are unrestrained,
leaning forward, sitting sideways or
out of position in any way, you are at
greater risk of injury or death in a
crash. You may also receive serious
or fatal injuries from the air bag if you
are up against it when it inflates. Al-
ways sit back against the seatback
and as far away as practical from the
steering wheel. Always use the seat
belts.

TILT OPERATION

Pull the lock lever down

O

1

and adjust the

steering wheel up or down

O

2

to the de-

sired position.

Push the lock lever up

O

1

firmly lock the

steering wheel in place.

TELESCOPIC OPERATION

Pull the lock lever down

O

1

and adjust the

steering wheel forward or backward

O

3

to

the desired position.

Push the lock lever up

O

1

firmly to lock the

steering wheel in place.

1. To block glare from the front, swing

down the main sun visor

O

1

.

2. To block glare from the side, remove the

main sun visor from the center mount
and swing the visor to the side

O

2

.

3. To extend the sun visor, slide in or out as

needed

O

3

.

LPD3092

LPD2154

STEERING WHEEL

SUN VISORS

Pre-driving checks and adjustments

3-25

CAUTION

Do not store the sun visor before re-
turning the extension to its original
position.

Do not pull the extension sun visor
forcedly downward.

VANITY MIRRORS

To access the vanity mirror, pull the sun
visor down and flip open the mirror cover.
Some vanity mirrors are illuminated and
turn on when the mirror cover is open.

CARD HOLDER

To use the card holder, slide card into the
clip. Do not view information while operat-
ing the vehicle.

LPD3093

LPD3290

Driver’s and passenger’s side

3-26

Pre-driving checks and adjustments

MANUAL ANTI-GLARE REARVIEW
MIRROR (if so equipped)

Use the night position

O

1

to reduce glare

from the headlights of vehicles behind you
at night.

Use the day position

O

2

when driving in

daylight hours.

WARNING

Use the night position only when nec-
essary, because it reduces rear view
clarity.

AUTOMATIC ANTI-GLARE
REARVIEW MIRROR (if so equipped)

The inside mirror is designed so that it au-
tomatically dims during night time condi-
tions and according to the intensity of the
headlights of the vehicle following you. The
automatic anti-glare feature is activated
when the ignition switch is in the ON
position.

NOTE:

Do not hang any objects over the sen-
sors

O

1

or apply glass cleaner to the sen-

sors. Doing so will reduce the sensitivity
of the sensors, resulting in improper
operation.

WPD0126

LPD2418

MIRRORS

Pre-driving checks and adjustments

3-27

OUTSIDE MIRRORS

The outside mirror remote control will op-
erate only when the ignition switch is in the
ON position.

Move the small switch

O

1

to select the right

or left mirror. Adjust each mirror to the de-
sired position using the large switch

O

2

.

Move the switch to the center (neutral) po-
sition to prevent accidentally moving the
mirror.

WARNING

Objects viewed in the outside mirror
on the passenger side are closer than
they appear. Be careful when moving
to the right. Using only this mirror
could cause an accident. Use the in-
side mirror or glance over your
shoulder to properly judge distances
to other objects.

Do not adjust the mirrors while driv-
ing. You could lose control of your ve-
hicle and cause an accident.

Manual folding outside mirrors

Pull the outside mirror toward the door to
fold it.

Heated mirrors (if so equipped)

Some outside mirrors can be heated to
defog, defrost or de-ice for improved visibil-
ity. For additional information, see “Rear
window and outside mirror (if so equipped)
defroster switch” (P. 2-57).

LPD2452

LPD2112

3-28

Pre-driving checks and adjustments

MEMO

Pre-driving checks and adjustments

3-29

4 Monitor, climate, audio, phone and
voice recognition systems

NissanConnect® Owner’s Manual . . . . . . . . . . . . . . . 4-2
Control panel buttons . . . . . . . . . . . . . . . . . . . . . . . . . . . 4-3

How to use the touch-screen . . . . . . . . . . . . . . . . 4-4
How to use the

MENU button . . . . . . . . . . . 4-5

(brightness control) button . . . . . . . . . . . . . 4-7

How to use the VOL (volume) knob /
PUSH

(power) button . . . . . . . . . . . . . . . . . . . . 4-7

Selecting menu from launch bar . . . . . . . . . . . . . 4-7

RearView Monitor (if so equipped) . . . . . . . . . . . . . . . 4-8

RearView Monitor system operation . . . . . . . . . . 4-9
How to read the displayed lines . . . . . . . . . . . . . 4-10
Difference between predicted and
actual distances . . . . . . . . . . . . . . . . . . . . . . . . . . . . 4-10
How to park with predicted course
lines (if so equipped) . . . . . . . . . . . . . . . . . . . . . . . . 4-12
Adjusting the screen . . . . . . . . . . . . . . . . . . . . . . . . 4-13
How to turn on and off predicted
course lines (if so equipped) . . . . . . . . . . . . . . . . . 4-14
RearView Monitor system limitations . . . . . . . . 4-14
System maintenance . . . . . . . . . . . . . . . . . . . . . . . 4-15

Intelligent Around View® Monitor
(if so equipped) . . . . . . . . . . . . . . . . . . . . . . . . . . . . . . . . . 4-16

Intelligent Around View® Monitor
system operation . . . . . . . . . . . . . . . . . . . . . . . . . . . 4-18
Difference between predicted and
actual distances . . . . . . . . . . . . . . . . . . . . . . . . . . . . 4-21

How to park with predicted course
lines . . . . . . . . . . . . . . . . . . . . . . . . . . . . . . . . . . . . . . . . . 4-22
How to switch the display . . . . . . . . . . . . . . . . . . . 4-23
Adjusting the screen . . . . . . . . . . . . . . . . . . . . . . . . 4-24
Intelligent Around View® Monitor
system limitations . . . . . . . . . . . . . . . . . . . . . . . . . . 4-25
System maintenance . . . . . . . . . . . . . . . . . . . . . . . 4-27

Moving Object Detection (MOD)
(if so equipped) . . . . . . . . . . . . . . . . . . . . . . . . . . . . . . . . . 4-28

MOD system operation . . . . . . . . . . . . . . . . . . . . . . 4-29
Turning MOD on and off (if so equipped) . . . . . 4-31
MOD system limitations . . . . . . . . . . . . . . . . . . . . . 4-31
System maintenance . . . . . . . . . . . . . . . . . . . . . . . 4-32

Vents . . . . . . . . . . . . . . . . . . . . . . . . . . . . . . . . . . . . . . . . . . 4-32
Heater and air conditioner (manual)
(if so equipped) . . . . . . . . . . . . . . . . . . . . . . . . . . . . . . . . . 4-33

Controls . . . . . . . . . . . . . . . . . . . . . . . . . . . . . . . . . . . . . 4-34
Heater operation . . . . . . . . . . . . . . . . . . . . . . . . . . . . 4-34
Air conditioner operation . . . . . . . . . . . . . . . . . . . . 4-36
Air flow charts . . . . . . . . . . . . . . . . . . . . . . . . . . . . . . . 4-37

Heater and air conditioner (automatic)
(if so equipped) . . . . . . . . . . . . . . . . . . . . . . . . . . . . . . . . . 4-40

Automatic operation . . . . . . . . . . . . . . . . . . . . . . . . 4-41
Manual operation . . . . . . . . . . . . . . . . . . . . . . . . . . . 4-42
Operating tips . . . . . . . . . . . . . . . . . . . . . . . . . . . . . . . 4-43

Servicing air conditioner . . . . . . . . . . . . . . . . . . . . . . . . 4-44
Audio system . . . . . . . . . . . . . . . . . . . . . . . . . . . . . . . . . . 4-45

Radio . . . . . . . . . . . . . . . . . . . . . . . . . . . . . . . . . . . . . . . 4-45
FM radio reception . . . . . . . . . . . . . . . . . . . . . . . . . . 4-45
AM radio reception . . . . . . . . . . . . . . . . . . . . . . . . . . 4-45
Satellite radio antenna (if so equipped) . . . . . . 4-46
Audio operation precautions . . . . . . . . . . . . . . . . 4-46
FM/AM radio . . . . . . . . . . . . . . . . . . . . . . . . . . . . . . . . 4-49
USB (Universal Serial Bus) Connection
Port . . . . . . . . . . . . . . . . . . . . . . . . . . . . . . . . . . . . . . . . . 4-53
iPod®* player operation . . . . . . . . . . . . . . . . . . . . . 4-56
Bluetooth® streaming audio . . . . . . . . . . . . . . . . . 4-59
Steering wheel switch for audio control . . . . . 4-63
Radio Antenna . . . . . . . . . . . . . . . . . . . . . . . . . . . . . . 4-64

Siri® Eyes Free . . . . . . . . . . . . . . . . . . . . . . . . . . . . . . . . . . 4-65

Requirements . . . . . . . . . . . . . . . . . . . . . . . . . . . . . . . 4-65
Operating Siri® Eyes Free . . . . . . . . . . . . . . . . . . . . 4-65
Troubleshooting guide . . . . . . . . . . . . . . . . . . . . . . 4-67

Car phone or CB radio . . . . . . . . . . . . . . . . . . . . . . . . . .4-68
Bluetooth® Hands-Free Phone System . . . . . . . . .4-68

Regulatory information . . . . . . . . . . . . . . . . . . . . . . 4-70
Using the system . . . . . . . . . . . . . . . . . . . . . . . . . . . 4-70
Indicators . . . . . . . . . . . . . . . . . . . . . . . . . . . . . . . . . . . 4-72
Control buttons . . . . . . . . . . . . . . . . . . . . . . . . . . . . . 4-72
Bluetooth® connecting procedure . . . . . . . . . . . 4-73
Voice commands . . . . . . . . . . . . . . . . . . . . . . . . . . . 4-74
Phone display screen . . . . . . . . . . . . . . . . . . . . . . . 4-76
Making a call . . . . . . . . . . . . . . . . . . . . . . . . . . . . . . . . 4-77
During a call . . . . . . . . . . . . . . . . . . . . . . . . . . . . . . . . . 4-77
Receiving/Ending a call . . . . . . . . . . . . . . . . . . . . . . 4-78
Text messaging (if so equipped) . . . . . . . . . . . . . 4-78
Bluetooth® connections screen . . . . . . . . . . . . . 4-81
Phone and text message settings . . . . . . . . . . . 4-82

iPod®/iPhone® . . . . . . . . . . . . . . . . . . . . . . . . . . . . . . . . .4-84

Refer to the digital NissanConnect® Own-
er’s manual using the QR code on this
page, or your printed NissanConnect®
Owner’s manual (if so equipped). This
manual includes the following information:
• NissanConnect® Services (if so equipped)
• Audio system
• Apple CarPlay®
• Android Auto™
• Bluetooth® Hands-Free Phone system
• Viewing information
• Other settings

• Voice recognition
• General system information

WARNING

Positioning of the heating or air con-
ditioning controls and display con-
trols should not be done while driv-
ing in order that full attention may be
given to the driving operation.

Do not disassemble or modify this
system. If you do, it may result in ac-
cidents, fire, or electrical shock.

Do not use this system if you notice
any abnormality, such as a frozen
screen or lack of sound. Continued
use of the system may result in acci-
dent, fire or electric shock.

In case you notice any foreign object
in the system hardware, spill liquid
on it, or notice smoke or smell com-
ing from it, stop using the system im-
mediately. Ignoring such conditions
may lead to accidents, fire or electri-
cal shock. It is recommended that
you

visit

a

NISSAN

dealer

for

servicing.

LHA6505

NISSANCONNECT® OWNER’S
MANUAL

4-2

Monitor, climate, audio, phone and voice recognition systems

1. Display screen

2. TUNE·SCROLL knob / PUSH SOUND

button

3.

BACK button

4. DISP button

5.

button*

6.

MENU button

7.

(brightness control) button

8. VOL (volume) knob / PUSH

(power)

button

* For additional information regarding the
Bluetooth® Hands-Free Phone System
control button, see “Bluetooth® Hands-
Free Phone System” (P. 4-68).

When you use this system, make sure the
engine is running.

If you use the system with the engine not
running for a long time, it will discharge
the battery, and the engine will not start.

Reference symbols:
“Example” — Words marked in quotes refer to
a key shown only on the display. These keys
can be selected by touching the screen.

LHA4960

CONTROL PANEL BUTTONS

Monitor, climate, audio, phone and voice recognition systems

4-3

HOW TO USE THE TOUCH-SCREEN

CAUTION

The glass display screen may break if
it is hit with a hard or sharp object. If
the glass screen breaks, do not touch
it. Doing so could result in an injury.

To clean the display, never use a
rough cloth, alcohol, benzine, thinner
or any kind of solvent or paper towel
with a chemical cleaning agent. They
will scratch or deteriorate the panel.

Do not splash any liquid such as wa-
ter or car fragrance on the display.
Contact with liquid will cause the sys-
tem to malfunction.

To help ensure safe driving, some functions
cannot be operated while driving.

The on-screen functions that are not avail-
able while driving will be “grayed out” or
muted.

WARNING

ALWAYS give your full attention to
driving.

Avoid using vehicle features that
could distract you. If distracted, you
could lose control of your vehicle and
cause an accident.

Touch-screen operation

Menu Item

Result

Selecting the item

Touch an item to select. To select the “Phone” key, touch the “Phone” key on the screen. Touch the “

” key to

return to the previous screen.

Adjusting the item

Touch the “+” key or the “−” key to adjust the settings of an item. Touch the up arrow to scroll up the page one
item at a time. Touch the down arrow to scroll down the page one item at a time.

Inputting characters

Touch the number key. There are some options available when inputting characters.

123

Touch to manually enter numbers.

OK

Completes the character input.

LHA5318

4-4

Monitor, climate, audio, phone and voice recognition systems

Touch-screen maintenance

If you clean the display screen, use a dry,
soft cloth. If additional cleaning is neces-
sary, use a small amount of neutral deter-
gent with a soft cloth. Never spray the
screen with water or detergent. Dampen
the cloth first and then wipe the screen.

HOW TO USE THE

MENU

BUTTON

To select and/or adjust several functions,
features and modes that are available for
your vehicle:

1. Press the

MENU button.

2. Touch the “Settings” key.

3. Touch the desired item.

LHA5319

LHA5318

Monitor, climate, audio, phone and voice recognition systems

4-5


Content      ..     4      5      6      7     ..