Nissan Murano (2024 year). Manual in english - page 3
 

  Index      Manuals     Nissan Murano (2024 year). Manual in english


Search            copyright infringement  


Content      ..     1      2      3      4      ..


Nissan Murano (2024 year). Manual in english - page 3


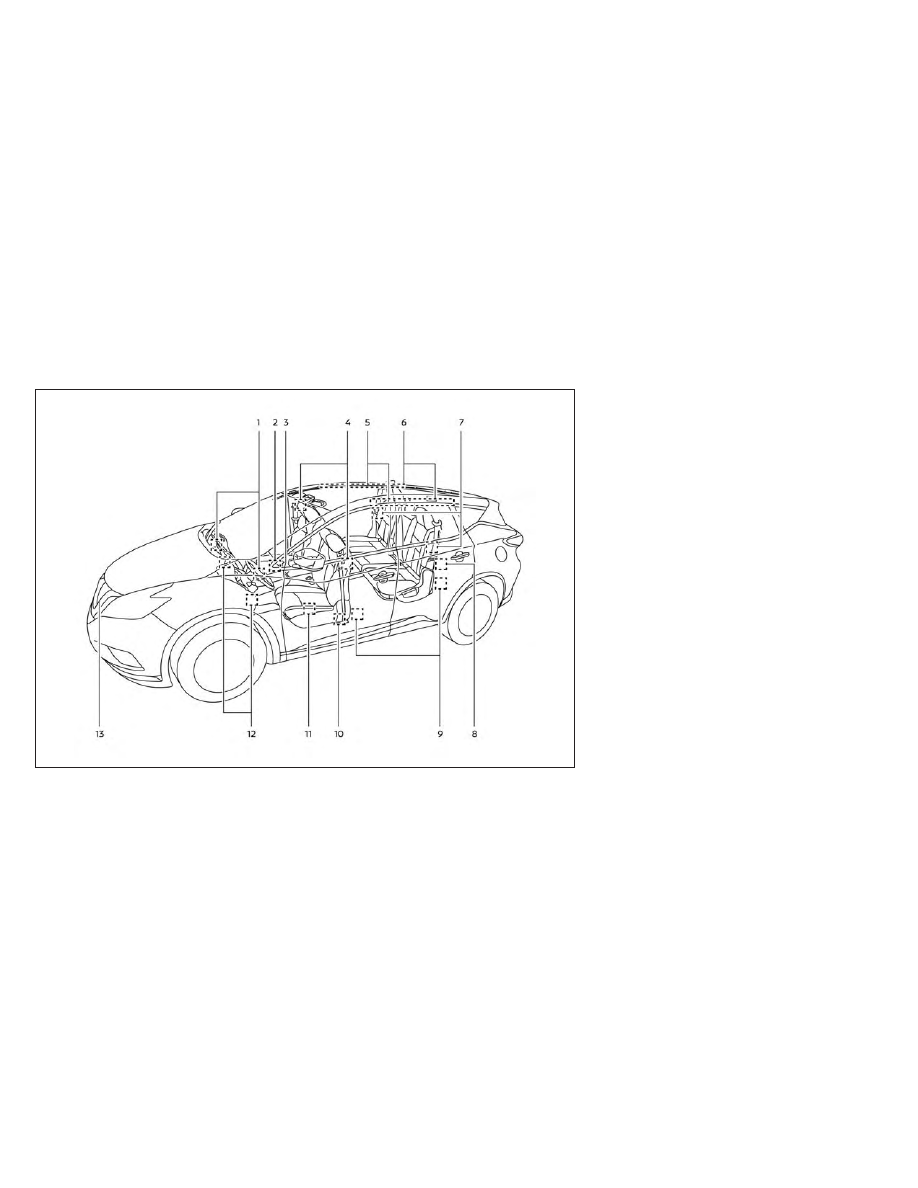
NISSAN Advanced Air Bag System
(front seats)

1. Supplemental front-impact air bag

modules

2. Air bag Control Unit (ACU)

3. Occupant classification sensor (weight

sensor)

4. Front seat-mounted side-impact supple-

mental air bag modules

5. Roof-mounted curtain side-impact and

rollover supplemental air bags

6. Roof-mounted curtain side-impact and

rollover supplemental air bag inflators

7. Rear

outboard

seat-mounted

side-

impact supplemental air bag modules

8. Seat belt with pretensioner(s) (rear out-

board seats)

9. Satellite sensors (driver’s side shown;

passengers side similar)

10. Seat belt with pretensioner(s) (front

seats)

11. Pressure sensors in door (driver’s side

shown; front passenger side similar)

12. Driver and front passenger supple-

mental knee air bags

13. Crash zone sensor

LRS3179

1-56

Safety-Seats, seat belts and supplemental restraint system

WARNING

To ensure proper operation of the pas-
senger’s NISSAN Advanced Air Bag Sys-
tem, please observe the following
items.

Do not allow a passenger in the rear
bench seats to push or pull on the
seatback pocket.

Do not place heavy loads heavier
than 9.1 lbs. (4 kg) on the seatback,
head restraint/headrest or in the
seatback pocket.

Make sure that there is nothing
pressing against the rear of the seat-
back, such as a child restraint in-
stalled in the rear seat or an object
stored on the floor.

Make sure that there is no object
placed under the front passenger
seat.

Make sure that there is no object
placed between the seat cushion and
center console or between the seat
cushion and the door.

If a forward-facing child restraint is
installed in the front passenger seat,
do not position the front passenger
seat so the child restraint contacts
the instrument panel. If the child re-
straint does contact the instrument
panel, the system may determine the
seat is occupied and the passenger
air bag and front passenger supple-
mental knee air bag may deploy in a
collision. Also the front passenger air
bag status light may not illuminate.
For additional information, see “Child
restraints” (P. 1-26).

Confirm the operating condition with
the front passenger air bag status
light.

If you notice that the front passenger
air bag status light is not operating
as described in this section, get the
occupant

classification

system

checked. It is recommended that you
visit a NISSAN dealer for this service.

Until you have confirmed with a
dealer that your passenger seat oc-
cupant classification system is work-
ing properly, position the occupants
in the rear seating positions.

Do not position the front passenger
seat so it contacts the rear seat. If the
front seat does contact the rear seat,
the air bag system may determine a
sensor malfunction has occurred
and the front passenger air bag sta-
tus light may illuminate and the
supplemental air bag warning light
may flash.

This vehicle is equipped with the NISSAN
Advanced Air Bag System for the driver and
front passenger seats. This system is de-
signed to meet certification requirements
under U.S. regulations. It is also permitted in
Canada.

All of the information, cautions

and warnings in this manual still apply
and must be followed.

The driver supplemental front-impact air
bag is located in the center of the steering
wheel. The front passenger supplemental
front-impact air bag is mounted in the dash-
board above the glove box. The front air bags
are designed to inflate in higher severity
frontal collisions, although they may inflate if
the forces in another type of collision are
similar to those of a higher severity frontal
impact. They may not inflate in certain fron-
tal collisions. Vehicle damage (or lack of it) is
not always an indication of proper front air
bag system operation.

Safety-Seats, seat belts and supplemental restraint system

1-57

The NISSAN Advanced Air Bag System
monitors information from the crash zone
sensor, the Air bag Control Unit (ACU), seat
belt buckle sensors and occupation classi-
fication sensor (weight sensor). Inflator op-
eration is based on the severity of a colli-
sion and seat belt usage for the driver. For
the front passenger, the occupant classifi-
cation sensor is also monitored. Based on
information from the sensor, only one front
air bag may inflate in a crash, depending on
the crash severity and whether the front
occupants are belted or unbelted. Addi-
tionally, the front passenger air bag and
front passenger supplemental knee air
bag may be automatically turned off under
some conditions, depending on the weight
detected on the front passenger seat and
how the seat belt is used. If the front pas-
senger

air

bag

and

front

passenger

supplemental knee air bag are OFF, the
front passenger air bag status light will be
illuminated. For additional information, see
“Front passenger air bag and status light”
(P. 1-59). One front air bag inflating does not
indicate improper performance of the
system.

If you have any questions about your air
bag system, it is recommended that you
visit a NISSAN dealer to obtain information
about the system. If you are considering
modification of your vehicle due to a dis-
ability, you may also contact NISSAN. Con-
tact information is contained in the front of
this Owner's Manual.

When a front air bag inflates, a fairly loud
noise may be heard, followed by the re-
lease of smoke. This smoke is not harmful
and does not indicate a fire. Care should be
taken to not inhale it, as it may cause irrita-
tion and choking. Those with a history of a
breathing condition should get fresh air
promptly.

Front air bags, along with the use of seat
belts, help to cushion the impact force on
the face and chest of the front occupants.
They can help save lives and reduce seri-
ous injuries. However, an inflating front air
bag may cause facial abrasions or other
injuries. Front air bags, other than the driv-
er’s knee air bag and front passenger
supplemental knee air bag, do not provide
restraint to the lower body.

Even with NISSAN Advanced Air Bags, seat
belts should be correctly worn and the
driver and front passenger seated upright
as far as practical away from the steering
wheel or instrument panel. The front air
bags inflate quickly in order to help protect
the front occupants. Because of this, the
force of the front air bag inflating can in-
crease the risk of injury if the occupant is
too close to, or is against, the front air bag
module during inflation.

The front air bags deflate quickly after a
collision.

The front air bags operate only when the
ignition switch is in the ON position.

After placing the ignition switch in the
ON position, the supplemental air bag
warning light illuminates. The supple-
mental air bag warning light will turn off
after about 7 seconds if the system is
operational.

1-58

Safety-Seats, seat belts and supplemental restraint system

Front passenger air bag and status
light

WARNING

The front passenger air bag and front
passenger supplemental knee air bag
are designed to automatically turn OFF
under some conditions. Read this sec-
tion carefully to learn how it operates.
Proper use of the seat, seat belt, and
child restraints is necessary for most
effective protection. Failure to follow all
instructions in this manual concerning
the use of seats, seat belts, and child
restraints can increase the risk or se-
verity of injury in an accident.

Status light

The front passenger seat is equipped with
an occupant classification sensor (weight
sensor) that turns the front passenger air
bag and front passenger supplemental
knee air bag on or off depending on the
weight applied to the front passenger seat.
The status of the front passenger air bag
and front passenger supplemental knee
air bag (ON or OFF) is indicated by the front
passenger air bag status light

which

is located on the instrument panel.

After the ignition switch is placed in the
"ON" position, the front passenger air bag
status light on the instrument panel illumi-
nates for about 7 seconds and then turns
off or remains illuminated depending on
the front passenger seat occupied status.
The light operates as follows:

CONDITION

DESCRIPTION

PASSENGER AIR BAG
STATUS LIGHT (

)

FRONT PASSENGER AIR BAG AND FRONT PASSENGER

SUPPLEMENTAL KNEE AIR BAG STATUS

Empty

Empty front passenger seat

ON (illuminated)

INHIBITED

Nobody/Somebody

Bag or Child or Child Restraint or

Small Adult in front passenger seat

ON (illuminated)

INHIBITED

Adult

Adult in the front passenger seat

OFF (dark)

ACTIVATED

In addition to the above, certain objects
placed on the front passenger seat may also
cause the light to operate as described
above depending on their weight.

For additional information, see “Normal op-
eration” (P. 1-61) and “Troubleshooting” (P. 1-62).

LRS0865

Safety-Seats, seat belts and supplemental restraint system

1-59

Front passenger air bag

The front passenger air bag is designed to
automatically turn OFF when the vehicle is
operated under some conditions as de-
scribed below in accordance with U.S. regu-
lations. If the front passenger air bag is OFF,
it will not inflate in a crash. The driver air bag
and other air bags in your vehicle are not
part of this system.

The purpose of the regulation is to help
reduce the risk of injury or death from an
inflating air bag to certain front passenger
seat occupants, such as children, by requir-
ing the air bag to be automatically turned
OFF. Certain sensors are used to meet the
requirements.

The occupant classification sensor in this
vehicle is a weight sensor. It is designed to
detect an occupant and objects on the
seat by weight. For example, if a child is in
the front passenger seat, the NISSAN Ad-
vanced Air Bag System is designed to turn
the front passenger air bag OFF in accor-
dance with the regulations. Also, if a child
restraint of the type specified in the regula-
tions is on the seat, its weight and the
child’s weight can be detected and cause
the air bag to turn OFF.

Front passenger seat adult occupants who
are properly seated and using the seat belt
as outlined in this manual should not
cause the front passenger air bag and
front passenger supplemental knee air
bag to be automatically turned OFF. For
small adults it may be turned OFF, however
if the occupant takes his/her weight off the
seat cushion (for example, by not sitting
upright, by sitting on an edge of the seat, or
by otherwise being out of position), this
could cause the sensor to turn the front
passenger air bag and front passenger
supplemental knee air bag OFF. Always be
sure to be seated and wearing the seat belt
properly for the most effective protection
by the seat belt and supplemental air bag.

NISSAN recommends that pre-teens and
children be properly restrained in a rear
seat. NISSAN also recommends that ap-
propriate child restraints and booster
seats be properly installed in a rear seat. If
this is not possible, the occupant classifica-
tion sensor is designed to operate as de-
scribed above to turn the front passenger
air bag and front passenger supplemental
knee air bag OFF for specified child re-
straints as required by the regulations. Fail-
ing to properly secure child restraints
and to use the ALR mode may allow the
restraint to tip or move in a collision or

sudden stop. This can also result in the
passenger air bag and front passenger
supplemental knee air bag inflating in a
crash instead of being OFF. For additional
information about proper use and installa-
tion, see “Child restraints” (P. 1-26).

If the front passenger seat is not occupied,
the front passenger air bag and front pas-
senger supplemental knee air bag are de-
signed not to inflate in a crash. However,
heavy objects placed on the seat could re-
sult in air bag inflation, because of the ob-
ject’s weight detected by the occupant
classification

sensor.

Other

conditions

could also result in air bag inflation, such as
if a child is standing on the seat, or if two
children are on the seat, contrary to the
instructions in this manual. Always be sure
that you and all vehicle occupants are
seated and restrained properly.

Using the front passenger air bag status
light, you can monitor when the front pas-
senger

air

bag

and

front

passenger

supplemental knee air bag are automati-
cally turned OFF.

If an adult occupant is in the seat but the
front passenger air bag status light is illu-
minated (indicating that the front passen-
ger air bag and front passenger supple-
mental knee air bag are OFF), it could be

1-60

Safety-Seats, seat belts and supplemental restraint system

that the person is a small adult, or is not
sitting on the seat properly or not using the
seat belt properly.

If a child restraint must be used in the front
seat, the front passenger air bag status
light may or may not be illuminated, de-
pending on the size of the child and the
type of child restraint being used. If the air
bag status light is not illuminated (indicat-
ing that the front passenger air bag and
front passenger supplemental knee air
bag might inflate in a crash), it could be that
the child restraint or seat belt is not being
used properly. Make sure that the child re-
straint is installed properly, the seat belt is
used properly and the occupant is posi-
tioned properly. If the air bag status light is
still not illuminated, reposition the occu-
pant or child restraint in a rear seat.

If the front passenger air bag status light
will not illuminate even though you believe
that the child restraint, the seat belts and
the occupant are properly positioned, it is
recommended that you take your vehicle
to a NISSAN dealer. A NISSAN dealer can
check system status by using a special
tool. However, until you have confirmed
with a dealer that your air bag is working
properly, reposition the occupant or child
restraint in a rear seat.

The NISSAN Advanced Air Bag System and
front passenger air bag status light will
take a few seconds to register a change in
the front passenger seat status. This is nor-
mal system operation and does not indi-
cate a malfunction.

If a malfunction occurs in the front passen-
ger air bag system, the supplemental air
bag warning light

, located in the me-

ter and gauges area of the instrument
panel, will be illuminated (blinking or
steadily lit). Have the system checked. It is
recommended that you visit a NISSAN
dealer for this service.

Normal operation

In order for the occupant classification
sensor system to classify the front passen-
ger based on weight, please follow the pre-
cautions and steps outlined below:

Precautions

• Make sure that there are no objects

weighing over 9.1 lbs. (4 kg) hanging on
the seat or placed in the seatback pocket.

• Make sure that a child restraint or other

object is not pressing against the rear of
the seatback.

• Make sure that a rear passenger is not

pushing or pulling on the back of the front
passenger seat.

• Make sure that the front passenger seat

or seatback is not forced back against an
object on the seat or floor behind it.

• Make sure that there is no object placed

under the front passenger seat.

Steps

1. Adjust the seat as outlined in the “Seats”

(P. 1-2) section of this manual. Sit upright,
leaning against the seatback, and cen-
tered on the seat cushion with your feet
comfortably extended to the floor.

2. Make sure there are no objects on your

lap.

3. Fasten the seat belt as outlined in the

“Seat belts” (P. 1-13) section of this
manual. Front passenger seat belt
buckle status is monitored by the occu-
pant classification system, and is used
as an input to determine occupancy
status. So, it is highly recommended that
the front passenger fasten their seat
belt.

4. Remain in this position for 30 seconds

allowing the system to classify the front
passenger before the vehicle is put into
motion.

5. Ensure proper classification by checking

the front passenger air bag status light.

Safety-Seats, seat belts and supplemental restraint system

1-61

NOTE:

This vehicle’s occupant classification
sensor system generally keeps the clas-
sification locked during driving, so it is
important that you confirm that the
front passenger is properly classified
prior to driving. However, the occupant
classification sensor may recalculate the
weight of the occupant under some con-
ditions (both while driving and when
stopped), so front passenger seat occu-
pants should continue to remain seated
as outlined above.

Troubleshooting

If you think the front passenger air bag
status light is incorrect:

1. If the light is ON with an adult occupying

the front passenger seat:

• Occupant is a small adult — the air bag

light is functioning as intended. The front
passenger air bag and front passenger
supplemental knee air bag are sup-
pressed.

However, if the occupant is not a small
adult, then this may be due to the following
conditions that may be interfering with the
weight sensors:
• Occupant is not sitting upright, leaning

against the seatback, and centered on
the seat cushion with his/her feet com-
fortably extended to the floor.

• A child restraint or other object pressing

against the rear of the seatback.

• A rear passenger pushing or pulling on

the back of the front passenger seat.

• Forcing the front seat or seatback against

an object on the seat or floor behind it.

• An object placed under the front passen-

ger seat.

• An object placed between the seat cush-

ion and center console or between the
seat cushion and the door.

If the vehicle is moving, please come to a
stop when it is safe to do so. Check and
correct any of the above conditions. Re-
start the vehicle and wait 1 minute.

NOTE:

A system check will be performed during
which the front passenger air bag status
light will remain lit for about 7 seconds
initially.

If the light is still ON after this, the person
should be advised not to ride in the front
passenger seat and the vehicle should be
checked as soon as possible. It is recom-
mended that you visit a NISSAN dealer for
this service.

2. If the light is OFF with a small adult, child

or child restraint occupying the front
passenger seat.

This may be due to the following condi-
tions that may be interfering with the
weight sensors:

• Small adult or child is not sitting upright,

leaning against the seatback, and cen-
tered on the seat cushion with his/her
feet comfortably extended to the floor.

• The child restraint is not properly in-

stalled, as outlined in the “Child restraints”
section of this manual.

• An object weighing over 9.1 lbs. (4 kg)

hanging on the seat or placed in the seat-
back pocket.

• A child restraint or other object pressing

against the rear of the seatback.

• A rear passenger pushing or pulling on

the back of the front passenger seat.

• Forcing the front seat or seatback against

an object on the seat or floor behind it.

1-62

Safety-Seats, seat belts and supplemental restraint system

• An object placed under the front passen-

ger seat.

• An object placed between the seat cush-

ion and center console.

If the vehicle is moving, please come to a
stop when it is safe to do so. Check and
correct any of the above conditions. Re-
start the vehicle and wait 1 minute.

NOTE:

A system check will be performed during
which the front passenger air bag status
light will remain lit for about 7 seconds
initially.

If the light is still OFF after this, the small
adult, child or child restraint should be re-
positioned in the rear seat and the vehicle
should be checked as soon as possible. It is
recommended that you visit a NISSAN
dealer for this service.

3. If the light is OFF with no front passenger

and no objects on the front passenger
seat, the vehicle should be checked. It is
recommended that you visit a NISSAN
dealer as soon as possible.

Other supplemental front-impact air
bag precautions

WARNING

Do not place any objects on the
steering wheel pad or on the instru-
ment panel. Also, do not place any
objects between any occupant and
the steering wheel or instrument
panel. Such objects may become
dangerous projectiles and cause in-
jury if the front air bags inflate.

Immediately after inflation, several
front air bag system components will
be hot. Do not touch them; you may
severely burn yourself.

No unauthorized changes should be
made to any components or wiring
of the supplemental air bag system.
This is to prevent accidental inflation
of the supplemental air bag or dam-
age to the supplemental air bag
system.

Do not make unauthorized changes
to your vehicle's electrical system,
suspension system or front end
structure. This could affect proper
operation of the front air bag system.

Tampering with the front air bag sys-
tem may result in serious personal
injury. Tampering includes changes
to the steering wheel and the instru-
ment panel assembly by placing ma-
terial over the steering wheel pad
and above the instrument panel or
by installing additional trim material
around the air bag system.

Removing or modifying the front
passenger seat may affect the func-
tion of the air bag system and result
in serious personal injury.

Modifying or tampering with the
front passenger seat may result in
serious personal injury. For example,
do not change the front seats by
placing material on the seat cushion
or by installing additional trim mate-
rial, such as seat covers, on the seat
that are not specifically designed to
assure proper air bag operation. Ad-
ditionally, do not stow any objects
under the front passenger seat or the
seat cushion and seatback. Such ob-
jects may interfere with the proper
operation of the occupant classifica-
tion sensor (weight sensor).

Safety-Seats, seat belts and supplemental restraint system

1-63

No unauthorized changes should be
made to any components or wiring
of the seat belt system. This may af-
fect the front air bag system. Tam-
pering with the seat belt system may
result in serious personal injury.

It is recommended that you visit a
NISSAN dealer for work on and
around the front air bag. It is also rec-
ommended that you visit a NISSAN
dealer for installation of electrical
equipment. The Supplemental Re-
straint System (SRS) wiring har-
nesses* should not be modified or
disconnected. Unauthorized electri-
cal test equipment and probing de-
vices should not be used on the air
bag system.

A cracked windshield should be re-
placed immediately by a qualified re-
pair facility. A cracked windshield
could affect the function of the
supplemental air bag system.

*The SRS wiring harness connectors are
yellow and orange for easy identification.

When selling your vehicle, we request that
you inform the buyer about the front air
bag system and guide the buyer to the
appropriate

sections

in

this

Owner's

Manual.

Front and rear outboard
seat-mounted side-impact
supplemental air bag and
roof-mounted curtain
side-impact and rollover
supplemental air bag systems

The side air bags are located in the outside
of the seatback of the front and rear out-
board seats. The curtain air bags are lo-
cated in the side roof rails.

All of the infor-

mation, cautions and warnings in this
manual must be followed.

The side air

bags and curtain air bags are designed to

LRS3142

1-64

Safety-Seats, seat belts and supplemental restraint system

inflate in higher severity side collisions, al-
though they may inflate if the forces in an-
other type of collision are similar to those of
a higher severity impact. They are de-
signed to inflate on the side where the ve-
hicle is impacted. They may not inflate in
certain side collisions.

Curtain air bags are also designed to inflate
in certain types of rollover collisions or near
rollovers. As a result, certain vehicle move-
ments (for example, during severe off-
roading) may cause the curtain air bags to
inflate.

Vehicle damage (or lack of it) is not always
an indication of proper side air bag and
curtain air bag operation.

When the side air bags and curtain air bags
inflate, a fairly loud noise may be heard,
followed by the release of smoke. This
smoke is not harmful and does not indi-
cate a fire. Care should be taken not to
inhale it, as it may cause irritation and
choking. Those with a history of a breath-
ing condition should get fresh air promptly.

Side air bags, along with the use of seat
belts, help to cushion the impact force on
the chest and pelvic area of the front and
rear outboard occupants. Curtain air bags
help to cushion the impact force to the

head of occupants in the front and rear
outboard seating positions. They can help
save lives and reduce serious injuries. How-
ever, an inflating side air bag and curtain air
bag may cause abrasions or other injuries.
Side air bags and curtain air bags do not
provide restraint to the lower body.

The seat belts should be correctly worn
and the driver, front passenger and rear
outboard occupants seated upright as far
as practical away from the side air bag.
Rear seat passengers should be seated as
far away as practical from the door finish-
ers and side roof rails. The side air bags and
curtain air bags inflate quickly in order to
help protect the occupants. Because of
this, the force of the side air bag and curtain
air bag inflating can increase the risk of
injury if the occupant is too close to, or is
against, these air bag modules during in-
flation. The side air bag will deflate quickly
after the collision is over.

The curtain air bag will remain inflated for a
short time.

The side air bags and curtain air bags
operate only when the ignition switch is
placed in the ON position.

After placing the ignition switch in the
ON position, the supplemental air bag
warning light illuminates. The supple-
mental air bag warning light will turn off
after about 7 seconds if the system is
operational.

WARNING

Do not place any objects near the
seatback of the front and rear seats.
Also, do not place any objects (an
umbrella, bag, etc.) between the front
and rear door finisher and the front
and rear seat. Such objects may be-
come

dangerous

projectiles

and

cause injury if a side air bag inflate.

Right after inflation, several side air
bag and curtain air bag system com-
ponents will be hot. Do not touch
them; you may severely burn yourself.

No unauthorized changes should be
made to any components or wiring
of the side air bag and curtain air bag
systems. This is to prevent damage
to or accidental inflation of the side
air bag and curtain air bag or dam-
age to the side air bag and curtain air
bag systems.

Safety-Seats, seat belts and supplemental restraint system

1-65

Do not make unauthorized changes
to your vehicle's electrical system,
suspension system or side panel.
This could affect proper operation of
the side air bag and curtain air bag
systems.

Tampering with the side air bag sys-
tem may result in serious personal
injury. For example, do not change
the front and rear seats by placing
material near the seatbacks or by in-
stalling

additional

trim

material,

such as seat covers, around the side
air bag.

It is recommended that you visit a
NISSAN dealer for work on and
around the side air bag and curtain
air bag. It is also recommended that
you visit a NISSAN dealer for installa-
tion of electrical equipment. The SRS
wiring harnesses* should not be
modified or disconnected. Unauthor-
ized electrical test equipment and
probing devices should not be used
on the side air bag or curtain air bag
system.

* The SRS wiring harness connectors are
yellow and orange for easy identification.

When selling your vehicle, we request that
you inform the buyer about the side air bag
and curtain air bag systems and guide the
buyer to the appropriate sections in this
Owner's Manual.

Driver and front passenger
supplemental knee air bag

The knee air bag is located in the knee
bolster, on the driver’s and front passen-
ger’s side.

All of the information, cautions

and warnings in this manual apply and
must be followed.

The knee air bag is de-

signed to inflate in higher severity frontal
collisions, although it may inflate if the
forces in another type of collision are simi-
lar to those of a higher severity frontal im-
pact. It may not inflate in certain collisions.

LRS2599

Driver’s side

1-66

Safety-Seats, seat belts and supplemental restraint system

Vehicle damage (or lack of it) is not always
an indication of proper knee air bag
operation.

When the knee air bag inflates, a fairly loud
noise may be heard, followed by release of
smoke. This smoke is not harmful and
does not indicate a fire. Care should be
taken not to inhale it, as it may cause irrita-
tion and choking. Those with a history of a
breathing condition should get fresh air
promptly.

The knee air bag helps to cushion the im-
pact force on the knees of the driver and
passenger. It can help reduce serious inju-
ries. However, an inflating knee air bag may
cause abrasions or other injuries. The knee
air bag provides restraint to the lower body.

The knee air bag inflates quickly in order to
help protect the occupants. Because of
this, the force of the knee air bag inflating
can increase the risk of injury if the occu-
pant is too close to, or is against, this air bag
module during inflation. The knee air bag
will deflate quickly after the collision is over
OR the knee air bag will remain inflated for
a short time.

The knee air bag operates only when
the ignition switch is placed in the ON
position.

After placing the ignition switch in the
ON position, the supplemental air bag
warning light illuminates. The supple-
mental air bag warning light will turn off
after about 7 seconds if the system is
operational.

WARNING

Do not place any objects between the
knee bolster and the driver’s or pas-
senger’s seat. Such objects may be-
come

dangerous

projectiles

and

cause injury if a knee air bag inflates.

Right after inflation, the knee air bag
system components will be hot. Do
not touch them; you may severely
burn yourself.

No unauthorized changes should be
made to any components or wiring
of the knee air bag system. This is to
prevent damage to or accidental in-
flation of the knee air bag system.

Do not make unauthorized changes
to your vehicle's electrical system or
suspension system. This could affect
proper operation of the knee air bag
system.

Tampering with the knee air bag sys-
tem may result in serious personal
injury. For example, do not change
the driver or passenger knee bolster
or install additional trim material
around the knee air bag.

LRS3250

Front passenger’s side

Safety-Seats, seat belts and supplemental restraint system

1-67

It is recommended that you visit a
NISSAN dealer for work on and
around the knee air bag. It is also rec-
ommended that you visit a NISSAN
dealer for installation of electrical
equipment. The SRS wiring har-
nesses* should not be modified or
disconnected. Unauthorized electri-
cal test equipment and probing de-
vices should not be used on the knee
air bag system.

*The SRS wiring harness or connectors are
yellow or orange for easy identification.

When selling your vehicle, we request that
you inform the buyer about the knee air
bag system and guide the buyer to the
appropriate sections in this manual.

Seat belt with pretensioner(s)
(front and rear outboard seats)

WARNING

The pretensioner(s) cannot be re-
used after activation. They must be
replaced together with the retractor
and buckle as a unit.

If the vehicle becomes involved in a
collision but pretensioner(s) are not
activated, be sure to have the preten-
sioner system checked and, if neces-
sary, replaced. It is recommended
that you visit a NISSAN dealer for this
service.

No unauthorized changes should be
made to any components or wiring
of the pretensioner system. This is to
prevent damage to or accidental ac-
tivation of the pretensioner(s). Tam-
pering with the pretensioner system
may result in serious personal injury.

It is recommended that you visit a
NISSAN dealer for work on and
around the pretensioner system. It is
also recommended that you visit a
NISSAN dealer for installation of elec-
trical equipment. Unauthorized elec-
trical test equipment and probing
devices should not be used on the
pretensioner system.

If you need to dispose of the preten-
sioner(s) or scrap the vehicle, it is rec-
ommended that you visit a NISSAN
dealer for this service. Incorrect dis-
posal procedures could cause per-
sonal injury.

The pretensioner system may activate
with the supplemental air bag system in
certain types of collisions. Working with the
seat belt retractor, the pretensioner(s) help
tighten the seat belt when the vehicle be-
comes involved in certain types of colli-
sions, helping to restrain front and rear out-
board seat occupants.

The pretensioner(s) are encased within the
seat belt retractor and to the seat belt an-
chor affixed to the floor of the vehicle.
These seat belts are used the same way as
conventional seat belts.

When pretensioner(s) activate, smoke is re-
leased and a loud noise may be heard. This
smoke is not harmful and does not indi-
cate a fire. Care should be taken not to
inhale it, as it may cause irritation and
choking. Those with a history of a breath-
ing condition should get fresh air promptly.

After the pretensioner(s’) activation, load
limiters allow the seat belt to release web-
bing (if necessary) to reduce forces against
the chest.

The supplemental air bag warning light

is used to indicate malfunctions in the

pretensioner system. For additional infor-
mation, see "Supplemental air bag warning

1-68

Safety-Seats, seat belts and supplemental restraint system

light" (P. 1-69). If the operation of the supple-
mental air bag warning light indicates
there is a malfunction, have the system
checked. It is recommended that you visit a
NISSAN dealer for this service.

When selling your vehicle, we request that
you inform the buyer about the preten-
sioner system and guide the buyer to the
appropriate

sections

in

this

Owner's

Manual.

SUPPLEMENTAL AIR BAG WARNING
LABELS

Warning labels about the supplemental
front-impact air bag system are placed in
the vehicle as shown in the illustration.

WARNING

Do not use a rear-facing child restraint
on a seat protected by an air bag in
front of it. If the air bag deploys, it may
cause serious injury or death.

SUPPLEMENTAL AIR BAG WARNING
LIGHT

The supplemental air bag warning light,
displaying

in the instrument panel,

monitors the circuits for the air bag sys-
tems, pretensioner(s) and all related wiring.
When the ignition switch is placed in the ON
position, the supplemental air bag warning
light illuminates for about 7 seconds and
then turns off. This means the system is
operational.

LRS2617

1. SRS Air bag warning labels

The warning labels are located on the
surface of the sun visor.

LRS0100

Safety-Seats, seat belts and supplemental restraint system

1-69

If any of the following conditions occur, the
front air bag, side air bag, curtain air bag,
knee air bag and pretensioner systems
need servicing:
• The supplemental air bag warning light re-

mains on after approximately 7 seconds.

• The supplemental air bag warning light

flashes intermittently.

• The supplemental air bag warning light

does not come on at all.

Under these conditions, the front air bags,
side air bags, curtain air bags, knee air bags
or pretensioner systems may not operate
properly. They must be checked and re-
paired. It is recommended that you visit a
NISSAN dealer for this service.

WARNING

If the supplemental air bag warning
light is on, it could mean that the front
air bags, side air bags, curtain air bags,
knee air bags and/or pretensioner sys-
tems will not operate in an accident. To
help avoid injury to yourself or others,
have your vehicle checked as soon as
possible. It is recommended that you
visit a NISSAN dealer for this service.

Repair and replacement
procedure

The front air bags, side air bags, curtain air
bags, knee air bags and pretensioner(s) are
designed to inflate on a one-time-only
basis. As a reminder, unless it is damaged,
the supplemental air bag warning light
remains illuminated after inflation has oc-
curred. These systems should be repaired
and/or replaced as soon as possible. It is
recommended that you visit a NISSAN
dealer for this service.

When maintenance work is required on the
vehicle, the front air bags, side air bags,
curtain air bags, knee air bags, pretension-
er(s) and related parts should be pointed
out to the person performing the mainte-
nance. The ignition switch should always
be in the LOCK position when working un-
der the hood or inside the vehicle.

WARNING

Once a front air bag, side air bag, cur-
tain air bag, or knee air bag has in-
flated, the air bag module will not
function again and must be replaced.
Additionally, the activated preten-
sioner(s) must also be replaced. The
air bag module and pretensioner(s)
should be replaced. It is recom-
mended that you visit a NISSAN
dealer for this service. However, the
air bag module and pretensioner(s)
cannot be repaired.

The front air bag, side air bag, curtain
air bag, knee air bag systems and the
pretensioner system should be in-
spected if there is any damage to the
front end or side portion of the ve-
hicle. It is recommended that you
visit a NISSAN dealer for this service.

If you need to dispose of a supple-
mental air bag or pretensioner sys-
tems or scrap the vehicle, it is recom-
mended that you visit a NISSAN
dealer. Incorrect disposal procedures
could cause personal injury.

1-70

Safety-Seats, seat belts and supplemental restraint system

If there is an impact to your vehicle
from any direction, your Occupant
Classification Sensor (OCS) should be
checked to verify it is still functioning
correctly. It is recommended that you
visit a NISSAN dealer for this service.
The OCS should be checked even if no
air bags deploy as a result of the im-
pact. Failure to verify proper OCS
function may result in an improper
air bag deployment resulting in in-
jury or death.

Safety-Seats, seat belts and supplemental restraint system

1-71

2 Instruments and controls

Instrument panel . . . . . . . . . . . . . . . . . . . . . . . . . . . . . . . . 2-2
Meters and gauges . . . . . . . . . . . . . . . . . . . . . . . . . . . . . 2-4

Speedometer and odometer . . . . . . . . . . . . . . . . . 2-4
Tachometer . . . . . . . . . . . . . . . . . . . . . . . . . . . . . . . . . . 2-6
Engine coolant temperature gauge . . . . . . . . . . 2-6
Fuel gauge . . . . . . . . . . . . . . . . . . . . . . . . . . . . . . . . . . . 2-7
Distance To Empty (DTE) . . . . . . . . . . . . . . . . . . . . . 2-7
Eco Drive Report (if so equipped) . . . . . . . . . . . . . 2-8

Warning lights, indicator lights and audible
reminders . . . . . . . . . . . . . . . . . . . . . . . . . . . . . . . . . . . . . . . 2-9

Checking lights . . . . . . . . . . . . . . . . . . . . . . . . . . . . . . 2-10
Warning/Indicator lights (red) . . . . . . . . . . . . . . . 2-10
Warning/Indicator lights (yellow) . . . . . . . . . . . . 2-12
Warning/Indicator lights (other) . . . . . . . . . . . . . 2-17
Audible reminders . . . . . . . . . . . . . . . . . . . . . . . . . . . 2-17

Vehicle information display . . . . . . . . . . . . . . . . . . . . . 2-18

How to use the vehicle information
display . . . . . . . . . . . . . . . . . . . . . . . . . . . . . . . . . . . . . . 2-18
Startup display . . . . . . . . . . . . . . . . . . . . . . . . . . . . . . 2-19
Trip computer . . . . . . . . . . . . . . . . . . . . . . . . . . . . . . . 2-20
Settings . . . . . . . . . . . . . . . . . . . . . . . . . . . . . . . . . . . . . 2-22
Vehicle information display warnings
and indicators . . . . . . . . . . . . . . . . . . . . . . . . . . . . . . . 2-29

Security systems . . . . . . . . . . . . . . . . . . . . . . . . . . . . . . . 2-35

Vehicle security system . . . . . . . . . . . . . . . . . . . . . 2-35
NISSAN Vehicle Immobilizer System . . . . . . . . . 2-36

Wiper and washer switch . . . . . . . . . . . . . . . . . . . . . . . 2-38

Switch operation . . . . . . . . . . . . . . . . . . . . . . . . . . . . 2-38
Rear switch operation . . . . . . . . . . . . . . . . . . . . . . . 2-39

Rear window and outside mirror defroster
switch . . . . . . . . . . . . . . . . . . . . . . . . . . . . . . . . . . . . . . . . . . 2-40
Headlight and turn signal switch . . . . . . . . . . . . . . . 2-40

Headlight control switch . . . . . . . . . . . . . . . . . . . . 2-40
LED Daytime Running Lights (DRL)
system . . . . . . . . . . . . . . . . . . . . . . . . . . . . . . . . . . . . . . 2-45
Instrument brightness control . . . . . . . . . . . . . . 2-45
Turn signal switch . . . . . . . . . . . . . . . . . . . . . . . . . . . 2-46
Fog light switch (if so equipped) . . . . . . . . . . . . . 2-46

Horn . . . . . . . . . . . . . . . . . . . . . . . . . . . . . . . . . . . . . . . . . . . 2-47
Climate controlled seat switches
(if so equipped) . . . . . . . . . . . . . . . . . . . . . . . . . . . . . . . . . 2-47
Heated seat switches (if so equipped) . . . . . . . . . . 2-49
Heated rear seat switches (if so equipped) . . . . . 2-50
Heated steering wheel switch (if so equipped) . . 2-51
Dynamic driver assistance switch . . . . . . . . . . . . . . 2-52
Vehicle Dynamic Control (VDC) OFF switch . . . . . 2-52
Emergency call (SOS) button (if so equipped) . . . 2-53

Emergency support . . . . . . . . . . . . . . . . . . . . . . . . . 2-53

USB/iPod® charging ports . . . . . . . . . . . . . . . . . . . . . . 2-55
Rear Door Alert . . . . . . . . . . . . . . . . . . . . . . . . . . . . . . . . . 2-55
Power outlets . . . . . . . . . . . . . . . . . . . . . . . . . . . . . . . . . . 2-57

12v outlets . . . . . . . . . . . . . . . . . . . . . . . . . . . . . . . . . . 2-57

Extended storage switch . . . . . . . . . . . . . . . . . . . . . . . 2-58
Storage . . . . . . . . . . . . . . . . . . . . . . . . . . . . . . . . . . . . . . . . 2-59

Front-door pockets . . . . . . . . . . . . . . . . . . . . . . . . . 2-59
Console side pockets . . . . . . . . . . . . . . . . . . . . . . . 2-59
Seatback pockets . . . . . . . . . . . . . . . . . . . . . . . . . . . 2-59
Storage trays . . . . . . . . . . . . . . . . . . . . . . . . . . . . . . . . 2-60
Glove box . . . . . . . . . . . . . . . . . . . . . . . . . . . . . . . . . . . 2-61
Console box . . . . . . . . . . . . . . . . . . . . . . . . . . . . . . . . . 2-61
Overhead sunglasses storage . . . . . . . . . . . . . . . 2-62
Cup holders . . . . . . . . . . . . . . . . . . . . . . . . . . . . . . . . . 2-62
Cargo area storage bin . . . . . . . . . . . . . . . . . . . . . . 2-64
Luggage hooks . . . . . . . . . . . . . . . . . . . . . . . . . . . . . 2-64
Coat hooks . . . . . . . . . . . . . . . . . . . . . . . . . . . . . . . . . 2-65
Roof rack (if so equipped) . . . . . . . . . . . . . . . . . . . 2-65

Windows . . . . . . . . . . . . . . . . . . . . . . . . . . . . . . . . . . . . . . . 2-67

Power windows . . . . . . . . . . . . . . . . . . . . . . . . . . . . . 2-67

Power moonroof (if so equipped) . . . . . . . . . . . . . . . 2-69

. . . . . . . . . . . . . . . . . . . . . . . . . 2-69

Interior lights . . . . . . . . . . . . . . . . . . . . . . . . . . . . . . . . . . . 2-72

Console light . . . . . . . . . . . . . . . . . . . . . . . . . . . . . . . . 2-72
Map lights . . . . . . . . . . . . . . . . . . . . . . . . . . . . . . . . . . . 2-73
Personal lights . . . . . . . . . . . . . . . . . . . . . . . . . . . . . . 2-73
Luggage compartment light . . . . . . . . . . . . . . . . 2-73

HomeLink® Universal Transceiver
(if so equipped) . . . . . . . . . . . . . . . . . . . . . . . . . . . . . . . . . 2-74

Programming HomeLink® . . . . . . . . . . . . . . . . . . . 2-74
Programming HomeLink® for Canadian
customers and gate openers . . . . . . . . . . . . . . . 2-76
Operating the HomeLink® Universal
Transceiver . . . . . . . . . . . . . . . . . . . . . . . . . . . . . . . . . . 2-77
Programming trouble-shooting . . . . . . . . . . . . . 2-77
Clearing the programmed information . . . . . . 2-77
Reprogramming a single HomeLink®
button . . . . . . . . . . . . . . . . . . . . . . . . . . . . . . . . . . . . . . 2-78
If your vehicle is stolen . . . . . . . . . . . . . . . . . . . . . . 2-78

1.

Vent (P. 4-26)

2.

Headlight/fog light (if so equipped)/
turn signal switch (P. 2-40, 2-46)

3.

Supplemental air bag (P. 1-48)
Horn (P. 2-47)

4.

Meters and gauges (P. 2-4)
Warning and indicator lights (P. 2-9)
Vehicle information display (P. 2-18)

5.

Wiper and washer switch (P. 2-38)
Rear window wiper and washer switch
(P. 2-39)

6.

Audio system/Center display controls*

7.

Hazard warning flasher switch (P. 6-2)

8.

Center display*
Navigation display (if so equipped)*

9.

Front passenger supplemental air bag
(P. 1-48)

10.

Glove box (P. 2-61)

11.

Front passenger supplemental knee air
bag (P. 1-66)

12.

Front passenger air bag status light
(P. 1-59)

13.

Power outlet (P. 2-57)

14.

USB ports*
AUX jack*

15.

Heater and air conditioning controls
(P. 4-28)

16.

Shift lever (P. 5-20)

17.

Push-button ignition switch (P. 5-13)

18.

Intelligent Cruise Control (ICC) switches
(P. 5-57)

19.

Driver supplemental knee air bag
(P. 1-66)

LII2574

INSTRUMENT PANEL

2-2

Instruments and controls

20.

Bluetooth® Hands-Free Phone System/
Audio control switches*

21.

Hood release (P. 3-20)
Fuel door release (P. 3-28)

22.

Fuse box (P. 8-20)

23.

Heated steering wheel switch (if so
equipped) (P. 2-51)
Dynamic driver assistance switch
(P. 2-52)
Liftgate instrument panel switch (if so
equipped) (P. 3-21)
Vehicle Dynamic Control (VDC) OFF
switch (P. 2-52)

24.

Instrument brightness control (P. 2-45)
Twin trip odometer reset switch (P. 2-4)

*: Refer to the separate NissanConnect

®

Owner's Manual.

Refer to the page number indicated in
parentheses for operating details.

Instruments and controls

2-3

1.

Tachometer

2.

Warning and indicator lights

3.

Vehicle information display
Odometer
Twin Trip Odometer

4.

Speedometer

5.

Fuel gauge

6.

Engine coolant temperature gauge

SPEEDOMETER AND ODOMETER

This vehicle is equipped with a speedom-
eter and odometer. The speedometer is
located on the right side of the meter clus-
ter. The odometer is located within the ve-
hicle information display.

LIC4125

METERS AND GAUGES

2-4

Instruments and controls

Speedometer

The speedometer indicates vehicle speed.

Odometer/Twin trip odometer

The odometer and the twin trip odometer

O

1

are displayed in the vehicle information

display when the ignition switch is placed
in the ON position.

The odometer records the total distance
the vehicle has been driven.

The twin trip odometer records the dis-
tance of individual trips.

Changing the display

Push the TRIP RESET switch

O

2

on the left

side of the instrument panel to change the
display as follows:

Trip

Trip

Odometer Mile-

age

Trip

Resetting the trip odometer

Pushing the TRIP RESET switch

O

2

for more

than 1 second resets the currently dis-
played trip odometer to zero.

LIC2255

LIC2921

Instruments and controls

2-5

TACHOMETER

The tachometer indicates engine speed in
revolutions per minute (rpm). Do not rev
engine into the red zone

O

1

.

CAUTION

When engine speed approaches the
red zone, reduce engine speed. Operat-
ing the engine in the red zone may
cause serious engine damage.

ENGINE COOLANT TEMPERATURE
GAUGE

The gauge indicates the engine coolant
temperature. The engine coolant tempera-
ture is within the normal range

O

1

when

the gauge needle points within the zone
shown in the illustration.

The engine coolant temperature varies
with the outside air temperature and driv-
ing conditions.

CAUTION

If the gauge indicates coolant tem-
perature near the hot (H) end of the
normal range, reduce vehicle speed to
decrease temperature. If the gauge is
over the normal range, stop the vehicle
as soon as safely possible. If the engine
is overheated, continued operation of
the vehicle may seriously damage the
engine. For additional information, see
“If your vehicle overheats” (P. 6-12) 
for
immediate action required.

LIC3780

LIC3538

2-6

Instruments and controls

FUEL GAUGE

The gauge indicates the

approximate

fuel

level in the tank.

The gauge may move slightly during brak-
ing, turning, acceleration, or going up or
down hills.

The gauge needle returns to 0 (Empty) af-
ter the ignition switch is placed in the OFF
position.

The low fuel warning message shows in
the vehicle information display when the
amount of fuel in the tank is getting low.

Refill the fuel tank before the gauge reg-
isters 0 (Empty).

The

indicates that the fuel-filler door

is located on the driver's side of the vehicle.

CAUTION

If the vehicle runs out of fuel, the
Malfunction Indicator Light (MIL) may
come on. Refuel as soon as possible.
After a few driving trips, the

light

should turn off. If the light remains on
after a few driving trips, have the ve-
hicle inspected. It is recommended
that you visit a NISSAN dealer for this
service.

For additional information, see “Mal-
function Indicator Light (MIL)” (P. 2-14).

DISTANCE TO EMPTY (DTE)

Displays the estimated distance the ve-
hicle can be driven before refueling. The
value is calculated based on recent fuel
economy, the amount of fuel remaining
in the fuel tank, and the actual fuel
consumption.

Changes in driving patterns or conditions
can cause the DTE value to vary. As a result,
the value displayed may differ from the ac-
tual distance that can be driven.

DTE display will change to “---” when the
fuel level in the tank is getting low, prior to
the fuel gauge reaching 0 (Empty).

NOTE:
• The DTE value after refill is estimated

based on recent fuel economy and
amount of fuel added.

• If a small amount of fuel is added, or

the ignition is on during refueling, the
display may not be updated.

• Conditions

that

affect

the

fuel

economy will also affect the estimated
DTE value (city/highway driving, idle
time, remote start time, terrain, sea-
sonal weather, added vehicle weight,
added deflectors, roof racks, etc.).

LIC2222

Instruments and controls

2-7

ECO DRIVE REPORT (if so
equipped)

When the ignition switch is in the OFF posi-
tion, the ECO management display appears.

1

Previous 5 times (History)

2

Current fuel economy

3

Best fuel economy

The result of ECO evaluation is displayed 30
seconds after the ignition switch is placed
in the ON position and the vehicle is driven
at least 1/3 miles (500 meters).

1

The average fuel economy for the pre-
vious 5 times will be displayed.

2

The average fuel economy since the
last reset will be displayed.

3

The best fuel economy of the past his-
tory will be displayed.

The ECO Drive Report can be set to be ON
or OFF.

LSD4103

2-8

Instruments and controls

Warning/Indicator light (red)

Warning/Indicator light (yellow)

Warning/Indicator light (other)

or

Brake warning light

or

Anti-lock Braking System (ABS)
warning light

Front fog light indicator light (green) (if so
equipped)

Charge warning light

Automatic Emergency Braking (AEB) with
Pedestrian Detection system warning light

High Beam Assist indicator light (green)

Engine oil pressure warning light

Front passenger air bag status light

High beam indicator light (blue)

Master warning light

Low tire pressure warning light

Side light and headlight indicator light
(green)

Seat belt warning light and chime

Malfunction Indicator Light (MIL)

Turn signal/hazard indicator lights (green)

Security indicator light

Master warning light

Supplemental air bag warning light

Power steering warning light

Rear Automatic Braking (RAB) system
warning light

Slip indicator light

Vehicle Dynamic Control (VDC) OFF indica-
tor light

WARNING LIGHTS, INDICATOR LIGHTS
AND AUDIBLE REMINDERS

Instruments and controls

2-9

CHECKING LIGHTS

With all doors closed, apply the parking
brake, fasten the seat belts and place the
ignition switch in the ON position without
starting the engine. The following lights
(if so equipped) will come on:

,

or

,

,

,

,

,

The following lights (if so equipped) come
on briefly and then go off:

or

,

,

,

,

If any light fails to come on or operate in a
way other than described, it may indicate a
burned-out bulb and/or a system mal-
function. Have the system checked. It is
recommended that you visit a NISSAN
dealer for this service.

Some indicators and warnings are also dis-
played in the vehicle information display
between the speedometer and tachom-
eter. For additional information, see “Ve-
hicle information display” (P. 2-18).

WARNING/INDICATOR LIGHTS (red)

For additional information, see “Vehicle in-
formation display” (P. 2-18).

or

Brake warning
light

This light functions for both the parking
brake and the foot brake systems.

Low brake fluid warning light

When the ignition switch is placed in the ON
position, the light warns of a low brake fluid
level. If the light comes on while the engine
is running with the parking brake not ap-
plied, stop the vehicle and perform the
following:

1. Check the brake fluid level. Add brake

fluid as necessary. For additional infor-
mation, see “Brake fluid” (P. 8-11).

2. If the brake fluid level is correct, have the

warning system checked. It is recom-
mended that you visit a NISSAN dealer
for this service.

WARNING

Your brake system may not be work-
ing properly if the warning light is on.
Driving could be dangerous. If you
judge it to be safe, drive carefully to
the nearest service station for re-
pairs. Otherwise, have your vehicle
towed because driving it could be
dangerous.

Pressing the brake pedal with the en-
gine stopped and/or a low brake
fluid level may increase your stop-
ping distance and braking will re-
quire greater pedal effort as well as
pedal travel.

If the brake fluid level is below the
MINIMUM or MIN mark on the brake
fluid reservoir, do not drive until the
brake system has been checked. It is
recommended

that

you

visit

a

NISSAN dealer for this service.

Charge warning light

If this light comes on while the engine is
running, it may indicate the charging sys-
tem is not functioning properly. Turn the
engine off and check the drive belt. If the
belt is loose, broken, missing, or if the light
remains on, have your vehicle serviced im-
mediately. It is recommended that you visit
a NISSAN dealer for this service.

CAUTION

Do not continue driving if the drive belt
is loose, broken or missing.

2-10

Instruments and controls

Engine oil pressure
warning light

This light warns of low engine oil pressure.
If the light flickers or comes on during nor-
mal driving, pull off the road in a safe area,
stop the engine

immediately

and call a

NISSAN dealer or other authorized repair
shop.

The engine oil pressure warning light is
not designed to indicate a low oil level.

Use the dipstick to check the oil level.
For additional information, see “Engine oil”
(P. 8-6).

CAUTION

Running the engine with the engine oil
pressure warning light on could cause
serious damage to the engine almost
immediately. Such damage is not cov-
ered by the NISSAN New Vehicle Limited
Warranty. Turn off the engine as soon
as it is safe to do so.

Master warning light

When the ignition switch is in the ON posi-
tion, the master warning light illuminates if
any of the following are displayed on the
vehicle information display:
• Parking brake release warning
• Door open warning (when vehicle is moving)
• Shift into Park warning
• LED Headlight Failure warning (when red

warning exists)

For additional information, see “Vehicle in-
formation display” (P. 2-18).

Seat belt warning light and
chime

• The light and chime remind you to fasten

the seat belts.

• The seat belt warning light will illuminate

when the ignition switch is pushed to the
ON position if the driver’s seat belt is not
fastened, or if the front passenger seat
belt is not fastened when occupied.

• The seat belt warning light will also illumi-

nate if a rear passenger seat belt is
changed from fastened to unfastened.

• If the driver’s seat belt is not fastened

when the ignition switch is pushed to the
ON position, the chime will sound shortly.

• If the vehicle is driven above 9 mph (15

km/h) in the conditions that illuminate
the seat belt warning light, the lamp will
begin to blink and the chime will sound
for over one minute, or until the seat belt
is fastened again.

NOTE:

The warning light and/or chime may
activate if an object is placed in the un-
occupied front passenger seat. In this
case, please remove the object from
the front passenger seat.

The warning light and/or chime may
activate if any seat belt is unfastened
before the vehicle comes to a complete
stop. Please remain fastened until the
vehicle has come to a complete stop.

Security indicator light

This light blinks when the ignition switch is
placed in the OFF, LOCK or ACC position.

The blinking security indicator light indi-
cates that the security systems equipped
on the vehicle are operational.

For additional information, see “Security
systems” (P. 2-35).

Instruments and controls

2-11

Supplemental air bag
warning light

When the ignition switch is placed in the ON
position, the supplemental air bag warning
light illuminates for about 7 seconds and
then turns off. This means the system is
operational.

If any of the following conditions occur, the
front air bag, side air bag, curtain air bag,
and pretensioner seat belt systems need
servicing:
• The supplemental air bag warning light re-

mains on after approximately 7 seconds.

• The supplemental air bag warning light

flashes intermittently.

• The supplemental air bag warning light

does not come on at all.

It is recommended that you visit a NISSAN
dealer for these services.

Unless checked and repaired, the supple-
mental restraint system (air bag system)
and/or the pretensioners may not func-
tion properly. For additional information,
see “Supplemental Restraint System (SRS)”
(P. 1-48).

WARNING

If the supplemental air bag warning
light is on, it could mean that the front
air bag, side air bag, curtain air bag sys-
tems and/or pretensioner systems will
not operate in an accident. To help
avoid injury to yourself or others, have
your vehicle checked as soon as pos-
sible. It is recommended that you visit a
NISSAN dealer for this service.

WARNING/INDICATOR LIGHTS
(yellow)

For additional information, see “Vehicle in-
formation display” (P. 2-18).

or

Anti-lock Braking
System (ABS)
warning light

When the ignition switch is placed in the ON
position, the ABS warning light illuminates
and then turns off. This indicates the ABS is
operational.

If the ABS warning light illuminates while
the engine is running or while driving, it
may indicate the ABS is not functioning
properly. Have the system checked. It is

recommended that you visit a NISSAN
dealer for this service.

If an ABS malfunction occurs, the anti-lock
function is turned off. The brake system
then operates normally but without anti-
lock assistance. For additional information,
see “Brake system” (P. 5-119).

Automatic Emergency
Braking (AEB) with
Pedestrian Detection
system warning light

This light comes on when the ignition
switch is placed in the ON position. It turns
off after the engine is started.

This light illuminates when the AEB with
Pedestrian Detection system is set to OFF
in the meter or when the Vehicle Dynamic
Control (VDC) system is turned off.

If the light illuminates or blinks when the
AEB with Pedestrian Detection system is
on, it may indicate that the system is un-
available. For additional information, see
“Automatic Emergency Braking (AEB) with
Pedestrian Detection” (P. 5-86) and “Intelli-
gent Forward Collision Warning (I-FCW)”
(P. 5-97).

2-12

Instruments and controls

Front passenger air bag
status light

The front passenger air bag status light will
be lit and the passenger front air bag and
passenger knee air bag will be off depend-
ing on how the front passenger seat is be-
ing used.

For additional information, see “Front pas-
senger air bag and status light” (P. 1-59).

Low tire pressure warning
light

Your vehicle is equipped with a Tire Pres-
sure Monitoring System (TPMS) that moni-
tors the tire pressure of all tires except the
spare.

The low tire pressure warning light warns
of low tire pressure or indicates that the
TPMS is not functioning properly.

After the ignition switch is placed in the ON
position, this light illuminates for about 1
second and turns off.

Low tire pressure warning

If the vehicle is being driven with low tire
pressure, the warning light will illumi-
nate. A “Tire Pressure Low - Add Air”
warning also appears in the vehicle in-
formation display.

When the low tire pressure warning light
illuminates, you should stop and adjust
the tire pressure of all four tires to the
recommended COLD tire pressure shown
on the Tire and Loading Information la-
bel located in the driver's door opening.
The low tire pressure warning light does
not automatically turn off when the tire
pressure is adjusted. After the tire is in-
flated to the recommended pressure,
the vehicle must be driven at speeds
above 16 mph (25 km/h) to activate the
TPMS and turn off the low tire pressure
warning light. Use a tire pressure gauge
to check the tire pressure.

The “Tire Pressure Low - Add Air” warning
appears each time the ignition switch is
placed in the ON position as long as the
low tire pressure warning light remains
illuminated.

For additional information, see “Vehicle in-
formation display” (P. 2-18) and “Tire Pres-
sure Monitoring System (TPMS)” (P. 5-5).

TPMS malfunction

If the TPMS is not functioning properly, the
low tire pressure warning light will flash for
approximately 1 minute when the ignition
switch is placed in the ON position. The
light will remain on after 1 minute. Have the

system checked. It is recommended that
you visit a NISSAN dealer for this service.
The "Tire Pressure Low — Add Air" warning
does not appear if the low tire pressure
warning light illuminates to indicate a
TPMS malfunction.

For additional information, see “Tire Pres-
sure Monitoring System (TPMS)” (P. 5-5) and
“Tire pressure” (P. 8-27).

WARNING

Radio waves could adversely affect
electric medical equipment. Those
who use a pacemaker should contact
the

electric

medical

equipment

manufacturer for the possible influ-
ences before use.

If the light does not illuminate with
the ignition switch placed in the ON
position, have the vehicle checked as
soon as possible. It is recommended
that you visit a NISSAN dealer for this
service.

Instruments and controls

2-13

If the light illuminates while driving,
avoid sudden steering maneuvers or
abrupt

braking,

reduce

vehicle

speed, pull off the road to a safe loca-
tion and stop the vehicle as soon as
possible. Driving with under-inflated
tires may permanently damage the
tires and increase the likelihood of
tire failure. Serious vehicle damage
could occur and may lead to an acci-
dent and could result in serious per-
sonal injury or death. Check the tire
pressure for all four tires. Adjust the
tire pressure to the recommended
COLD tire pressure shown on the Tire
and Loading Information label lo-
cated in the driver’s door opening to
turn the low tire pressure warning
light off. If the light still illuminates
while driving after adjusting the tire
pressure, a tire may be flat or the
TPMS may be malfunctioning. If you
have a flat tire, replace it with a spare
tire as soon as possible. If no tire is
flat and all tires are properly inflated,
have the vehicle checked. It is recom-
mended that you visit a NISSAN
dealer for this service.

When using a wheel without the
TPMS such as the spare tire, the TPMS
will not function and the low tire
pressure warning light will flash for
approximately 1 minute. The light will
remain on after 1 minute. Have your
tires replaced and/or TPMS system
reset as soon as possible. It is recom-
mended that you visit a NISSAN
dealer for these services.

Replacing tires with those not origi-
nally specified by NISSAN could af-
fect the proper operation of the
TPMS.

CAUTION

The TPMS is not a substitute for the
regular tire pressure check. Be sure
to check the tire pressure regularly.

If the vehicle is being driven at
speeds of less than 16 mph (25 km/h),
the TPMS may not operate correctly.

Be sure to install the specified size of
tires to the four wheels correctly.

Malfunction Indicator Light
(MIL)

If this indicator light comes on steady or
blinks while the engine is running, it may
indicate

a

potential

emission

control

malfunction.

The MIL may also come on steady if the
fuel-filler cap is loose or missing, or if the
vehicle runs out of fuel. Check to make sure
the fuel-filler cap is installed and closed
tightly, and that the vehicle has at least 3
gallons (11.4 liters) of fuel in the fuel tank.

After a few driving trips, the

light

should turn off if no other potential emis-
sion control system malfunction exists.

If this indicator light comes on steady for 20
seconds and then blinks for 10 seconds
when the engine is not running, it indicates
that the vehicle is not ready for an emission
control system inspection/maintenance
test. For additional information, see “Readi-
ness for Inspection/Maintenance (I/M) test”
(P. 10-31).

2-14

Instruments and controls

Operation

The MIL will come on in one of two ways:
• MIL on steady — An emission control sys-

tem malfunction has been detected.
Check the fuel-filler cap if the Loose Fuel
Cap warning appears in the vehicle infor-
mation display. If the fuel-filler cap is loose
or missing, tighten or install the cap and
continue to drive the vehicle. The
light should turn off after a few driving
trips. If the

light does not turn off

after a few driving trips, have the vehicle
inspected. It is recommended that you
visit a NISSAN dealer for this service. You
do not need to have your vehicle towed
to the dealer.

• MIL blinking — An engine misfire has been

detected which may damage the emis-
sion control system. To reduce or avoid
emission control system damage:

– do not drive at speeds above 45 mph

(72 km/h).

– avoid hard acceleration or deceleration.
– avoid steep uphill grades.
– if possible, reduce the amount of cargo

being hauled or towed.

The MIL may stop blinking and come on
steady. Have the vehicle inspected. It is rec-
ommended that you visit a NISSAN dealer
for this service. You do not need to have
your vehicle towed to the dealer.

CAUTION

Continued vehicle operation without
having the emission control system
checked and repaired as necessary
could lead to poor driveability, reduced
fuel economy, and possible damage to
the emission control system.

Master warning light

When the ignition switch is in the ON posi-
tion, the master warning light illuminates if
any of the following are displayed on the
vehicle information display:
• No Key Detected warning
• Low windshield washer fluid warning
• Door open warning (when vehicle is

stopped)

• Low tire pressure warning
• Loose Fuel Cap warning
• Traffic Sign Recognition system fault (if so

equipped)

• Driver Attention Alert malfunction (if so

equipped)

• Push Engine Start Lock warning
• Key ID Incorrect warning
• I-Key System Fault warning

• CVT warning
• Sonar Parking Sensor Error warning
• LED Headlight Failure warning (when no

other red warnings are on)

• Chassis Control warning
• Tire size incorrect warning
• AWD system error warning
• AWD high temperature warning

For additional information, see “Vehicle in-
formation display” (P. 2-18).

Power steering warning
light

WARNING

If the engine is not running or is
turned off while driving, the power
assist for the steering will not work.
Steering will be harder to operate.

When the power steering warning
light illuminates with the engine run-
ning, there will be no power assist for
the steering. You will still have control
of the vehicle, but the steering will be
harder to operate. Have the power
steering system checked. It is recom-
mended that you visit a NISSAN
dealer for this service.

Instruments and controls

2-15


Content      ..     1      2      3      4      ..