Nissan Leaf (2024 year). Manual in english - page 9
 

  Index      Manuals     Nissan Leaf (2024 year). Manual in english


Search            copyright infringement  


Content      ..     7      8      9      10     ..


Nissan Leaf (2024 year). Manual in english - page 9


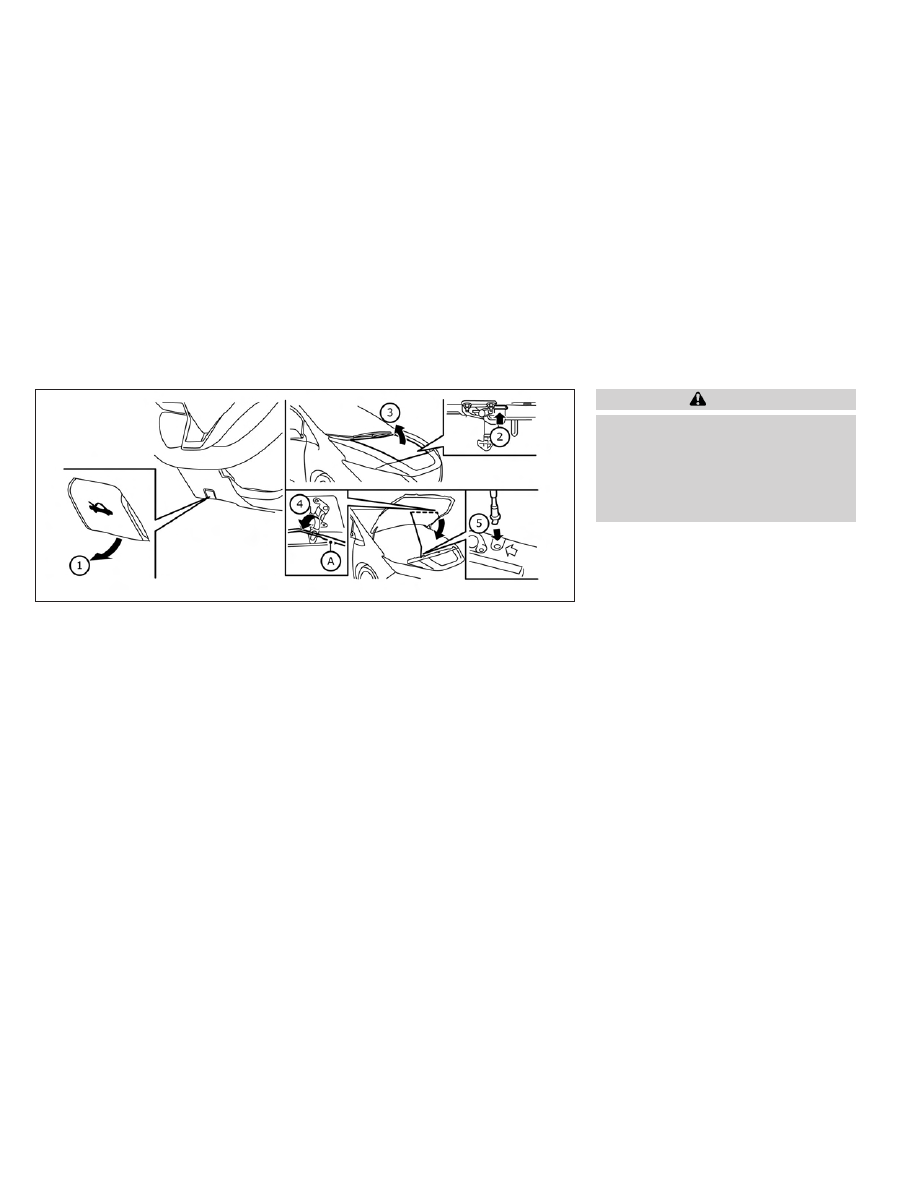
1. Securely close the charge port lid.

2. Pull the hood lock release handle

O

1

lo-

cated below the driver’s side instrument
panel until the hood springs up slightly.

3. Locate the lever

O

2

between the hood

and the charge port lid, and push the
lever upward with your fingertips.

4. Raise the hood

O

3

.

5. Remove the support rod

O

4

from under

the hood and insert it into the slot

O

5

.

Hold the coated parts when removing
or resetting the support rod

O

A

. Avoid

direct contact with the metal parts, as
they may be hot immediately after the
motor has been stopped.

When closing the hood, return the support
rod to its original position, lower the hood
to approximately 8 in (20 cm) above the
latch and release it. This allows proper en-
gagement of the hood latch.

WARNING

Make sure the hood is completely
closed and latched before driving.
Failure to do so could cause the hood
to fly open and result in an accident.

If you see steam or smoke coming from
the motor compartment, to avoid injury
do not open the hood.

LPD2691

HOOD

3-18

Pre-driving checks and adjustments

To open the rear hatch, unlock it and push
the rear hatch opener switch

O

A

. Pull up the

rear hatch to open.

The rear hatch can be unlocked by:
• Pushing the power door lock switch to

the unlock position.

• Pushing the rear hatch request switch.
• Pressing the

button on the Intelli-

gent Key.

For additional information, see “NISSAN In-
telligent Key® system” (P. 3-6).

WARNING

Always make sure that the rear hatch
has been closed securely to prevent
it from opening while driving.

Do not drive with the rear hatch open.

Make sure that all passengers have
their hands, etc. inside the vehicle
before closing the rear hatch.

SECONDARY REAR HATCH RELEASE

Follow the following steps to unlock the
rear hatch when the battery is discharged.

NOTE:

It is recommended that you visit a NISSAN
certified LEAF dealer as soon as possible
for inspection.

Unlocking the rear hatch:

LPD2692

LPD2782

REAR HATCH

Pre-driving checks and adjustments

3-19

1. Move the cover

O

A

by using a screwdriver

or a similar tool available on hand.

2. Then move the inside lever

O

B

by using

a screwdriver or similar tool available on
hand. The rear hatch will open.

OPENING CHARGE PORT LID

When opening the charge port lid perform
one of the following:
• Push the charge port lid switch located

on the instrument panel, or

• Press and hold the

button on the

Intelligent Key for more than one second.

LPD2783

LPD2784

LPD2694

Instrument panel switch

CHARGE PORT LID

3-20

Pre-driving checks and adjustments

When opening the charge port lid:

1. The charging status indicator lights flash

and a chime sounds three times and the
charge port lid will then spring up slightly.

2. Put your hand into the underside of the

lid and open until it is in the fully open
position.

When closing the charge port lid:

1. Slowly move the lid down.

2. Lock it securely into place.

If the charge port lid cannot be unlocked

1. Open the hood.

2. Move the lever behind the charge port

lid in the direction of the arrow using a
flat head screwdriver or suitable tool,
and the port is unlocked.

CAUTION

Make sure that the charge port lid is
completely closed and latched before
driving. Failure to do so could cause the
lid to open suddenly during driving.

LPD2151

Intelligent Key button

LPD2706

LPD2705

Pre-driving checks and adjustments

3-21

CHARGE PORT CAP

When opening the charge port cap, press
the tab inward and the cap will spring open.

When the charge port cap is closed to its
previous position, it will lock automatically.

CAUTION

When charging is finished, be sure to
close the charge port cap. If water or
dust gets inside the charge port, this
may cause a malfunction.

Pay particular attention when using
the normal charge port as the charge
port lid can be closed even when the
normal charge port cap is open.

Close the quick charge port cap be-
fore closing the charging lid. The quick
charge port cap can be damaged if it
is open when closing the charge port
lid.

WARNING

Do not adjust the steering wheel while
driving. You could lose control of your
vehicle and cause an accident.

Do not adjust the steering wheel any
closer to you than is necessary for
proper steering operation and com-
fort. The driver's air bag inflates with
great force. If you are unrestrained,
leaning forward, sitting sideways or
out of position in any way, you are at
greater risk of injury or death in a
crash. You may also receive serious
or fatal injuries from the air bag if
you are up against it when it inflates.
Always sit back against the seatback
and as far away as practical from the
steering wheel. Always use the seat
belts.

LPD3317

STEERING WHEEL

3-22

Pre-driving checks and adjustments

TILT AND TELESCOPIC OPERATION

Push the lock lever

O

1

down:

• Adjust the steering wheel up or down in

direction

O

2

to the desired position.

• Adjust the steering wheel forward or

backward in direction

O

3

to the desired

position.

Pull the lock lever

O

1

up firmly to lock the

steering wheel in place.

1. To block glare from the front, swing

down

O

1

the main sun visor.

2. To block glare from the side, remove the

main sun visor from the center mount
and swing the visor to the side

O

2

.

3. To extend

O

3

the sun visor, slide in or out

as needed.

CAUTION

Do not store the sun visor before re-
turning the extension to its original
position.

Do not pull the extension sun visor
forcedly downward.

LPD3112

WPD0344

SUN VISORS

Pre-driving checks and adjustments

3-23

VANITY MIRRORS

To access the vanity mirror, pull the sun
visor down and flip open the mirror cover.
The vanity mirror will illuminate when the
mirror cover is open.

MANUAL ANTI-GLARE REARVIEW
MIRROR (if so equipped)

Use the night position

O

1

to reduce glare

from the headlights of vehicles behind you
at night.

Use the day position

O

2

when driving in

daylight hours.

WARNING

Use the night position only when nec-
essary, because it reduces rear view
clarity.

AUTOMATIC ANTI-GLARE
REARVIEW MIRROR

The inside mirror is designed so that it
automatically dims during night time con-
ditions and according to the intensity of the
headlights of the vehicle following you. The
automatic anti-glare feature will always be
ON.

The indicator light

O

2

will illuminate when

the automatic anti-glare feature is operat-
ing.

LPD2595

WPD0126

LPD3278

MIRRORS

3-24

Pre-driving checks and adjustments

NOTE:

Do not hang any objects over the sensors

O

1

or apply glass cleaner to the sensors.

Doing so will reduce the sensitivity of the
sensors, resulting in improper operation.

OUTSIDE MIRRORS

The outside mirror remote control will op-
erate only when the power switch is in the
ACC or ON position.

Turn the switch

O

1

to select the left or right

mirror then adjust each mirror to the de-
sired position using the control switch

O

2

.

Return the small switch

O

1

to the center

(neutral) position to prevent accidentally
moving the mirror.

WARNING

Objects viewed in the outside mirror
on the passenger side are closer than
they appear. Be careful when moving
to the right. Using only this mirror
could cause an accident. Use the in-
side mirror or glance over your
shoulder to properly judge distances
to other objects.

Do not adjust the mirrors while driv-
ing. You could lose control of your ve-
hicle and cause an accident.

JVC0061X

Pre-driving checks and adjustments

3-25

Foldable outside mirrors

Pull the outside mirror toward the door to
fold it.

Heated mirrors (if so equipped)

Some outside mirrors can be heated to
defrost, defog, or de-ice for improved vis-
ibility. For additional information, see “Rear
window

and

outside

mirror

defroster

switch” (P. 2-47).

LPD2216

3-26

Pre-driving checks and adjustments

4 Monitor, climate, audio, phone and
voice recognition systems

NissanConnect® Manual . . . . . . . . . . . . . . . . . . . . . . . . 4-2
RearView Monitor (if so equipped) . . . . . . . . . . . . . . . 4-3

RearView Monitor system operation . . . . . . . . . . 4-4
How to read the displayed lines . . . . . . . . . . . . . . 4-5
Difference between predicted and
actual distances . . . . . . . . . . . . . . . . . . . . . . . . . . . . . 4-5
How to park with predicted course lines . . . . . . . 4-7
Adjusting the screen . . . . . . . . . . . . . . . . . . . . . . . . . 4-8
How to turn on and off predicted
course lines . . . . . . . . . . . . . . . . . . . . . . . . . . . . . . . . . . 4-9
RearView Monitor system limitations . . . . . . . . . 4-9
System maintenance . . . . . . . . . . . . . . . . . . . . . . . 4-10

Intelligent Around View® Monitor
(if so equipped) . . . . . . . . . . . . . . . . . . . . . . . . . . . . . . . . . .4-11

Intelligent Around View® Monitor
system operation . . . . . . . . . . . . . . . . . . . . . . . . . . . 4-12
Difference between predicted and
actual distances . . . . . . . . . . . . . . . . . . . . . . . . . . . . 4-16
How to park with predicted course lines . . . . . . 4-17
How to switch the display . . . . . . . . . . . . . . . . . . . 4-18
Adjusting the screen . . . . . . . . . . . . . . . . . . . . . . . . 4-19
Intelligent Around View® Monitor
system limitations . . . . . . . . . . . . . . . . . . . . . . . . . . 4-20
System maintenance . . . . . . . . . . . . . . . . . . . . . . . 4-22

Moving Object Detection (MOD)
(if so equipped) . . . . . . . . . . . . . . . . . . . . . . . . . . . . . . . . . 4-23

MOD system operation . . . . . . . . . . . . . . . . . . . . . . 4-24
Turning MOD ON and OFF . . . . . . . . . . . . . . . . . . . 4-26
MOD system limitations . . . . . . . . . . . . . . . . . . . . . 4-26
System maintenance . . . . . . . . . . . . . . . . . . . . . . . 4-27

Vents . . . . . . . . . . . . . . . . . . . . . . . . . . . . . . . . . . . . . . . . . . 4-28
Heater and air conditioner (automatic) . . . . . . . . . 4-29

Displaying climate control system status
screen (models with navigation system) . . . . . . 4-30
Operating tips . . . . . . . . . . . . . . . . . . . . . . . . . . . . . . . 4-30
In-cabin microfilter . . . . . . . . . . . . . . . . . . . . . . . . . . 4-31
Automatic climate control
(models without Navigation System) . . . . . . . . 4-32
Automatic climate control
(models with Navigation System) . . . . . . . . . . . . 4-35
Climate ctrl. timer . . . . . . . . . . . . . . . . . . . . . . . . . . . 4-38

Antenna . . . . . . . . . . . . . . . . . . . . . . . . . . . . . . . . . . . . . . . . 4-43
Car phone or CB radio . . . . . . . . . . . . . . . . . . . . . . . . . . 4-43
iPod®/iPhone® . . . . . . . . . . . . . . . . . . . . . . . . . . . . . . . . . 4-44

Refer

to

the

digital

NissanConnect®

manual using the QR code on this page,
or your printed NissanConnect® manual
(if so equipped). This manual includes the
following information:
• EV-Specific functions
• Audio
• Hands-Free Phone
• NissanConnect® EV & Services

(if so equipped)

• Apple CarPlay®
• Android Auto™

• Navigation (if so equipped)
• Voice recognition
• Information and settings viewable on the

system

LHA6511

NISSANCONNECT® MANUAL

4-2

Monitor, climate, audio, phone and voice recognition systems

LHA5348

1. CAMERA button

2. MENU button

REARVIEW MONITOR (if so
equipped)

Monitor, climate, audio, phone and voice recognition systems

4-3

WARNING

Failure to follow the warnings and in-
structions for proper use of the Rear-
View Monitor system could result in se-
rious injury or death.

RearView Monitor is a convenience
feature and is not a substitute for
proper backing. Always turn and look
out the windows and check mirrors
to be sure that it is safe to move be-
fore operating the vehicle. Always
back up slowly.

The system is designed as an aid
to the driver in showing large sta-
tionary objects directly behind the
vehicle, to help avoid damaging the
vehicle.

The distance guide line and the ve-
hicle width line should be used as a
reference only when the vehicle is on
a level paved surface. The distance
viewed on the monitor is for refer-
ence only and may be different than
the actual distance between the ve-
hicle and displayed objects.

CAUTION

Do not scratch the camera lens when
cleaning dirt or snow from the front of
the camera.

The RearView Monitor system automati-
cally shows a rear view of the vehicle when
the shift lever is shifted into the R (Reverse)
position. The radio can still be heard while
the RearView Monitor is active.

To display the rear view, the RearView Moni-
tor system uses a camera located just
above the vehicle’s license plate

1

.

REARVIEW MONITOR SYSTEM
OPERATION

With the EV (electric vehicle) system on and
in “READY to drive”, move the shift lever to
the R (Reverse) position to operate the
RearView Monitor.

LHA4522

4-4

Monitor, climate, audio, phone and voice recognition systems

HOW TO READ THE DISPLAYED
LINES

Guiding lines which indicate the vehicle
width and distances to objects with refer-
ence to the vehicle body line

O

A

are dis-

played on the monitor.

Distance guide lines

Indicate distances from the vehicle body.
• Red line

O

1

: approx. 1.5 ft (0.5 m)

• Yellow line

O

2

: approx. 3 ft (1 m )

• Green line

O

3

: approx. 7 ft (2 m)

Vehicle width guide lines

O

4

Indicate the vehicle width when backing
up.

The width of the vehicle width guide line is
wider than the actual width.

Predicted course lines

O

5

Indicate the predicted course when back-
ing up. The predicted course lines will be
displayed on the monitor when the shift
lever is in the R (Reverse) position and the
steering wheel is turned. The predicted
course lines will move depending on how
much the steering wheel is turned and will
not be displayed while the steering wheel is
in the straight-ahead position.

The vehicle width guide lines and the width
of the predicted course lines are wider than
the actual width and course.

DIFFERENCE BETWEEN PREDICTED
AND ACTUAL DISTANCES

The displayed guidelines and their loca-
tions on the ground are for approximate
reference only. Objects on uphill or downhill
surfaces or projecting objects will be actu-
ally located at distances different from
those displayed in the monitor relative to
the guidelines (refer to illustrations). When
in doubt, turn around and view the objects
as you are backing up, or park and exit the
vehicle to view the positioning of objects
behind the vehicle.

LHA4805

Monitor, climate, audio, phone and voice recognition systems

4-5

Backing up on a steep uphill

When backing up the vehicle up a hill, the
distance guide lines and the vehicle width
guide lines are shown closer than the actual
distance. Note that any object on the hill is
further than it appears on the monitor.

Backing up on a steep downhill

When backing up the vehicle down a hill,
the distance guide lines and the vehicle
width guide lines are shown farther than
the actual distance. Note that any object
on the hill is closer than it appears on the
monitor.

Backing up near a projecting
object

The predicted course lines

O

A

do not touch

the object in the display. However, the ve-
hicle may hit the object if it projects over
the actual backing up course.

LHA5064

LHA5065

LHA5069

4-6

Monitor, climate, audio, phone and voice recognition systems

Backing up behind a projecting
object

The position

O

C

is shown farther than the

position

O

B

in the display. However, the po-

sition

O

C

is actually at the same distance

as the position

O

A

. The vehicle may hit the

object when backing up to the position

O

A

if the object projects over the actual back-
ing up course.

HOW TO PARK WITH PREDICTED
COURSE LINES

WARNING

If the tires are replaced with different
sized tires, the predicted course lines
may be displayed incorrectly.

On a snow-covered or slippery road,
there may be a difference between
the predicted course line and the ac-
tual course line.

If the battery is disconnected or be-
comes discharged, the predicted
course lines may be displayed incor-
rectly. If this occurs, please perform
the following procedures:
- Turn the steering wheel from lock to
lock while the EV (electric vehicle)
system is running.
- Drive the vehicle on a straight road
for more than 5 minutes.

When the steering wheel is turned
with the power switch in the ACC po-
sition, the predicted course lines may
be displayed incorrectly.

1. Visually check that the parking space is

safe before parking your vehicle.

2. The rear view of the vehicle is displayed

on the screen

O

A

when the shift lever is

moved to the R (Reverse) position.

LHA5067

LHA5070

Monitor, climate, audio, phone and voice recognition systems

4-7

3. Slowly back up the vehicle adjusting the

steering wheel so that the predicted
course lines

O

B

enter the parking space

O

C

.

4. Maneuver the steering wheel to make

the vehicle width guide lines

O

D

parallel

to the parking space

O

C

while referring

to the predicted course lines.

5. When the vehicle is parked in the space

completely, push the P (Park) position
switch and apply the parking brake.

ADJUSTING THE SCREEN

1. Press the MENU button.

2. Touch the ”Settings” key.

3. Touch the “Camera” key.

4. Touch the “Display Settings” key.

5. Touch the “Brightness”, “Contrast”, “Tint”,

“Color”, or “Black Level” key.

6. Adjust the item by touching the “+” or “-”

key on the touch-screen display.

LHA5071

LHA5512

4-8

Monitor, climate, audio, phone and voice recognition systems

NOTE:
Do not adjust any of the display set-
tings of the RearView Monitor while
the vehicle is moving. Make sure the
parking brake is firmly applied.

HOW TO TURN ON AND OFF
PREDICTED COURSE LINES

To toggle ON and OFF the predicted course
lines while in the P (Park) position:

1. Touch the “Settings” key.

2. Touch the “Camera” key.

3. Touch the “Predicted Course Lines” key

to turn the feature ON or OFF.

Pressing the CAMERA button while the shift
lever is in the R (Reverse) position can also
turn on and off the predicted course lines.

REARVIEW MONITOR SYSTEM
LIMITATIONS

WARNING

Listed below are the system limitations
for RearView Monitor. Failure to oper-
ate the vehicle in accordance with
these system limitations could result in
serious injury or death.

The system cannot completely elimi-
nate blind spots and may not show
every object.

Underneath the bumper and the
corner areas of the bumper cannot
be viewed on the RearView Monitor
because of its monitoring range
limitation. The system will not show
small objects below the bumper, and
may not show objects close to the
bumper or on the ground

.

Objects viewed in the RearView Moni-
tor differ from actual distance be-
cause a wide-angle lens is used.

Objects in the RearView Monitor will
appear visually opposite compared
to when viewed in the rearview and
outside mirrors.

Use the displayed lines as a refer-
ence. The lines are highly affected by
the number of occupants, fuel level,
vehicle position, road conditions and
road grade.

Make sure that the rear hatch is se-
curely closed when backing up.

Do not put anything on the rearview
camera. The rearview camera is in-
stalled above the license plate.

When washing the vehicle with high
pressure water, be sure not to spray it
around the camera. Otherwise, water
may enter the camera unit causing
water condensation on the lens, a
malfunction, fire or an electric shock.

Do not strike the camera. It is a preci-
sion instrument. Otherwise, it may
malfunction or cause damage result-
ing in a fire or an electric shock.

The following are operating limitations and
do not represent a system malfunction:
• When the temperature is extremely high

or low, the screen may not clearly display
objects.

• When strong light directly shines on the

camera, objects may not be displayed
clearly.

• Vertical lines may be seen in objects on

the screen. This is due to strong reflected
light from the bumper.

• The screen may flicker under fluorescent

light.

• The colors of objects on the RearView

Monitor may differ somewhat from the
actual color of objects.

Monitor, climate, audio, phone and voice recognition systems

4-9

• Objects on the monitor may not be clear

in a dark environment.

• There may be a delay when switching

between views.

• If dirt, rain or snow accumulate on the

camera, RearView Monitor may not dis-
play objects clearly. Clean the camera.

• Do not use wax on the camera lens. Wipe

off any wax with a clean cloth dampened
with a diluted mild cleaning agent, then
wipe with a dry cloth.

SYSTEM MAINTENANCE

CAUTION

Do not use alcohol, benzine or thinner
to clean the camera. This will cause
discoloration.

Do not damage the camera as the
monitor screen may be adversely
affected.

If dirt, rain or snow accumulates on the
camera

O

1

, the RearView Monitor may not

display objects clearly. Clean the camera
by wiping it with a cloth dampened with
a diluted mild cleaning agent and then
wiping it with a dry cloth.

LHA4522

4-10

Monitor, climate, audio, phone and voice recognition systems

LHA5348

1. CAMERA button

2. MENU button

INTELLIGENT AROUND VIEW®
MONITOR (if so equipped)

Monitor, climate, audio, phone and voice recognition systems

4-11

WARNING

Failure to follow the warnings and in-
structions for proper use of the Intelli-
gent Around View® Monitor system could
result in serious injury or death.

The Intelligent Around View® Monitor
is a convenience feature and is not a
substitute for proper vehicle opera-
tion because it has areas where ob-
jects cannot be viewed. The four cor-
ners of the vehicle in particular, are
areas where objects do not always
appear in the bird’s-eye, front, or rear
views. Always check your surround-
ings to be sure that it is safe to move
before operating the vehicle. Always
operate the vehicle slowly.

The driver is always responsible for
safety during parking and other
maneuvers.

Use the mirrors or actually look to
properly judge distances to other
objects.

CAUTION

Do not scratch the camera lens when
cleaning dirt or snow from the front of
the camera.

The Intelligent Around View® Monitor sys-
tem is designed as an aid to the driver in
situations such as slot parking or parallel
parking. The monitor displays various
views of the position of the vehicle in a split
screen format. Not all views are available at
all times.

Available views:

• Front View

The view of the front of the vehicle.

• Rear View

The view of the rear of the vehicle.

• Bird’s-Eye View

The surrounding views of the vehicle
from above.

• Front-Side View

The view around and ahead of the front
passenger’s side wheel.

• Full screen rear view

The view to the rear of the vehicle (which is
a little wider than the standard rear view).

To display the multiple views, the Intelligent
Around View® Monitor system uses cam-
eras located in the front grille, on the vehi-
cle’s outside mirrors and one just above
the vehicle’s license plate

O

1

.

INTELLIGENT AROUND VIEW®
MONITOR SYSTEM OPERATION

With the EV (electric vehicle) system on,
move the shift lever to the R (Reverse) po-
sition or press the CAMERA button to oper-
ate the Intelligent Around View® Monitor.

When the camera is first activated with the
bird’s-eye view in the display, a red icon will
flash on the screen. This indicates that the

LHA5633

4-12

Monitor, climate, audio, phone and voice recognition systems

sonar system is activated. For additional
information on the rear sonar system, see
“Rear sonar system” (P. 5-168). The screen
displayed on the Intelligent Around View®
Monitor will automatically return to the
previous screen 3 minutes after the CAM-
ERA button has been pressed with the shift
lever in a position other than the R (Re-
verse) position.

Available views

WARNING

The distance guide lines and the ve-
hicle width lines should be used as a
reference only when the vehicle is on
a paved, level surface. The apparent
distance viewed on the monitor may
be different than the actual distance
between the vehicle and displayed
objects.

Use the displayed lines and the bird’s
eye view as a reference. The lines and
the bird’s-eye view are greatly af-
fected by the number of occupants,
cargo, fuel level, vehicle position,
road condition and road grade.

If the tires are replaced with different
sized tires, the predicted course lines
and the bird’s-eye view may be dis-
played incorrectly.

When driving the vehicle up a hill,
objects viewed in the monitor are
further than they appear. When driv-
ing the vehicle down a hill, objects
viewed in the monitor are closer than
they appear.

Objects in the rear view will appear
visually opposite compared to when
viewed in the rear view and outside
mirrors

.

Use the mirrors or actually look to
properly judge distances to other
objects.

On a snow-covered or slippery road,
there may be a difference between
the predicted course lines and the
actual course line.

The vehicle width and predicted
course lines are wider than the actual
width and course.

The displayed lines will appear slightly
off to the right, because the rearview
camera is not installed in the rear cen-
ter of the vehicle.

Front and rear view

Guiding lines that indicate the approximate
vehicle width and distance to objects with
reference to the vehicle body lines

O

A

are

displayed on the monitor.

Distance guide lines

Indicate distances from the vehicle body:
• Red line

O

1

: approximately 1.5 ft (0.5 m)

• Yellow lines

O

2

: approximately 3 ft (1 m)

• Green lines

O

3

: approximately 7 ft (2 m)

• Green lines

O

4

: approximately 10 ft (3 m)

(if so equipped)

SAA1840

Front View

Monitor, climate, audio, phone and voice recognition systems

4-13

Vehicle width guide lines

O

5

Indicate the approximate vehicle width
when backing up.

Predicted course lines

O

6

Indicate the predicted course when oper-
ating the vehicle. The predicted course
lines will be displayed on the monitor when
the steering wheel is turned. The predicted
course lines will move depending on how
much the steering wheel is turned and
may not be displayed while the steering

wheel is in the straight-ahead position. The
front view will not be displayed when the
vehicle speed is above 6 mph (10 km/h).

NOTE:

When the monitor displays the front
view and the steering wheel turns about
90 degrees or less from the straight-
ahead position, both the right and left
predicted course lines

O

6

are displayed.

When the steering wheel turns about 90
degrees or more, a line is displayed only
on the opposite side of the turn.

Birds-eye view

The bird’s-eye view shows the overhead
view of the vehicle, which helps confirm the
vehicle position and the predicted course
to a parking space. The vehicle icon

O

1

shows the position of the vehicle. Note that
the apparent distance between objects
viewed in the bird’s-eye view may differ
somewhat from the actual distance to the
vehicle.

The areas that the cameras cannot cover

O

2

are indicated in black.

LHA5068

Rear View

LHA4641

4-14

Monitor, climate, audio, phone and voice recognition systems

After the EV system is placed in the ON
position, the non-viewable areas

O

2

are

highlighted in yellow for several seconds
after the bird’s-eye view is displayed. It will
be shown only the first time after the
power switch is placed in the ON position.

WARNING

Objects in the bird’s-eye view will ap-
pear further than the actual distance.

Tall objects, such as a curb or vehicle,
may be misaligned or not displayed
at the seam of the views.

Objects that are above the camera
cannot be displayed.

The view for the bird’s-eye view may
be misaligned when the camera po-
sition alters.

A line on the ground may be mis-
aligned and is not seen as being
straight at the seam of the views. The
misalignment will increase as the
line proceeds away from the vehicle.

Front-side view

Guiding lines

Guiding lines that indicate the approximate
width and the front end of the vehicle are
displayed on the monitor.

The front-of-vehicle line

O

1

shows the front

part of the vehicle.

The side-of-vehicle line

O

2

shows the ap-

proximate vehicle width including the out-
side mirrors.

The extensions

O

3

of both the front

O

1

and

side

O

2

lines are shown with a green dotted

line.

Full screen rear view

The full screen rear view shows a wider
area on the entire screen and allows the
checking of the blind corners on right and
left sides. The full screen rear view displays
an approximately 180-degree area. The
predicted course lines are not displayed
when using the full screen rear view.

Distance guide lines

Indicates distances from the vehicle body:
• Red line

O

1

: approximately 1.5 ft (0.5 m)

• Yellow line

O

2

: approximately 3 ft (1 m)

• Green line

O

3

: approximately 7 ft (2 m)

LHA2652

LHA4819

Full screen rear view

Monitor, climate, audio, phone and voice recognition systems

4-15

Vehicle width guide lines

O

4

Indicate the vehicle width when backing
up.

DIFFERENCE BETWEEN PREDICTED
AND ACTUAL DISTANCES

The displayed guidelines and their loca-
tions on the ground are for approximate
reference only. Objects on uphill or downhill
surfaces or projecting objects will be actu-
ally located at distances different from
those displayed in the monitor relative to
the guidelines (refer to illustrations). When
in doubt, turn around and view the objects
as you are backing up, or park and exit the
vehicle to view the positioning of objects
behind the vehicle.

Backing up on a steep uphill

When backing up the vehicle up a hill, the
distance guide lines and the vehicle width
guide lines are shown closer than the actual
distance. Note that any object on the hill is
further than it appears on the monitor.

Backing up on a steep downhill

When backing up the vehicle down a hill,
the distance guide lines and the vehicle
width guide lines are shown farther than
the actual distance. Note that any object
on the hill is closer than it appears on the
monitor.

LHA5064

LHA5065

4-16

Monitor, climate, audio, phone and voice recognition systems

Backing up near a projecting
object

The predicted course lines

O

A

do not touch

the object in the display. However, the ve-
hicle may hit the object if it projects over
the actual backing up course.

Backing up behind a projecting
object

The position

O

C

is shown farther than the

position

O

B

in the display. However, the po-

sition

O

C

is actually at the same distance

as the position

O

A

. The vehicle may hit the

object when backing up to the position

O

A

if the object projects over the actual back-
ing up course.

HOW TO PARK WITH PREDICTED
COURSE LINES

WARNING

If the tires are replaced with different
sized tires, the predicted course lines
may be displayed incorrectly.

On a snow-covered or slippery road,
there may be a difference between
the predicted course line and the ac-
tual course line.

If the battery is disconnected or be-
comes discharged, the predicted
course lines may be displayed incor-
rectly. If this occurs, please perform
the following procedures:

Turn the steering wheel from lock

to lock while the EV (electric ve-
hicle) system is running.

Drive the vehicle on a straight road

for more than 5 minutes.

When the steering wheel is turned
with the power switch in the ACC po-
sition, the predicted course lines may
be displayed incorrectly.

LHA5069

LHA5067

Monitor, climate, audio, phone and voice recognition systems

4-17

1. Visually check that the parking space is

safe before parking your vehicle.

2. The rear view of the vehicle is displayed

on the screen

O

A

when the shift lever is

moved to the R (Reverse) position.

3. Slowly back up the vehicle adjusting the

steering wheel so that the predicted
course lines

O

B

enter the parking space

O

C

.

4. Maneuver the steering wheel to make

the vehicle width guide lines

O

D

parallel

to the parking space

O

C

while referring

to the predicted course lines.

5. When the vehicle is parked in the space

completely, move the shift position to
the P (Park) position and apply the park-
ing brake.

HOW TO SWITCH THE DISPLAY

With the power switch in the ON position,
press the CAMERA button or move the shift
lever to the R (Reverse) position to operate
the Intelligent Around View® Monitor.

The Intelligent Around View® Monitor dis-
plays different split screen views depend-
ing on the position of the shift lever. Press
the CAMERA button to switch between the
available views.

If the shift lever is in the R (Reverse) position,
the available views are:
• Rear view/bird’s-eye view split screen
• Rear view/front-side view split screen
• Full screen rear view

LHA5070

LHA5071

4-18

Monitor, climate, audio, phone and voice recognition systems

If the shift position is in the P (Park) and D
(Drive) position, the available views are:
• Front view/bird’s-eye view split screen
• Front view/front-side view split screen

The display will switch from the Intelligent
Around View® Monitor screen when:
• The shift lever is in the D (Drive) position

and the vehicle speed increases above
approximately 6 mph (10 km/h).

• A different screen is selected.

ADJUSTING THE SCREEN

1. Press MENU button.

2. Touch the “Settings” key

3. Touch the “Camera” key

4. Touch the “Display Settings” key

5. Touch the “Brightness,” “Contrast,” “Tint,”

“Color,” or “Black Level” key.

6. Adjust the item by touching the “+” or “-”

key on the touch-screen display.

NOTE:

Do not adjust any of the display settings
of the Intelligent Around View® Monitor
while the vehicle is moving. Make sure
the parking brake is firmly applied.

LHA5594

Monitor, climate, audio, phone and voice recognition systems

4-19

INTELLIGENT AROUND VIEW®
MONITOR SYSTEM LIMITATIONS

WARNING

Listed below are the system limitations
for Intelligent Around View® Monitor.
Failure to operate the vehicle in accor-
dance with these system limitations
could result in serious injury or death.

Do not use the Intelligent Around
View® Monitor with the outside mir-
rors in the stored position, and make
sure that the rear hatch is securely
closed when operating the vehicle
using the Intelligent Around View®
Monitor.

The apparent distance between ob-
jects viewed on the Intelligent Around
View® Monitor differs from the actual
distance.

The cameras are installed on the
front grille, the outside mirrors and
above the rear license plate. Do not
put anything on the vehicle that cov-
ers the cameras.

When washing the vehicle with high
pressure water, be sure not to spray it
around the cameras. Otherwise, wa-
ter may enter the camera unit caus-
ing water condensation on the lens, a
malfunction, fire or an electric shock.

Do not strike the cameras. They are
precision instruments. Doing so could
cause a malfunction or cause damage
resulting in a fire or an electric shock.

There are some areas where the system
will not show objects and the system does
not warn of moving objects. When in the
front or rear view display, an object below
the bumper or on the ground may not be
viewed

O

1

. When in the bird’s-eye view,

a tall object near the seam

O

2

of the cam-

era viewing areas will not appear in the
monitor.

The following are operating limitations and
do not represent a system malfunction:
• There may be a delay when switching

between views.

• When the temperature is extremely high

or low, the screen may not display objects
clearly.

• When strong light directly shines on the

camera, objects may not be displayed
clearly.

• The screen may flicker under fluorescent

light.

• The colors of objects on the Intelligent

Around View® Monitor may differ some-
what from the actual color of objects.

LHA5634

4-20

Monitor, climate, audio, phone and voice recognition systems

• Objects on the Intelligent Around View®

Monitor may not be clear and the color of
the object may differ in a dark environ-
ment.

• There may be differences in sharpness

between each camera view of the bird’s-
eye view.

• Do not use wax on the camera lens. Wipe

off any wax with a clean cloth that has
been dampened with a diluted mild clean-
ing agent, then wipe with a dry cloth.

System temporarily unavailable

When the “!” icon is displayed on the screen,
there are abnormal conditions in the Intel-
ligent Around View® Monitor. This will not
hinder normal driving operation but the
system should be inspected. It is recom-
mended that you visit a NISSAN certified
LEAF dealer for this service.

When the “[X]” icon is displayed on the
screen, the camera image may be receiv-
ing temporary electronic disturbances
from surrounding devices. This will not hin-
der normal driving operation but the sys-
tem should be inspected if it occurs fre-
quently. It is recommended that you visit
a NISSAN certified LEAF dealer for this
service.

LHA4412

LHA4413

Monitor, climate, audio, phone and voice recognition systems

4-21

SYSTEM MAINTENANCE

CAUTION

Do not use alcohol, benzine or thinner
to clean the camera. This will cause
discoloration.

Do not damage the cameras as the
monitor screen may be adversely
affected.

If dirt, rain or snow accumulates on any
of the cameras

O

1

, the Intelligent Around

View® Monitor may not display objects
clearly. Clean the camera by wiping with a
cloth dampened with a diluted mild clean-
ing agent and then wiping with a dry cloth.

LHA5633

4-22

Monitor, climate, audio, phone and voice recognition systems

LHA5349

1. CAMERA button

MOVING OBJECT DETECTION (MOD)
(if so equipped)

Monitor, climate, audio, phone and voice recognition systems

4-23


Content      ..     7      8      9      10     ..