Nissan Versa Sedan (2015 year). Instruction - part 8


  Index      Nissan     Nissan Versa Sedan - instruction 2015 year in english


Search            


Content   ..  6  7  8  9   ..


Nissan Versa Sedan (2015 year). Instruction - part 8


As many as 4 Intelligent Keys can be registered
and used with one vehicle. For information about
the purchase and use of additional Intelligent
Keys, contact a NISSAN dealer.

CAUTION

Listed below are conditions or occur-
rences which will damage the Intelligent
Key:

● Do not allow the Intelligent Key, which

contains

electrical

components,

to

come into contact with water or salt
water. This could affect the system
function.

● Do not drop the Intelligent Key.
● Do not strike the Intelligent Key sharply

against another object.

● Do not change or modify the Intelligent

Key.

● Wetting may damage the Intelligent

Key. If the Intelligent Key gets wet, im-
mediately wipe until it is completely dry.

● If the outside temperature is below 14°F

(-10°C) the battery of the Intelligent Key
may not function properly.

● Do not place the Intelligent Key for an

extended period in an area where tem-
peratures exceed 140°F (60°C).

● Do not attach the Intelligent Key with a

key holder that contains a magnet.

● Do not place the Intelligent Key near

equipment that produces a magnetic
field, such as a TV, audio equipment and
personal computers.

If an Intelligent Key is lost or stolen, NISSAN
recommends erasing the ID code of that Intelli-
gent Key from the vehicle. This may prevent the
unauthorized use of the Intelligent Key to operate
the vehicle. For information regarding the erasing
procedure, contact a NISSAN dealer.
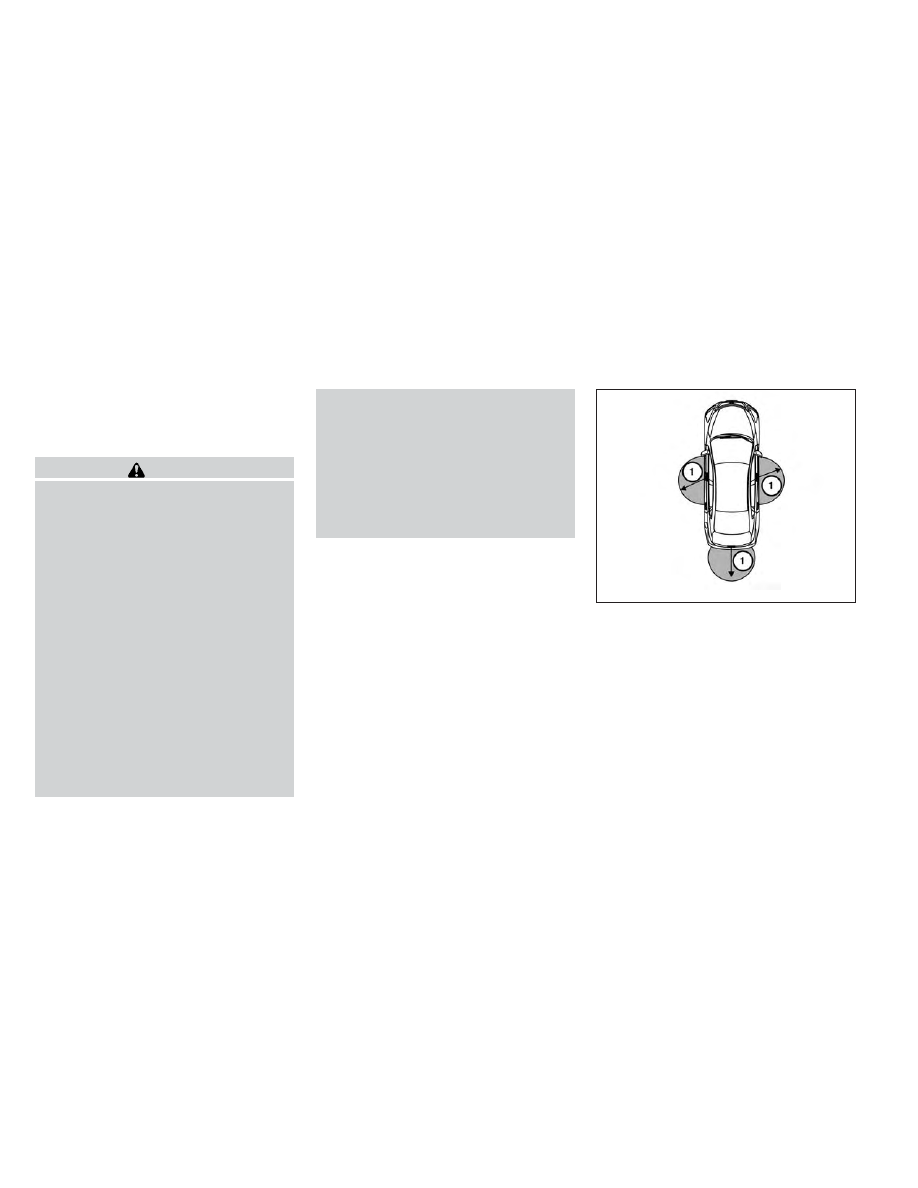
OPERATING RANGE

The Intelligent Key functions can only be used
when the Intelligent Key is within the specified
operating range from the request switch

1

.

When the Intelligent Key battery is discharged or
strong radio waves are present near the operat-
ing location, the Intelligent Key operating range
becomes narrower, and the Intelligent Key may
not function properly.

The operating range is within 31.50 in (80 cm)
from each request switch

1

.

LPD2095

Pre-driving checks and adjustments

3-13

If the Intelligent Key is too close to the door glass,
handle or rear bumper, the request switches may
not function.

When the Intelligent Key is within the operating
range, it is possible for anyone, even someone
who does not carry the Intelligent Key, to push the
request switch to lock/unlock the doors.

DOOR LOCKS/UNLOCKS
PRECAUTION

● Do not push the door handle request switch

with the Intelligent Key held in your hand as
illustrated. The close distance to the door
handle will cause the Intelligent Key system
to have difficulty recognizing that the Intelli-
gent Key is outside the vehicle.

● After locking with the door handle request

switch, verify the doors are securely locked
by testing them.

● To prevent the Intelligent Key from being left

inside the vehicle, make sure you carry the
Intelligent Key with you and then lock the
doors.

● Do not pull the door handle before pushing

the door handle request switch. The door
will be unlocked but will not open. Release
the door handle once and pull it again to
open the door.

WPD0375

3-14

Pre-driving checks and adjustments

NISSAN INTELLIGENT KEY®
OPERATION

You can lock or unlock the doors without taking
the Intelligent Key out of your pocket or bag.

When you carry the Intelligent Key with you, you
can lock or unlock all doors by pushing the door
handle request switch within the range of opera-
tion.

Locking doors

1. Move the shift lever to the P (Park) position,

place the ignition switch in the LOCK posi-
tion and make sure you carry the Intelligent
Key with you.

2. Close all doors.

3. Push any door handle request switch

1

while carrying the Intelligent Key with you.

4. All doors will lock.

5. The hazard warning lights flash twice and

the outside buzzer sounds once.

NOTE:

● Doors lock with the door handle request

switch while the ignition switch is not in the
LOCK position.

● Doors do not lock by pushing the door

handle request switch while any door is
open. However, doors lock with the me-
chanical key even if any door is open.

● Doors do not lock with the door handle

request switch with the Intelligent Key inside
the vehicle and a beep sounds to warn you.
However, when an Intelligent Key is inside
the vehicle, doors can be locked with an-
other Intelligent Key.

LPD2074

LPD2075

WPD0369

Pre-driving checks and adjustments

3-15

CAUTION

● After locking the doors using the re-

quest switch, make sure that the doors
have been securely locked by operating
the door handle .

● When locking the doors using the re-

quest switch, make sure to have the
Intelligent Key in your possession be-
fore operating the request switch to
prevent the Intelligent Key from being
left in the vehicle.

● The request switch is operational only

when the Intelligent Key has been de-
tected by the Intelligent Key system.

Lockout protection

To prevent the Intelligent Key from being acci-
dentally locked in the vehicle, lockout protection
is equipped with the Intelligent Key.

When the driver’s side door is open, the doors
are locked, and then the Intelligent Key is put
inside the vehicle and all the doors are closed;
the lock will automatically unlock and the door
buzzer sounds.

NOTE:

The doors may not lock when the Intelli-
gent Key is in the same hand that is oper-
ating the request switch to lock the door.
Put the Intelligent Key in a purse, pocket or
your other hand.

CAUTION

The lockout protection may not function
under the following conditions:

● When the Intelligent Key is placed on

top of the instrument panel.

● When the Intelligent Key is placed on

top of the rear parcel shelf.

● When the Intelligent Key is placed in-

side the glove box or a storage bin.

● When the Intelligent Key is placed in-

side the door pockets.

● When the Intelligent Key is placed on or

under the spare tire area.

● When the Intelligent Key is placed in-

side or near metallic materials.

Unlocking doors

1. Carry the Intelligent Key.

2. Push the door handle request switch

1

.

3. The hazard warning lights flash once and the

outside buzzer sounds once.

4. Push the door handle request switch

1

again within 5 seconds to unlock all doors.

If a door handle is pulled while unlocking the
doors, that door may not be unlocked. Returning
the door handle to its original position will unlock
the door. If the door does not unlock after return-
ing the door handle, push the door handle re-
quest switch to unlock the door.

LPD2075

3-16

Pre-driving checks and adjustments

All doors will be locked automatically unless one
of the following operations is performed within
1 minute after pushing the request switch.

● Opening any door.
● Pushing the ignition switch.

The interior light timer illuminates for a period of
time when a door is unlocked and the room light
switch is in the DOOR position.

The interior light can be turned off without waiting
by performing one of the following operations.

● Placing the ignition switch in the ON posi-

tion.

● Locking the doors with the remote controller.
● Switching the room light switch to the OFF

position.

Opening the trunk lid

1. Push the trunk opener request switch

A

for

more than 1 second while carrying the Intel-
ligent Key with you.

2. The trunk will unlatch. A chime will sound 4

times.

3. Raise the trunk lid to open the trunk.

Lockout protection

To prevent the Intelligent Key from being acci-
dentally locked in the trunk, lockout protection is
equipped with the Intelligent Key.

WPD0369

LPD2114

Pre-driving checks and adjustments

3-17

When all doors are locked and the trunk lid is
closed with the Intelligent Key inside the trunk,
the outside buzzer will sound and the trunk will
open.

HOW TO USE THE REMOTE
KEYLESS ENTRY FUNCTION

The remote keyless entry function can operate all
door locks using the remote keyless function of
the Intelligent Key. The remote keyless function
can operate at a distance of 33 ft (10 m) away
from the vehicle. The operating distance de-
pends upon the conditions around the vehicle.

The remote keyless entry function will not func-
tion under the following conditions:

● When the Intelligent Key is not within the

operational range.

● When the doors or the trunk are open or not

closed securely.

● When the Intelligent Key battery is dis-

charged.

CAUTION

When locking the doors using the Intelli-
gent Key, be sure not to leave the key in
the vehicle.

Locking doors

1. Place the ignition switch in the LOCK posi-

tion.

2. Close all doors.

3. Press the

button on the Intelligent

Key.

4. The hazard warning lights flash twice and

the horn beeps once.

5. All doors will be locked.

CAUTION

After locking the doors using the Intelli-
gent Key, be sure that the doors have been
securely locked by operating the door
handles.

WPD0359

3-18

Pre-driving checks and adjustments

Unlocking doors

1. Press the

button on the Intelligent

Key.

2. The hazard warning lights flash once.

3. Press the

button again within 5 sec-

onds to unlock all doors.

All doors will be locked automatically unless one
of the following operations is performed within
1 minute after pressing the

button:

● Opening any doors.
● Pushing the ignition switch.

The interior light illuminates for a period of time
when a door is unlocked and the room light
switch is in the DOOR position.

The light can be turned off without waiting by
performing one of the following operations:

● Placing the ignition switch in the ON posi-

tion.

● Locking the doors with the Intelligent Key.
● Switching the room light switch to the OFF

position.

Releasing the trunk lid

Press the

button for longer than 0.5 sec-

onds to open the trunk lid. The trunk release
button will not operate when the ignition switch is
placed in the ON position.

WPD0360

WPD0364

Pre-driving checks and adjustments

3-19

Using the panic alarm

If you are near your vehicle and feel threatened,
you may activate the panic alarm to call attention
by pressing and holding the

button on the

Intelligent Key for longer than 0.5 seconds.

The panic alarm and headlights will stay on for a
period of time.

The panic alarm stops when:

● It has run for a period of time, or
● Any button is pressed on the Intelligent Key.
● The request switch on the driver or passen-

ger door has been pushed and the Intelligent
Key is in range of the door handle.

Silencing the horn beep feature

If desired, the horn beep feature can be deacti-
vated using the Intelligent Key.

To deactivate: Press and hold the
and

buttons for at least 2 seconds.

The hazard warning lights will flash 3 times to
confirm that the horn beep feature has been
deactivated.

To activate: Press and hold the
and

buttons for at least 2 seconds once

more.

WPD0361

WPD0362

3-20

Pre-driving checks and adjustments

The hazard warning lights will flash once and the
horn will sound once to confirm that the horn
beep feature has been reactivated.

Deactivating the horn beep feature does not si-
lence the horn if the alarm is triggered.

1

P (Park) position selecting warning
light

2

NISSAN Intelligent Key® warning light

WARNING LIGHTS AND AUDIBLE
REMINDERS

The Intelligent Key is equipped with a function
that is designed to minimize improper operations
and to help prevent the vehicle from being stolen.
The warning buzzer sounds and the warning light
illuminates when improper operations are de-
tected.

CAUTION

When the buzzer sounds and the warning
light illuminates, be sure to check both the
vehicle and the Intelligent Key.

WARNING SIGNALS

To help prevent the vehicle from moving unex-
pectedly by erroneous operation of the Intelligent
Key or to help prevent the vehicle from being
stolen, a chime or buzzer sounds from inside and
outside the vehicle and a warning light comes on
in the instrument panel.

When a chime or beep sounds or the warning
light comes on, be sure to check the vehicle and
the Intelligent Key.

Audible reminder and warning when
locking the doors

When the chime or buzzer sounds from inside
and outside the vehicle, check for the following:

● The ignition switch is placed in the LOCK

position.

● The Intelligent Key is not left inside the ve-

hicle.

● The shift lever is in the P (Park) position.

Type B meter only

LPD2094

Pre-driving checks and adjustments

3-21

Audible reminder and warning when
the engine stops

When the P position selecting warning light
(

) in the instrument panel blinks in red:

● Make sure the shift lever is in the P (Park)

position.

When the chime sounds intermittently:

● Make sure the shift lever is in the P (Park)

position and the ignition switch is placed in
the LOCK position.

If the chime sounds continuously when the driv-
er’s door is opened, check the following:

● The shift lever is placed in the P (Park)

position and the ignition switch is placed in
the LOCK position.

● The mechanical key is not inserted into the

ignition switch.

● The warning chime may stop when one of

the following is performed:

– Returning the ignition switch to the LOCK

position.

– Removing the mechanical key.

– Closing the doors.

Alarm and warning when the engine
starts

When the Intelligent Key system warning light
(

) blinks red and the outside buzzer

sounds, make sure the Intelligent Key is inside the
vehicle.

Warning for low battery power

When the Intelligent Key battery is low, the Intel-
ligent Key system warning light (

) will blink

green for about 30 seconds after the ignition
switch is placed in the ON position. This warning
is to let you know that the battery of the Intelligent
Key will run down soon. Replace it with a new
one. Refer to “Battery replacement” in the “Main-
tenance and do-it-yourself” section.

NISSAN recommends replacing the battery at a
NISSAN dealer.

Preventing the Intelligent Key from
being left in the vehicle

If you lock all doors using the power door lock
switch with the Intelligent Key in the vehicle, all of
the doors unlock immediately and the buzzer will
warn you when the door is closed.

3-22

Pre-driving checks and adjustments

TROUBLESHOOTING GUIDE

Symptom

Possible Cause

Remedy

When pushing the ignition switch to stop
the engine

The P (Park) warning light in the instrument
panel illuminates and the inside chime
sounds continuously.

The shift lever is not in the P (Park) position.

Make sure that the shift lever is in the P
(Park) position.

When placing the shift lever in the P (Park)
position

The inside warning chime sounds
continuously.

The ignition switch is in the “ACC” or “ON”
position.

Place the ignition switch in the “OFF”
position.

When opening the driver’s door

A warning chime sounds continuously.

The ignition switch is in the “ACC” position.

Place the ignition switch in the “OFF”
position.

When pushing the door handle request
switch to lock the door

The outside chime sounds for approximately
a few seconds.

The Intelligent Key is inside the vehicle.

Be sure to carry the Intelligent Key with you.

A door is not closed securely.

Close the door securely.

When closing the doors

The key warning light in the instrument
panel blinks in yellow, the outside chime
sounds 3 times and the inside warning
chime sounds for approximately 3 seconds.

The ignition switch is in the “ACC” or “ON”
position.

Place the ignition switch in the “OFF”
position.

The P (Park) warning light in the instrument
panel illuminates and the outside chime
sounds continuously.

The ignition switch is in the “ACC” or “OFF”
position and the shift lever is not in the P
(Park) position.

Make sure that the shift lever is in the P
(Park) position and place the ignition switch
in the “OFF” position.

The outside chime sounds for approximately
3 seconds and all doors unlock.

The Intelligent Key is in the vehicle or trunk.

Be sure to carry the Intelligent Key with you.

When closing the trunk lid

The outside chime sounds for approximately
10 seconds and the trunk lid opens.

The Intelligent Key is inside the trunk.

Be sure to carry the Intelligent Key with you.

When stopping the engine

The P (Park) position warning light in the
instrument panel blinks in red.

The shift lever is not in the P (Park) position.

Make sure that the shift lever is in the P
(Park) position and place the ignition switch
in the LOCK position.

When starting the engine

The key warning light in the instrument
panel blinks in green.

The battery charge is low.

Replace the battery with a new one. See
“Battery replacement” in the “Maintenance
and do-it-yourself” section.

When pushing the request switch or the
LOCK button on the Intelligent Key to the
lock the door

The outside chime sounds for a few sec-
onds and all the doors unlock.

The Intelligent Key is inside the trunk.

Be sure to carry the Intelligent Key with you.

The Intelligent Key is inside the vehicle.

Be sure to carry the Intelligent Key with you.

A door is not closed securely.

Close the doors securely.

Pre-driving checks and adjustments

3-23

1. Pull the hood lock release handle

1

located

below the instrument panel until the hood
springs up slightly.

2. Locate the lever

2

in between the hood and

grille and push the lever sideways with your
fingertips.

3. Raise the hood

3

.

4. Remove the support rod

4

and insert it into

the slot

5

.

Hold the coated parts when removing or
resetting the support rod. Avoid direct con-
tact with the metal parts, as they may be
hot immediately after the engine has been
stopped.

When closing the hood, return the support rod to
its original position, lower the hood to approxi-
mately 12 in (30 cm) above the latch and release
it. This allows proper engagement of the hood
latch.

WARNING

● Make sure the hood is completely

closed and latched before driving. Fail-
ure to do so could cause the hood to fly
open and result in an accident.

● If you see steam or smoke coming from

the engine compartment, to avoid injury
do not open the hood.

LPD2035

HOOD

3-24

Pre-driving checks and adjustments

WARNING

● Do not drive with the trunk lid open. This

could allow dangerous exhaust gases
to be drawn into the vehicle. See “Ex-
haust gas (carbon monoxide)” in the
“Starting and driving” section of this
manual.

● Closely supervise children when they

are around cars to prevent them from
playing and becoming locked in the
trunk where they could be seriously in-
jured. Keep the car locked, with the rear
seatback and trunk lid securely latched
when not in use, and prevent children’s
access to car keys.

KEY OPERATION

To open the trunk lid, turn the key clockwise. To
close the trunk lid, lower and push the trunk lid
down securely.

OPENING THE TRUNK LID

To open the trunk, unlock it with one of the
following operations:

● Unlock the trunk using the key.
● Pull up on the opener lever (if so equipped)

located on the floor next to the driver’s seat.

● Press the button on the Intelligent Key.
● Push the

A

release switch.

LPD2036

LPD2114

TRUNK LID

Pre-driving checks and adjustments

3-25

OPENER OPERATION (if so
equipped)

WARNING

● Do not drive with the trunk lid open. This

could allow dangerous exhaust gases
to be drawn into the vehicle. See “Ex-
haust gas (carbon monoxide)” in the
“Starting and driving” section of this
manual.

● Closely supervise children when they

are around cars to prevent them from
playing and becoming locked in the
trunk where they could be seriously in-
jured. Keep the car locked, with the rear
seatback and trunk lid securely latched
when not in use, and prevent children’s
access to car keys.

The trunk lid release is located on the floor to the
left of the driver’s seat.

To open the trunk lid, pull the opener lever up.

To close the trunk lid, lower and push the trunk lid
down securely.

INTERIOR TRUNK LID RELEASE

WARNING

Closely supervise children when they are
around cars to prevent them from playing
and becoming locked in the trunk where
they could be seriously injured. Keep the
car locked, with the rear seatback and
trunk lid securely latched when not in use,
and prevent children’s access to car keys.

The interior trunk lid release mechanism provides
a means of escape for children and adults in the
event they become locked inside the trunk.

LPD2215

LPD2042

3-26

Pre-driving checks and adjustments

To open the trunk from the inside, pull the illumi-
nated release handle until the lock releases and
push up on the trunk lid. The release handle is
made of a material that glows in the dark after a
brief exposure to ambient light.

The handle is located inside the trunk compart-
ment on the trunk lock at the center of the trunk
lid.

OPENER OPERATION

The fuel-filler door release is located below the
instrument panel. To open the fuel-filler door, pull
the release. To lock, close the fuel-filler door
securely.

FUEL-FILLER CAP

WARNING

● Gasoline is extremely flammable and

highly explosive under certain condi-
tions. You could be burned or seriously
injured if it is misused or mishandled.
Always stop the engine and do not
smoke or allow open flames or sparks
near the vehicle when refueling.

● Do not attempt to top off the fuel tank

after the fuel pump nozzle shuts off
automatically. Continued refueling may
cause fuel overflow, resulting in fuel
spray and possibly a fire.

● Use only an original equipment type

fuel-filler cap as a replacement. It has a
built-in safety valve needed for proper
operation of the fuel system and emis-
sion control system. An incorrect cap
can result in a serious malfunction and
possible injury. It could also cause
the

Malfunction Indicator Light

(MIL) to come on.

● Never pour fuel into the throttle body to

attempt to start your vehicle.

LPD2022

FUEL-FILLER DOOR

Pre-driving checks and adjustments

3-27

● Do not fill a portable fuel container in

the vehicle or trailer. Static electricity
can cause an explosion of flammable
liquid, vapor or gas in any vehicle or
trailer. To reduce the risk of serious
injury or death when filling portable fuel
containers:

– Always place the container on the

ground when filling.

– Do not use electronic devices when

filling.

– Keep the pump nozzle in contact

with the container while you are fill-
ing it.

– Use only approved portable fuel con-

tainers for flammable liquid.

CAUTION

● Do not use E-15 or E-85 fuel in your

vehicle. For further information see the
“Fuel Recommendation” in the “Techni-
cal and consumer information” section
of this manual.

● Failure to tighten the fuel-filler cap

properly may cause the

Malfunc-

tion Indicator Light (MIL) to illuminate.
If the

light illuminates because

the fuel-filler cap is loose or missing,
tighten or install the cap and continue
to drive the vehicle. The

light

should turn off after a few driving trips.
If the

light does not turn off after a

few driving trips, have the vehicle in-
spected by a NISSAN dealer.

● The LOOSE FUEL CAP warning mes-

sage will display if the fuel-filler cap is
not properly tightened. It may take a
few driving trips for the message to be
displayed. Failure to tighten the fuel-
filler cap properly after the LOOSE
FUEL CAP warning message is dis-
played may cause the

Malfunc-

tion Indicator Light (MIL) to illuminate.

● For additional information, see the

“Malfunction Indicator Light (MIL)” in
the “Instruments and Controls” section
in this manual.

● If fuel is spilled on the vehicle body,

flush it away with water to avoid paint
damage.

To remove the fuel-filler cap:

1. Turn the fuel-filler cap counterclockwise

1

to remove.

2. Loop the tether strap around the hook while

refueling.

To install the fuel-filler cap:

1. Insert the fuel-filler cap straight into the fuel-

filler tube.

2. Turn the fuel-filler cap clockwise

2

until a

single click is heard.

SPA1755

3-28

Pre-driving checks and adjustments


Content   ..  6  7  8  9   ..