Nissan Versa Note (2019 year). Instruction - part 6


  Index      Nissan     Nissan Versa Note - instruction 2019 year in english


Search            


Content   ..  4  5  6  7   ..


Nissan Versa Note (2019 year). Instruction - part 6


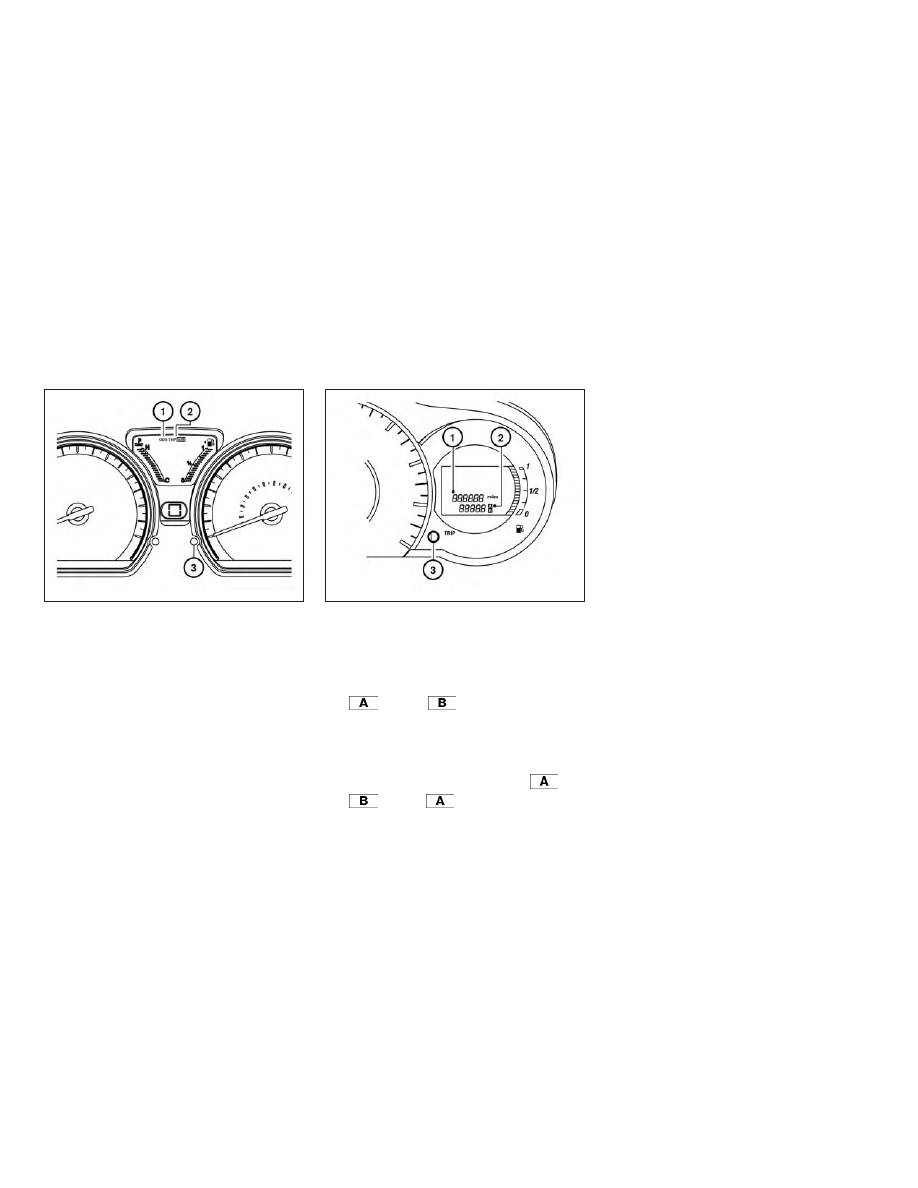
Odometer/Twin trip odometer

The odometer/twin trip odometer is dis-
played when the ignition switch is placed in
the ON position.

The odometer

1

records the total dis-

tance the vehicle has been driven.

The twin trip odometer

2

records the dis-

tance of individual trips.

Changing the display

Press the change button

3

to change the

display as follows:

Type A (if so equipped) : Odometer (ODO)

Trip

→ Trip

→ Instant fuel con-

sumption

→ Average fuel consumption →

DTE (cruising range)

→ Outside Air Tem-

perature (if so equipped)

→ Odometer

(ODO)

Type B (if so equipped) : Trip

Trip

→ Trip

Resetting the trip odometer

Press the change/reset button

3

for more

than 1 second to reset the currently dis-
played trip odometer to zero.

Type A (if so equipped)

LIC2139

Type B (if so equipped)

LIC2758

2-6

Instruments and controls

Loose fuel cap warning message

Push the reset button

A

for more than

1 second to reset the LOOSE FUEL CAP
warning message after the fuel cap has
been tightened. For additional information,
refer to “Fuel-filler cap” in the “Pre-driving
checks and adjustments” section of this
manual.

Check tire pressure warning
message (if so equipped)

The CHECK TIRE PRES (pressure) warning
message is displayed when the low tire
pressure warning light is illuminated and
low tire pressure is detected. Check and
adjust the tire pressure to the recom-
mended COLD tire pressure shown on the
Tire and Loading Information label.

Type A (if so equipped)

LPD2025

Type B (if so equipped)

LIC2836

Type A (if so equipped)

LPD2128

Instruments and controls

2-7

Type A (if so equipped): The CHECK TIRE
PRES warning message can be turned off
using the reset button

A

on the meter, the

low tire pressure warning light will not be
turned off.
Type B (if so equipped): The CHECK TIRE
PRES warning message is displayed when
the low tire pressure warning light is illumi-
nated and low tire pressure is detected.
Check and adjust the tire pressure to the
recommended COLD tire pressure shown
on the tire and Loading Information label.

The low tire pressure warning light remains
illuminated until the tires are inflated to the
recommended COLD tire pressure.

Type A Only (if so equipped): The CHECK
TIRE PRES warning message is displayed
each time the ignition switch is placed in
the ON position as long as the low tire
pressure warning light remains illumi-
nated.

For additional information, refer to “Low tire
pressure warning light” in this section, “Tire
Pressure Monitoring System (TPMS)” in the
“Starting and driving” section and “Wheels
and tires” in the “Do-it-yourself ” section of
this manual.

TACHOMETER

The tachometer indicates engine speed in
revolutions per minute (rpm).

Do not rev the engine into the red zone

1

.

CAUTION

When engine speed approaches the red
zone, shift to a higher gear or reduce
engine speed. Operating the engine in
the red zone may cause serious engine
damage.

Type B (if so equipped)

LIC3669

Type A (if so equipped)

LIC2151

2-8

Instruments and controls

ENGINE COOLANT TEMPERATURE
GAUGE

NOTE:

The ignition switch must be placed in the
ON position for the gauge to give a read-
ing.

Type A (if so equipped): The gauge indi-
cates the engine coolant temperature. The
engine coolant temperature will vary with
the outside air temperature and driving
conditions.

Type B (if so equipped): Engine coolant
temperature monitoring is performed by
the high temperature warning light. For ad-
ditional information, refer to “High tem-
perature warning light (red)” in this section.

Type B (if so equipped)

LIC2761

Type A (if so equipped)

LIC2501

Type B (if so equipped)

LIC4042

Instruments and controls

2-9

CAUTION

If the gauge indicates a coolant tem-
perature near the hot (H) end of the nor-
mal range, reduce vehicle speed to de-
crease the temperature. If the gauge is
over the normal range, stop the vehicle
as soon as safely possible. If the engine
is overheated, continued operation of
the vehicle may seriously damage the
engine. For additional information, re-
fer to “If your vehicle overheats” in the
“In case of emergency” section of this
manual.

FUEL GAUGE

The gauge indicates the approximate fuel
level in the tank when the ignition switch is
placed in the ON position.

The gauge may move slightly during brak-
ing, turning, acceleration, or going up or
down hills.

The low fuel warning light will turn on when
the amount of fuel in the tank is getting low.

Refill the fuel tank before the gauge reg-
isters 0 (Empty).

The

indicates that the fuel-filler

door is located on the driver’s side of the
vehicle.

Type A (if so equipped)

LIC3257

Type B (if so equipped)

LIC2762

2-10

Instruments and controls

CAUTION

∙ If the vehicle runs out of fuel, the

check engine light may come on. Re-
fuel as soon as possible. After a few
driving trips, the

light should

turn off. If the light remains on after a
few driving trips, have the vehicle in-
spected. It is recommended that you
visit a NISSAN dealer for this service.

∙ For additional information, refer to

“Malfunction Indicator Light (MIL)” in
this section.

TRIP COMPUTER

Type A (if so equipped): When the ignition
switch is placed in the ON position, modes
of the trip computer can be selected by
pushing the trip computer change button

A

on the instrument panel located near

the speedometer.

The following modes can be selected in the
display

B

:

∙ Odometer

∙ Trip A

∙ Trip B

∙ Instant fuel consumption

∙ Average fuel consumption

∙ Distance to empty

∙ Outside air temperature (if so equipped)

Type B (if so equipped): When the ignition
switch is placed in the ON position, modes
of the trip computer can be selected by
pushing the menu button

on the

steering wheel.

Type A (if so equipped)

LIC2138

Type B (if so equipped)

LIC2764

Instruments and controls

2-11

The following modes can be selected in the
display

B

:

∙ Instant fuel consumption

∙ Average fuel consumption

∙ Distance to empty

∙ Average speed

∙ Travel time

∙ Outside air temperature (if so equipped)

Instant fuel consumption

The instant fuel consumption mode shows
the instant fuel economy. The display up-
dates instantly when driving.

Average fuel consumption (mpg
or l (liter)/100km)

The average fuel consumption mode
shows the average fuel consumption since
the last reset. Resetting is done by pressing
the trip or change button for more than
approximately 1 second. The display is up-
dated every 30 seconds. At about the first
1/3 mi (500 m) after a reset, the display
shows (----).

Distance to empty

The distance to empty mode provides you
with an estimation of the distance that can
be driven before refueling. The range is
constantly being calculated, based on the
amount of fuel in the fuel tank and the
actual fuel consumption.

The distance to empty includes a low
range warning feature: when the fuel level
is low, the distance to empty is automati-
cally selected and the digits blink in order
to draw the driver’s attention. Press the trip
computer change/reset button if you wish
to return to the mode that was selected
before the warning occurred.

When the fuel level drops even lower, the
distance to empty will display (----).

Average speed

The average speed mode shows the aver-
age vehicle speed since the last reset. Re-
setting is done by pushing the menu but-
ton on the steering wheel for longer than
1 second.

Travel time

The travel time mode (elapsed time) shows
the time since the last reset. The displayed

time can be reset by pushing the menu
button on the steering wheel for longer
than 1 second.

Trip computer reset

Type A (if so equipped):Pushing the
change button for more than 3 seconds
will reset all modes except Trip A and Dis-
tance To Empty (DTE).

Type B (if so equipped):Pushing the menu
button

on the steering wheel for

more than 3 seconds will reset average fuel
economy, average speed and travel time.

Outside air temperature (ICY-°F or
°C) (if so equipped)

The outside air temperature is displayed in
°F or °C.

The outside air temperature mode in-
cludes a low temperature warning feature:
below 37°F (3°C), the outside air tempera-
ture mode is automatically selected and
ICY will illuminate in order to draw the driv-
er’s attention. Press the trip or change but-
ton to toggle to the next mode, if desired.
The ICY indicator will remain illuminated as
long as the temperature remains below
39°F (4°C).

2-12

Instruments and controls

The ambient temperature sensor is lo-
cated in front of the radiator. The sensor
may be affected by road or engine heat,
wind directions and other driving condi-
tions. The display may differ from the ac-
tual ambient temperature or the tempera-
ture

displayed

on

various

signs

or

billboards.

SERVICE INTERVAL REMINDER (if
so equipped)

When the ignition switch is placed in the ON
position, a wrench symbol and the dis-
tance to oil change information will illumi-
nate on the display for approximately
5 seconds. The wrench symbol and dis-
tance to oil change switch to oil display
status. The oil display status then switches
to the odometer and twin trip odometer
information mode that was displayed be-
fore the ignition switch was placed in the
ACC, OFF or LOCK position.

The oil level display status provides specific
information regarding your approximate
engine oil level.

If the oil level is sufficient, “Oil Good” is dis-
played for approximately 10 seconds. If the
oil level is low, “Oil Lo” blinks for approxi-
mately 30 seconds in order to draw your
attention to necessary action.

Quickly push and release the trip odometer
reset switch on the instrument panel lo-
cated near the speedometer during the
“Oil Good” or “Oil Lo” mode to display an
approximate oil level indication.

In case of low engine oil level, refer to “En-
gine oil” in the “Do-it-yourself ” section for
the proper engine oil refilling procedure.

Oil change schedule set up (if so
equipped)

It is possible to adjust the interval distance
to oil change by pushing the trip odometer
reset switch on the instrument panel lo-
cated near the speedometer for 3 seconds
while the wrench symbol and distance to
oil change are displayed. The symbol and
distance display will start flashing and the
display shows the current interval. Push
the switch to increase the interval distance.
Each step increases the interval distance
by 500 mi (1,000 km). The interval distance
can be set up to 18,000 mi (30,000 km) after
which the display returns to zero.

If no further action is made, the display
returns to oil display status indication and
the new interval is set.

If the interval distance is set to 0, the display
will skip the distance to oil change informa-
tion and wrench symbol display mode and
will directly display the oil display status (“Oil
Good” or “Oil Lo”). In order to return to the
distance to oil change information and
wrench symbol display mode, push the trip
computer change button on the instru-
ment panel located near the speedometer
for approximately 3 seconds after the igni-
tion switch has been turned to the ON po-
sition, and adjust the distance to oil change
schedule as previously described.

For additional information, refer to “Stan-
dard maintenance” in the “Maintenance
and schedules” section of this manual.

CAUTION

∙ The oil level should be checked regu-

larly.

Operating

with

insufficient

amount of oil level can damage the
engine and such damage is not cov-
ered by the warranty.

∙ NISSAN recommends checking the oil

level every 3,000 mi (5,000 km).

Instruments and controls

2-13

or

Anti-lock Braking System
(ABS) warning light

P position selecting warning light
(if so equipped)

Malfunction Indicator Light (MIL)

or

Brake warning light

Power steering warning light

Overdrive OFF indicator light
(if so equipped)

Charge warning light

Seat belt warning light and chime

Security indicator light (if so equipped)

Door open warning light

Supplemental air bag warning light

SET indicator light (if so equipped)

Engine oil pressure warning light

Continuously Variable Transmission (CVT)
position indicator light (if so equipped)

Side light and headlight indicator light
(green) (if so equipped)

High temperature warning light (red)
(if so equipped)

CRUISE indicator light (if so equipped)

Slip indicator light

Low fuel warning light

Engine start operation indicator light
(if so equipped)

Turn signal/hazard indicator lights

Low tire pressure warning light
(if so equipped)

Front fog light indicator light
(if so equipped)

Vehicle Dynamic Control (VDC) OFF
indicator light

Low windshield-washer fluid warning
light (if so equipped)

Front passenger air bag status light

NISSAN Intelligent Key® warning light
(if so equipped)

High beam indicator light (blue)

WARNING LIGHTS, INDICATOR LIGHTS
AND AUDIBLE REMINDERS

2-14

Instruments and controls

CHECKING LIGHTS

With all doors closed, apply the parking
brake, fasten the seat belts and place the
ignition switch in the ON position without
starting the engine. The following lights (if
so equipped) will come on:

or

,

,

,

,

The following lights (if so equipped) will
come on briefly and then go off:

or

,

(red),

,

,

,

,

,

,

If any light does not come on or operate in
a way other than described, it may indicate
a burned-out bulb and/or a system mal-
function. Have the system checked. It is
recommended that you visit a NISSAN
dealer for this service.

WARNING LIGHTS

This vehicle has various warning lights that
may illuminate to indicate a potential prob-
lem. For additional information, refer to the
specific light in this section.

or

Anti-lock Braking

System (ABS)

warning light

When the ignition switch is placed in the ON
position, the ABS warning light illuminates
and then turns off. This indicates the ABS is
operational.

If the ABS warning light illuminates while
the engine is running or while driving, it
may indicate the ABS is not functioning
properly. Have the system checked. It is
recommended that you visit a NISSAN
dealer for this service.

If an ABS malfunction occurs, the anti-lock
function is turned off. The brake system
then operates normally but without anti-
lock assistance. For additional information,
refer to “Brake system” in the “Starting and
driving” section of this manual.

or

Brake warning

light

This light functions for both the parking
brake and the foot brake systems.

Parking brake indicator

When the ignition switch is placed in the ON
position, the light comes on when the park-
ing brake is applied.

Low brake fluid warning light

When the ignition switch is placed in the ON
position, the light warns of a low brake fluid
level. If the light comes on while the engine
is running with the parking brake not ap-
plied, stop the vehicle and perform the fol-
lowing:

1. Check the brake fluid level. Add brake

fluid as necessary. For additional infor-
mation, refer to “Brake fluid” in the “Do-
it-yourself ” section of this manual.

2. If the brake fluid level is correct, have

the warning system checked. It is rec-
ommended that you visit a NISSAN
dealer for this service.

Instruments and controls

2-15

WARNING

∙ Your brake system may not be working

properly if the warning light is on. Driv-
ing could be dangerous. If you judge it
to be safe, drive carefully to the nearest
service station for repairs. Otherwise,
have your vehicle towed because driv-
ing it could be dangerous.

∙ Pressing the brake pedal with the en-

gine stopped and/or a low brake fluid
level may increase your stopping dis-
tance and braking will require greater
pedal effort as well as pedal travel.

∙ If the brake fluid level is below the

MINIMUM or MIN mark on the brake
fluid reservoir, do not drive until the
brake system has been checked. It is
recommended that you visit a NISSAN
dealer for this service.

Charge warning light

If this light comes on while the engine is
running, it may indicate the charging sys-
tem is not functioning properly. Turn the
engine off and check the drive belt. If the
belt is loose, broken, missing, or if the light
remains on, have your vehicle serviced im-
mediately. It is recommended that you visit
a NISSAN dealer for this service.

CAUTION

Do not continue driving if the drive belt
is loose, broken or missing.

Door open warning light

This light comes on when any of the doors
are not closed securely while the ignition
switch is in the ON position.

Engine oil pressure

warning light

This light warns of low engine oil pressure. If
the light flickers or comes on during nor-
mal driving, pull off the road in a safe area,
stop the engine immediately and call a
NISSAN dealer or other authorized repair
shop.

The engine oil pressure warning light is
not designed to indicate a low oil level.
Use the dipstick to check the oil level. For
additional information, refer to “Engine oil”
in the “Do-it-yourself ” section of this
manual.

CAUTION

Running the engine with the engine oil
pressure warning light on could cause
serious damage to the engine almost
immediately. Such damage is not cov-
ered by the NISSAN New Vehicle Limited
Warranty. Turn off the engine as soon as
it is safe to do so.

High temperature warning

light (red) (if so equipped)

When the ignition switch is placed in the ON
position, the high temperature warning
light illuminates and then turns off. This in-
dicates that the high temperature sensor
in the engine coolant system is opera-
tional.

When driving, the high temperature warn-
ing light may turn off. This indicates that the
engine coolant temperature is within the
normal range.

2-16

Instruments and controls

CAUTION

If the high temperature warning light
illuminates while the engine is running,
it may indicate the engine temperature
is extremely high. Stop the vehicle
safely as soon as possible. If the vehicle
is overheated, continuing vehicle op-
eration may seriously damage the en-
gine. For additional information, refer
to “If your vehicle overheats” in the “In
case of emergency” section of this
manual.

Low fuel warning light

This light comes on when the fuel level in
the fuel tank is getting low. Refuel as soon
as it is convenient, preferably before the
fuel gauge reaches 0 (Empty). There will be
a small reserve of fuel in the tank when
the fuel gauge reaches 0 (Empty), show-
ing no more fuel bars.

Low tire pressure warning

light (if so equipped)

Your vehicle is equipped with a Tire Pres-
sure Monitoring System (TPMS) that moni-
tors the tire pressure of all tires except the
spare.

The low tire pressure warning light warns
of low tire pressure or indicates that the
TPMS is not functioning properly.

After the ignition switch is placed in the ON
position, this light illuminates for about
1 second and turns off.

Low tire pressure warning

If the vehicle is being driven with low tire
pressure, the warning light will illumi-
nate.

A CHECK TIRE PRES (pressure) warning
message is also displayed in the odom-
eter.

When the low tire pressure warning light
illuminates, you should stop and adjust
the tire pressure of all four tires to the
recommended COLD tire pressure shown
on the Tire and Loading Information la-
bel located in the driver’s door opening.
The low tire pressure warning light does
not automatically turn off when the tire
pressure is adjusted. After the tire is in-
flated to the recommended pressure,
the vehicle must be driven at speeds
above 16 mph (25 km/h) to activate the
TPMS and turn off the low tire pressure
warning light. Use a tire pressure gauge
to check the tire pressure.

The low tire pressure warning light remains
illuminated until the tires are inflated to the
recommended COLD tire pressure. The
CHECK TIRE PRES warning message is dis-
played each time the ignition switch is
placed in the ON position as long as the low
tire pressure warning light remains illumi-
nated.

For additional information, refer to "Check
tire pressure warning message" in this sec-
tion and “Tire Pressure Monitoring System
(TPMS)” in the “Starting and driving” section
and in the “In case of emergency” section of
this manual.

TPMS malfunction

If the TPMS is not functioning properly, the
low tire pressure warning light will flash for
approximately 1 minute when the ignition
switch is placed in the ON position. The
light will remain on after 1 minute. Have the
system checked. It is recommended that
you visit a NISSAN dealer for this service.
The "CHECK TIRE PRES" warning does not
appear if the low tire pressure warning light
illuminates to indicate a TPMS malfunction.

Instruments and controls

2-17

For additional information, refer to “Tire
Pressure Monitoring System (TPMS)” in the
“Starting and driving” section and “Tire
pressure” in the “Do-it-yourself ” section of
this manual.

WARNING

∙ Radio waves could adversely affect

electric medical equipment. Those
who use a pacemaker should contact
the

electric

medical

equipment

manufacturer for the possible influ-
ences before use.

∙ If the light does not illuminate with

the ignition switch placed in the ON
position, have the vehicle checked as
soon as possible. It is recommended
that you visit a NISSAN dealer for this
service.

∙ If the light illuminates while driving,

avoid sudden steering maneuvers or
abrupt braking, reduce vehicle speed,
pull off the road to a safe location and
stop the vehicle as soon as possible.
Driving with under-inflated tires may
permanently damage the tires and in-
crease the likelihood of tire failure. Se-
rious vehicle damage could occur and
may lead to an accident and could re-
sult in serious personal injury or
death. Check the tire pressure for all
four tires. Adjust the tire pressure to
the recommended COLD tire pressure
show on the Tire and Loading Infor-
mation label located in the driver’s
door opening to turn the low tire pres-
sure warning light off. If the light still
illuminates while driving after adjust-
ing the tire pressure, a tire may be flat
or the TPMS may be malfunctioning. If
you have a flat tire, replace it with a
spare tire as soon as possible. If no tire
is flat and all tires are properly in-
flated, have the vehicle checked. It is
recommended that you visit a NISSAN
dealer for this service.

∙ When replacing a wheel without the

TPMS such as the spare tire, the TPMS
will not function and the low tire pres-
sure warning light will flash for ap-
proximately 1 minute. The light will re-
main on after 1 minute. Have your
tires replaced and/or TPMS system
reset as soon as possible. It is recom-
mended that you visit a NISSAN dealer
for these services.

∙ Replacing tires with those not origi-

nally specified by NISSAN could affect
the proper operation of the TPMS.

CAUTION

∙ The TPMS is not a substitute for the

regular tire pressure check. Be sure to
check the tire pressure regularly.

∙ If the vehicle is being driven at speeds

of less than 16 mph (25 km/h), the
TPMS may not operate correctly.

∙ Be sure to install the specified size of

tires to the four wheels correctly.

2-18

Instruments and controls

Low windshield-washer

fluid warning light (if so
equipped)

This light comes on when the windshield-
washer

fluid

is

at

a

low

level.

Add

windshield-washer fluid as necessary. For
additional information, refer to “Windshield-
washer fluid” in the “Do-it-yourself ” section
of this manual.

NISSAN Intelligent Key®

warning light (if so
equipped)

The Intelligent Key warning light illumi-
nates green when the ignition switch can
be turned. The Intelligent Key warning light
illuminates red when the ignition switch
cannot be turned.

The Intelligent Key warning light blinks yel-
low if the Intelligent Key is taken outside of
the vehicle while the ignition switch is
placed in the ACC or ON position.

∙ If the Intelligent Key warning light blinks,

make sure of the location of the Intelli-
gent Key as soon as possible. The Intel-
ligent Key should be carried by the
driver while operating the vehicle.

∙ The Intelligent Key warning light turns

off about 10 seconds after the Intelli-
gent Key is brought inside the vehicle.

The Intelligent Key warning light blinks
green indicating that the Intelligent Key
battery is almost discharged.

For additional information, refer to “NISSAN
Intelligent Key®” in the “Pre-driving checks
and adjustments” section of this manual.

P position selecting

warning light (if so
equipped)

The light blinks red and the warning buzzer
sounds if you are outside of the vehicle with
the Intelligent Key and the engine is off, but
the shift lever is not in the P (Park) position.

When the warning light blinks, place the
ignition switch in the ON position, move the
shift lever to the P (Park) position, then
place the ignition switch in the LOCK posi-
tion.

Power steering warning

light

WARNING

∙ If the engine is not running or is

turned off while driving, the power as-
sist for the steering will not work.
Steering will be harder to operate.

∙ When the power steering warning

light illuminates with the engine run-
ning, there will be no power assist for
the steering. You will still have control
of the vehicle, but the steering will be
harder to operate. Have the power
steering system checked. It is recom-
mended that you visit a NISSAN dealer
for this service.

When the ignition switch is placed in the ON
position, the power steering warning light
illuminates. After starting the engine, the
power steering warning light turns off. This
indicates the power steering is operational.

If the power steering warning light illumi-
nates while the engine is running, it may
indicate the power steering is not function-
ing properly and may need servicing. Have
the power steering checked. It is recom-
mended that you visit a NISSAN dealer for
this service.

Instruments and controls

2-19

When the power steering warning light illu-
minates with the engine running, there will
be no power assist for the steering, but you
will still have control of the vehicle. At this
time, greater steering effort is required to
operate the steering wheel, especially in
sharp turns and at low speeds.

For additional information, refer to “Power
steering” in the “Starting and driving” sec-
tion of this manual.

Seat belt warning light and

chime

The light and chime remind you to fasten
your seat belts. The light illuminates when-
ever the ignition switch is placed in the ON
or START position and remains illuminated
until the driver’s seat belt is fastened. At the
same time, the chime sounds for about
6 seconds unless the driver’s seat belt is
securely fastened.

The seat belt warning light may also illumi-
nate if the front passenger’s seat belt is not
fastened when the front passenger’s seat
is occupied. For 7 seconds after the ignition
switch is placed in the ON position, the sys-
tem does not activate the warning light for
the front passenger.

For additional information, refer to “Seat
belts” in the “Safety—Seats, seat belts and
supplemental restraint system” section of
this manual.

Supplemental air bag

warning light

When the ignition switch is placed in the ON
or START position, the supplemental air
bag warning light illuminates for about
7 seconds and then turns off. This means
the system is operational.

If any of the following conditions occur, the
front air bag, side air bag, curtain air bag,
and pretensioner seat belt systems need
servicing:

∙ The supplemental air bag warning light

remains on after approximately 7 sec-
onds.

∙ The supplemental air bag warning light

flashes intermittently.

∙ The supplemental air bag warning light

does not come on at all.

It is recommended that you visit a NISSAN
dealer for these services.

Unless checked and repaired, the supple-
mental restraint system (air bag system)
and/or the pretensioner(s) may not func-
tion properly. For additional information, re-
fer to “Supplemental Restraint System
(SRS)” in the “Safety—Seats, seat belts and
supplemental restraint system” section of
this manual.

WARNING

If the supplemental air bag warning
light is on, it could mean that the front
air bag, side air bag, curtain air bag,
and/or pretensioner systems will not
operate in an accident. To help avoid
injury to yourself or others, have your
vehicle checked as soon as possible. It is
recommended that you visit a NISSAN
dealer for this service.

INDICATOR LIGHTS

This vehicle has various indicator lights
that may illuminate to indicate a system
status. For additional information, refer to
the specific light in this section.

2-20

Instruments and controls

Continuously Variable

Transmission (CVT)
position indicator light (if
so equipped)

When the ignition switch is placed in the ON
position, the indicator light shows the shift
lever position. For additional information,
refer to “Driving the vehicle” in the “Starting
and driving” section of this manual.

CRUISE indicator light (if so

equipped)

The light comes on when the cruise control
ON/OFF switch is pushed. The light goes
out when the ON/OFF switch is pushed
again. When the CRUISE indicator light
comes on, the cruise control system is op-
erational. For additional information, refer
to “Cruise control” in the “Starting and driv-
ing” section of this manual.

Engine start operation

indicator light (if so
equipped)

For vehicles equipped with push button ig-
nition this indicator illuminates when the
ignition switch is in the LOCK, OFF, ACC or
ON position with the shift lever in the P
(Park) position.

This indicator means that the engine will
start by pushing the push-button ignition
switch with the brake pedal depressed.

Front fog light indicator

light (if so equipped)

The front fog light indicator light illumi-
nates when the front fog lights are on. For
additional information, refer to “Fog light
switch” in this section.

Front passenger air bag

status light

The front passenger air bag status light will
be lit and the passenger front air bag will be
off depending on how the front passenger
seat is being used.

For additional information, refer to “Front
passenger air bag and status light” in the
“Safety — Seats, seat belts and supplemen-
tal restraint system” section of this manual.

High beam indicator light

(blue)

This blue light comes on when the head-
light high beams are on and goes out when
the low beams are selected.

The high beam indicator light also comes
on when the passing signal is activated.

Malfunction Indicator Light

(MIL)

If this indicator light comes on steady or
blinks while the engine is running, it may
indicate a potential emission control mal-
function.

The

may also come on steady if the

fuel-filler cap is loose or missing or if the
vehicle runs out of fuel. Check to make sure
the fuel-filler cap is installed and closed
tightly and that the vehicle has at least 3 gal
(11.4 L) of fuel in the fuel tank.

Instruments and controls

2-21


Content   ..  4  5  6  7   ..