Nissan Pathfinder Hybrid (2015 year). Instruction - part 25


  Index      Nissan     Nissan Pathfinder Hybrid - instruction 2015 year in english


Search            


Content   ..  23  24  25  26   ..


Nissan Pathfinder Hybrid (2015 year). Instruction - part 25


BSW SYSTEM PRECAUTIONS

WARNING

● The radar sensors may not be able to

detect and activate BSW when certain
objects are present such as:

– Pedestrians, bicycles, or animals.

– Vehicles such as motorcycles, low

height vehicles, or high ground clear-
ance vehicles.

– Oncoming vehicles.

– Vehicles remaining in the detection

zone when you accelerate from a
stop. For additional information, re-
fer to “BSW driving situations” in this
section.

– A vehicle merging into an adjacent

lane at a speed approximately the
same as your vehicle. For additional
information, refer to “BSW driving
situations” in this section.

– A vehicle approaching rapidly from

behind. For additional information,
refer to “BSW driving situations” in
this section.

– A vehicle which your vehicle over-

takes rapidly. For additional informa-
tion, refer to “BSW driving situa-
tions” in this section.

– A vehicle that passes through the de-

tection zone quickly.

● The radar sensors detection zone is de-

signed based on a standard lane width.
When driving in a wider lane, the radar
sensors may not detect vehicles in an
adjacent lane. When driving in a narrow
lane, the radar sensors may detect ve-
hicles driving two lanes away.

● The radar sensors are designed to ig-

nore most stationary objects, however
objects such as guardrails, walls, foli-
age and parked vehicles may occasion-
ally be detected. The system malfunc-
tion warning message with the Blind
Spot indicator (orange) will appear in
the vehicle information display. This is a
normal driving condition.

● Severe weather or road spray condi-

tions may reduce the ability of the radar
to detect other vehicles.

● Excessive noise (e.g. audio system vol-

ume, open vehicle window) will inter-
fere with the chime sound, and it may
not be heard.

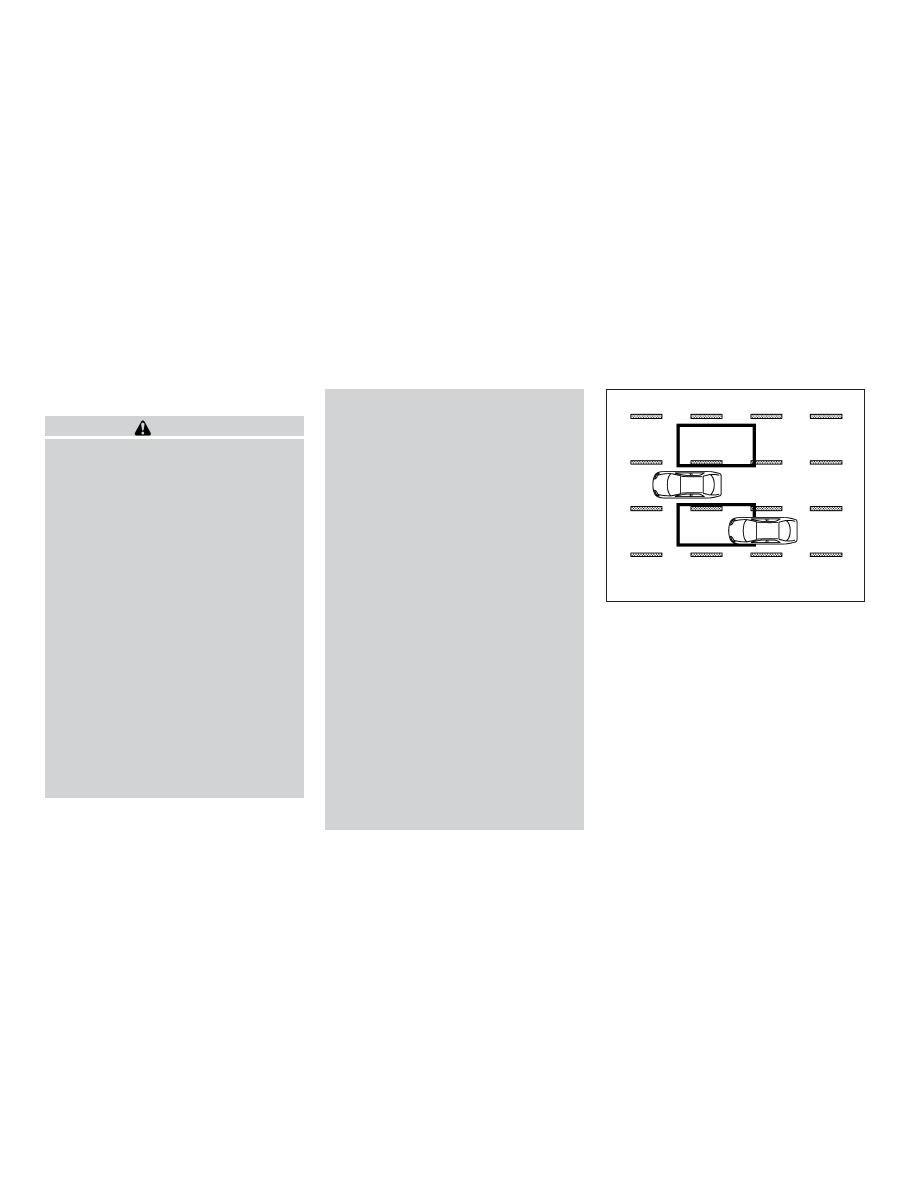
BSW DRIVING SITUATIONS

Another vehicle approaching from
behind

Illustration 1: The Blind Spot Warning indicator
light illuminates if a vehicle enters the detection
zone from behind in an adjacent lane.

However, if the overtaking vehicle is traveling much
faster than your vehicle, the indicator light may not
illuminate before the detected vehicle is beside
your vehicle. Always use the side and rear mirrors
and turn and look in the direction your vehicle will
move to ensure it is safe to change lanes.

Illustration 1 – Approaching from behind

SSD1026

5-22

Starting and driving

Illustration 2: If the driver activates the turn signal
then the system chimes a sound (twice) and the
Blind Spot Warning indicator light flashes.

NOTE:

If the driver activates the turn signal before
a vehicle enters the detection zone, the
Blind Spot Warning indicator light will flash
but no chime will sound when the other
vehicle is detected.

NOTE:

Illustration 3: If you accelerate from a stop
with a vehicle in the detection zone, the
other vehicle may not be detected.

Overtaking another vehicle

Illustration 4: The Blind Spot Warning indicator
light illuminates if you overtake a vehicle and that
vehicle stays in the detection zone for approxi-
mately 2 seconds.

The radar sensors may not detect slower moving
vehicles if they are passed quickly.

Illustration 2 – Approaching from behind

SSD1031

Illustration 3 – Accelerate from a stop

SSD1032

Illustration 4 – Overtaking another vehicle

SSD1033

Starting and driving

5-23

Illustration 5: If the driver activates the turn signal
while another vehicle is in the detection zone,
then the system chimes a sound (twice) and the
Blind Spot Warning indicator light flashes.

NOTE:

Illustration 6: When overtaking several ve-
hicles in a row, the vehicles after the first
vehicle may not be detected if they are
traveling close together.

Illustration 5 – Overtaking another vehicle

SSD1034

Illustration 6 – Overtaking several vehicles

SSD1036

5-24

Starting and driving

Entering from the side

Illustration 7: The Blind Spot Warning indicator
light illuminates if a vehicle enters the detection
zone from either side.

NOTE:

The radar sensors may not detect a vehicle
which is traveling at about the same speed
as your vehicle when it enters the detection
zone.

Illustration 8: If the driver activates the turn signal,
the Blind Spot Warning indicator light flashes
and a chime will sound twice.

NOTE:

If the driver activates the turn signal before
a vehicle enters the detection zone, the
Blind Spot Warning indicator light will flash
but no chime will sound when another ve-
hicle is detected.

WARNING

● The RCTA system is not a replacement

for proper driving procedure, is not de-
signed to prevent contact with vehicles
or objects. When backing out of parking
space, always use the side and rear
mirrors and turn and look in the direc-
tion you will move. Never rely solely on
the RCTA system.

Illustration 7– Entering from the side

LSD2050

Illustration 8– Entering from the side

SSD1038

LSD2217

THE REAR CROSS TRAFFIC ALERT
(RCTA) SYSTEM (if so equipped)

Starting and driving

5-25

RCTA SYSTEM OPERATION

The RCTA systems can help alert the driver of an
approaching vehicle when the driver is backing
out of a parking space.

When the shift position is R (Reverse) and the
vehicle speed is less than approximately 5 MPH
(8 km/h), the RCTA system operates.

The RCTA system uses radar sensors

1

in-

stalled on both sides near the rear bumper to
detect an approaching vehicle.

The radar sensors

1

detect an approaching

vehicle from up to approximately 66 ft. (20 m)
away.

If the radar detects a vehicle approaching from
the side, the system gives visual and audible
warnings

LSD2216

5-26

Starting and driving

RCTA SYSTEM PRECAUTIONS

WARNING

● Always check surroundings and turn to

check what is behind you before back-
ing up. The radar sensors detect ap-
proaching (moving) vehicles. The radar
sensors cannot detect every object such
as:

– Pedestrians, bicycles, motorcycles,

animals

or

child

operated

toy

vehicles

– A vehicle that passing at speeds

greater than approximately 19 MPH
(30 km/h)

– A vehicle that passing at speeds

lower than approximately 5 MPH
(8 km/h)

● The radar sensors may not detect ap-

proaching vehicles in certain situations:

– Illustration A: When a vehicle parked

next to you obstructs the beam of the
radar sensor.

– Illustration B: When the vehicle is

parked in an angled parking space.

– Illustration C: When the vehicle is

parked on inclined ground.

LSD2173

Starting and driving

5-27

– Illustration D: When an approaching

vehicle turns into your vehicle’s park-
ing lot aisle.

– Illustration

E:

When

the

angle

formed by your vehicle and ap-
proaching vehicle is small

● The following conditions may reduce

the ability of the radar to detect other
vehicles:

– Severe weather

– Road spray

– Ice build up on the vehicle

– Frost up on the vehicle

– Dirt build up on the vehicle

● Do not attach stickers (including transpar-

ent material), install accessories or apply
additional paint near the radar sensors.
These conditions may reduce the ability of
the radar to detect other vehicles

● Do not use the RCTA systems when

towing a trailer.

● Excessive noise (e.g. audio system vol-

ume, open vehicle window) will inter-
fere with the chime sound, and it may
not be heard.

If the radar detects an approaching vehicle from
the side, the system chimes a sound (single
beep), the Blind Spot Warning indicator light on
the side of the approaching vehicle flashes.

NOTE:

● In the case of several vehicles approaching

in a row (Illustration 1) or in the opposite
direction (Illustration 2), a chime may not be
sounded by the RCTA system after the first
vehicle passes the sensors.

Illustration 1

LSD2043

5-28

Starting and driving

● The sonar system chime indicating there is a

object behind the vehicle has a higher prior-
ity than the RCTA chime (single beep) indi-
cating an approaching vehicle. If the RCTA
system detects an object behind the vehicle
and an approaching vehicle at the same time
the following indications are provided:

– The sonar system chime sounds

– The Blind Spot Warning indicator light on

the side of the approaching vehicle
flashes

RCTA SYSTEM OPERATION

The BSW/RCTA system can be turned off tem-
porarily by pushing the Blind Spot Warning and
Rear Cross Traffic Alert switch

1

. The

BSW/RCTA system automatically turns on every
time the engine is started.

The RCTA system can be turned off permanently
by setting in the vehicle information display.

1. Press the

button until “Settings” dis-

plays in the vehicle information display. Use
the

button to select “Driver Assis-

tance”. Then press the ENTER button.

2. Select “Driver Aids”, and press the ENTER

button.

3. To set the BSW/RCTA system to on or off,

use the buttons to navigate in the menu and
use the ENTER button to select or change
an item.

● Select “Blind Spot” and press the ENTER

button.

– To turn on the warning, use the ENTER

button to check box for “BSW/RCTA”

RCTA temporarily not available

When radar blockage is detected, the system will
be deactivated automatically. The “Side Radar
Obstruction” warning message will appear and
the Blind Spot indicator (white) will blink in the
vehicle information display. The Blind Spot Warn-
ing and Rear Cross Traffic Alert switch indicators
will also blink.

The systems are not available until the conditions
no longer exist.

The radar sensors may be blocked by temporary
ambient conditions such as splashing water, mist
or fog. The blocked condition may also be caused
by objects such as ice, frost or dirt obstructing
the radar sensors.

Illustration 2

LSD2044

LSD2208

Starting and driving

5-29

Action to take:
When the above conditions no longer exist, the
system will resume automatically.

RCTA malfunction

If the RCTA system malfunctions, the system will
turn off automatically. The system malfunction
warning message with the Blind spot indicator
(orange) will appear in the vehicle information
display. If the BSW system fails, the RCTA sys-
tem will also fail.

Action to take:
Stop the vehicle in a safe location, turn the engine
off and restart the engine. If the message contin-
ues to appear, have the system checked by a
NISSAN dealer.

RADAR MAINTENANCE

The two radar sensors

1

for the BSW and

RCTA systems are located near the rear bumper.
Always keep the area near the radar sensors
clean.

The radar sensors may be blocked by temporary
ambient conditions such as splashing water, mist
or fog.

The blocked condition may also be caused by
objects such as ice, frost or dirt obstructing the
radar sensors.

Check for and remove objects obstructing the
area around the radar sensors.

Do not attach stickers (including transparent ma-
terial), install accessories or apply additional
paint near the radar sensors.

Do not strike or damage the area around the
radar sensors. Consult a NISSAN dealer if the
area around the radar sensors is damaged due to
a collision.

Radio frequency statement

This device complies with part 15 of the
FCC Rules.

Operation is subject to the following two
conditions:

1. This device may not cause harmful in-

terference, and

2. This device must accept any interfer-

ence received, including interference
that may cause undesired operation.

FCC Warning
Changes or modifications not expressly ap-
proved by the party responsible for compli-
ance could void the user’s authority to op-
erate the equipment.

LSD2217

5-30

Starting and driving

Applicable law: Canada 310
This device complies with Industry Canada
license-exempt RSS standard(s). Opera-
tion is subject to the following two condi-
tions: (1) this device may not cause inter-
ference, and (2) this device must accept any
interference, including interference that
may cause undesired operation of the de-
vice.

Frequency

of

operation:

24.05GHz

24.25GHz

Output power: less than 20 milliwatts

PRECAUTIONS ON CRUISE
CONTROL

1.

ACCEL/RES switch

2.

COAST/SET switch

3.

CANCEL switch

4.

ON·OFF switch

● If the cruise control system malfunctions, it

cancels automatically. The SET indicator
light in the vehicle information display then
blinks to warn the driver. For additional infor-
mation, refer to “Vehicle information display”
in the “Instruments and controls” section of
this manual.

● If the SET indicator light blinks, push the

cruise control ON·OFF switch off and have
the system checked by a NISSAN dealer.

LSD2218

CRUISE CONTROL

Starting and driving

5-31

● The SET indicator light may blink when the

cruise control ON·OFF switch is pushed ON
while

pushing

the

ACCEL/RES,

COAST/SET, or CANCEL switch. To prop-
erly set the cruise control system, use the
following procedures.

WARNING

Do not use the cruise control when driving
under the following conditions:

● When it is not possible to keep the

vehicle at a set speed.

● In heavy traffic or in traffic that varies in

speed.

● On winding or hilly roads.
● On slippery roads (rain, snow, ice, etc.).
● In very windy areas.
Doing so could cause a loss of vehicle
control and result in an accident.

CRUISE CONTROL OPERATIONS

The cruise control allows driving at a speed be-
tween 25 - 89 MPH (40 - 144 km/h) without
keeping your foot on the accelerator pedal.

To turn on the cruise control, push the
ON·OFF switch on. The CRUISE indicator light in
the vehicle information display will illuminate.

To set cruising speed, accelerate the vehicle to
the desired speed, push the COAST/SET switch
and release it. The SET indicator light in the
vehicle information display will illuminate. Take
your foot off the accelerator pedal. Your vehicle
maintains the set speed.

● To pass another vehicle, depress the ac-

celerator pedal. When you release the
pedal, the vehicle returns to the previously
set speed.

● The vehicle may not maintain the set speed

when going up or down steep hills. If this
happens, drive without the cruise control.

To cancel the preset speed, use one of the
following three methods:

● Push the CANCEL button; the SET indicator

light in the vehicle information display goes
out.

● Tap the brake pedal; the SET indicator light

goes out.

● Push the ON·OFF switch off. Both the

CRUISE indicator light and SET indicator
light in the vehicle information display go out.

The cruise control is automatically canceled and
the SET light in the vehicle information display
goes out if:

● You depress the brake pedal while pushing

the ACCEL/RES or SET/COAST switch.
The preset speed is deleted from memory.

● The vehicle slows down more than 8 MPH

(13 km/h) below the set speed.

● You move the shift lever to N (Neutral).

To reset at a faster cruising speed, use one of
the following three methods:

● Depress the accelerator pedal. When the

vehicle attains the desired speed, push and
release the COAST/SET switch.

● Push and hold the ACCEL/RES switch.

When the vehicle attains the speed you de-
sire, release the switch.

● Push and release the ACCEL/RES switch.

Each time you do this, the set speed in-
creases by about 1 MPH (1.6 km/h).

To reset at a slower cruising speed, use one
of the following three methods:

● Lightly tap the brake pedal. When the ve-

hicle attains the desired speed, push the
COAST/SET switch and release it.

● Push and hold the COAST/SET switch. Re-

lease the switch when the vehicle slows to
the desired speed.

5-32

Starting and driving

● Push and release the COAST/SET switch.

Each time you do this, the set speed de-
creases by about 1 MPH (1.6 km/h).

To resume the preset speed, push and re-
lease the ACCEL/RES switch. The vehicle re-
turns to the last set cruising speed when the
vehicle speed is over 25 MPH (40 km/h).

CAUTION

During the first 1,200 miles (2,000 km),
follow these recommendations to obtain
maximum engine performance and ensure
the future reliability and economy of your
new vehicle. Failure to follow these rec-
ommendations may result in shortened
engine

life

and

reduced

engine

performance.

● Avoid driving for long periods at constant

speed, either fast or slow, and do not run the
engine over 4,000 RPM.

● Do not accelerate at full throttle in any gear.
● Avoid quick starts.
● Avoid hard braking as much as possible.
● Do not tow a trailer for the first 500 mi

(805 km). Your engine, axle or other parts
could be damaged.

Follow these easy-to-use Fuel-Efficient Driving
Tips to help you achieve the most fuel economy
from your vehicle.

1. Use Smooth Accelerator and Brake

Pedal Application

● Avoid rapid starts and stops
● Use smooth, gentle accelerator and

brake application whenever possible

● Maintain constant speed while commut-

ing and coast whenever possible

● Apply light pressure to the accelerator

pedal when driving on flat roads or down
hills

● Avoid pumping the breaks when slowing

the vehicle when possible

2. Maintain Constant Speed

● Look ahead to try and anticipate and mini-

mize stops

● Synchronizing your speed with traffic

lights allows you to reduce your number
of stops

● Maintaining a steady speed can minimize

red light stops and improve fuel efficiency

BREAK-IN SCHEDULE

FUEL-EFFICIENT DRIVING TIPS

Starting and driving

5-33

3. Use Air Conditioning (A/C) at Higher

Vehicle Speeds

● Below 40 MPH (64 km/h), it is more

efficient to open windows to cool the
vehicle due to reduced engine load

● Above 40 MPH (64 km/h), it is more

efficient to use A/C to cool the vehicle
due to increased aerodynamic drag

● Recirculating the cool air in the cabin

when the A/C is on reduces cooling load

● Turn off air conditioning when it is not

necessary

4. Drive at Economical Speeds and Dis-

tances

● Observing the speed limit and not ex-

ceeding 60 MPH (97 km/h) (where le-
gally allowed) can improve fuel efficiency
due to reduced aerodynamic drag

● Maintaining a safe following distance be-

hind other vehicles reduces unnecessary
braking

● Safely monitoring traffic to anticipate

changes in speed permits reduced brak-
ing and smooth acceleration changes

● Select a gear range suitable to road con-

ditions

● Frequent short-distance driving can re-

duce fuel economy

5. Use Cruise Control

● Using cruise control during highway driv-

ing helps maintain a steady speed

● Cruise control is particularly effective in

providing fuel savings when driving on flat
terrains

6. Plan for the Shortest Route

● Utilize a map or navigation system to de-

termine the best route to save time

7. Avoid Idling

● Shutting off your engine when safe for

stops exceeding 30–60 seconds saves
fuel and reduces emissions

8. Buy an Automated Pass for Toll Roads

● Automated passes permit drivers to use

special lanes to maintain cruising speed
through the toll and avoid stopping and
starting

9. Winter Warm Up

● Limit idling time to minimize impact to fuel

economy

● Vehicles typically need no more than

30 seconds of idling at start-up to effec-

tively circulate the engine oil before driv-
ing

● Your vehicle will reach its ideal operating

temperature more quickly while driving
versus idling

● Park your vehicle in moderate ambient

temperatures when possible

10. Keeping your Vehicle Cool

● Park your vehicle in a covered parking

area or in the shade whenever possible

● When entering a hot vehicle, opening the

windows will help to reduce the inside
temperature faster, resulting in reduced
demand on your A/C system

11. Cargo

● Avoid transporting unnecessary luggage

in the vehicle

● Avoid carrying luggage in the roof rack

which can increase aerodynamic drag

12. Break-in

● your vehicle may need a break-in period

for more than 4000 miles to improve the
fuel economy

● Avoid measuring fuel economy within ini-

tial 1200 miles

5-34

Starting and driving

13. Use D (Drive)

● Use the D (Drive) and drive with the Over

Drive on as much as possible

● Driving with the Over Drive OFF or in the

L (Low) position may cause the engine to
run longer than necessary and reduce
fuel economy

NOTE:

In

order

to

display

the

correct

fuel

economy, reset the fuel economy meter
first.

● Keep your engine tuned up.
● Follow the recommended scheduled main-

tenance.

● Keep the tires inflated to the correct pres-

sure. Low tire pressure increases tire wear
and lowers fuel economy.

● Keep the wheels in correct alignment. Im-

proper alignment increases tire wear and
lowers fuel economy.

● Use the recommended viscosity engine oil.

For additional information, refer to “Engine
oil and oil filter recommendations” in the
“Technical and consumer information” sec-
tion of this manual.

4X4–I SYSTEM OPERATION

WARNING

● Do not drive beyond the performance

capability of the tires. Accelerating
quickly, sharp steering maneuvers or
sudden braking may cause loss of con-
trol, even with Intelligent 4WD engaged.

● For 4WD equipped vehicles, do not at-

tempt to raise 2 wheels off the ground
and shift the transmission to any drive
or reverse position with the engine run-
ning. Doing so may result in drivetrain
damage or unexpected vehicle move-
ment which could result in serious per-
sonal injury or vehicle damage.

INCREASING FUEL ECONOMY

INTELLIGENT 4WD (if so equipped)

Starting and driving

5-35

● Do not attempt to test an 4WD equipped

vehicle on a 2-wheel dynamometer
(such as the dynamometers used by
some states for emissions testing) or
similar equipment even if the other 2
wheels are raised off the ground. Make
sure that you inform the test facility
personnel that your vehicle is equipped
with 4WD before it is placed on a dyna-
mometer. Using the wrong test equip-
ment may result in drivetrain damage or
unexpected vehicle movement which
could result in serious personal injury
or vehicle damage.

CAUTION

● Do not operate the engine on a free

roller when any of the wheels are
raised.

● If you use the free roller, rotate 4 wheels

with the same speed without raising
any wheels.

● If an 4WD warning message is dis-

played while driving there may be a
malfunction in the 4WD system. Reduce
the vehicle speed immediately and have
your vehicle checked by an NISSAN
dealer as soon as possible.

● If the 4WD high temperature message is

displayed while you are driving, pull off
the road in a safe area, and idle the
engine. The driving mode will change to
2WD to prevent the 4WD system from
malfunctioning. If the warning message
turns off, you can drive again.

● If the tire size incorrect message is dis-

played while you are driving, pull off the
road in a safe area with the engine
idling. Check that all tire sizes are the
same, that the tire pressure is correct
and that the tires are not excessively
worn.

● If a warning message continues to be

displayed after the above operations,
have

your

vehicle

checked

by

an

NISSAN dealer as soon as possible.

4WD shift switch

The 4WD system is used to select the 2WD,
AUTO or LOCK mode depending on the driving
conditions.

Turn the 4WD mode switch, located on the cen-
ter console, to select 2WD, AUTO, or LOCK.

● 2WD – Turn the 4WD mode switch to the

2WD position. The 2WD indicator light in
the vehicle information display illuminates.

● AUTO – Turn the 4WD mode switch to the

neutral (AUTO) position. The 4WD AUTO
indicator light in the vehicle information dis-
play illuminates.

LSD2206

5-36

Starting and driving

● LOCK – To engage the LOCK mode, turn

the 4WD mode switch to the LOCK posi-
tion. The switch will return to the AUTO
position automatically and the 4WD LOCK
indicator light in the vehicle information dis-
play illuminates. To disengage the LOCK
mode, turn the switch to the LOCK position
again. The switch will return to the AUTO
position automatically, and the 4WD LOCK
indicator light turns into the AUTO indicator
light. The LOCK mode will automatically be
cancelled when the ignition switch is turned
to the OFF position.

4WD mode

Wheels driven

4WD mode indicator

light

Use conditions

2WD

Front only – This mode
is used when driving on
a normal road *1

2WD

For driving on dry paved
roads.

AUTO

Distribution of torque to
the front and rear
wheels changes auto-
matically depending on
road conditions
encountered. This re-
sults in improved driving
stability.

AUTO

For driving on paved or
slippery roads.

LOCK

4-Wheel Drive *2 *3

LOCK

For driving on rough
roads.

*1 The 2WD mode may change to the 4WD mode automatically depending on the driving conditions.

*2 The LOCK mode will change to the AUTO mode automatically when the vehicle has been driven at
a high speed. The 4WD LOCK indicator light turns into the AUTO indicator light.

*3 The LOCK mode will automatically be cancelled when the ignition switch is turned to the OFF
position.

Starting and driving

5-37


Content   ..  23  24  25  26   ..