Nissan Leaf (2019 year). Instruction - part 5


  Index      Nissan     Nissan Leaf - instruction 2019 year in english


Search            


Content   ..  3  4  5  6   ..


Nissan Leaf (2019 year). Instruction - part 5


To start normal charging:

NOTE:

Charging timer, remote charge (models
with navigation system) and immediate
charge can be performed in the trickle
charge mode. For additional informa-
tion, refer to “Charging methods” in this
section.

1. Push the P (Park) position switch to place

the vehicle in the P (Park) position and
apply the parking brake.

2. When charging the Li-ion battery, place

the power switch in the OFF position.
When the power switch is in the ON po-
sition, the Li-ion battery will not start
charging.

3. Open the charge port lid. For additional

information, refer to “Charge port lid” in
the “Pre-driving checks and adjust-
ments” section of this manual.

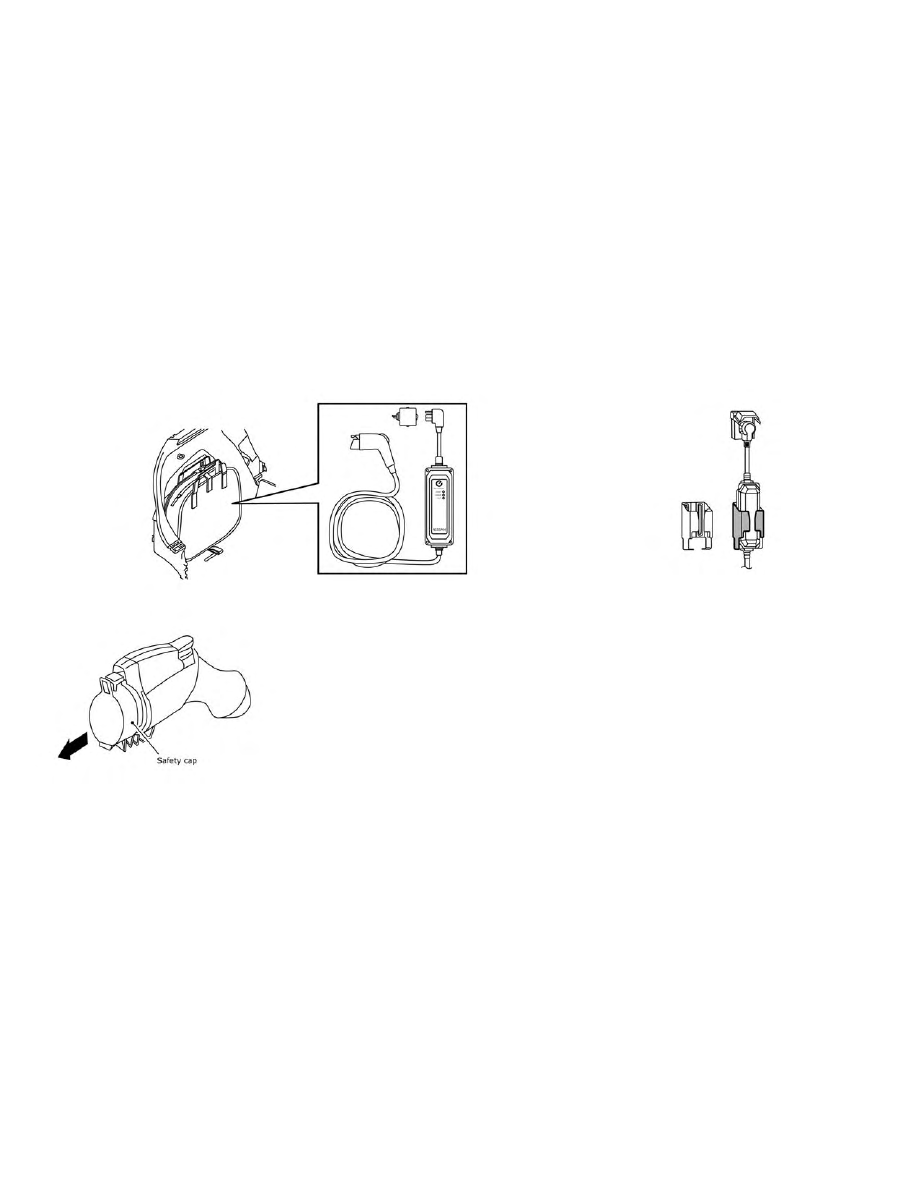
4. Take out the EVSE from the rear hatch.

CH-26

Charging

5. Connect the electrical plug to the AC 220

- 240 volt, 50A dedicated electrical outlet.
If it is connected normally, the green light
on the EVSE control box indicator light
illuminates.

NOTE:
You can pass a rope through the
holes

A

on the control box or place

the control box to the holder in order
to hang it up while the Li-ion battery
is charging.

Use the EVSE with the plug in an up-
right position. (The cord should ex-
tend down from the outlet.)

6. Open the charge port cap. For additional

information, refer to “Charge port cap” in
the “Pre-driving checks and adjust-
ments” section of this manual.

Charging

CH-27

7. Remove the safety cap from the charge

connector.

8. Connect the charge connector to the

charge port. If it is connected normally, a
beep will sound once.

9. If charging has started, or if the Li-ion

battery is waiting for the charging timer,
a beep will sound twice and the charg-
ing status indicator light display will
change. For additional information, refer
to “Charging status indicator lights” in
this section.

10. When recharging outside, such as in

your driveway, use a commercially
available padlock attached in position

A

to prevent theft.

CH-28

Charging

To stop normal charging:

1. Ensure that the charge connector lock is

not engaged. For additional information,
refer to “Charge connector lock system”
in this section.

2. Press the button on the charge connec-

tor, release the lock and remove the
charge connector from the charge port.

3. Attach the safety cap to the EVSE.

4. Remove the electrical plug from the AC

220 - 240 volt, 50A dedicated electrical
outlet.

5. Store in its case.

NOTE:

Perform the following procedure to
store the EVSE in the case:

a. Wind the charge cable into a size

that will allow it to be stored in the
case (approximately 14 in (36 cm)
in diameter). Winding the charge
cable in the direction shown below
avoids shortening the cable life.

b. Place the EVSE into the case.

c. Pass the ring of the lower side belt

from the case through the fastener
on the bottom of the luggage board.

Charging

CH-29

d. Hang the hook from the case to the

ring from the trim.

e. Fix the belt with the hook-and-

loop fastener on the case, pulling
the belt from the case.

WARNING

Pass the lower side belt of the EVSE
case securely through the fastener on
the bottom of the luggage board. If the
case suddenly becomes loose, it may
cause serious injury or death.

6. After closing the cap on the charge port,

close the charge port lid.

NOTE:

To stop charging mid-charge, remove
the charge connector. Charging auto-
matically stops.

HOW TO QUICK CHARGE (IF SO
EQUIPPED)

Quick charge uses public charging sta-
tions (up to 50 kW of power) to charge the
battery in a short period of time.

WARNING

• Always use a quick charger that is

compatible with the LEAF. Using an
incompatible quick charger may
cause a fire or malfunction resulting
in serious personal injury or death.

CH-30

Charging

• Before starting the quick charge,

carefully read the instructions pro-
vided on the quick charger and
make sure the quick charge connec-
tor

is

properly

connected

and

locked. Failure to connect or operate
the quick charger correctly could
cause damage to the vehicle or the
charging equipment.

NOTE:

• Quick charging is possible (even several

times a day) if the battery temperature
is not near the red zone. If the battery
temperature reaches the red zone, in
order to protect the battery, quick
charging is not allowed and the power
limitation mode will be triggered. For
additional information, refer to “Li-ion
battery temperature gauge” in the “EV
Overview” and “Instruments and con-
trols” section of this manual.

• When

the

Li-ion

battery

available

charge and the Li-ion battery capacity
are shown on the quick charger unit, the
readings may differ from the Li-ion bat-
tery available charge/capacity reading
shown on the vehicle’s display.

To start charging:

1. Push the P (Park) position switch to place

the vehicle in the P (Park) position and
apply the parking brake.

2. When charging the Li-ion battery, place

the power switch in the OFF position.
When the power switch is in the ON po-
sition, the Li-ion battery will not start
charging.

3. Open the charge port lid and charge

port cap. For additional information, re-
fer to “Charge port lid” and “Charge port
cap” in the “Pre-driving checks and ad-
justments” section of this manual.

4. Align

1

with the groove of the charge

port and insert the charge connector.

Charging

CH-31

CAUTION

• Be sure to insert the charge connec-

tor straight into the quick charge port
right up to the base. Failure to do so
may result in the Li-ion battery not
charging or could cause damage to
the charging equipment.

5. Grasp the lock lever and lock the charge

connector.

6. Follow the instructions on the quick

charge equipment to start charging.
When the equipment is properly in-
stalled and ready to charge a beep
sounds twice and the charging status
indicator light will change. For additional
information, refer to “Charge status indi-
cator lights” in this section.

Charging ends in the following situations:

• When charging is complete

• When the possible charge time set for the

quick charger is exceeded

NOTE:

• Charging may automatically stop even

if it is not completed.

• If charging stops mid-charge, you can

restart charging by pressing the start
button on the quick charger again.

• The charge connector is locked to the

charge port during charging and can-
not be disconnected. Follow the in-
structions on the quick charge equip-
ment

to

stop

charging.

Confirm

charging is stopped by looking at the
indicators on the instrument panel. The
charge connector can be disconnected
from the vehicle when charging is
stopped.

• When quick charging, the Li-ion battery

charging rate is slower as the percent-
age of available battery charge in-
creases.

CH-32

Charging

To finish charging:

1. Confirm charging is stopped by looking

at the indicators on the instrument
panel. The charge connector can be dis-
connected from the vehicle when charg-
ing is stopped.

2. Unlock the charge connector, remove

from the vehicle and properly store it.

3. Close the quick charge port cap.

4. Shut the charge port lid.

CAUTION

• As the quick charge connector is

heavier in comparison to the other
charge connectors, allowing it to
drop could cause damage to the ve-
hicle or charge connector or per-
sonal injury. When removing the
connector, be sure to pull it out
straight and as carefully as possible.

CHARGE CONNECTOR LOCK
SYSTEM

The normal or trickle charge connector
can be locked to the normal charge port.

Perform the following steps and the
charge connector lock mode can be se-
lected:

1. Push the

button to select “EV

settings” and then push the OK button.

2. Push the

button until “Chg.

Connector Lock” is selected and then
push the OK button.

Charging

CH-33

3. Push the

button until the

preferred mode of AUTO, LOCK or UN-
LOCK, is selected and then push the OK
button.

NOTE:

The charge connector lock can be acti-
vated when the shift lever is in the P
(Park) position and the charge connector
is connected. The charge connector lock
will not be activated if the charge con-
nector is not properly connected.

AUTO mode

To select AUTO mode, push the up and
down switch until "AUTO" is selected and
then push the OK button. The indicator
light for "AUTO" will illuminate.

When AUTO mode is selected, the charge
connector is locked while charging is in
process. The charge connector will be un-
locked automatically when charging is
complete.

LOCK mode

To select the LOCK mode, push the up and
down switch until "LOCK" is selected and
then push the OK button. The indicator
light for "LOCK" will illuminate.

When LOCK mode is selected, the charge
connector will remain locked. The charge
connector will be unlocked when UNLOCK
mode is selected or temporary unlock op-
eration is performed.

UNLOCK mode

To select UNLOCK mode, push the up and
down switch until "UNLOCK" is selected
and then push the OK button. The indicator
light for "UNLOCK" will illuminate.

When UNLOCK mode is selected, the
charge connector will remain unlocked.

Temporary unlock mode:

When the charge connector lock system is
in the AUTO or LOCK mode, the charge
connector lock can be unlocked temporar-
ily by using the NISSAN Intelligent Key® or
the charge port lid switch.

Unlock operation using Intelligent
Key

1. Press the charge port lid opener button

on the Intelligent Key for more than
1 second.

2. The charging status indicator light

flashes three times and a beep sounds
three times. The charge connector lock
is unlocked for 30 seconds.

3. After 30 seconds, the charge connector

lock is locked.

CH-34

Charging

The charge connector lock can also be un-
locked for 30 seconds when unlocking a
door or the rear hatch (in this case, the
charging status indicator light does not
operate). If the lock is operated again within
30 seconds after unlocking the door/rear
hatch, the charge connector lock is locked
again.

Unlock operation using charge
port lid switch

1. Push the charge port lid switch.

2. The charging status indicator light

flashes three times and a beep sounds
three times. The charge connector lock
is unlocked for 30 seconds.

3. After 30 seconds, the charge connector

lock is locked.

NOTE:

• Depending on the charging station, the

lock mechanism established by local
standards may not be compatible with
your vehicle. It may not be possible for
the charge connector to lock to your ve-
hicle.

• When the power source is cut off while

charging in AUTO mode, the connector
will be continuously locked for 5 min-
utes, then it will be released.

• When timer charging is set with AUTO

mode, the connector will not lock until
charging is started.

• When the following system(s) are oper-

ated individually or the 12-volt battery
is being charged, the charging connec-
tor lock will not lock:

– Climate Ctrl. Timer
– Remote

climate

control

(if

so

equipped)

– Li-ion battery warmer (if so equipped)

Charging

CH-35

If the charge connector cannot be
unlocked

1. Place power switch in the OFF position.

2. Open the hood.

3. Insert a flat head screwdriver or suitable

tool into the screw that is located on the
front of the hood lock.

4. Turn it clockwise to release the charge

connector lock.

5. Remove the charge connector.

CHARGING TIMER

Use charging timer to schedule when the
Li-ion battery charges. The vehicle auto-
matically begins charging at the scheduled
times when the charge connector is con-
nected to the vehicle. The timers do not
need to be reset each time the Li-ion bat-
tery needs charging.

The charging timer can save two timer set-
tings that include the charging start time
and end time. The charging timer can be
applied to the timer settings for each day
of the week (models with Navigation Sys-
tem).

The vehicle automatically begins charging
at the scheduled times when the charge
connector is connected to the vehicle. The
timers do not need to be reset each time
the Li-ion battery needs to be charged.

1. Push the

button to select “EV

settings” and then push the OK button.

2. Push the

button to select

“Charge Timer1” or “Charge Timer2” and
then push the OK button.

3. Push the

button to select

“Timer” and then push the OK button.
The indicator light will turn on when the
timer setting is turned on.

4. Push the

button until to select

“Start time” and then push the OK
button.

5. Push the

button to set “Hour”

and then push the OK button.

CHARGING METHODS

CH-36

Charging

6. Push the

button to set “Min-

ute” and then push the OK button.

7. Push the

button to select “End

time” and then push the OK button.

8. Push the

button to set “Hour”

and then push the OK button.

9. Push the

button to set “Min-

ute” and then push the OK button.

10. Models with Navigation System: Push

the

button to select the days

of the week you wish to activate the
Charging Timer and then push the OK
button. Push the Back button to return
to the previous display.

11. After the setting is complete, place the

power switch in the OFF position, and
then connect the charge connector to
the vehicle.

NOTE:

• Always place the power switch in the

OFF position after setting the charging
timers. When the power switch in the
ON position, the Li-ion battery will not
start charging.

• Some charging stations used to per-

form normal charge are equipped with
timer functions. If the charger timer
function and the vehicle timer are both
set, and the two timers are not set to
operate at the same time, it is possible
that the charger will not start or the bat-
tery will not be charged to the level ex-
pected.

• The Li-ion battery may not charge to

the expected level using the Charging
Timer while the Li-ion battery warmer
(if so equipped) operates.

• Charging timer is performed according

to the current time setting of the clock
on the vehicle information display.
When setting the charging timer func-
tion, be sure to check that the current
time displayed is correct.

• To turn off the charging timer function,

select "Timer" on the Charge Timer dis-
play (vehicle information display) using
the

button and push the OK

button to turn off the indicator light.
The start and end time settings are not
deleted, even if the charging timer func-
tion is turned off.

• If the day of the week is not selected on

the timer charge setting screen, the
charging timer will not operate on that
day. The system will wait until the next
set charging time to perform charging
(models with Navigation System).

Charging

CH-37

Timer Charge setting screen

Chg. Timer Only at HOME (models
with Navigation System):

If you register your home in the navigation
system and turn on “Chg. Timer Only at
HOME,” the timer charging is applied only
when the normal or trickle charge is per-
formed at home. For additional informa-
tion, refer to LEAF Navigation System Own-
er’s Manual for the registration. When the
charging is performed at a place other
than home, the charging automatically
starts when a normal or trickle charge con-
nector is connected to the vehicle.

Full charge has priority:

If “Full charge has priority” is turned on, the
charge start timer will be advanced if the
fully charged condition of the Li-ion battery
cannot be achieved during the start time
to end time interval. If the fully charged
battery condition cannot be achieved, the
charge continues until the battery is fully
charged.

CH-38

Charging

NOTE:
If “Full charge has priority” is turned
on, it is possible that the battery is not
charged fully by the charge end time
due to the operating condition of
Climate Ctrl. Timer and the tolerance
of charging time, etc. In that case,
the charging continues until the Li-ion
battery is fully charged.

TIMER DISPLAY

The timer display appears for approxi-
mately 30 seconds when the power switch
is placed in the OFF position.

1

Charging time

The estimated time of charging the Li-ion
battery (start time and end time) is dis-
played.

• When the charging timer is set, the charg-

ing system calculates the estimated time
to charge the Li-ion battery based on the
electrical power supplied in the last
charging using the timer, and the start
time and end time are displayed.

• When the charging timer is set to OFF, the

estimated end time to charge the Li-ion
battery to a full level in the case of per-
forming the immediate charge. The end

time is calculated based on the electrical
power selected in the “Charge Time
Screen”.

• When the Li-ion battery was fully charged,

the charging time will be displayed as
“--:--”.

2

Charging timer setting status

When the charging timer is set, the start
time and end time of the charging using
the timer are displayed

3

Climate Ctrl. timer setting status

When the Climate Ctrl. timer is set, the de-
parture time (end time) set for the Climate
Ctrl. Timer is displayed.

4

Charge connector lock setting status

The current mode of the charge connector
lock (AUTO, LOCK or UNLOCK) is displayed.
For the charge connector lock operation,
see “Charge connector lock system” in the
“Charging” section of this manual.

When the OK button on the steering wheel
is pushed, the display will be switched to
the “EV Settings” menu. In the EV Settings,
the setting of the charging timer, Climate
Ctrl. timer and charge connector lock

Charging

CH-39

mode can be changed. (See “Vehicle infor-
mation display” in the “2. Instruments and
controls” section of this manual for the set-
tings menu of the vehicle information dis-
play.)

When the

button on the steering

wheel is pushed while the timer display is
shown, the display is switched to the ECO
Drive Report (if the vehicle was driven).

Either display will continue to be displayed
for another 30 seconds when the button is
operated. If the doors are locked after the
power switch was placed in the OFF posi-
tion, the display will turn off before the pre-
set time.

For models with Navigation System, the
day of the week is displayed with the time
(hour and minute) in each information

1

3

.

In addition to the above, note the following
conditions for the charging time

1

infor-

mation:

• The charging time is displayed by the

10 minutes. If the estimated charging time
is longer than 24 hours, “Over 24h” is
displayed.

• When the charging is set to start immedi-

ately after connecting the charge con-
nector to the vehicle, the start time is dis-
played as “Charge Now”.

• While being charged, the time when the

charging has actually started is displayed
as the start time. The end time is dis-
played according to the estimated charg-
ing time that was calculated based on the
electrical power being supplied.

• For models with Li-ion battery warmer,

the charging system calculates the elec-
trical power used by the battery warmer
when the Li-ion battery temperature is
low, and longer charging time will be
displayed.

• When “Chg. Timer Only at HOME” is set to

ON (models with Navigation System) in
the EV Settings, the start time is displayed
only when the power switch is placed in
the OFF position at home. If the power
switch is placed in the OFF position other
than at home, the immediate charge
mode is selected and “Charge Now” will
appear as the start time.

• When “Full charge has priority” is set to ON

in the EV Settings and the Li-ion battery

cannot be charged to a full level within the
hours between the scheduled start time
and end time of the charging timer, the
charging time shows the time that ex-
ceeds the scheduled hours in the charg-
ing timer.

• If you need to confirm the estimated

charging time depending on the available
electrical power (supplied to the charger),
see the Estimated Charge Time display.
(See “Trip computer” in the “Instruments
and controls” section of this manual.)

NOTE:

• The displayed end time of charging is

an estimation. The Li-ion battery may
not be charged to a full level by the es-
timated end time.

• If the charging timer and the Climate

Ctrl. timer are set to operate at the same
time, longer charging time will be dis-
played or the Li-ion battery may not be
charged to a full level at the scheduled
end time.

CH-40

Charging

IMMEDIATE CHARGE

When a charging timer is not turned on,
charging automatically starts when a nor-
mal or trickle charge connector is con-
nected to the vehicle.

Use the immediate charge mode anytime
you want to start charging when a charg-
ing timer is turned on by performing the
following:

1. Place the power switch in the OFF

position.

2. Push the immediate charge switch.

3. Connect the normal or trickle charge

cable when the charging status indica-
tor light changes to display immediate
charge mode. For additional informa-
tion, refer to “Charging status indicator
lights” in this section.

NOTE:

• You have 15 minutes to connect a nor-

mal or trickle charge connector to the
vehicle after the immediate charge
switch is pushed. If a charge connector
is not connected to the vehicle within
15 minutes, the vehicle automatically
returns to the previous setting.

• To cancel immediate charge mode push

the immediate charge switch again.

• If the charge cable is disconnected, the

Li-ion battery automatically switches to
charging timer. To perform an immedi-
ate charge again, push the immediate
charge switch and connect the charge
cable.

• If the charge cable is already connected,

push the immediate charge switch to
start performing an immediate charge.

Charging

CH-41


Content   ..  3  4  5  6   ..