Nissan Kicks (2018 year). Instruction - part 15


  Index      Nissan     Nissan Kicks - instruction 2018 year in english


Search            


Content   ..  13  14  15  16   ..


Nissan Kicks (2018 year). Instruction - part 15


FM/AM RADIO

For additional information, refer to “Audio
operation precautions” in this section.
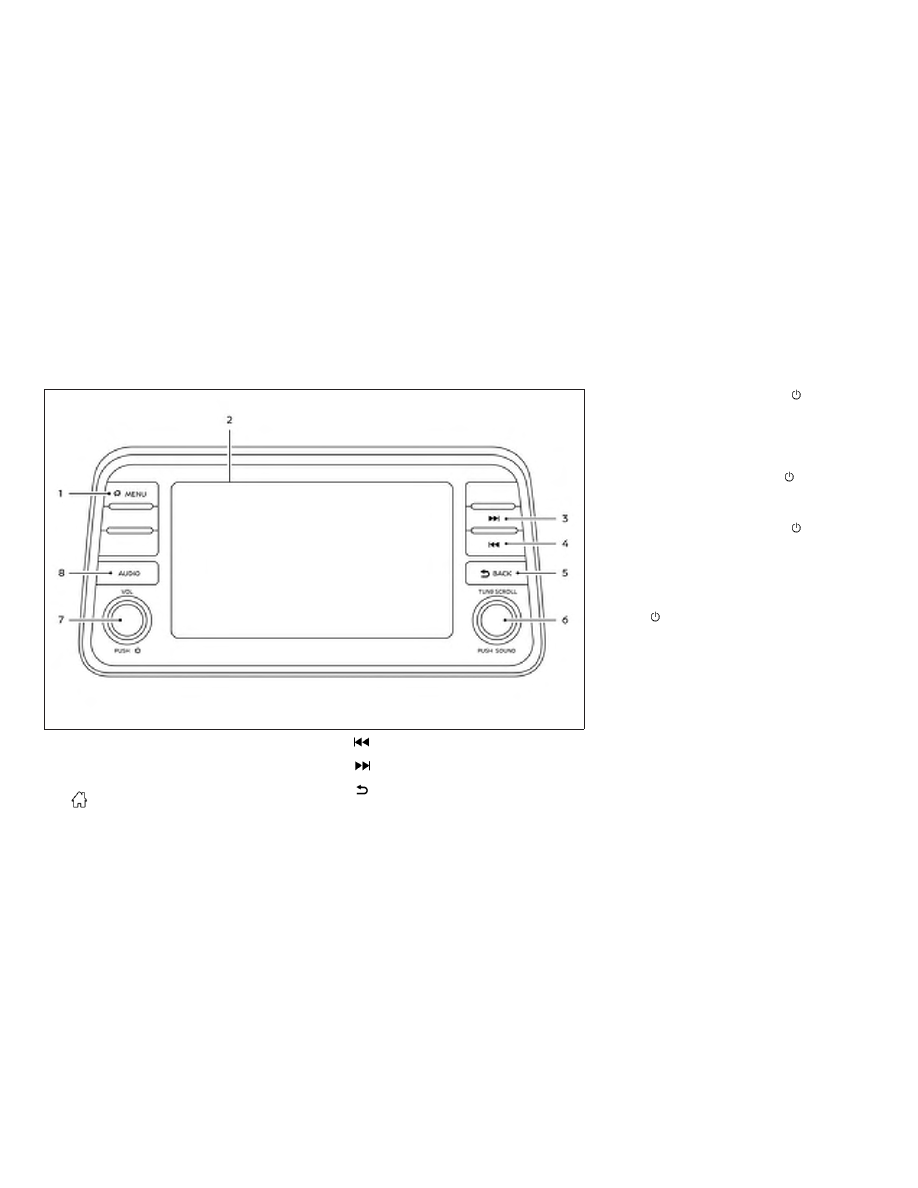
1.

MENU button

2. Display screen

3.

SEEK button

4.

TRACK button

5.

BACK button

6. PUSH SOUND button / TUNE• SCROLL

knob

7. VOL (volume) knob/PUSH

(power)

button

8. AUDIO button

Audio main operation

VOL (volume) knob / PUSH

(power)

button

Place the ignition switch in the ACC or ON
position and press the PUSH

(power)

button while the system is off to call up the
mode (radio, AUX, Bluetooth® audio, USB or
iPod®) that was playing immediately before
the system was turned off.
To

turn

the

system

off,

press

the

PUSH

(power) button.

Turn the VOL (volume) control knob to ad-
just the volume.

This vehicle may be equipped with Speed
Sensitive Volume. When this feature is ac-
tive, the audio volume changes as the driv-
ing speed changes.

LHA4704

4-48

Monitor, climate, audio, phone and voice recognition systems

MENU button

Press the

MENU button to show the

Menu screen. Touch the “Settings” key on
the display, then touch the “Sound” key.

Sound

Bass

Adjusts the bass to the desired level.

Treble

Adjusts the treble to the desired level.

Balance

Adjusts the balance to the desired level. Balance adjusts the sound level between the left and
right speakers.

Fade

Adjusts the fade to the desired level. Fade adjusts the sound level between the front and rear
speakers.

Speed Sensitive Volume

Adjusts the speed sensitive volume function, which increases the volume of the audio system
as the speed of the vehicle increases. Set to “OFF” to disable the feature. The higher the setting,
the more the volume increases in relation to vehicle speed.

Bass, treble, balance, fade, and Speed Sensitive Volume can be adjusted by touching “-” or “+” keys.

Monitor, climate, audio, phone and voice recognition systems

4-49

BACK button

Press the

BACK button to return to

the previous menu screen.

Audio button
Push to display the audio screen. When this
button is pushed while the audio screen is
not displayed, the last audio source played
will play.

AM/FM radio screen

1. “AM Menu” / “FM Menu” key

Touch to display the radio menu
screen.

2. Direct Tune (if so equipped)

Touch to manually enter a station.

3. Audio source indicator

Indicates the currently selected audio
source.

4. Reception information display

Reception information currently avail-
able such as frequency, station name,
etc. is displayed.

5. Preset list

To listen to a preset station, touch the
corresponding station from the preset
list. If displayed, touch the “<” or “>” keys
to scroll the preset list.

AM radio operation

Press the

MENU button and touch the

“AM” key or press the AUDIO button and
select AM on the bottom of the Launch Bar
to bring up the AM display screen.
If another audio source is playing when the
“AM” key is pressed, the audio source play-
ing will automatically be turned off and the
last radio station played will begin playing.

AM Menu

Touch the “AM Menu” key to display the AM
Menu screen options:

∙ SCAN: To scan the stations, touch the

“AM Menu” key on the radio screen and
then touch the “SCAN” key. The stations
will be turned from low to high frequen-
cies and stop at each broadcasting sta-
tion for several seconds. Touching the
“SCAN” key again during this period of
several seconds will stop tuning and the
radio will remain tuned to that station.

LHA4708

4-50

Monitor, climate, audio, phone and voice recognition systems

∙ Refresh: Touch the “Refresh” key to up-

date the station list displayed on the
right side of the AM Menu screen.

(SEEK/TRACK) buttons

Press the

or

buttons to tune

from low to high or high to low frequencies
and to stop at the next broadcasting station.
Direct Tune

Touch the “Direct Tune” key to display the
Direct Tune menu and manually enter a
station.

1 to 6 Station memory operations

Up to six stations can be registered in the
preset list.

1. Select the AM radio band.

2. Tune to the station you wish to store.

3. Touch and hold one of the preset num-

bers in the preset list.

The information such as frequency will be
displayed on the preset list.

To select and listen to the preset stations,

push

or

on the steering wheel

briefly or touch a preferred station on the
preset list on the radio screen.

FM radio operation

Press the

MENU button and touch the

“FM MENU” key or press the AUDIO button
and select FM on the bottom of the Launch
Bar to bring up the FM display screen.
If another audio source is playing when the
“FM” key is pressed, the audio source play-
ing will automatically be turned off and the
last radio station played will begin playing.

The FM stereo indicator (STEREO) is shown
on the screen during FM stereo reception.
When the stereo broadcast signal is weak,
the radio automatically changes from ste-
reo to monaural reception.

FM Menu

Touch the “FM Menu” key to display the FM
Menu screen options:

∙ SCAN: To scan the stations, touch the

“FM Menu” key on the radio screen and
then touch the “SCAN” key. The stations
will be tuned from low to high frequen-
cies and stop at each broadcasting sta-
tions for several seconds. Touching the
“SCAN” key again during this period of
several seconds will stop tuning and the
radio will remain tuned to that station.

∙ Refresh: Touch the “Refresh” key to up-

date the station list displayed on the
right side of the FM Menu screen.

∙ RDS Info: Radio station and song infor-

mation can be displayed on the FM dis-
play screen.

(SEEK/TRACK) buttons

Press the

or

buttons to tune

from low to high or high to low frequencies
and to stop at the next broadcasting sta-
tion.
1 to 12 Station memory operations

Up to 12 stations can be registered in the
preset list.

1. Select the FM radio band.

2. Tune to the station you wish to store.

3. Touch and hold one of the preset num-

bers in the preset list.

The information such as frequency will be
displayed on the preset list.

To select and listen to the preset stations,

push

or

on the steering wheel

briefly or touch a preferred station on the
preset list on the radio screen.

Monitor, climate, audio, phone and voice recognition systems

4-51

Auxiliary (AUX) devices operation

Connecting auxiliary devices

Connect an AUX device into the AUX input
jack located on the center console below
the heater and air conditioner controls.

The AUX input jack accepts any standard
analog audio input such as from a portable
cassette player, CD player, MP3 player or
phone.

Insert a 1/8 in (3.5 mm) stereo mini plug in
the audio input jack. If a cable with a mono
plug is used, the audio output may not
function normally.

Activation and playing

Turn on the AUX device. Connect an AUX
cable to the AUX device and the AUX input
jack. Select AUX mode from the audio
source menu screen or by pressing the
Source button on the steering wheel.

AUX screen

∙ Audio source indicator

Indicates that the AUX source is cur-
rently playing.

∙ “Volume Setting” keys

Touch one of the keys to select the
sound output gain from Low, Medium
and High.

∙ AUX from Launch Bar

Touch to change from another source
to AUX.

Additional features

For additional information, refer to “iPod®
player operation” regarding the iPod®
player available with this system in this
section.

For additional information, refer to “USB
(Universal Serial Bus) Connection Port” re-
garding the USB connection port available
with this system in this section.

For

additional

information,

refer

to

“Bluetooth® streaming audio” about the
Bluetooth® audio interface available with
this system in this section.

Microsoft (WMA) Obligation of
Labeling

Additional Obligation of Labeling

This product is protected by certain intel-
lectual

property

rights

of

Microsoft

Corporation and third parties. Use or distri-
bution of such technology outside of this
product is prohibited without a license
from Microsoft or an authorized Microsoft
subsidiary and third parties.

LHA4709

4-52

Monitor, climate, audio, phone and voice recognition systems

USB (Universal Serial Bus)
CONNECTION PORT

Connecting a device to the USB
Connection Port

WARNING

Do not connect, disconnect, or operate
the USB device while driving. Doing so
can be a distraction. If distracted you
could lose control of your vehicle and
cause an accident or serious injury.

CAUTION

∙ To avoid damage and loss of function

when using a USB device, note the fol-
lowing precautions.

∙ Do not force the USB device into the

USB port. Inserting the USB device
tilted or up-side-down into the port
may damage the port. Make sure that
the USB device is connected correctly
into the USB port.

∙ Do not grab the USB port cover (if so

equipped) when pulling the USB de-
vice out of the port. This could dam-
age the port and the cover.

∙ Do not leave the USB cable in a place

where it can be pulled unintentionally.
Pulling the cable may damage the
port.

For additional information, refer to your de-
vice manufacturer’s owner information re-
garding the proper use and care of the
device.

The USB port is located on the center con-
sole beneath the heater and air condi-
tioner controls. Insert the USB device into
the connection port.

When a compatible storage device is
plugged into the connection port, compat-
ible audio files on the storage device can be
played through the vehicle’s audio system.
The port is illuminated for better visibility
when the headlight switch is in the ON po-
sition.

LHA4701

Monitor, climate, audio, phone and voice recognition systems

4-53

USB connections screen

Press the

MENU button and touch the

“Connections” key or press the “Settings”
key and touch the “Connections” key to
change USB settings.

∙ Auto Change Source

Touch ON or OFF to change the audio
source settings for USB memory de-
vices or an iPod® connected through a
USB cable.

USB screen

1. “USB Menu” key

Touch to switch to the USB Menu
screen.

2. Track information

Track information such as the song
name, artist name and album name
are displayed.

3. Audio source indicator

Indicates the currently selected audio
source.

4. USB operation keys

Touch to control USB playback func-
tions

5. Play time and progress bar

The play time of the track is displayed.
The bar indicates the progress in play-
ing a track.

USB operation keys

Touch to control USB playback functions.

Keys

Description

Each time “

” key is touched,

the repeat mode changes.

Touch to return to the beginning of
the current track. Touch again to
select the previous track. Touch and
hold to rewind the current track.

Touch to play the track.

Touch to pause the track.

Touch to select the next track.
Touch and hold to fast-forward the
track.

Each time “

” key is touched,

the random mode changes.

LHA4711

LHA4710

4-54

Monitor, climate, audio, phone and voice recognition systems

USB memory device player
operation

Activation and playing
Connecting the USB memory device into
the port will start playing the USB memory.

USB memory device can also be played by
touching the “USB” key on the Menu screen
or by touching USB on the Launch Bar.

To pause playing the USB memory device
touch the “

” key. To resume playing,

touch the “

” key.

Skipping tracks

To skip the tracks, push the

or

buttons on the control panel or touch the

” or “

” keys on the screen repeat-

edly until the preferred track is selected.

NOTE:

Depending on the condition, skipping to
the previous track may require pushing
the button or touching the key twice.
Pushing the button or touching the key
once may only restart the current track
from the beginning.

Fast-forwarding/rewinding
To rewind or fast-forward the track, push

and hold the

or

buttons on the

control panel or touch and hold the “

or “

” keys on the screen.

Changing play mode
Repeat mode

Touch the “

” key on the USB screen to

change the repeat mode.
The following modes are available:
No text displayed: Repeat off

All: Repeat all

1 Folder: Repeat folder/sub-folder

1 Track: Repeat track

Random mode

Touch the “

” key on the screen to

change the random mode as follows:
No text displayed: Random off

Random: Random play

All: Repeat all

1 Folder: Repeat folder/sub-folder

USB menu

Touch the “USB Menu” key on the USB
screen to display the USB Menu screen.

“Now Playing” key

Touch to display the USB
screen.

“Folder List” key

Touch to display the folder
list. Touch an item on the list
to select the folder. The sub-
folder or track list will be
displayed. Select a sub-folder
or track from the list.

“Album Artwork”

Touch to run on/off the al-
bum artwork display on the
USB screen.

Monitor, climate, audio, phone and voice recognition systems

4-55

iPod®* PLAYER OPERATION

Connecting iPod®

WARNING

Do not connect, disconnect, or operate
the USB device while driving. Doing so
can be a distraction. If distracted you
could lose control of your vehicle and
cause an accident or serious injury.

CAUTION

∙ Do not force the USB device into the

USB port. Inserting the USB device
tilted or up-side-down into the port
may damage the port. Make sure that
the USB device is connected correctly
into the USB port.

∙ Do not grab the USB port cover (if so

equipped) when pulling the USB de-
vice out of the port. This could dam-
age the port and the cover.

∙ Do not leave the USB cable in a place

where it can be pulled unintentionally.
Pulling the cable may damage the
port.

For additional information, refer to your de-
vice manufacturer’s owner information re-
garding the proper use and care of the
device.

To connect an iPod® to the vehicle so that
the iPod® can be controlled with the audio
system controls and display screen, use
the USB connection port located on the
center console below the heater and air
conditioner controls. Connect the iPod®-
specific end of the cable to the iPod® and
the USB end of the cable to the USB con-
nection port on the vehicle. If your iPod®

supports charging via a USB connection, its
battery will be charged while connected to
the vehicle with the ignition switch in the
ON position. The port is illuminated for bet-
ter visibility when the headlight switch is in
the ON position.

While connected to the vehicle, the iPod®
can only be operated by the vehicle audio
controls.

To disconnect the iPod® from the vehicle,
remove the USB end of the cable from the
USB connection port on the vehicle, then
remove the cable from the iPod®.

* iPod® is a trademark of Apple Inc., regis-
tered in the U.S. and other countries.

Compatibility

The following models are compatible:

∙ iPod® Classic 5th generation (firmware

version 1.3.0 or later)

∙ iPod® Classic 6th generation (firmware

version 2.0.1 or later)

∙ iPod® Classic 7th generation (firmware

version 2.0.4 or later)

∙ iPod® Touch 2nd generation (firmware

version 4.2.1 or later)*

LHA4701

4-56

Monitor, climate, audio, phone and voice recognition systems

∙ iPod® Touch 3rd generation (firmware

version 5.1 or later)

∙ iPod® Touch 4th generation (firmware

version 5.1 or later)

∙ iPod® nano - 1st generation (firmware

version 1.3.1 or later)

∙ iPod® nano - 2nd generation (firmware

version 1.1.3 or later)

∙ iPod® nano - 3rd generation (firmware

version 1.1.3 or later)

∙ iPod® nano - 4th generation (firmware

version 1.0.4 or later)

∙ iPod® nano - 5th generation (firmware

version 1.0.2 or later)

∙ iPod® nano - 6th generation (firmware

version 1.1 or later)

∙ iPhone® 3G (firmware version 4.2.1 or

later)

∙ iPhone® 3GS (firmware version 5.1 or

later)

∙ iPhone® 4 (firmware version 5.1 or later)

∙ iPhone® 4S (firmware version 5.1 or later)

* Some features of this iPod® may not be
fully functional.

Make sure that your iPod® firmware is up-
dated to the version indicated above.

iPod screen

1. “iPod Menu” key

Touch to switch to the iPod Menu
screen.

2. Track information

Track information such as the song
name, artist name and album name
are displayed.

3. Audio source indicator

Indicates the currently selected audio
source.

LHA4724

Monitor, climate, audio, phone and voice recognition systems

4-57

4. Album artwork

An image of the album artwork is dis-
played when available if the setting is
turned on.

5. iPod® operation keys

Touch to control iPod® playback func-
tions

6. Play time and progress bar

The play time of the track is displayed.
The bar indicates the progress in play-
ing a track.

iPod® operation keys

Touch to control iPod® playback functions.

Keys

Description

Each time “

” key is touched, the

repeat mode changes.

Touch to return to the beginning of the
current track. Touch again to select
the previous track. Touch and hold to
rewind the current track.

Touch to play the track.

Touch to pause the track.

Touch to select the next track. Touch
and hold to fast-forward the track.

Each time “

” key is touched, the

random mode changes.

iPod® memory device player
operation

Activation and playing
Connecting the iPod® to the vehicle via USB
cable will activate the iPod® mode.

The iPod® can also be played by touching
the “iPod” key on the Menu screen or by
touching iPod on the Launch Bar.

Skipping tracks

To skip the tracks, push the

or

buttons on the control panel or touch the

” or “

” keys on the screen repeat-

edly until the preferred track is selected.

NOTE:

Depending on the condition, skipping to
the previous track may require pushing
the button or touching the key twice.
Pushing the button or touching the key
once may only restart the current track
from the beginning.

Fast-forwarding/rewinding
To rewind or fast-forward the track, push

and hold the

or

buttons on the

control panel or touch and hold the “

or “

” keys on the screen,

Changing play mode

Repeat mode

Touch the “

” key on the iPod® screen

to change the repeat mode. The following
modes are available.
No text displayed: Repeat off

All: Repeat all

One: Repeat track

Random mode

Touch the “

” key on the screen to

change the random mode as follows.
No text displayed: Random off

Random: Random play

4-58

Monitor, climate, audio, phone and voice recognition systems

iPod® Menu

Touch the “iPod Menu” key on the iPod®
screen to display the iPod® Menu screen.

“Now Playing” key

Touch to display the USB
screen.

“Folder List” key
(if so equipped)

Touch to display the folder
list. Touch an item on the list
to select the folder. The sub-
folder or track list will be
displayed. Select a sub-folder
or track from the list.

“Album Artwork”
key

Touch to run on/off the al-
bum artwork display on the
USB screen.

“Playlists” key

Touch to display the list ac-
cording to the selected item.

“Artists” key

“Albums” key

“Songs” key

“Podcasts” key

“Genres” key

“Composers” key

“Audiobooks” key

“iTunes Radio”
key

BLUETOOTH® STREAMING AUDIO

If you have a compatible Bluetooth® audio
device that is capable of playing audio files,
the device can be connected to the vehi-
cle’s audio system so that the audio files on
the device play through the vehicle’s
speakers. For additional information, refer
to “FM/AM radio” in this section.

NOTE:

For additional information regarding
Bluetooth® Streaming Audio, refer to the
cellular phone owner’s manual.

Connecting procedure

NOTE:

The connecting procedure must be per-
formed when the vehicle is stationary. If
the vehicle starts moving during the pro-
cedure, the procedure will be canceled.

LHA4726

Monitor, climate, audio, phone and voice recognition systems

4-59

To connect a phone to the Bluetooth®
Hands-Free Phone System:

Manual Connecting Procedure

1. Press the

MENU button on the

control panel.

2. Touch the “Connections” key on the

screen.

3. In the Bluetooth tab, touch the “Add

New” key to connect a phone.

4. When a compatible phone is found a

message with a PIN appears on the
screen.

5. Verify the PIN is correct and accept the

connection.

Menu Item

Result

Bluetooth

Allows user to switch Bluetooth® on and off. Bluetooth® must be turned on in order to connect a device.

ON

Turns Bluetooth® functionality on. To turn off, touch the “ON” key again. The indicator light will go off.

Favorite (Connection first)

Allows user to toggle “Phone” and “Audio” favorite settings on and off.

PIN

Allows user to customize the PIN to a four digit number.

4-60

Monitor, climate, audio, phone and voice recognition systems

Automatic Connecting Procedure

If no phone is connected to the system,
press and hold the

button on the

steering wheel for more than 1.5 seconds.
After the prompt, speak “Add Phone”, the
system will announce “transferring to the
add phone settings menu”. The system will
start the pairing procedure. When a com-
patible phone is found, a message with a
PIN appears on the screen. Operate the
Bluetooth® phone to complete the con-
nection process. For additional informa-
tion, refer to “Bluetooth® connections
screen” in this section.

Bluetooth® screen

1. “BT Menu” key

Depending on the Bluetooth® version
supported by the connected device, ei-
ther the “BT Menu” key or “Connections”
key is displayed.

2. Track information

Track information such as the song
name, artist name and album name
are displayed.

3. Audio source indicator

Indicates the currently selected audio
source.

4. Bluetooth® audio operation keys

Touch to control Bluetooth® audio
playback functions

5. Play time and progress bar

The play time of the track is displayed.
The bar indicates the progress in play-
ing a track.

Bluetooth® operation keys

Touch to control Bluetooth® playback
functions.

Keys

Description

Each time “

” key is touched,

the repeat mode changes.

Touch to return to the beginning of
the current track. Touch again to
select the previous track. Touch and
hold to rewind the current track.

Touch to play the track.

Touch to pause the track.

Touch to select the next track.
Touch and hold to fast-forward the
track.

Each time “

” key is touched,

the random mode changes.

LHA4727

Monitor, climate, audio, phone and voice recognition systems

4-61

Bluetooth® audio operation

The ability to pause, change tracks, fast
forward, rewind, randomize and repeat
music may be different between devices.
Some or all of these functions may not be
supported on each device.

NOTE:

Depending on the Bluetooth® audio de-
vice that is connected, it may not be pos-
sible to perform audio operations or a
delay may occur before music is played
back.

Activation and playing

A Bluetooth® audio device can be played by
touching the “Bluetooth” key on the Menu
screen or by touching Bluetooth on the
Launch Bar.

To pause playing the Bluetooth® audio,

touch the “

” key. Touch the “

” key

to resume playing.

Changing folders
To change folders, touch the “BT Menu” key.

Fast-forwarding/rewinding
To fast-forward or rewind the track, push

and hold the

or

buttons on the

control panel or touch the “

” or “

keys on the screen.

Changing play mode
Repeat mode

Touch the “

” key on the screen to

change the repeat mode.
Random mode

Touch the “

” on the screen to change

the random mode.

NOTE:

Available repeat/random modes change
depending on the connected device.

BT Menu

Touch the “BT Menu” key on the Bluetooth®
audio screen to display the Bluetooth® au-
dio menu screen.

The following items are available.

“Now Playing” key

Touch to display the
Bluetooth® audio screen.

“Current List” key (if so
equipped)*

A list of track in the cur-
rently selected folder is
displayed.

“Connections” key

Touch to display the
connections screen.

“Folder List” key*

Touch to display the
folder list. Touch an item
on the list to select the
folder.

*: displayed only when available.

NOTE:

Depending on the connected device, the
“BT Menu” key may not be displayed.

4-62

Monitor, climate, audio, phone and voice recognition systems

STEERING WHEEL SWITCH FOR
AUDIO CONTROL

1.

SEEK/TRACK buttons

2. SOURCE switch

3. Volume control switch

SOURCE switch

Push the SOURCE switch to change the
mode in the following sequence:

AM

→ FM→ USB/iPod®*→ Bluetooth® Au-

dio*

→ AUX* → AM.

* These modes are only available when
compatible media storage is inserted into
the device or connected to the system.

Volume control switch

Push the volume control switch to increase
or decrease the volume.

SEEK/TRACK buttons

AM and FM

∙ Press or hold for less than 1.5 seconds

to increase or decrease the preset sta-
tion and show a list of the preset sta-
tions.

∙ Press or hold for more than 1.5 seconds

to seek up or down to the next station.

iPod®

∙ Press or hold for less than 1.5 seconds

to increase or decrease the track num-
ber.

∙ Press or hold for more than 1.5 seconds

to reverse or fast forward the track be-
ing played.

Bluetooth® Streaming Audio

∙ Press or hold for less than 1.5 seconds

to skip ahead or back to the next song.

USB

∙ Press or hold for less than 1.5 seconds

to increase or decrease the track num-
ber.

∙ Press or hold for more than 1.5 seconds

to reverse or fast forward the track be-
ing played.

LHA4227

Monitor, climate, audio, phone and voice recognition systems

4-63


Content   ..  13  14  15  16   ..