Nissan Note E12. Manual - part 163


  Index      Nissan     Nissan Note E12 - Service and Repair Manual


Search            


Content   ..  161  162  163  164   ..


Nissan Note E12. Manual - part 163


DLK-156

< REMOVAL AND INSTALLATION >

FUEL FILLER LID OPENER

2. Remove fuel filler lid screws (A) and fuel filler lid (1).

INSTALLATION 

Installation is in the reverse order of removal.

CAUTION:

After installation, check fuel filler lid assembly open/close and lock/unlock operation.

FUEL FILLER OPENER CABLE
FUEL FILLER OPENER CABLE : Removal and Installation

INFOID:0000000009567381

REMOVAL 

1. Remove hood lock/fuel filler lid lock release handle. Refer to 

DLK-144, "HOOD LOCK RELEASE HAN-

DLE : Removal and Installation"

.

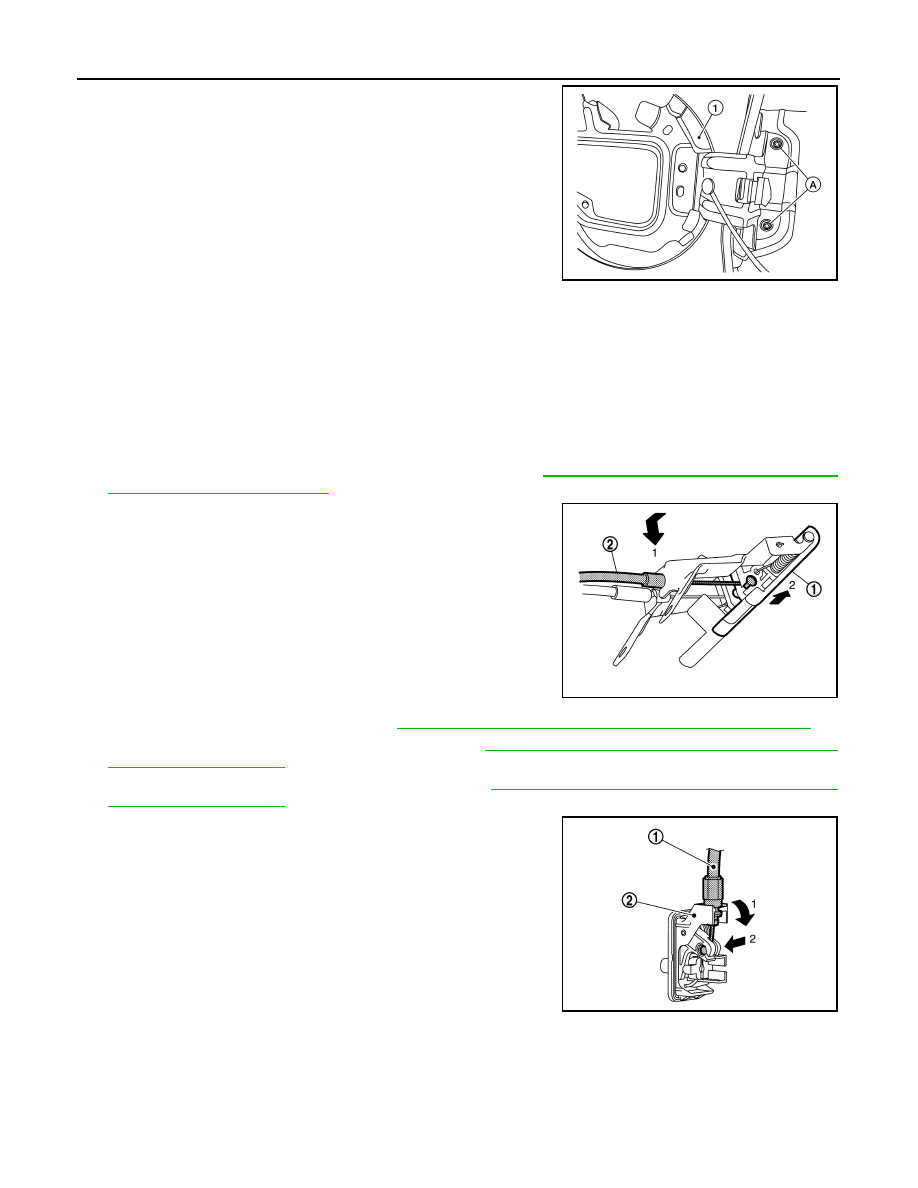
2. Disconnect fuel filler lid opener cable (2) from hood lock/fuel

filler lid lock release handle (1).

3. Remove dash side finisher (LH). Refer to 

INT-22, "DASH SIDE FINISHER : Removal and Installation"

.

4. Remove center pillar lower finisher (LH). Refer to 

INT-23, "CENTER PILLAR LOWER FINISHER :

Removal and Installation"

.

5. Remove luggage side lower finisher (LH). Refer to 

INT-32, "LUGGAGE SIDE LOWER FINISHER :

Removal and Installation"

.

6. Disconnect fuel filler lid opener cable (1) by pulling downward

and then sliding cable end to the side to remove from fuel filler

lid lock assembly (2).

INSTALLATION 

Installation is in the reverse order of removal.

CAUTION:

After installation, check fuel filler lid assembly open/close, lock/unlock operation.

FUEL FILLER LID LOCK

ALKIA3199ZZ

JMKIA7999ZZ

JMKIA8139ZZ

FUEL FILLER LID OPENER

DLK-157

< REMOVAL AND INSTALLATION >

C

D

E

F

G

H

I

J

L

M

A

B

DLK

N

O

P

FUEL FILLER LID LOCK : Removal and Installation

INFOID:0000000009567382

REMOVAL 

1. Fully open fuel filler lid.
2. Remove luggage side lower finisher (LH). Refer to 

INT-32, "LUGGAGE SIDE LOWER FINISHER :

Removal and Installation"

.

3. Disconnect the harness connector from the fuel filler lid lock assemby.
4. Release pawls (A) and remove fuel filler lid lock assembly (1).

CAUTION:

Be careful not to damage gasket (2) when removing.

5. Disconnect fuel filler lid opener cable (1) by pulling downward

and then sliding cable end to the side to remove from fuel filler

lid lock assembly (2).

INSTALLATION 

Installation is in the reverse order of removal.

CAUTION:

After installation, check fuel filler lid assembly open/close, lock/unlock operation.

JMKIA8138ZZ

JMKIA8139ZZ

DLK-158

< REMOVAL AND INSTALLATION >

DOOR SWITCH

DOOR SWITCH

Removal and Installation

INFOID:0000000009567383

REMOVAL

1. Remove the door switch bolt (A).
2. Disconnect the harness connector and remove door switch (1).

INSTALLATION

Installation is in the reverse order of removal.

JMKIA2173ZZ

INSIDE KEY ANTENNA

DLK-159

< REMOVAL AND INSTALLATION >

C

D

E

F

G

H

I

J

L

M

A

B

DLK

N

O

P

INSIDE KEY ANTENNA

INSTRUMENT CENTER
INSTRUMENT CENTER : Removal and Installation

INFOID:0000000009567384

REMOVAL

1. Remove center console lower. Refer to 

IP-20, "Removal and Installation"

.

2. Disconnect the harness connector from the inside key antenna (instrument center).
3. Remove screws (A) and the inside key antenna (instrument cen-

ter) (1).

INSTALLATION

Installation is in the reverse order of removal.

CONSOLE
CONSOLE : Removal and Installation

INFOID:0000000009567385

REMOVAL

1. Remove center console assembly. Refer to 

IP-18, "Removal and Installation"

.

2. Disconnect the harness connector from the inside key antenna (console).
3. Release clips (A) and remove inside key antenna (console) (1).

INSTALLATION

Installation is in the reverse order of removal.

LUGGAGE ROOM
LUGGAGE ROOM : Removal and Installation

INFOID:0000000009567386

REMOVAL

1. Remove rear seat cushion. Refer to 

SE-19, "SEAT CUSHION : Removal and Installation"

.

2. Disconnect the harness connector from the inside key antenna (luggage room).

JMKIA7948ZZ

JMKIA7950ZZ


Content   ..  161  162  163  164   ..