Mitsubishi Outlander GS45X. Manual - part 477
 

  Index      Mitsubishi     Mitsubishi Outlander GS45X - service repair manual


Search            


Content   ..  475  476  477  478   ..


Mitsubishi Outlander GS45X. Manual - part 477


CAMSHAFT

TSB Revision

ENGINE MECHANICAL <2.4L ENGINE>

11A-39

>>G<< ROCKER COVER ASSEMBLY 
INSTALLATION

1. Wipe off the sealant on the mating surface of the rocker 

cover assembly and cylinder head and timing chain case 
assembly, and degrease the surface where the sealant is 
applied.

CAUTION

After the installation, until a sufficient period of time (one 
hour or more) elapses, do not apply the oil or water to the 
sealant application area or start the engine.
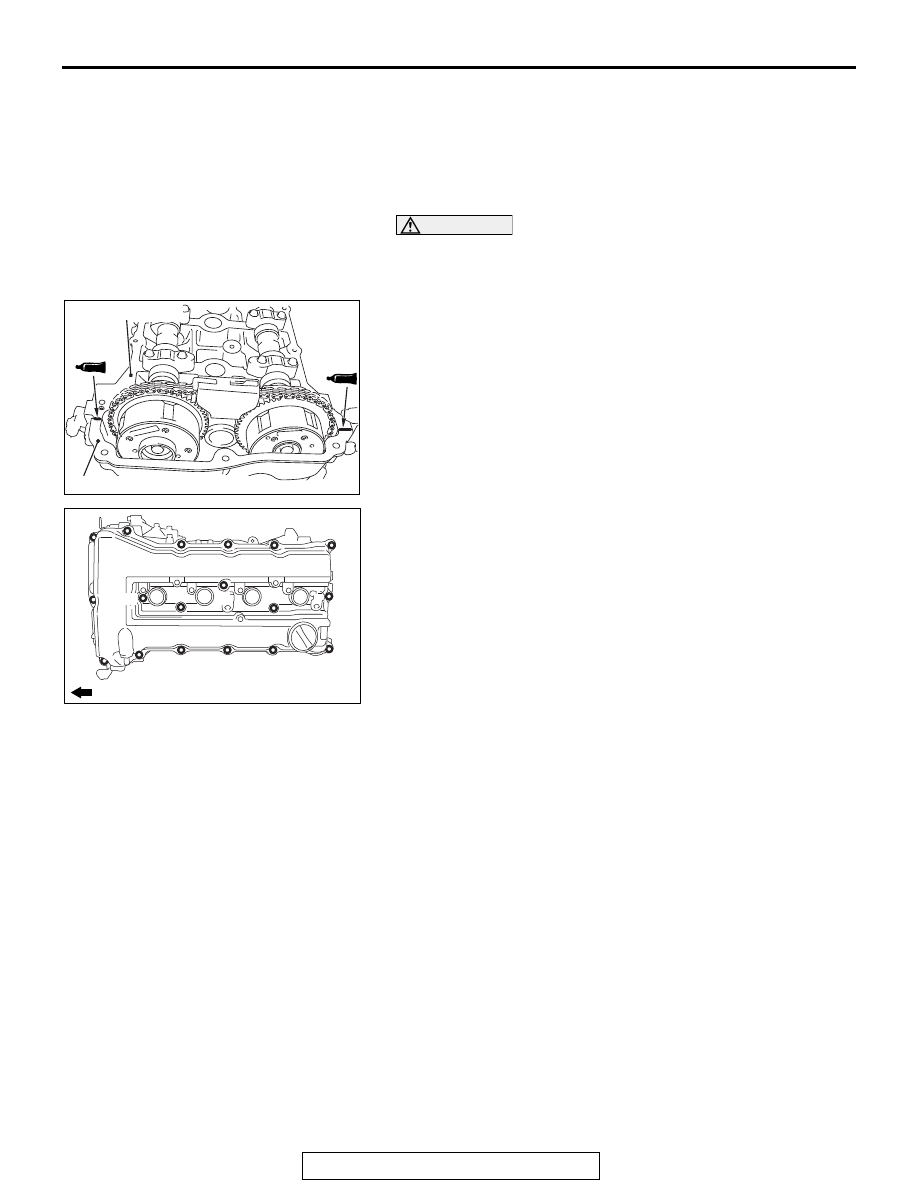
2. Apply sealant to the joint between the cylinder head and 

timing chain case assembly as shown in the figure and 
install the rocker cover assembly to the cylinder head.

Specified sealant: ThreeBond 1227D or equivalent

NOTE: Install the rocker cover assembly immediately after 
applying sealant.

3. Tighten the rocker cover assembly mounting bolts to the 

specified torque in the order of number shown in the figure.

Tightening torque: 3.0 

± 1.0 Nm (27 ± 8 in-lb)

4. Tighten again the rocker cover assembly mounting bolts to 

the specified torque in the order of number shown in the 
figure.

Tightening torque: 5.5 

± 0.5 Nm (49 ± 4 in-lb)

AC506753

AF

Cylinder head

Timing chain case assembly

φ 4 mm
(

φ 0.14 in)

φ 4 mm
(

φ 0.14 in)

AC506743

AE

3

6

1

9

5

10

4

8

7

11

13

14

15

16

17

18

2

12

Engine front

VALVE STEM SEAL

TSB Revision

ENGINE MECHANICAL <2.4L ENGINE>

11A-40

VALVE STEM SEAL

REMOVAL AND INSTALLATION

M1112008101583

CAUTION

*Remove and assemble the marked parts in each cylinder unit.

Pre-removal operation
• Engine Room Under Cover Front B and Engine Room Side 

Cover (RH) Removal (Refer to GROUP 51, Under Cover 

P.51-23

).

• Engine Oil Draining (Refer to GROUP 12, On-vehicle Ser-

vice 

− Engine Oil Replacement 

P.12-5

).

• Rocker Cover Assembly Removal (Refer to 

P.11A-26

).

• Engine Oil Pan Removal (Refer to 

P.11A-49

).

• Timing Chain Removal (Refer to 

P.11A-67

).

Post-installation operation
• Timing Chain Installation (Refer to 

P.11A-67

).

• Engine Oil Pan Installation (Refer to 

P.11A-49

).

• Valve Clearance Check (Refer to 

P.11A-13

).

• Rocker Cover Assembly Installation (Refer to 

P.11A-26

).

• Engine Oil Refilling (Refer to GROUP 12, On-vehicle Ser-

vice 

− Engine Oil Replacemen

P.12-5

).

• Engine Room Under Cover Front B and Engine Room Side 

Cover (RH) Installation (Refer to GROUP 51, Under Cover 

P.51-23

).

AC709946

6

3

11

AB

7

12

13

1

4

5

10

9

14

N

N

2

8

15*

16*

17*

18*
19*

15*

16*

17*

18*

19*

25 ± 5 N·m
19 ± 3 ft-ib

Apply engine oil to all
moving parts before
installation.

12 ± 1 N·m
107 ± 8 in-lb  

12 ± 1 N·m
107 ± 8 in-lb  

 → 

17 ± 3 N·m
13 ± 2 ft-lb

30 ± 2 N·m
22 ± 1 ft-lb

Removal steps 

<<

A

>> >>

F

<< 1.

Front camshaft bearing cap 
assembly

>>

E

<< 2.

Camshaft bearing

<<

B

>> >>

D

<< 3.

Camshaft bearing oil feeding cap 
(exhaust side)

<<

B

>> >>

D

<< 4.

Camshaft bearing cap (exhaust 
side)

<<

B

>> >>

D

<< 5.

Camshaft bearing cap (exhaust 
side)

<<

B

>> >>

D

<< 6.

Camshaft bearing thrust cap 
(exhaust side)

>>

E

<< 7.

Camshaft and camshaft sprocket 
assembly (exhaust side)

>>

E

<< 8.

Camshaft bearing

<<

B

>> >>

D

<< 9.

Camshaft bearing oil feeding cap 
(intake side)

<<

B

>> >>

D

<< 10. Camshaft bearing cap (intake side)

<<

B

>> >>

D

<< 11. Camshaft bearing cap (intake side)

Removal steps (Continued)

VALVE STEM SEAL

TSB Revision

ENGINE MECHANICAL <2.4L ENGINE>

11A-41

Required Special Tools:

• MB991928: Engine Hanger

• MB991895: Engine Hanger

• MD998772: Valve Spring Compressor

• MB992089: Retainer Holder C

• MB992090: Retainer Holder Attachment

• MB992085: Valve Stem Seal Pliers

• MD998737: Valve Stem Seal Installer

REMOVAL SERVICE POINTS

.

<<A>> FRONT CAMSHAFT BEARING CAP 
ASSEMBLY REMOVAL

1. Temporarily install the engine oil pan which was removed at 

the valve timing chain removal (Refer to 

P.11A-49

).

CAUTION

When supporting the engine and transaxle assembly with 
a garage jack, be careful not to deform the engine oil pan.
2. Place a garage jack against the engine oil pan with a piece 

of wood in between to support the engine and transaxle 
assembly.

3. Remove special tool engine hanger (MB991928 or 

MB991895) which was installed for supporting the engine 
and transaxle assembly when the valve timing chain was 
removed.

<<

B

>> >>

D

<< 12. Camshaft bearing oil feeding cap 

(intake side)

13. Camshaft and camshaft sprocket 

assembly (intake side)

14. Spark plug

<<

C

>> >>

C

<< 15. Valve tappet

<<

D

>> >>

B

<< 16. Valve spring retainer lock

17. Valve spring retainer
18. Valve spring

<<

E

>> >>

A

<< 19. Valve stem seal

Removal steps (Continued)

AC506487

AE

MB991527

MB991454

MB991928

MB991956

AC506484

MB991527

AE

MB991454

MB991956

MB991895

VALVE STEM SEAL

TSB Revision

ENGINE MECHANICAL <2.4L ENGINE>

11A-42

CAUTION

Be careful not to drop the camshaft bearing.
4. Loosen the mounting bolts of front camshaft bearing cap in 

the order of number shown in the figure, and remove the 
front camshaft bearing cap assembly.

.

<<B>> CAMSHAFT BEARING OIL FEEDING 
CAP/CAMSHAFT BEARING CAP/CAMSHAFT 
BEARING THRUST CAP REMOVAL

CAUTION

When the camshaft bearing cap mounting bolts are loos-
ened at once, the mounting bolts jump out by the spring 
force and the threads are damaged. Always loosen the 
mounting bolts in four or five steps.
Loosen the mounting bolts of the camshaft bearing caps in the 
order of number shown in the figure in four or five steps, and 
remove the camshaft bearing caps.

.

AC506745

AD

1

2

3

4

Engine front

Front camshaft
bearing cap
assembly

AC506746

AC

1

1

2

2

3

3

4

4

5

5

6

6

7

7

8

8

Engine front

Camshaft bearing cap

Camshaft bearing cap


Content   ..  475  476  477  478   ..