Mitsubishi Outlander (2013+). Manual - part 575
 

  Index      Mitsubishi     Mitsubishi Outlander - service repair manual 2013 year


Search            


Content   ..  573  574  575  576   ..


Mitsubishi Outlander (2013+). Manual - part 575


WIPER DEICER

EXTERIOR

51-59

earth.

OK: System voltage

Q: Is the check result normal?

YES : 

Go to Step 12.

NO : 

Go to Step 11.

STEP 11. Check of the open circuit in power 
supply line between wiper deicer relay connector 
and fusible link (4).

Q: Is the check result normal?

YES : 

Go to Step 12.

NO : 

Repair the wiring harness.

STEP 12. Check of short to power supply and 
open circuit in power supply line between wiper 
deicer connector and wiper deicer relay 
connector.

Q:  Is the check result normal?

YES : 

Intermittent malfunction (Refer to GROUP 

00 

− How to Use 

Troubleshooting/Inspection Service Points - 
How to Cope with Intermittent Malfunction ).

NO : 

Repair the wiring harness.

ON-VEHICLE SERVICE

M1511000801226

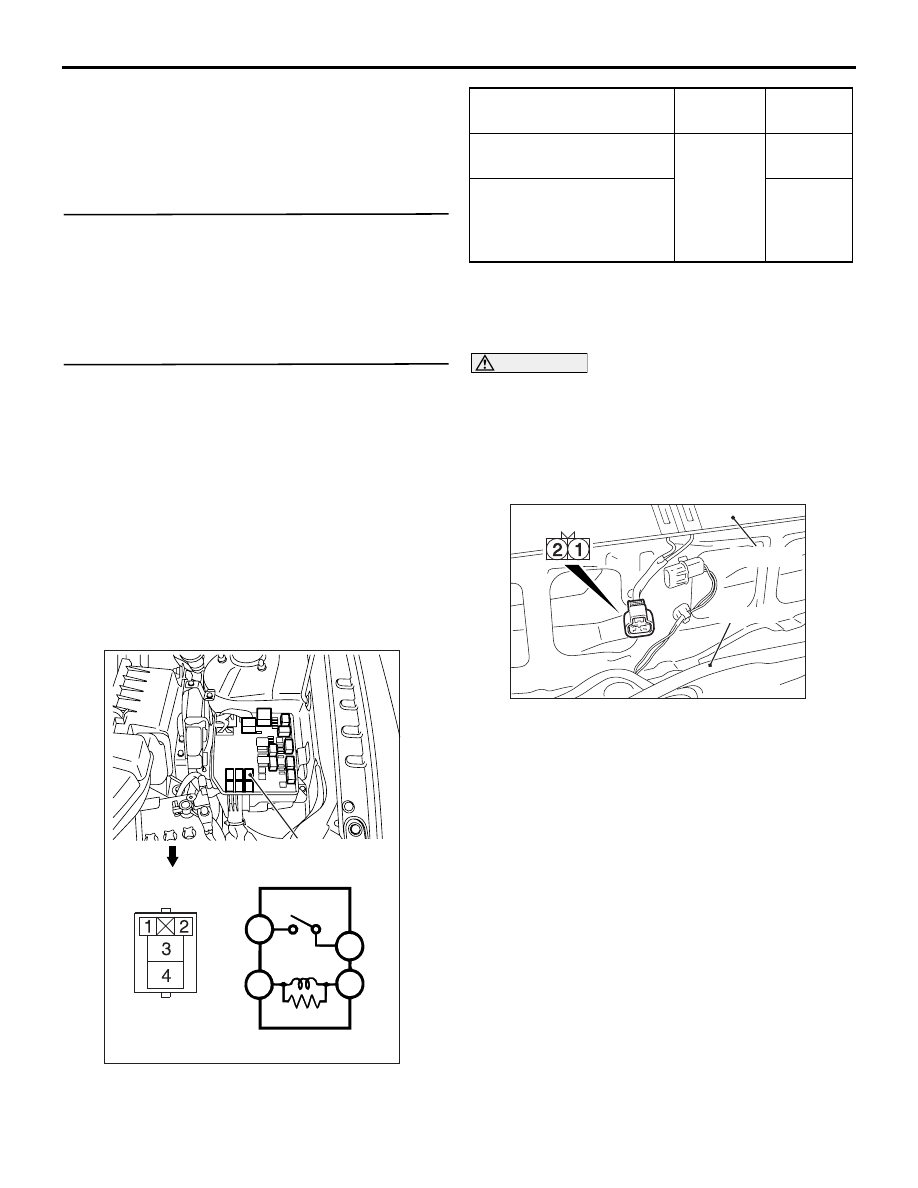
WIPER DEICER RELAY INSPECTION

ACC00157

1

2

3

4

AB

Wiper deicer relay

Front of vehicle 

Battery voltage

Terminal 
No.

Specified 
condition

Not applied

3 - 4

Open 
circuit

Connect terminal No.1 to 
battery (-) terminal.
Connect terminal No.2 to 
battery (+) terminal.

Continuity
(Less than 

Ω)

INSPECTION

WIPER DEICER INSPECTION

M1511010100139

CAUTION

When relocating the car between locations with 
extremely different temperatures (warm and 
cold), leave the car in the location for a while to 
adapt to the temperature prior to checking it.
1. Remove RH side of front deck garnish (Refer to 

P.51-39

).

AC506707AB

Front deck

Windshield

2. Check that the resistance value between the 

connector terminals shown in the illustration is at 
the standard value.

Standard value: 2.4 

± 0.24  at 25°C

HEADLAMP WASHER

EXTERIOR

51-60

HEADLAMP WASHER

TROUBLESHOOTING

STANDARD FLOW OF DIAGNOSTIC 
TROUBLESHOOTING

M1511014600835

Refer to GROUP 00 - Contents of Troubleshooting .

Inspection Procedure: The headlamp washer does not work.

CAUTION

Whenever the ECU is replaced, ensure that the input and output signal circuits are normal.

COMMENTS ON TROUBLE SYMPTOM

The headlamp washer motor, the headlamp washer 
relay, the column switch or the ETACS-ECU may be 
defective.

POSSIBLE CAUSES

• Malfunction of the headlamp washer motor

• Malfunction of the headlamp washer relay

• Malfunction of the column switch

• Malfunction of the ETACS-ECU

• Damaged harness wires and connectors

DIAGNOSIS PROCEDURE

STEP 1. M.U.T.-III diagnosis code.
When the ignition switch is turned to the LOCK 
(OFF) position, check that the ETACS-ECU does not 
set the diagnosis code.

Q: Is the diagnosis code set?

YES : 

Refer to GROUP 54A, Diagnosis Code 

Chart .

NO : 

Go to Step 2.

STEP 2. M.U.T.-III data list
Check the input signals below which are related to 
the headlamp washer.

• Ignition switch: ON

Item 
No.

Item name

Normal condition

214

Head lamp washer 

ON

254

IG voltage

System voltage

Headlamp washer switch: ON

OK: Normal conditions are displayed for all 
the items. 

Q: Is the check result normal?

All the signals are received normally. : 

Go to Step 

3.

The headlamp washer switch signal is not 
received. : 

Refer to GROUP 54A, Input signal 

procedure 11 "The column switch signal is 
not received ."

The ignition switch (IG1) signal is not received. : 

Refer to GROUP 54A, Input signal 
procedure 2 "The ignition switch (IG1) signal 
is not received ."

STEP 3. Check the headlamp washer motor 
assembly.
Refer to 

P.51-63

.

Q: Is the check result normal?

YES : 

Go to Step 4.

NO : 

Replace the headlamp washer motor.

STEP 4. Resistance measurement at headlamp 
washer motor connector (earth terminal).
(1) Disconnect the connector, and measure at the 

wiring harness side.

(2) Continuity between headlamp washer motor 

connector (earth terminal) and body earth.

OK: Continuity exists (2 

 or less)

Q: Is the check result normal?

YES : 

Go to Step 6.

NO : 

Go to Step 5.

STEP 5. Check of open circuit in earth line 
between headlamp washer motor connector and 
body earth.

Q: Is the check result normal?

HEADLAMP WASHER

EXTERIOR

51-61

YES : 

The trouble can be an intermittent 

malfunction (Refer to GROUP 00, How to 
use Troubleshooting/inspection Service 
Points - How to Cope with Intermittent 
Malfunction ).

NO : 

Repair the wiring harness.

STEP 6. Check the headlamp washer relay.
Refer to 

P.51-63

.

Q: Is the check result normal?

YES : 

Go to Step 7.

NO : 

Replace the headlamp washer relay.

STEP 7. Voltage measurement at headlamp 
washer relay connector (power supply line).
(1) Remove the headlamp washer relay, and 

measure at wiring harness side.

(2) Check the voltage between headlamp washer 

relay connector (power supply terminals) and 
body earth.

OK: System voltage

Q: Is the check result normal?

YES : 

Go to Step 9.

NO : 

Go to Step 8.

STEP 8. Check of the open circuit in power 
supply line between headlamp washer relay 
connector and the fusible link (4).

Q: Is the check result normal?

YES : 

The trouble can be an intermittent 

malfunction (Refer to GROUP 00, How to 
use Troubleshooting/inspection Service 
Points - How to Cope with Intermittent 
Malfunction ).

NO : 

Repair the wiring harness.

STEP 9. Check of the open circuit in HWA line 
between ETACS-ECU connector and headlamp 
washer relay connector.

Q: Is the check result normal?

YES : 

Go to Step 10.

NO : 

Repair the wiring harness.

STEP 10. Check of the open circuit in power 
supply line between headlamp washer motor 
connector and headlamp washer relay 
connector.

Q: Is the check result normal?

YES : 

Go to Step 11.

NO : 

Repair the wiring harness.

STEP 11. Retest the system.
The headlamp washer should now work normally.

Q: Is the check result normal?

YES : 

The trouble can be an intermittent 

malfunction (Refer to GROUP 00, How to 
use Troubleshooting/inspection Service 
Points - How to Cope with Intermittent 
Malfunction ).

NO : 

Replace the ETACS-ECU. Then write the 
Chassis Number (Chassis No.) of 
immobiliser system (Refer to GROUP 00, 
Precautions Before Service - How to 
Perform Chassis Number (Chassis No.) 
Writing ).

HEADLAMP WASHER

EXTERIOR

51-62

HEADLAMP WASHER

REMOVAL AND INSTALLATION

M1511009700438

ACB06024

3

AB

2

4.5 ± 1.5 N·m

4.5 ± 1.5 N·m

3

4

4

B

4

3

Claw

Section A – A

A

A

A

A

1

ACB05058AB

View B

2

4

4

Fog lamp wiring harness 
<some models>


Content   ..  573  574  575  576   ..