Mitsubishi Lancer Evolution IX. Manual - part 377
 

  Index      Mitsubishi     Mitsubishi Lancer Evolution IX - service repair manual


Search            


Content   ..  375  376  377  378   ..


Mitsubishi Lancer Evolution IX. Manual - part 377


WINDSHIELD WIPER AND WASHER

EXTERIOR

51-21

NOTE: For removal and installation of the wiper and 
washer switch, refer to GROUP 54A, Column switch 

P.54A-73

.

REMOVAL SERVICE POINT
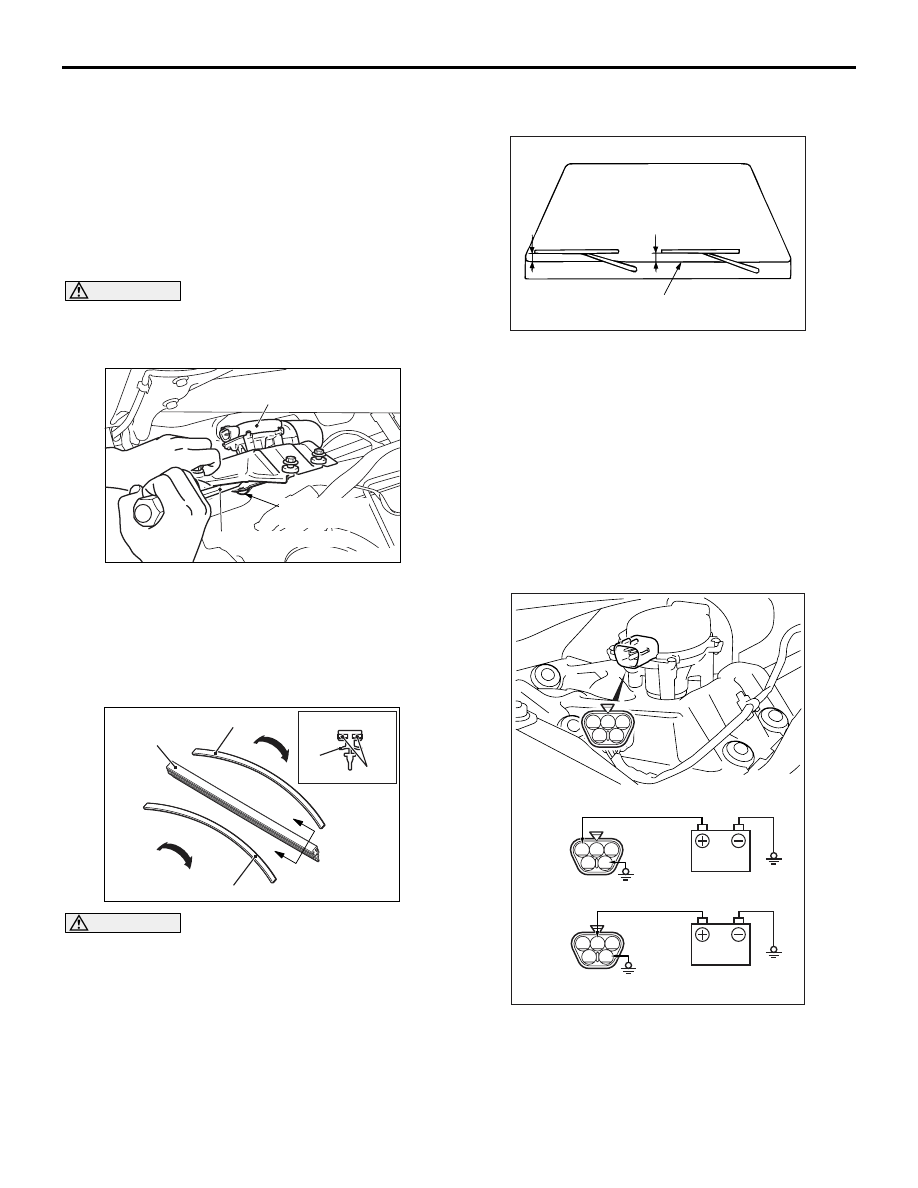
<<A>> WINDSHIELD WIPER MOTOR 
ASSEMBLY REMOVAL

1. Remove the windshield wiper motor assembly 

mounting bolts.

CAUTION

Be careful not to damage the windshield glass 
when removing the windshield wiper motor 
assembly.

AC310927AB

Windshield wiper
motor assembly

Link assembly
connection

Flat-tipped screwdriver

2. Use the flat-tipped screwdriver to disengage the 

link between the windshield wiper motor assembly 
and the link assembly.

INSTALLATION SERVICE POINTS
>>A<< WIPER BLADE INSTALLATION

AC101090

AD

Wiper blade

Backing

Backing

A

A

Section A – A

Wiper
blade

Backing

CAUTION

Ensure that the backings are bent in the shown 
direction, and then install the backings to the 
wiper blade.

>>B<< WIPER BLADE ASSEMBLY 
INSTALLATION

AC000427

A

A

Front deck garnish terminal

AD

Install the wiper blade at the specified position 
(standard value).

Standard value: (A) 69 

± 5 mm

INSPECTION

M1511008000209

FRONT WIPER MOTOR CHECK

Inspect the windshield wiper motor by removing the 
harness connector with the motor attached to the 
vehicle.

WIPER MOTOR AT LOW OR HIGH SPEED 
OPERATION

1

4

2

3

5

AC310929

1

4

2

3

5

1

4

2

3

5

Check operation

Low speed

High speed

AB

Connect the battery to the windshield wiper motor to 
inspect the operation of motor rotation in low or high 
speed.

WINDSHIELD WIPER AND WASHER

EXTERIOR

51-22

WIPER MOTOR AT STOP POSITION 
OPERATION

1

4

2

3

5

AC310930

1

4

2

3

5

1

4

2

3

5

(A) Low speed

(B) Automatic stop

Stop position check

AB

1. Connect the battery to the windshield wiper motor 

to rotate the motor in a low speed as shown in the 
illustration (A) and disconnect the battery during 
rotation to stop the motor.

2. Connect between the terminals and the battery as 

shown in the illustration (B) and confirm whether 
the motor stops at the automatic stop position 
after rotating in a low speed.

WINDSHIELD WIPER AND WINDSHIELD 
WASHER SWITCH CHECK

1

6

8

11

10

9

7

5

4

3

2

AC000417

Check continuity between the switch terminals.

Switch position

Tester 
connection

Specified 
condition

OFF

− 11, 6 − 10, 

− 9, 6 − 8, 6 

− 7

Open circuit

Windshield mist 
wiper switch

− 11

Less than 2 
ohms

Windshield 
intermittent wiper 
switch

− 10

Windshield 
low-speed wiper 
switch

− 9

Windshield 
high-speed wiper 
switch

− 8

Windshield 
washer switch

− 7

WINDSHIELD INTERMITTENT WIPER 
VOLUME CHECK

1

6

8

11

10

9

7

5

4

3

2

AC201004

Check that the resistance varies between 0 and 1 k

Ω 

when the windshield intermittent volume is turned 
from FAST to SLOW after measuring resistance 
between connector terminals 3 and 6 at the column 
switch.

WINDSHIELD WIPER AND WASHER

EXTERIOR

51-23

WINDSHIELD WASHER

REMOVAL AND INSTALLATION

M1511008200407

AC310066

1

2

4

3

5

5.0 ± 1.0 N·m

AB

Washer hose removal steps 

Splash shield <Right side> (Refer to 
GROUP 42, Fender 

P.42-6

).

Cowl side trim, front scuff plate, 
centre pillar trim, lower, rear scuff 
plate (Refer to GROUP 52A, Trim 

P.52A-10

).

Rear seat (Refer to GROUP 52A, 
Seat 

P.52A-20

).

1. Front washer hose

Windshield washer nozzle removal 
steps 

Connection of washer hose

2. Windshield washer nozzle
Washer tank and washer motor 
removal steps 

Rear end trim, trunk side trim (Refer 
to GROUP 52A, Trim 

P.52A-10

).

Connection of front washer hose

3. Washer tank assembly
4. Washer tank bracket
5. Front washer motor

WINDSHIELD WIPER AND WASHER

EXTERIOR

51-24

NOTE: For removal and installation of the wiper and 
washer switch, refer to GROUP 54A, Column switch 

P.54A-73

.

INSPECTION

M1511008300200

FRONT WASHER MOTOR CHECK

1

2

AC211378

1. Remove the washer tank assembly with the 

washer hose attached. Then fill the washer tank 
with water.

2. Check to see that the water is vigorously 

sprayed. When connecting the positive battery 
terminal to terminal number 2 and terminal 
number 1 to the negative battery terminal.

WINDSHIELD WASHER FLUID EJECTION 
CHECK

Move the nozzle to adjust the position so that the 
spray is in the area shown in the illustration.

CAUTION

On RH drive vehicles, the illustration is symmet-
rical.

AC309919

Units: mm

AB

<Right>

<Left>

440

430

220

220

25

25

25

50

50

25

25

90

130

90

40

50

85

75

25

35

Windshield washer nozzle

Ceramic line terminal

600

Windshield washer

nozzle perpendicular

Windshield washer

nozzle perpendicular

110

25

25

25


Content   ..  375  376  377  378   ..