Mersedes Maybach S-Class. Service Manual - part 7


  Index      Manuals     Mersedes Maybach S-Class. Service Manual


Search            copyright infringement  


Content      ..     5      6      7      8     ..


Mersedes Maybach S-Class. Service Manual - part 7


Problems with the seat ventilation

Problem

Possible causes/consequences and Solutions

The seat ventilation has

switched off prematurely

or cannot be switched

on.

The on-board voltage is too low because too many electrical consum-

ers are switched on.

X

Switch off electrical consumers that you do not need, such as the

rear window defroster or interior lighting.

Once the battery is sufficiently charged, the seat ventilation can be

switched back on.

Steering wheel

Important safety notes

G

WARNING

You could lose control of your vehicle if you do

the following while driving:

R

adjust the driver's seat, head restraint,

steering wheel or mirrors

R

fasten the seat belt

There is a risk of an accident.
Adjust the driver's seat, head restraint, steer-

ing wheel and mirror and fasten your seat belt

before starting the engine.

G

WARNING

Children could injure themselves if they

adjust the steering wheel. There is a risk of

injury.
When leaving the vehicle, always take the

SmartKey with you and lock the vehicle. Never

leave children unsupervised in the vehicle.

The electrically adjustable steering wheel can

still be adjusted when there is no SmartKey in

the ignition lock.

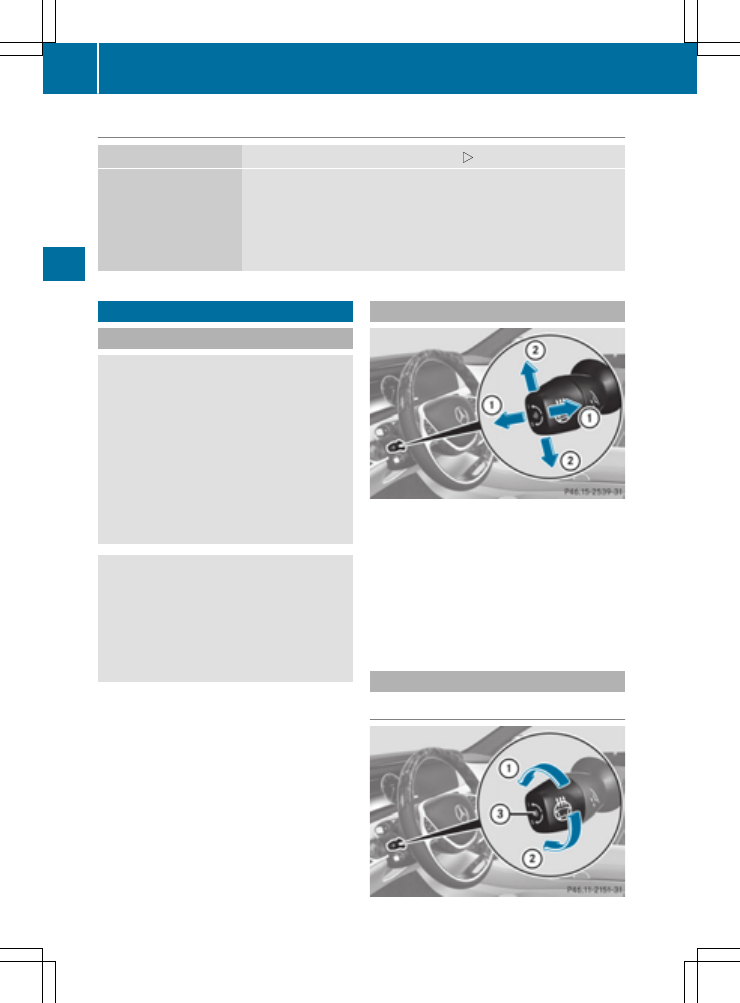
Adjusting the steering wheel

:

To adjust the steering wheel position (fore-

and-aft adjustment)

;

To adjust the steering wheel height

i

Further related subjects:

R

EASY-ENTRY/EXIT feature (

Y

page 122)

R

Storing settings (

Y

page 126)

R

Operating the on-board computer

(

Y

page 257).

Steering wheel heating

Switching on/off

120

Steering wheel

Seats,

steering

wheel

and

mirrors

-------------------------------------------------------------------------------------------------------------------------------------------------------------

X

Turn the SmartKey to position in the ignition

lock (

Y

page 162).

X

To switch on/off: turn the lever in the direc-

tion of arrow : or ;.

Indicator lamp = lights up or goes out.

If you switch off the ignition, the steering wheel

heating is deactivated.

Steering wheel

121

Seats,

steering

wheel

and

m

irrors

Z

-------------------------------------------------------------------------------------------------------------------------------------------------------------

Problems with the steering wheel heating

Problem

Possible causes/consequences and Solutions

The steering wheel heat-

ing has switched off pre-

maturely or cannot be

switched on.

The on-board voltage is too low because too many electrical consum-

ers are switched on.

X

Switch off electrical consumers that you do not need, such as the

rear window defroster or interior lighting.

EASY-ENTRY/EXIT feature

Important safety notes

G

WARNING

When the EASY-ENTRY/EXIT feature adjusts

the steering wheel and the driver's seat, you

and other vehicle occupants – particularly

children – could become trapped. There is a

risk of injury.
While the EASY-ENTRY/EXIT feature is mak-

ing adjustments, make sure that no one has

any body parts in the sweep of the seat and

the steering wheel.
If there is a risk of becoming trapped by

R

the steering wheel: move the steering

wheel adjustment lever.

R

the seat: press the switch for seat adjust-

ment.

The adjustment process is stopped.

Press one of the memory function position

switches. The adjustment process is stopped.

This function is only available on vehicles with

memory function.

G

WARNING

If children activate the EASY-ENTRY/EXIT fea-

ture, they can become trapped, particularly

when unattended. There is a risk of injury.
When leaving the vehicle, always take the

SmartKey with you and lock the vehicle. Never

leave children unsupervised in the vehicle.

G

WARNING

If you drive off while the EASY-ENTRY/EXIT

feature is making adjustments, you could lose

control of the vehicle. There is a risk of an

accident.
Always wait until the adjustment process is

complete before driving off.

The EASY-ENTRY/EXIT feature makes getting in

and out of your vehicle easier.

You can activate and deactivate the EASY-

ENTRY/EXIT feature using the multimedia sys-

tem (see the separate operating instructions).

Position of the steering wheel and the

driver's seat when the EASY-ENTRY/

EXIT feature is active

The steering wheel tilts upwards and the driver's

seat moves backwards if you:

R

remove the SmartKey from the ignition lock

R

with KEYLESS-GO: open the driver's door;

KEYLESS-GO must be in position 1

R

with the SmartKey: open the driver's door;

the SmartKey must be in position or in the

ignition lock (

Y

page 162)

R

open the driver's door when the ignition is

switched off

i

The steering wheel only tilts upwards and

the driver's seat only moves backwards if the

driving position is stored after seat or steering

wheel adjustment.

The last position of the steering wheel or seat is

stored if:

R

the ignition is switched off

R

the setting is stored with the memory function

(

Y

page 126).

i

The steering wheel only moves upwards if it

has not already reached the upper stop. The

driver's seat only moves backwards if it is not

already in the rearmost position.

122

Steering wheel

Seats,

steering

wheel

and

mirrors

-------------------------------------------------------------------------------------------------------------------------------------------------------------

Position of the steering wheel and the

driver's seat for driving

The steering wheel and the driver's seat are

moved to the previously set position if:

R

the driver's door is closed and you insert the

SmartKey into the ignition lock

R

you close the driver's door when the ignition

is switched on

R

you press the Start/Stop button once on vehi-

cles with KEYLESS-GO

i

The steering wheel and the driver's seat only

return to the last set position when the driving

position is stored after seat or steering wheel

adjustment.

The last position of the steering wheel or seat is

stored if:

R

the ignition is switched off

R

the setting is stored with the memory function

(

Y

page 126).

Crash-responsive EASY-EXIT feature

If the crash-responsive EASY-EXIT feature is trig-

gered in an accident, the steering column will

move upwards when the driver's door is opened

or the SmartKey is removed from the ignition

lock. This makes it easier to exit the vehicle and

rescue the occupants.

The crash-responsive EASY-EXIT feature is only

operational if the EASY-EXIT/ENTRY feature is

activated in the multimedia system (see the sep-

arate operating instructions).

Mirrors

Rear-view mirror

X

Anti-glare mode: flick anti-glare lever : for-

wards or back.

Exterior mirrors

Important safety notes

G

WARNING

You could lose control of your vehicle if you do

the following while driving:

R

adjust the driver's seat, head restraint,

steering wheel or mirrors

R

fasten the seat belt

There is a risk of an accident.
Adjust the driver's seat, head restraint, steer-

ing wheel and mirror and fasten your seat belt

before starting the engine.

G

WARNING

The exterior mirror on the front-passenger

side reduces the size of the image. Visible

objects are actually closer than they appear.

This means that you could misjudge the dis-

tance from road users traveling behind, e.g.

when changing lane. There is a risk of an acci-

dent.
For this reason, always make sure of the

actual distance from the road users traveling

behind by glancing over your shoulder.

Adjusting the exterior mirrors

Mirrors

123

Seats,

steering

wheel

and

mirrors

Z

-------------------------------------------------------------------------------------------------------------------------------------------------------------

X

Turn the SmartKey to position or in the

ignition lock (

Y

page 162).

X

Press button ; for the right-hand exterior

mirror or button = for the left-hand exterior

mirror.

The indicator lamp lights up in the button that

has been pressed.

The indicator lamp goes out again after some

time. You can adjust the selected mirror using

adjustment button : as long as the indicator

lamp is lit.

X

Press adjustment button : up, down, or to

the left or right until you have adjusted the

exterior mirror to the correct position. You

should have a good overview of traffic condi-

tions.

The convex exterior mirrors provide a larger field

of vision.

After the engine has been started, the exterior

mirrors are automatically heated if the rear win-

dow defroster is switched on and the outside

temperature is low.

Folding the exterior mirrors in or out

electrically

X

Turn the SmartKey to position or in the

ignition lock (

Y

page 162).

X

Briefly press button :.

Both exterior mirrors fold in or out.

i

Make sure that the exterior mirrors are

always folded out fully while driving. They

could otherwise vibrate.

i

If you are driving faster than 30 mph

(47 km/h), you can no longer fold in the exte-

rior mirrors.

Setting the exterior mirrors

If the battery has been disconnected or com-

pletely discharged, the exterior mirrors must be

reset. The exterior mirrors will otherwise not

fold in when you select the "Fold in mirrors when

locking" function in the on-board computer.

X

Turn the SmartKey to position or in the

ignition lock (

Y

page 162).

X

Press button :.

Folding the exterior mirrors in or out

automatically

When the

Automatic Mirror Folding

func-

tion is activated in the multimedia system (see

the separate operating instructions):

R

the exterior mirrors fold in automatically as

soon as you lock the vehicle from the outside.

R

the exterior mirrors fold out automatically

again as soon as you unlock the vehicle.

i

If the exterior mirrors have been folded in

manually, they do not fold out.

Exterior mirror pushed out of position

If an exterior mirror has been pushed out of

position, proceed as follows:

X

Press and hold button : until you hear a click

and the mirror engages audibly into position

(

Y

page 124).

The mirror housing is engaged again and you

can adjust the exterior mirrors as usual

(

Y

page 123).

Automatic anti-glare mirrors

G

WARNING

Electrolyte may escape if the glass in an auto-

matic anti-glare mirror breaks. The electrolyte

is harmful and causes irritation. It must not

come into contact with your skin, eyes, res-

piratory organs or clothing or be swallowed.

There is a risk of injury.

124

Mirrors

Seats,

steering

wheel

and

m

irrors

-------------------------------------------------------------------------------------------------------------------------------------------------------------

If you come into contact with the electrolyte,

observe the following:

R

Rinse off the electrolyte from your skin

immediately with water.

R

Immediately rinse the electrolyte out of

your eyes thoroughly with clean water.

R

If the electrolyte is swallowed, immediately

rinse your mouth out thoroughly. Do not

induce vomiting.

R

If electrolyte comes into contact with your

skin or hair or is swallowed, seek medical

attention immediately.

R

Immediately change out of clothing which

has come into contact with electrolyte.

R

If an allergic reaction occurs, seek medical

attention immediately.

The rear-view mirror and the exterior mirror on

the driver's side automatically go into anti-glare

mode if the following conditions are met simul-

taneously:

R

the ignition is switched on

R

incident light from headlamps strikes the sen-

sor in the rear-view mirror.

The mirrors do not go into anti-glare mode if

reverse gear is engaged or if the interior lighting

is switched on.

Parking position for the exterior mir-

ror on the front-passenger side

Setting and storing the parking position

You can position the front-passenger side exte-

rior mirror in such a way that you can see the

rear wheel on that side as soon as you engage

reverse gear. You can store this position.

Using reverse gear

:

Memory button M

;

Adjustment button

=

Button for the front-passenger side exterior

mirror

?

Button for the driver's side exterior mirror

X

Turn the SmartKey to position in the ignition

lock (

Y

page 162).

X

Press button = for the exterior mirror on the

front-passenger side.

X

Engage reverse gear.

The exterior mirror on the front-passenger

side moves to the preset parking position.

X

Use adjustment button ; to adjust the exte-

rior mirror to a position that allows you to see

the rear wheel and the curb.

The parking position is stored.

i

If you shift the transmission to another posi-

tion, the exterior mirror on the front-

passenger side returns to the driving position

after approximately ten seconds.

Using the memory button

You can store the parking position of the exte-

rior mirror on the front-passenger side using

memory button :. The reverse gear must not

be engaged during the process.

X

Turn the SmartKey to position in the ignition

lock (

Y

page 162).

X

Press button = for the exterior mirror on the

front-passenger side.

X

Use adjustment button ; to adjust the exte-

rior mirror to a position that allows you to see

the rear wheel and the curb.

Mirrors

125

Seats,

ste

erin

g

w

heel

and

mirrors

Z

-------------------------------------------------------------------------------------------------------------------------------------------------------------

X

Press memory button : and one of the

arrows on adjustment button ; within three

seconds.

The parking position is stored if the exterior

mirror does not move.

X

If the mirror moves out of position, repeat the

steps.

Calling up a stored parking position set-

ting

X

Turn the SmartKey to position in the ignition

lock (

Y

page 162).

X

Adjust the exterior mirror on the front-

passenger side using button =.

X

Engage reverse gear.

The exterior mirror on the front-passenger

side moves to the stored parking position.

The exterior mirror on the front-passenger side

moves back to its original position:

R

as soon as you exceed a speed of 9 mph

(15 km/h)

R

about ten seconds after you have disengaged

reverse gear

R

if you press button ? for the exterior mirror

on the driver's side

Memory function

Important safety notes

G

WARNING

If you use the memory function on the driver's

side while driving, you could lose control of

the vehicle as a result of the adjustments

being made. There is a risk of an accident.
Only use the memory function on the driver's

side when the vehicle is stationary.

G

WARNING

When the memory function adjusts the seat or

steering wheel, you and other vehicle occu-

pants – particularly children – could become

trapped. There is a risk of injury.
While the memory function is making adjust-

ments, make sure that no one has any body

parts in the sweep of the seat or steering

wheel. If somebody becomes trapped, imme-

diately release the memory function position

button. The adjustment process is stopped.

G

WARNING

Children could become trapped if they acti-

vate the memory function, particularly when

unattended. There is a risk of injury.
When leaving the vehicle, always take the

SmartKey with you and lock the vehicle. Never

leave children unsupervised in the vehicle.

The memory function can be used at any time,

e.g. even when the SmartKey isn't in the ignition

lock.

Storing settings

The memory function is only available in vehicles

with the memory package.

With the memory function, you can store up to

three different settings, e.g. for three different

people.

The following settings are stored as a single

memory preset:

R

seat, backrest, head restraint position and

contour of the backrest in the lumbar region

R

active multicontour seat: side bolsters of the

backrest, shoulder of the backrest, contour of

the backrest, dynamic function level

R

seat heating: distribution of the heated sec-

tions of the seat cushion and backrest

R

driver's side: position of the exterior mirrors

on the driver's and front-passenger sides

126

Memory function

Seats,

steering

wheel

and

m

irrors

-------------------------------------------------------------------------------------------------------------------------------------------------------------

X

Adjust the seat accordingly (

Y

page 106).

X

On the driver's side, adjust the steering wheel

(

Y

page 120) and the exterior mirrors

(

Y

page 123).

X

Press memory button and one of the stor-

age position buttons 1or within three

seconds.

The settings are stored in the selected preset

position. A tone sounds when the settings

have been completed.

Calling up a stored setting

X

Press and hold the relevant storage position

button 1or until the:

R

Seat

R

Steering wheel

R

Exterior mirrors

are in the stored position.

i

If you release the storage position button,

the seat, steering wheel and mirror setting

functions stop immediately. The multicontour

seat setting or the 4-way lumbar support is

still carried out.

Memory function in the rear compart-

ment

Important safety notes

G

WARNING

When the memory function adjusts the seat or

steering wheel, you and other vehicle occu-

pants – particularly children – could become

trapped. There is a risk of injury.
While the memory function is making adjust-

ments, make sure that no one has any body

parts in the sweep of the seat or steering

wheel. If somebody becomes trapped, imme-

diately release the memory function position

button. The adjustment process is stopped.

G

WARNING

Children could become trapped if they acti-

vate the memory function, particularly when

unattended. There is a risk of injury.

When leaving the vehicle, always take the

SmartKey with you and lock the vehicle. Never

leave children unsupervised in the vehicle.

General notes

The settings for the rear seat and the front-

passenger seat can be stored using the rear-

compartment memory function.

R

If the indicator lamp in the v button is not

lit, store the rear seat settings.

R

If the indicator lamp in the v button lights

up, store the front-passenger seat and rear

seat settings. Both the front-passenger and

rear seat are taken into account with this set-

ting. Depending on the equipment in the vehi-

cle, two or three memory positions can be

stored for the front-passenger and rear seats.

Storing settings

General notes

With the memory function in the rear, you can

store up to three different settings, e.g. for three

different people.

The following settings are stored as a single

memory preset:

R

position of the seat, backrest and head

restraint

R

multicontour seat: the seat cushions of the

backrest as well as the contour of the back-

rest in the lumbar and shoulder regions

R

seat heating: distribution of the heated sec-

tions of the seat cushion and backrest if the

indicator lamp in the v button is not lit

The following settings are stored to a memory

position, if the indicator lamp in the v button

lights up:

R

position of the footrest for the front-

passenger seat, if available

R

position of the screen, if available

Memory function in the rear compartment

127

Seats,

stee

ring

w

he

el

an

d

mi

rrors

Z

-------------------------------------------------------------------------------------------------------------------------------------------------------------

Vehicles without rear reclining seat

The SmartKey must be in the ignition lock and in

position or 2, in order for the front-passenger

seat to be selected (

Y

page 162).

Selecting a rear-compartment seat

X

Press the v button repeatedly until the

indicator lamp in the button is not lit.

The rear-compartment seat is selected if the

indicator lamp in the button is not lit.

X

Adjust the rear seat accordingly

(

Y

page 107).

X

Press memory button and one of the stor-

age position buttons 1or within three

seconds.

The settings are stored in the selected stor-

age position.

Selecting the front-passenger seat and rear-

compartment seat

X

Press the v button repeatedly until the

indicator lamp in the button is not lit.

The rear-compartment seat is selected if the

indicator lamp in the button is not lit.

X

Adjust the rear seat accordingly

(

Y

page 107).

X

Press the v button repeatedly until the

indicator lamp in the button lights up.

The front-passenger seat is selected if the

indicator lamp in the button lights up.

X

Adjust the front-passenger seat accordingly

(

Y

page 108).

X

Press memory button and one of the stor-

age position buttons 1or within three

seconds.

The settings are stored in the selected stor-

age position.

Vehicles with a rear reclining seat

The SmartKey must be in the ignition lock and in

position or 2, in order for the front-passenger

seat to be selected (

Y

page 162).

Selecting a rear-compartment seat

X

Press the v button repeatedly until the

indicator lamp in the button is not lit.

The rear-compartment seat is selected if the

indicator lamp in the button is not lit.

X

Adjust the rear seat accordingly

(

Y

page 107).

X

Press the memory button and then press

either the or memory button within three

seconds.

The settings are stored in the selected stor-

age position.

Selecting the front-passenger seat and rear-

compartment seat

X

Press the v button repeatedly until the

indicator lamp in the button is not lit.

The rear-compartment seat is selected if the

indicator lamp in the button is not lit.

X

Adjust the rear seat accordingly

(

Y

page 107).

X

Press the v button repeatedly until the

indicator lamp in the button lights up.

The front-passenger seat is selected if the

indicator lamp in the button lights up.

X

Adjust the front-passenger seat accordingly

(

Y

page 108).

X

Press the memory button and then press

either the or memory button within three

seconds.

The settings are stored in the selected stor-

age position.

You cannot store any settings on the button for

setting the reclined position.

128

Memory function in the rear compartment

Seats,

stee

ring

w

he

el

an

d

mi

rrors

-------------------------------------------------------------------------------------------------------------------------------------------------------------

Calling up a stored setting

General notes

The memory positions in the area for the chauf-

feur mode can only be set when the conditions

for the chauffeur mode are fulfilled

(

Y

page 111).

Vehicles without rear reclining seat

The SmartKey must be in the ignition lock and in

position or 2, in order for the front-passenger

seat to be selected (

Y

page 162).

X

To call up the stored rear seat setting:

press the v button repeatedly until the

indicator lamp in the button is not lit.

X

To call up the stored front-passenger seat

and rear seat settings: press the v but-

ton repeatedly until the indicator lamp in the

button lights up.

X

Press and hold the relevant storage position

button 1or until the rear seat or the front-

passenger seat are in the stored position.

i

Seat adjustment is interrupted as soon as

you release the storage position button. The

adjustment of the multicontour seat is still

carried out.

Vehicles with a rear reclining seat

The SmartKey must be in the ignition lock and in

position or 2, in order for the front-passenger

seat to be selected (

Y

page 162).

X

To call up the stored rear seat setting:

press the v button repeatedly until the

indicator lamp in the button is not lit.

X

To call up the stored front-passenger seat

and rear seat settings: press the v but-

ton repeatedly until the indicator lamp in the

button lights up.

X

Press and hold the relevant storage position

button or until the rear seat or the front-

passenger seat is in the stored position.

i

Seat adjustment is interrupted as soon as

you release the storage position button. The

adjustment of the multicontour seat is still

carried out.

Memory function in the rear compartment

129

Seats,

steer

in

g

wheel

and

mi

rro

rs

Z

-------------------------------------------------------------------------------------------------------------------------------------------------------------

Useful information

i

This Operator's Manual describes all models

and all standard and optional equipment of

your vehicle available at the time of publica-

tion of the Operator's Manual. Country-spe-

cific differences are possible. Please note

that your vehicle may not be equipped with all

features described. This also applies to

safety-related systems and functions.

i

Read the information on qualified specialist

workshops (

Y

page 28).

Exterior lighting

General notes

For reasons of safety, Mercedes-Benz recom-

mends that you drive with the lights switched on

even during the daytime. In some countries,

operation of the headlamps varies due to legal

requirements and self-imposed obligations.

Setting the exterior lighting

Setting options

Exterior lighting can be set using:

R

the light switch

R

the combination switch (

Y

page 131)

R

the on-board computer (

Y

page 274)

Light switch

Operation

1 W

Left-hand standing lamps

2 X

Right-hand standing lamps

3 T

Parking lamps, license plate and

instrument cluster lighting

4 Ã

Automatic headlamp mode, controlled

by the light sensor

5 L

Low-beam/high-beam headlamps

If you hear a warning tone when you leave the

vehicle, the lights may still be switched on.

X

Turn the light switch to the Ã position.

The exterior lighting (except the parking/stand-

ing lamps) switches off automatically if you:

R

remove the SmartKey from the ignition lock

R

open the driver's door with the SmartKey in

position in the ignition lock

Automatic headlamp mode

G

WARNING

When the light switch is set to Ã, the low-

beam headlamps may not be switched on

automatically if there is fog, snow or other

causes of poor visibility due to the weather

conditions such as spray. There is a risk of an

accident.
In such situations, turn the light switch to

L.

The automatic headlamp feature is only an aid.

The driver is responsible for the vehicle's light-

ing at all times.

Canada only:
The daytime running lamps improve the visibility

of your vehicle during the day. The daytime run-

ning lamps function is required by law in Can-

ada. It cannot therefore be deactivated.

When the engine is running and the vehicle is

stationary: if you move the selector lever from a

drive position to P, the daytime running lamps/

low-beam headlamps go out after three

minutes.

When the engine is running, the vehicle is sta-

tionary and in bright ambient light: if you turn the

light switch to the T position, the daytime

running lamps and parking lamps switch on.

If the engine is running and you turn the light

switch to the L position, the manual settings

take precedence over the daytime running

lamps.

USA only:
The daytime running lamps improve the visibility

of your vehicle during the day. Here, the

Day‐

130

Exterior lighting

Lights

and

windshield

wiper

s

-------------------------------------------------------------------------------------------------------------------------------------------------------------

time Running Lights

function must be

switched on via the on-board computer

(

Y

page 274).

If the engine is running and you turn the light

switch to the T or L position, the manual

settings take precedence over the daytime run-

ning lamps.
àis the favored light switch setting. The light

setting is automatically selected according to

the brightness of the ambient light (exception:

poor visibility due to weather conditions such as

fog, snow or spray):

R

SmartKey in position in the ignition lock: the

parking lamps are switched on or off auto-

matically depending on the brightness of the

ambient light.

R

With the engine running: if you have switched

on the

Daytime Running Lights

function in

the on-board computer, the daytime running

lamps or the parking lamps and low-beam

headlamps are switched on or off automati-

cally depending on the brightness of the ambi-

ent light.

X

To switch on the automatic headlamps:

turn the light switch to the Ã position.

Low-beam headlamps

Even if the light sensor does not detect that it is

dark, the parking lamps and low-beam head-

lamps switch on when the ignition is switched on

and the light switch is set to the L position.

This is a particularly useful function in the event

of rain and fog.

X

To switch on the low-beam headlamps:

turn the SmartKey in the ignition lock to posi-

tion or start the engine.

X

Turn the light switch to the L position.

The green L indicator lamp in the instru-

ment cluster lights up.

Parking lamps

!

If the battery charge is very low, the parking

lamps or standing lamps are automatically

switched off to enable the next engine start.

Always park your vehicle safely and suffi-

ciently lit according to legal standards. Avoid

using the parking lamps T over a period of

several hours. If possible, switch on the right-

hand X or left-hand W standing lamp.

X

To switch on: turn the light switch to the

T position.

The green T indicator lamp in the instru-

ment cluster lights up.

Standing lamps

Switching on the standing lamps ensures the

corresponding side of the vehicle is illuminated.

X

To switch on the standing lamps: the

SmartKey should not be in the ignition lock or

it should be in position 0.

X

Turn the light switch to the W (left-hand

side of the vehicle) or X ((right-hand side

of the vehicle) position.

Combination switch

Turn signal

:

High-beam headlamps

;

Turn signal, right

=

High-beam flasher

?

Turn signal, left

X

To indicate briefly: press the combination

switch briefly to the pressure point in the

direction of arrow ; or ?.

The corresponding turn signal flashes three

times.

X

To indicate: press the combination switch

beyond the pressure point in the direction of

arrow ; or ?.

Exterior lighting

131

Lights

and

w

in

dshield

w

ipers

Z

-------------------------------------------------------------------------------------------------------------------------------------------------------------

High-beam headlamps

X

To activate manually: turn the SmartKey in

the ignition lock to position or start the

engine.

X

Vehicles without Adaptive Highbeam Assist

Plus: turn the light switch to position L or

Ã.

X

Vehicles with Adaptive Highbeam Assist Plus:

turn the light switch to the L position.

X

Press the combination switch beyond the

pressure point in the direction of arrow :.

In the Ã position, the high-beam head-

lamps are only switched on when it is dark and

the engine is running.

The blue K indicator lamp in the instru-

ment cluster lights up when the high-beam

headlamps are switched on.

X

To switch off: move the combination switch

back to its normal position.

The blue K indicator lamp in the instru-

ment cluster goes out.

Vehicles with Adaptive Highbeam Assist

Plus: if Adaptive Highbeam Assist Plus is acti-

vated, it automatically controls activation and

deactivation of the high-beam headlamps

(

Y

page 133).

High-beam flasher

X

To switch on: turn the SmartKey in the igni-

tion lock to position or 2, or start the engine.

X

Pull the combination switch in the direction of

arrow =.

Hazard warning lamps

X

To switch on the hazard warning lamps:

press button :.

All turn signals flash. If you now switch on a

turn signal using the combination switch, only

the turn signal lamp on the corresponding

side of the vehicle will flash.

X

To switch off the hazard warning lamps:

press button :.

The hazard warning lamps automatically switch

on if:

R

an air bag is deployed or

R

the vehicle decelerates rapidly from a speed

of above 45 mph (70 km/h) and comes to a

standstill

The hazard warning lamps switch off automati-

cally if the vehicle reaches a speed of above

6 mph (10 km/h) again after a full brake appli-

cation.

The hazard warning lamps still operate if the

ignition is switched off.

Cornering light function

The cornering light function improves the illu-

mination of the road over a wide angle in the

direction you are turning, enabling better visi-

bility in tight bends, for example. It can only be

activated when the low-beam headlamps are

switched on.

Active:

R

if you are driving at speeds below 25 mph

(40 km/h) and switch on the turn signal or

turn the steering wheel

R

if you are driving at speeds between 25 mph

(40 km/h) and 45 mph (70 km/h) and turn

the steering wheel

The cornering lamp may remain lit for a short

time, but is automatically switched off after no

more than three minutes.

132

Exterior lighting

Lights

and

w

indshield

w

ipe

rs

-------------------------------------------------------------------------------------------------------------------------------------------------------------

Adaptive Highbeam Assist Plus

General notes

With Adaptive Highbeam Assist Plus, you can

automatically switch between low-beam, partial

high-beam and high-beam headlamps.

Partial high-beam is a form of illumination

whereby the high-beam is directed past other

road users. Other road users are kept out of the

high-beam. This prevents glare. When there is a

vehicle in front, for example, the high-beam

headlamps illuminate the areas to its right and

left, and the vehicle in front is illuminated by the

low-beam headlamps.

The system automatically adapts the low-beam

headlamp range depending on the distance to

the other vehicle. Once the system no longer

detects any other vehicles, it reactivates the

high-beam headlamps.

If the high-beam or partial high-beam are caus-

ing too much reflection from traffic signs, the

lights are automatically dimmed and glare for

the driver caused by the reflections is thus avoi-

ded.

The system's optical sensor is located behind

the windshield near the overhead control panel.

Important safety notes

G

WARNING

Adaptive Highbeam Assist Plus does not rec-

ognize road users:

R

who have no lights, e.g. pedestrians

R

who have poor lighting, e.g. cyclists

R

whose lighting is blocked, e.g. by a barrier

In very rare cases, Adaptive Highbeam Assist

Plus may not recognize road users who do

have lights, or may recognize them too late. In

this or similar situations, the automatic high-

beam headlamps will not be deactivated or

will be activated regardless. There is a risk of

an accident.
Always carefully observe the traffic conditions

and switch off the high-beam headlamps in

good time.

Adaptive Highbeam Assist Plus cannot take into

account road, weather or traffic conditions.

Adaptive Highbeam Assist Plus is only an aid.

You are responsible for adjusting the vehicle's

lighting to the prevailing light, visibility and traf-

fic conditions.

In particular, the detection of obstacles can be

restricted if there is:

R

poor visibility, e.g. due to fog, heavy rain or

snow

R

dirt on the sensors or the sensors are

obscured

Switching Adaptive Highbeam Assist

PLUS on/off

:

High-beam headlamps

;

Turn signal, right

Exterior lighting

133

Lights

and

windshield

wip

er

s

Z

-------------------------------------------------------------------------------------------------------------------------------------------------------------

=

High-beam flasher

?

Turn signal, left

X

To switch on: turn the light switch to Ã.

X

Press the combination switch beyond the

pressure point in the direction of arrow :.

The _ indicator lamp in the multifunction

display lights up if it is dark and the light sen-

sor activates the low-beam headlamps.

At speeds above approx. 16 mph

(25 km/h): the headlamp range is set auto-

matically depending on the distance between

the vehicle and other road users.

At speeds above approx. 19 mph

(30 km/h):

R

If no other road users are detected, the

high-beam headlamps are automatically

switched on.

R

If other road users are detected, the partial

high-beam headlamps are automatically

switched on.

The K indicator lamp in the instrument

cluster also lights up.

At speeds below approx. 16 mph

(25 km/h) or when there is sufficient

street lighting:

R

The partial high-beam headlamps are

switched off automatically.

R

The high-beam headlamps are switched off

automatically.

The K indicator lamp in the instrument

cluster goes out. The _ indicator lamp in

the multifunction display remains lit.

X

To switch off: move the combination switch

back to its normal position or move the light

switch to another position.

The _ indicator lamp in the multifunction

display goes out.

Headlamps fogged up on the inside

Certain climatic and physical conditions may

cause moisture to form in the headlamp. This

moisture does not affect the functionality of the

headlamp.

Interior lighting

Overview of interior lighting

Front overhead control panel

:

p Switches the left-hand front reading

lamp on/off

;

| Switches the automatic interior light-

ing control on/off

=

c Switches the front interior lighting on/

off

?

u Switches the rear compartment inte-

rior lighting on/off

A

p Switches the right-hand front reading

lamp on/off

Control panel in the grab handle (rear

compartment)

X

To switch on the corresponding side of

the vehicle: press button ;.

Reading lamp : and the make-up lamp light

up.

X

To switch off: press button ;.

Press once: the make-up lamp goes out.

Press twice: reading lamp : goes out.

134

Interior lighting

Li

ghts

and

w

indshie

ld

w

ipe

rs

-------------------------------------------------------------------------------------------------------------------------------------------------------------

X

To switch on both sides of the vehicle:

press button =.

Reading lamp : and the make-up lamp light

up.

X

To switch off: press button =.

Reading lamp : and the make-up lamp go

out.

Interior lighting control

General notes

In order to prevent the vehicle's battery from

discharging, the interior lighting functions are

automatically deactivated after some time

except when the SmartKey is in position in the

ignition lock.

The color, brightness, zone and display lighting

for the ambient lighting are set using the multi-

media system (see the separate operating

instructions).

The interior lighting control can be operated

using the front overhead control panel.

Automatic interior lighting control

X

To switch on or off: press the | button.

When the automatic interior lighting control is

activated, the button is flush with the over-

head control panel.

The interior lighting automatically switches on if

you:

R

unlock the vehicle

R

open a door

R

remove the SmartKey from the ignition lock

The interior light is activated for a short while

when the SmartKey is removed from the ignition

lock. This delayed switch-off can be adjusted via

the multimedia system (see the separate oper-

ating instructions).

Manual interior lighting control

X

To switch the front interior lighting on/

off: press the c button.

X

To switch the rear compartment interior

lighting on/off: press the u button.

X

To switch the reading lamp on/off: press

the p button.

Crash-responsive emergency lighting

The interior lighting is activated automatically if

the vehicle is involved in an accident.

X

To switch off the crash-responsive emer-

gency lighting: press the hazard warning

lamp button.

or

X

Lock and then unlock the vehicle using the

SmartKey.

Replacing bulbs

The front and rear light clusters of your vehicle

are equipped with LED light bulbs. Do not

replace the bulbs yourself. Contact a qualified

specialist workshop which has the necessary

specialist knowledge and tools to carry out the

work required.

Lamps are an important aspect of vehicle safety.

You must therefore make sure that these func-

tion correctly at all times. Have the headlamp

setting checked regularly.

Windshield wipers

Switching the windshield wipers

on/off

!

Do not operate the windshield wipers when

the windshield is dry, as this could damage

the wiper blades. Moreover, dust that has col-

lected on the windshield can scratch the glass

if wiping takes place when the windshield is

dry.

If it is necessary to switch on the windshield

wipers in dry weather conditions, always use

washer fluid when operating the windshield

wipers.

!

If the windshield wipers leave smears on the

windshield after the vehicle has been washed

in an automatic car wash, wax or other resi-

dues may be the reason for this. Clean the

windshield using washer fluid after washing

the vehicle in an automatic car wash.

!

Vehicles with a rain sensor: if the windshield

becomes dirty in dry weather conditions, the

windshield wipers may be activated inadver-

tently. This could then damage the windshield

wiper blades or scratch the windshield.

Windshield wipers

135

Li

ghts

and

w

in

ds

hi

el

d

w

ip

er

s

Z

-------------------------------------------------------------------------------------------------------------------------------------------------------------


Content      ..     5      6      7      8     ..