Mercedes-Benz Sprinter / Dodge Sprinter. Manual - part 494


  Index      Mercedes     Mercedes-Benz Sprinter / Dodge Sprinter - service repair manual 2006 year


Search            


Content   ..  492  493  494  495   ..


Mercedes-Benz Sprinter / Dodge Sprinter. Manual - part 494


INSTALLATION

(1) Install the foam support and install the screws.
(2) Install the a-pillar trim bottom and push the

top in toward a-pillar.

(3) Seat the retaining clips fully.

ASSIST HANDLE

REMOVAL

(1) Hold the handle in the down position and

remove the screws. (Fig. 3)

INSTALLATION

(1) Install the handle and install the screws.

B - PILLAR TRIM

REMOVAL

(1) Remove the lower seat belt anchor bolt. (Fig. 4)
(2) Pull door opening weatherstrip away from

flange along the b-pillar. (Fig. 5)

(3) Using a trim stick C-4755 or equivalent,

release the trim clips and remove the trim. (Fig. 6)

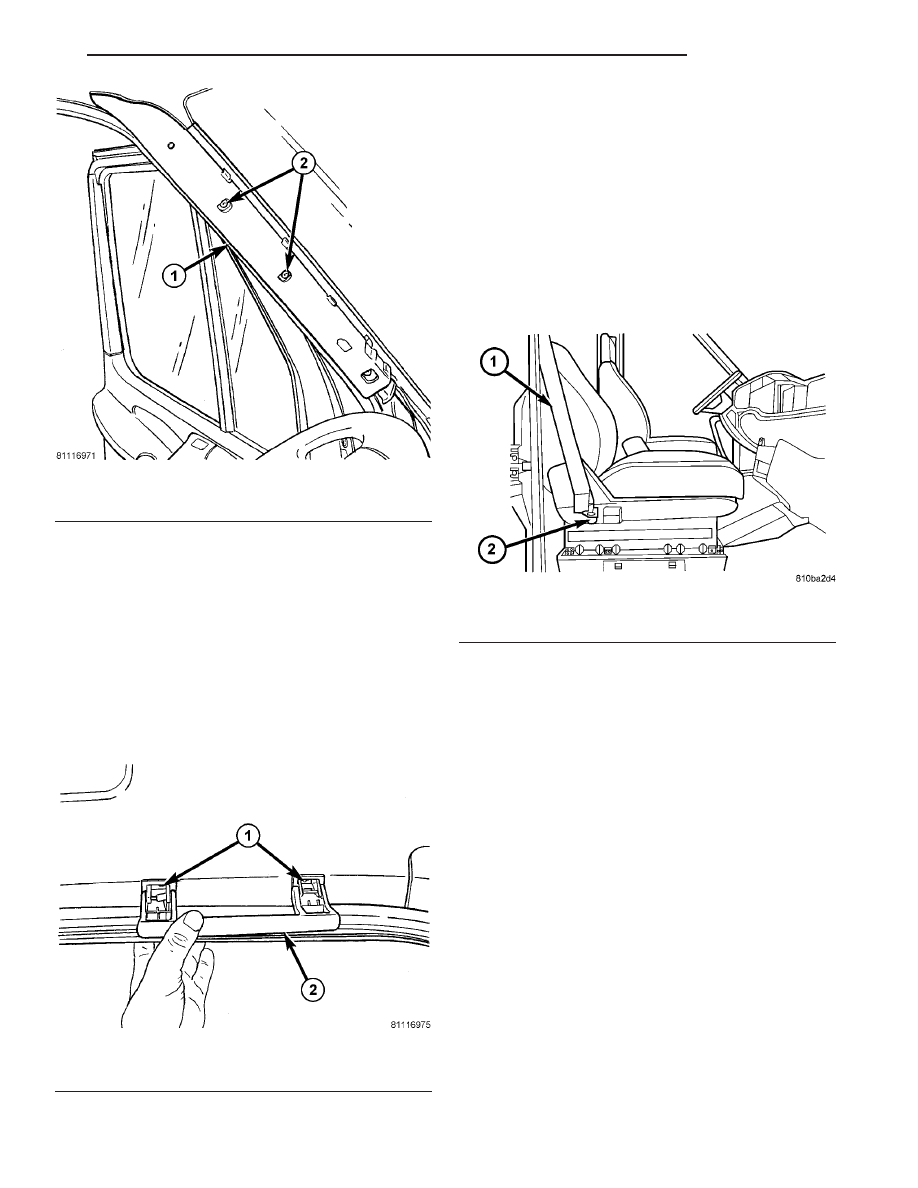
Fig. 2 A-PILLAR SUPPORT FOAM

1 - SUPPORT FOAM
2 - SCREWS (4)

Fig. 3 ASSIST HANDLE

1 - SCREWS (2)
2 - ASSIST HANDLE

Fig. 4 Front Seat Belt Lower Anchor

1 - FRONT SEAT BELT
2 - COVER AND/OR SCREW

VA

INTERIOR

23 - 71

INSTALLATION

(1) Route the seat belt through the trim and

mount the trim panel.

(2) Seat the mounting clips fully.
(3) Position the door opening weatherstrip back

along the mounting flange.

(4) Install the seat belt and mounting bolt.
(5) Tighten the bolt to 35 N·m (26 ft. lbs.).

BULKHEAD TRIM PANEL

REMOVAL

(1) Remove the rivets and remove the lower panel.

(Fig. 7)

(2) Remove the rivets and remove the upper

panel.

INSTALLATION

(1) Install the upper panel and replace rivets.
(2) Install the lower panel and replace rivets.

CARPETS AND FLOOR MATS

REMOVAL

Cargo / Passenger Van - Front

(1) Remove the stepwell scuff pads. (Refer to 23 -

BODY/INTERIOR/STEPWELL

SCUFF

PADS

-

REMOVAL)

(2) Remove the three bolts and tray behind drivers

seat.

(3) Remove cup holder. (Refer to 23 - BODY/IN-

STRUMENT PANEL/CUP HOLDER - REMOVAL)

(4) Remove the jack storage cover.
(5) Remove carpet/mat.

Passenger Van - Rear

(1) Remove seats. (Refer to 23 - BODY/SEATS/

SEAT - REAR - REMOVAL)

(2) Remove the screws and retaining strips.
(3) Remove the seat striker assemblies.
(4) Remove carpet/mat.

Fig. 5 B-PILLAR TRIM

1 - FRONT DOOR WEATHERSTRIP
2 - B-PILLAR
3 - B-PILLAR TRIM

Fig. 6 B-PILLAR TRIM MOUNTING CLIPS

1 - RETAINING CLIPS (5)
2 - B-PILLAR TRIM

Fig. 7 BULKHEAD TRIM PANEL

1 - RIVETS
2 - UPPER PANEL
3 - PANEL GLASS
4 - LOWER PANEL

23 - 72

INTERIOR

VA

Cargo Van - Rear

(1) Remove the screws and retaining strips.
(2) Remove carpet/mat.

INSTALLATION

Cargo / Passenger Van - Front

(1) Position carpet/mat in vehicle.
(2) Install the jack storage cover.
(3) Install the cup holder. (Refer to 23 - BODY/IN-

STRUMENT PANEL/CUP HOLDER - INSTALLA-
TION)

(4) Install the tray behind the driver’s seat and

install the three bolts.

(5) Install the stepwell scuff pads. (Refer to 23 -

BODY/INTERIOR/STEPWELL

SCUFF

PADS

-

INSTALLATION)

Passenger Van - Rear

(1) Position carpet/mat in vehicle.
(2) Install the seat striker assemblies.
(3) Install the retaining strips and screws.
(4) Install the seats. (Refer to 23 - BODY/SEATS/

SEAT - INSTALLATION)

Cargo Van - Rear

(1) Position carpet/mat in vehicle.
(2) Install the retaining strips and screws.

COWL TRIM

REMOVAL

(1) Position door weatherstrip aside.
(2) Remove the jack storage cover, if necessary.
(3) Position aside carpet/mat, if necessary.
(4) Using a trim stick C-4755 or equivalent,

remove the cowl trim panel.

INSTALLATION

(1) Position the cowl trim panel and seat the clips

fully.

(2) Install the jack storage cover, if necessary.
(3) Position the carpet/mat back.
(4) Position the door weatherstrips back.

D - PILLAR TRIM

REMOVAL

(1) Remove the three plastic twist screws and

remove the panel.

INSTALLATION

(1) Install the panel and install the three twist

screws.

HEADLINER

REMOVAL

Cab Section

(1) Remove the a-pillar trim. (Refer to 23 - BODY/

INTERIOR/A-PILLAR TRIM - REMOVAL)

(2) Remove the sun visors. (Refer to 23 - BODY/

INTERIOR/SUN VISOR - REMOVAL)

(3) Remove the b-pillar trim. (Refer to 23 - BODY/

INTERIOR/B-PILLAR TRIM - REMOVAL)

(4) Remove the assist handle. (Refer to 23 - BODY/

INTERIOR/ASSIST HANDLE - REMOVAL)

(5) Remove the dome light. (Refer to 8 - ELECTRI-

CAL/LAMPS/LIGHTING

-

INTERIOR/CARGO

LAMP UNIT - REMOVAL)

(6) Carefully separate the headliner and remove.

Number 2 Section

(1) Disconnect and isolate battery negative cable.
(2) Remove the second and third row seats. (Refer

to 23 - BODY/SEATS/SEAT - REAR - REMOVAL)

NOTE: If vehicle is not equipped with rear air con-
ditioning unit, skip to step 8.

(3) Remove the push pin fasteners and remove the

rear air front duct cover.

(4) Disconnect the electrical connector at front of

cover.

(5) Remove the push pin fasteners and remove the

rear air middle duct cover.

(6) Disconnect the electrical connector.
(7) Remove the three push-pins and three screws

and remove the rear air cover.

(8) Remove the duct work.
(9) Release clips at front and rear of headliner and

remove.

Number 3 Section

(1) Disconnect and isolate battery negative cable.
(2) Remove the third and fourth row seats. (Refer

to 23 - BODY/SEATS/SEAT - REAR - REMOVAL)

NOTE: If vehicle is not equipped with rear air con-
ditioning unit, skip to step 8.

(3) Remove the push pin fasteners and remove the

rear air front duct cover.

(4) Disconnect the electrical connector at front of

cover.

(5) Remove the push pin fasteners and remove the

rear air middle duct cover.

(6) Disconnect the electrical connector.
(7) Remove the three push-pins and three screws

and remove the rear air cover.

(8) Remove the duct work.

VA

INTERIOR

23 - 73

(9) Release clips at front and rear of headliner and

remove.

Number 4 Section

(1) Disconnect and isolate battery negative cable.
(2) Remove the third and fourth row seats. (Refer

to 23 - BODY/SEATS/SEAT - REAR - REMOVAL)

NOTE: If vehicle is not equipped with rear air con-
ditioning unit, skip to step 8.

(3) Remove the push pin fasteners and remove the

rear air front duct cover.

(4) Disconnect the electrical connector at front of

cover.

(5) Remove the push pin fasteners and remove the

rear air middle duct cover.

(6) Disconnect the electrical connector.
(7) Remove the three push-pins and three screws

and remove the rear air cover.

(8) Remove the duct work.
(9) Release clips at front and rear of headliner and

remove.

INSTALLATION

Cab Section

(1) Position the headliner in vehicle and seat fully.
(2) Install dome light. (Refer to 8 - ELECTRICAL/

LAMPS/LIGHTING

-

INTERIOR/CARGO

LAMP

UNIT - INSTALLATION)

(3) Install assist handle. (Refer to 23 - BODY/IN-

TERIOR/ASSIST HANDLE - INSTALLATION)

(4) Install b-pillar trim. (Refer to 23 - BODY/IN-

TERIOR/B-PILLAR TRIM - INSTALLATION)

(5) Install the sun visors. (Refer to 23 - BODY/IN-

TERIOR/SUN VISOR - INSTALLATION)

(6) Install the a-pillar trim. (Refer to 23 - BODY/

INTERIOR/A-PILLAR TRIM - INSTALLATION)

(7) Connect battery negative cable.

Number 2 Section

(1) Position the headliner in vehicle and seat fully.

NOTE: If vehicle is not equipped with rear air con-
ditioning unit, skip to step 8.

(2) Install rear air unit duct work.
(3) Install the rear air unit rear cover and install

the three screws and push-pins.

(4) Connect the electrical connector and install the

middle duct work cover.

(5) Install the push pin fasteners.
(6) Connect the electrical connector and install the

front duct work cover.

(7) Install the push pin fasteners.
(8) Install the second and third row seats. (Refer

to 23 - BODY/SEATS/SEAT - INSTALLATION)

(9) Connect battery negative cable.

Number 3 Section

(1) Position the headliner in vehicle and seat fully.

NOTE: If vehicle is not equipped with rear air con-
ditioning unit, skip to step 8.

(2) Install rear air unit duct work.
(3) Install the rear air unit rear cover and install

the three screws and push-pins.

(4) Connect the electrical connector and install the

middle duct work cover.

(5) Install the push pin fasteners.
(6) Connect the electrical connector and install the

front duct work cover.

(7) Install the push pin fasteners.
(8) Install the third and fourth row seats. (Refer to

23 - BODY/SEATS/SEAT - INSTALLATION)

(9) Connect battery negative cable.

Number 4 Section

(1) Position the headliner in vehicle and seat fully.

NOTE: If vehicle is not equipped with rear air con-
ditioning unit, skip to step 8.

(2) Install rear air unit duct work.
(3) Install the rear air unit rear cover and install

the three screws and push-pins.

(4) Connect the electrical connector and install the

middle duct work cover.

(5) Install the push pin fasteners.
(6) Connect the electrical connector and install the

front duct work cover.

(7) Install the push pin fasteners.
(8) Install the third and fourth row seats. (Refer to

23 - BODY/SEATS/SEAT - INSTALLATION)

(9) Connect battery negative cable.

QUARTER TRIM PANEL

REMOVAL

Passenger Van

(1) Remove seats as necessary. (Refer to 23 -

BODY/SEATS/SEAT - REMOVAL)

(2) Remove d-pillar trim if necessary. (Refer to 23 -

BODY/INTERIOR/D-PILLAR TRIM - REMOVAL)

(3) Using a trim stick C-4755 or equivalent, sepa-

rate the push-pin fasteners and remove trim panels.

Cargo Van

(1) Remove bolts and remove tie down rings, if

equipped.

(2) Remove rivets and remove paneling

23 - 74

INTERIOR

VA


Content   ..  492  493  494  495   ..