Mazda 3 (2024 year). Manual in english - page 13
 

  Index      Manuals     Mazda 3 (2024 year). Manual in english


Search            copyright infringement  


Content      ..     11      12      13      14     ..


Mazda 3 (2024 year). Manual in english - page 13


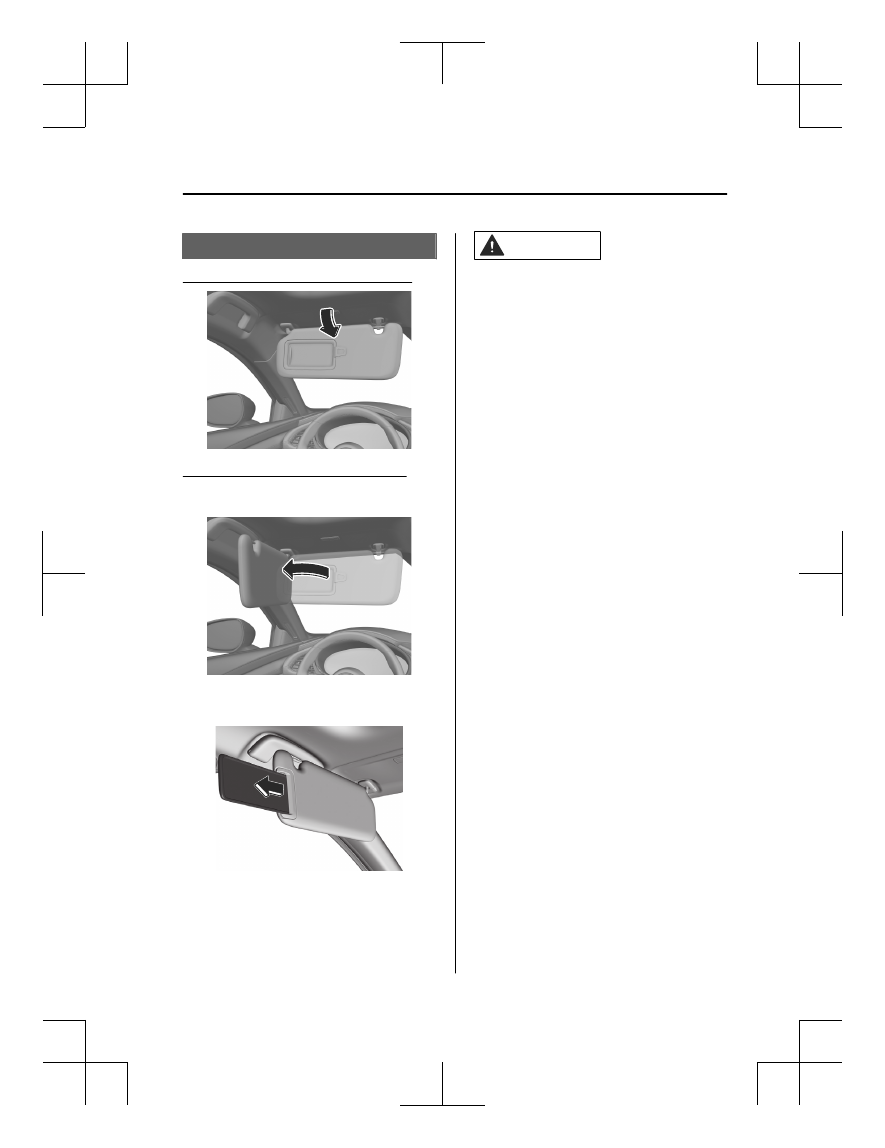
How to Use the Sunvisor

When blocking light from the front

When blocking light from the side

Unhook the sunvisor and swing it to
the side.

The visor extender extends the
sunvisor's range of sun shading.
To use, pull it out.

CAUTION

When moving the sunvisor, retract the
visor extender to its original position.
Otherwise, the visor extender could hit
the rearview mirror.

Other Equipment

Sunvisor

7-31

Mazda3_8LX5-EA-23E_Edition2_new

2023-4-17 20:22:43

How to Use the Vanity

Mirrors

1. Vanity mirror light

*

2. Lighting range
3. Off range
For vehicles with a light, it turns on
when the cover is opened.
The light turns on only when the
sunvisor angle is within the lighting
range.

NOTE

If a vanity mirror light is left on with
the vehicle power switched OFF, the
light is turned off automatically to
prevent the lead-acid battery from
being discharged.

The vanity mirror light can be turned
on again by doing any of the
following operations:

Opening/closing any door.

Unlocking any door.

Switching the vehicle power to
ACC or ON.

Switching an overhead light/front
map light on.

Other Equipment

Vanity Mirror

7-32

*Some models.

Mazda3_8LX5-EA-23E_Edition2_new

2023-4-17 20:22:43

Illuminated Entry System

The interior lights turn on/off in
conjunction with the opening/closing
of the doors and the position of the
vehicle power (ON/OFF).

How to Use the

Illuminated Entry System

The overhead lights turn on when any
of the following operations is done
with the overhead light switch in the
DOOR-linked position.

The driver's door is unlocked with
the vehicle power switched OFF.

The vehicle power is switched OFF
with all doors closed.

The overhead lights turns off when any
of the following operations is done.

The driver's door is locked.

The vehicle power is switched ON.

When the vehicle power is switched
OFF and the interior lights remain on,
they turn off after a certain period of
time has passed.

NOTE

The amount of time until the
illuminated entry system turns off can
be changed.
Refer to Mazda Connect Owner's
Manual or consult an Authorized
Mazda Dealer.

The illuminated entry system does
not operate when the overhead
lights are turned on by operating the
overhead light ON/OFF switch.

Other Equipment

Interior Lights

7-33

Mazda3_8LX5-EA-23E_Edition2_new

2023-4-17 20:22:43

How to Use the

Overhead Lights

Front

The overhead lights turn on.

Press the 

 switch again to turn off

the overhead lights.

When the door interlock is ON

The indicator light in the 

 switch

turns off.

The lights turn on when any of the
doors is opened.

The light turns on/off depending on
the illumination entry system.

When the door interlock is OFF

The indicator light in the switch turns
on.

Rear

The rear overhead lights also turns
on/off in conjunction with the
operation of the front overhead lights.

Other Equipment

Interior Lights

7-34

Mazda3_8LX5-EA-23E_Edition2_new

2023-4-17 20:22:43

How to Use the Map

Lights

The map light turns on.
Press the switch again to turn off the
map lights.

NOTE

Pressing the switch does not turn the
lights off in any of the following
cases.

When the light is turned on by

operating an overhead light 
switch.

When the illuminated entry system
is operating.

How to Use the Trunk

Lights (4-Door)

Open the trunk.

The trunk lights turn on.
When the trunk is closed, the trunk
lights turn off.

Other Equipment

Interior Lights

7-35

Mazda3_8LX5-EA-23E_Edition2_new

2023-4-17 20:22:43

How to Use the Luggage

Compartment Lights

(5-Door)

Open the liftgate.

The luggage compartment lights turn
on.
When the liftgate is closed, the luggage
compartment lights turn off.

Other Equipment

Interior Lights

7-36

Mazda3_8LX5-EA-23E_Edition2_new

2023-4-17 20:22:43

Accessory Sockets

The accessory socket is used as a
socket for accessories when the vehicle
power is switched to ACC or ON.
Only use accessories that have a
maximum power consumption of 120
W (DC12V-10A) or below.

Warnings and Cautions

When Using the

Accessory Socket

CAUTION

Always close the cover when it is not
in use. If foreign matter or liquid
penetrates the socket, it may cause a
problem.

Insert the accessory plug into the
socket securely. If the plug is not
inserted securely, it may heat
excessively and blow the fuse.

Do not use accessories that have a
power consumption of over 120 W
(DC12V-10A). Otherwise, it could
cause a malfunction.

Noise may occur on the audio
playback depending on the device
connected to the accessory socket.

Do not insert the cigarette lighter
into the accessory socket.

Depending on the device connected
to the accessory socket, the vehicle's
electrical system might be affected,
which could cause the warning light
to turn on. Disconnect the
connected device and make sure
that the problem is resolved. If the
problem is resolved, switch the
vehicle power OFF after the device is
disconnected from the socket. If the
problem is not resolved, consult an
Authorized Mazda Dealer.

Other Equipment

Accessory Sockets

7-37

Mazda3_8LX5-EA-23E_Edition2_new

2023-4-17 20:22:43

How to Use the

Accessory Socket

Open the lid and insert the plug to be
used.

Other Equipment

Accessory Sockets

7-38

Mazda3_8LX5-EA-23E_Edition2_new

2023-4-17 20:22:43

Wireless Charger (Qi)

*

You can charge mobile devices such as
Smartphones which comply with the
Qi Wireless Charging standard.
Only use mobile devices that have a
maximum power consumption of 5 W,
or 15 W or below.

Trademarks

“Qi” and the Qi symbol are trademarks
or registered trademarks of the
Wireless Power Consortium (WPC).

Warnings and Cautions

When Using the Wireless

Charger (Qi)

WARNING

Radio waves from the Wireless
Charger (Qi) may affect the operation
of medical devices such as
implanted-type cardiac pacemakers
or defibrillators.

Before using the Wireless Charger
(Qi) near people who use medical
devices, ask the medical device
manufacturer or your physician if
radio waves from the Wireless
Charger (Qi) will affect the device.

The Wireless Charger (Qi) can be
disabled to prevent it from affecting
medical devices. Consult an
Authorized Mazda Dealer for details.

Heed the following cautions.
Otherwise, the Wireless Charger (Qi)
may malfunction or be damaged,
which could cause a fire, burns due to
heat generation, or an accident such
as electrical shock.

Do not install, remove, disassemble,
or change the wiring of the Wireless
Charger (Qi). If the Wireless Charger
(Qi) needs to be installed or
removed, consult an Authorized
Mazda Dealer.

Do not use the Wireless Charger (Qi)
when it is malfunctioning. In
addition, if smoke, abnormal noise,
or abnormal smell is emitted from
the Wireless Charger (Qi), stop the
vehicle in a safe place, turn off the
Wireless Charger (Qi), and consult
an Authorized Mazda Dealer.

Other Equipment

Wireless Charger (Qi)

*Some models.

7-39

Mazda3_8LX5-EA-23E_Edition2_new

2023-4-17 20:22:43

When using the Wireless Charger
(Qi) to store items on, turn off the
Wireless Charger (Qi).

Do not place any metal object
between the charging area and the
mobile device. Also, do not apply
items such as a metallic sticker to the
Wireless Charger (Qi).

When charging, do not place any
item other than the mobile device to
be charged on the Wireless Charger
(Qi). In addition, do not place any
metal object, IC card, coin, or
magnetic item near the charging
area.

Remove dust or dirt from the
charging area before use.

Do not apply strong force or impact
to the Wireless Charger (Qi) or get it
wet.

Use only mobile devices which
support the Wireless Charger (Qi).

CAUTION

While a mobile device is placed on
the charging area, keep the vehicle
key away from the Wireless Charger
(Qi). The vehicle key may not be
detected due to radio wave
interference by the Wireless Charger
(Qi).

Charging may not operate normally
under the following conditions:

The mobile device is fully charged.

There is foreign matter between
the mobile device and the charging
area.

The temperature of the mobile
device is high.

The mobile device is placed with
the charging side facing upward.

The mobile device is placed in a
position extremely deviating from
the center of the charging area.

Your vehicle is in an area where
strong radio waves or electrical
noise occur such as near a
television tower, power plant, or
airport.

The Near Field Communication
(NFC) function setting of the
mobile device is on (depends on
the model of the mobile device).

Keep the following items away from
the charging area. Otherwise the
data stored on the mobile device
could be erased or the device could
malfunction.

Magnetic items such as magnets,
magnetic cards, and magnetic
recording media.

High precision devices such as
wristwatches.

Before using the Wireless Charger
(Qi), make sure to back up the data
stored on the mobile device. The
data on the mobile device could be
deleted.

Do not wipe the Wireless Charger
(Qi) using oil, alcohol, or thinner, or
spray hairspray or insecticide onto it.
Otherwise, it could cause damage or
cracking.

Do not leave mobile devices in the
cabin. The temperature inside the
cabin may become very hot, causing
the devices to malfunction.

Other Equipment

Wireless Charger (Qi)

7-40

Mazda3_8LX5-EA-23E_Edition2_new

2023-4-17 20:22:43

How to Use the Wireless

Charger (Qi)

1. Start the engine.

The power for the Wireless Charger
(Qi) turns on and the LED indicator
turns on.

2. Place a device compliant with the

Qi Wireless Charging standard
(portable device with a maximum
power consumption of 5 W or 15
W or below) in the center of the
charging area on the tray.

1. Charging area
2. LED indicator
The LED indicator turns on in amber
or green when charging starts.
Charging starts when all the doors
and liftgate are closed.

For details on the LED indicator, refer
to the following LED indicator table.

Charging status display

The charging status of the Wireless
Charger (Qi) can be checked with the
LED indicator or the icon displayed on
the center display.

Illumina-

tion/flash

pattern

Icon indi-

cation

Status

Does not

turn on

Indicates that charg-
ing is turned off.

Illumina-

tion/flash

pattern

Icon indi-

cation

Status

Turns on in

white

Indicates that charg-
ing is possible.

Turns on in

amber

Indicates normal
charging.

Turns on in

green

Indicates fast charg-
ing

*1

.

Flashes in

white

Indicates that the
charging conditions
are not met.

Flashes in red

Indicates that charg-
ing is not possible
because a high tem-
perature is detected.

Indicates that charg-
ing is not possible
because foreign mat-
ter is detected.

Turns on in

red

Indicates that there
is a problem with
Wireless Charger
(Qi) and it needs to
be repaired. Consult
an Authorized Maz-
da Dealer.

*

1 Some mobile devices can switch

between normal charging and fast
charging.

NOTE

Charging efficiency may be reduced
or charging may not be possible
depending on the use environment
and conditions.

Other Equipment

Wireless Charger (Qi)

7-41

Mazda3_8LX5-EA-23E_Edition2_new

2023-4-17 20:22:43

Depending on the mobile device
case or accessories used, the mobile
device may not charge, or the
charging efficiency may be reduced
resulting in a longer charging time. If
charging does not start even when a
mobile device is placed on the
charging area, remove the case or
accessory.

Depending on the vehicle condition,
charge amount may be temporarily
restricted and charging may be
canceled, however, this does not
indicate a problem.

If the mobile device temperature
rises during charging, charging may
stop due to the protection function
of the device. If that happens, wait
until the mobile device cools down
sufficiently and then recharge it.

When using the Wireless Charger
(Qi), applications using the Near
Field Communication (NFC) function
may launch, however, this does not
indicate a problem with the Wireless
Charger (Qi).

(Vehicles with i-stop)

While i-stop is operating, charge
amount may be temporarily
restricted and charging may be
temporarily canceled, however, this
does not indicate a problem.

Charging may be temporarily
canceled depending on the vehicle
conditions, such as when the engine
is stopped.

Convenient Ways to Use

the Wireless Charger (Qi)

The Wireless Charger (Qi) can be
turned on/off and the connection
mode can be switched.
Refer to the Settings section in the
Mazda Connect Owner's Manual.

Other Equipment

Wireless Charger (Qi)

7-42

Mazda3_8LX5-EA-23E_Edition2_new

2023-4-17 20:22:43

Warnings and Cautions

When Using the Assist

Grips

WARNING

Never hang heavy or sharp objects on
the assist grips and coat hooks.

Hanging heavy or sharp-ended objects
such as a coat hanger from the assist
grips or coat hooks is dangerous as
they can fly off and hit an occupant in
the cabin if a curtain air bag was to
deploy, which could result in serious
injury or death.

Do not use the assist grips when
getting in and out of the vehicle or
getting out of a seat.

An assist grip could break under a
heavy load resulting in injury.

How to Use the Assist

Grips

Use the assist grips to support your
body while seated in the vehicle and
while the vehicle is moving.

Other Equipment

Assist Grip

7-43

Mazda3_8LX5-EA-23E_Edition2_new

2023-4-17 20:22:43

Towing

Your Mazda is not designed for towing.
Never tow a trailer with your Mazda.

Other Equipment

Towing

7-44

Mazda3_8LX5-EA-23E_Edition2_new

2023-4-17 20:22:43

HomeLink Wireless

Control System

*

The HomeLink system replaces up to 3
hand-held transmitters with a single
built-in component in the
auto-dimming mirror. Pressing the
HomeLink button on the
auto-dimming mirror activates garage
doors, gates and other devices
surrounding your home.

NOTE

HomeLink and HomeLink house are
registered trademarks of Gentex
Corporation.

Warning and Cautions for

Using the HomeLink

Wireless Control System

WARNING

Do not use the HomeLink system with
any garage door opener that lacks the
safety stop and reverse feature.

Using the HomeLink system with any
garage door opener that lacks the
safety stop and reverse feature as
required by federal safety standards is
dangerous. (This includes garage doors
manufactured before April 1, 1982.)
Using these garage door openers can
increase the risk of serious injury or
death. For further information, contact

HomeLink at www.homelink.com

 or

www.youtube.com/HomeLinkGentex

or an Authorized Mazda Dealer.

Always check the areas surrounding
garage doors and gates for people or
obstructions before programming or
during operation of the HomeLink
system.

Programming or operating the
HomeLink system without verifying the
safety of areas surrounding garage
doors and gates is dangerous and
could result in an unexpected accident
and serious injury if someone were to
be hit.

Other Equipment

HomeLink Wireless Control System

*Some models.

7-45

Mazda3_8LX5-EA-23E_Edition2_new

2023-4-17 20:22:43

How to Use the

HomeLink Wireless

Control System

Programming the HomeLink System

The HomeLink system provides 3
buttons which can be individually
selected and programmed using the
transmitters for current, on-market
devices as follows:
1. Verify that there is a remote control

transmitter available for the device
you would like to program.

NOTE

It is recommended that a new
battery be placed in the hand-held
transmitter of the device being
programmed to HomeLink for
quicker training and accurate
transmission of the radio-frequency
signal.

2. Press and release the HomeLink

button you would like to program.
The indicator light flashes slowly in
amber when the button is pressed.

1. Indicator light
2. HomeLink button

3. Hold the hand-held transmitter 3 to

7 cm (1.2 to 2.7 in) away from the
HomeLink button you would like to
program while keeping the
indicator light in view.

NOTE

Depending on the hand-held
transmitter, it may be easier to do
the programming by holding it
about 20 cm (7.9 in) away from the
HomeLink button.

4. Press the hand-held transmitter

button continuously until the
indicator light changes from amber
(flashing) to green (on/flashing).

NOTE

Some gate operators and garage
door openers may require you to
replace this Programming Step 4
with procedures noted in the “Gate
Operator/Canadian Programming”
section.

5. Press the HomeLink button again to

check if the programming has been
completed.
If the indicator light remains on in
green, the programming is
complete and the device becomes
operational.
If the indicator light flashes rapidly
in green, firmly press and hold the
Homelink button and release it
after two seconds have passed.
Repeat this process up to three
times to complete the
programming. The device becomes
operational and programming is
complete. If the device does not
operate, go to the next step.

6. At the garage door opener receiver

(motor-head unit) in the garage,
locate the “learn” or “smart” button.
This can usually be found where the
hanging antenna wire is attached to
the motor-head unit.

7. Firmly press and release the “learn”

or “smart” button. (The name and
color of the button may vary by
manufacturer.)

Other Equipment

HomeLink Wireless Control System

7-46

Mazda3_8LX5-EA-23E_Edition2_new

2023-4-17 20:22:43

NOTE

Complete the programming within
30 seconds.

8. Return to the vehicle and firmly

press and hold the Homelink
button, and then release it after two
seconds have passed. Repeat the
“press/hold/release” sequence a
second time, and, depending on
the brand of the garage door
opener (or other rolling code
equipped device), repeat this
sequence a third time to complete
the programming process.
Press the programmed HomeLink
button and make sure that the
HomeLink System operates.
If the status indicator arrows are
flashing, refer to Programming
two-way communication.

1. Indicator light
For questions or comments, please
contact HomeLink at
www.homelink.com or
www.youtube.com/
HomeLinkGentex, or the HomeLink
toll-free hotline at 1-800-355-3515
(for calls placed outside of the USA,
Canada, and Puerto Rico,
international rates will apply and
may differ based on landline or
mobile phone).

Gate operator/Canadian
Programming

Canadian radio-frequency laws require
transmitter signals to “time-out” (or
quit) after several seconds of
transmission 

 which may not be long

enough for HomeLink to pick up the
signal during programming. Similar to
this Canadian law, some U.S. gate
operators are designed to “time-out”
in the same manner.
If you live in Canada or are having
difficulties programming a gate
operator by using the programming
procedures (regardless of where you
live), replace Step 4 of Programming
the HomeLink System with the
following:

NOTE

If programming a garage door opener
or gate operator, it is advised to unplug
the device during the “cycling” process
to prevent possible overheating.

While the indicator light is flashing in
amber, press the button on the
hand-held transmitter for 2 seconds
and release it repeatedly until the
indicator light changes from amber to
green.
Go back to Step 5 of Programming the
HomeLink System to complete the
procedure.

Operating the HomeLink System

Press the programmed HomeLink
button to operate a programmed
device.

Reprogramming the HomeLink system

To program a device to HomeLink
using a HomeLink button previously
trained, follow these steps:
1. Press and hold the desired

HomeLink button. Do not release
the button.

2. After 20 seconds, the indicator light

flashes in amber. After the indicator
light flashes, release the HomeLink
button.

Other Equipment

HomeLink Wireless Control System

7-47

Mazda3_8LX5-EA-23E_Edition2_new

2023-4-17 20:22:43

3. Go back to Step 3 of Programming

the HomeLink System to complete
the procedure.

NOTE

If the programming has not been
completed, the system returns to the
previous programming.

Programming two-way
communication

The garage door two-way
communication is a function that
communicates with the garage door
opener and indicates whether the
garages door is open or closed using
the indicator lights in the rear view
mirror. It can indicate the status of the
garage door within a range up-to 250
m (820 ft).

NOTE

The communication range may shorten
depending on obstructions.

Within five seconds after programming
a new HomeLink button, both of the
garage door status indicator lights will
flash rapidly in green indicating that
the garage door two-way
communication has been established.
If the garage door status indicator
lights flash, the two-way
communication programming is
complete.
If the garage door status indicator
lights do not flash, the two-way
communication programming is not
completed. For additional HomeLink
information and programming videos,
refer to the following Websites:

www.HomeLink.com

www.youtube.com/
HomeLinkGentex

Operating the garage door two-way
communication

By pressing HomeLink buttons 1 and 2
at the same time for two seconds, the
status of the garage door is indicated
for about 3 seconds as follows:

1. HomeLink button 1
2. HomeLink button 2

Garage door

status

Indicator light

Closing

Amber flashes

Opening

Amber flashes

Closed

Green turns on

Opened

Green turns on

Erasing Programmed HomeLink
Buttons

Press the two outer HomeLink buttons
continuously at the same time until the
indicator light flashes.

Other Equipment

HomeLink Wireless Control System

7-48

Mazda3_8LX5-EA-23E_Edition2_new

2023-4-17 20:22:43

1. HomeLink button 1
2. HomeLink button 3

NOTE

All of the programmed HomeLink
buttons are reset. If there is
programming you do not want to
delete, reprogram if necessary. Refer
to Programming the HomeLink
System.

Verify that the programming has
been erased if you resell the vehicle.

The programming will not be erased
even if the battery is disconnected.

Other Equipment

HomeLink Wireless Control System

7-49

Mazda3_8LX5-EA-23E_Edition2_new

2023-4-17 20:22:43

Warnings and Cautions

For Using the Accessories

CAUTION

When installing accessories using
electrical or electronic components,
consult an Authorized Mazda Dealer.
There is a possibility of accidents due
to brake or air bag mis-operation,
vehicle damage or malfunctions.

Other Equipment

Accessories

7-50

Mazda3_8LX5-EA-23E_Edition2_new

2023-4-17 20:22:43

Warnings and Cautions
For Using the Floor Mat

We recommend the use of Genuine
Mazda floor mats.

WARNING

Make sure the floor mats are secured
with the grommets to prevent them
from bunching up under the foot
pedals (Driver's side).

Using a floor mat that is not secured is
dangerous as it will interfere with the
accelerator and brake pedal operation
(driver's side), which could result in an
accident.
Only use a floor mat which conforms
to the shape of the floor on the driver's
side and make sure it is oriented
correctly.
Secure the floor mat using the
grommets.

There are various ways to secure floor
mats depending on the type used,
therefore secure the mat according to
the type.
After installing the floor mat, make
sure that it does not slide from side to
side or back and forth, and that there
is sufficient clearance with the
accelerator and brake pedals on the
driver's side.

After removing the floor mat for
cleaning or some other reason, always
securely reinstall it while paying
attention to the precautions just
mentioned.

Do not install two floor mats, one on
top of the other, on the driver's side.

Installing two floor mats, one on top of
the other, on the driver's side is
dangerous as the retention pins can
only keep one floor mat from sliding
forward.
Loose floor mat(s) will interfere with
the foot pedals and could result in an
accident.
If using an all-weather mat for winter
use always remove the original floor
mat.

Other Equipment

Floor Mat

7-51

Mazda3_8LX5-EA-23E_Edition2_new

2023-4-17 20:22:43

Malfunction Diagnosis

Connector

CAUTION

Do not connect any devices other than
the specially designed malfunction
diagnosis devices for servicing. If any
device other than the malfunction
diagnosis device is connected, it may
affect the vehicle's electrical devices or
lead to damage such as lead-acid
battery depletion.

Other Equipment

Malfunction Diagnosis Connector

7-52

Mazda3_8LX5-EA-23E_Edition2_new

2023-4-17 20:22:43

Jack

To remove the jack

4-Door

1. Remove the trunk board.


2. Remove the cover.


3. Turn the wing bolt and jack screw

counterclockwise.

1. Wing bolt
2. jack screw

5-Door

1. Remove the luggage board.


2. Remove the jack.


To secure the jack

4-Door

1. Insert the wing bolt into the jack

with the jack screw pointing to the
front and turn the wing bolt
clockwise to temporarily tighten it.

2. Turn the jack screw clockwise.


Other Equipment

Spare Tire and Tool Storage

7-53

Mazda3_8LX5-EA-23E_Edition2_new

2023-4-17 20:22:43

1. Wing bolt
2. jack screw
 

3. Turn the wing bolt completely to

secure the jack.

5-Door

Perform the removal procedure in
reverse.
 

Maintenance

Always keep the jack clean.

Make sure the moving parts are kept
free from dirt or rust.

Make sure the screw thread is
adequately lubricated.

Spare Tire

The temporary spare tire is lighter and
smaller than a conventional tire, and is
designed only for emergency use and
should be used only for VERY short
periods. Temporary spare tires should
NEVER be used for long drives or
extended periods.

WARNING

Do not install the temporary spare tire
on the front wheels (driving wheels).

Driving with the temporary spare tire
on one of the front driving wheels is
dangerous. Handling will be affected.
You could lose control of the vehicle,
especially on ice or snow bound roads,
and have an accident. Move a regular
tire to the front wheel and install the
temporary spare tire to the rear.

CAUTION

When using the temporary spare tire,
driving stability may decrease
compared to when using only the
conventional tire. Drive carefully.

To avoid damage to the temporary
spare tire or to the vehicle, observe
the following precautions:

Do not exceed 80 km/h (50 mph).

Avoid driving over obstacles. Also,
do not drive through an automatic
car wash. This tire's diameter is
smaller than a conventional tire, so
the ground clearance is reduced.

Do not use a tire chain on this tire
because it will not fit properly.

Do not use your temporary spare
tire on any other vehicle, it has
been designed only for your
Mazda.

Other Equipment

Spare Tire and Tool Storage

7-54

Mazda3_8LX5-EA-23E_Edition2_new

2023-4-17 20:22:43

Use only one temporary spare tire
on your vehicle at the same time.

To remove the spare tire

4-Door

1. Remove the trunk board.


2. Turn the spare tire hold-down bolt

counterclockwise and remove the
spare tire.

NOTE

If the spare tire hold-down bolt
cannot be loosened, hold the edge
of the tire and turn it
counterclockwise until the spare
tire hold-down bolt rotates.


5-Door

1. Remove the luggage board.


2.

(Vehicles with sub-woofer)

Uncouple the sub-woofer
connector.

NOTE

Extra strength may be required to
uncouple the connector. Be sure to
squeeze the tab firmly.


3.

(Vehicles with sub-woofer)

Turn the spare tire hold-down bolt
counterclockwise and remove the
sub-woofer and the spare tire.

Other Equipment

Spare Tire and Tool Storage

7-55

Mazda3_8LX5-EA-23E_Edition2_new

2023-4-17 20:22:43

(Vehicles without sub-woofer)

Turn the spare tire hold-down bolt
counterclockwise and remove the
spare tire.

NOTE

If the spare tire hold-down bolt
cannot be loosened, hold the edge
of the tire and turn it
counterclockwise until the spare
tire hold-down bolt rotates.

To secure the spare tire

Store the spare tire in the reverse order
of removal. After storing, verify that the
spare tire is stored securely.

Other Equipment

Spare Tire and Tool Storage

7-56

Mazda3_8LX5-EA-23E_Edition2_new

2023-4-17 20:22:43

8

What to Do in Case of Emergency

In Case of Emergency................ 8-4

Dealing With an Accident....... 8-4

When Towing is Required...........8-5

Having the Vehicle Towed...... 8-5
Using the Tiedown Hooks.......8-6

Key Does Not Operate............... 8-9

Canceling the Key Temporary
Suspension Function.............. 8-9
Unlocking Using the Auxiliary
Key....................................... 8-9
Starting the Engine With a Dead
Key Battery.......................... 8-10

Engine Does Not Start..............8-12

Taking Action with Depleted
Lead-acid Battery................. 8-12
Starting a Flooded Engine..... 8-16

Engine Cannot be Stopped....... 8-17

Forcibly Stopping the
Engine.................................8-17

Problem With the Brake System (Foot
Brake)....................................8-18

Applying the Emergency
Brake.................................. 8-18

AUTOHOLD Cannot be
Canceled............................... 8-19

Forcibly Canceling the
AUTOHOLD........................ 8-19

Selector Lever Cannot Be
Operated............................... 8-20

Canceling shift-lock system
(Automatic transmission)......8-20

Overheating........................... 8-21

Taking Action with
Overheating........................ 8-21

Tire is Punctured or Bursts........ 8-23

Changing a Flat Tire..............8-23

Liftgate/Trunk Lid Cannot
Open.................................... 8-32

Open the liftgate from the
luggage compartment.......... 8-32
Open the Trunk Lid from the
luggage compartment.......... 8-32

The Power Windows Cannot Be
Operated............................... 8-34

Initializing the Power
Window.............................. 8-34

The Moonroof Cannot Be
Operated............................... 8-35

Initializing the Moonroof

*

.....8-35

Windshield Wipers Operate at High
Speed....................................8-36

Have the Vehicle Inspected..........
.......................................... 8-36

*Some models.

8-1

Mazda3_8LX5-EA-23E_Edition2_new

2023-4-17 20:22:43

Washer Fluid Does Not Spray ...........
............................................ 8-37

Inspecting Washer Fluid
Level................................... 8-37

Active Driving Display Does Not
Operate................................. 8-38

Active Driving Display Does Not
Operate.............................. 8-38

Warning/Indicator Light Turns
On........................................ 8-39

Warning Lights..................... 8-39
Brake System Warning
Light................................... 8-39
Charging System Warning
Light................................... 8-40
Engine Oil Warning Light...... 8-41
High Engine Coolant Temperature
Warning Light...................... 8-41
Electric Power Steering Warning
Light................................... 8-42
ABS Warning Light................8-42
Master Warning Light........... 8-43
Brake Control System Warning
Light................................... 8-43
Electric Parking Brake (EPB)
Indicator Light..................... 8-44
Check Engine Warning
Light................................... 8-44
i-stop Warning Light (Amber)

*

......

.......................................... 8-45
Automatic Transmission Warning
Light

*

.................................. 8-45

AWD Warning Light

*

............ 8-46

Tire Pressure Monitoring System
(TPMS) Warning Light
(Flashing)............................ 8-46
TCS/DSC Indicator Light (Turns
on)..................................... 8-47

Air Bag/Seat Belt Pretensioner
System Warning Light........... 8-47
KEY Warning Light (Red).......8-48
Security Indicator Light......... 8-48
High Beam Control System (HBC)
Warning Light (Amber)

*

........ 8-49

i-ACTIVSENSE Warning Light

*

.......

.......................................... 8-49
Exterior Lights Warning
Light................................... 8-50
Low Fuel Warning Light.........8-50
Check Fuel Cap Warning
Light................................... 8-51
Engine Oil Level Warning
Light................................... 8-51
Seat Belt Warning Light (Front
Seat)...................................8-52
Seat Belt Warning Light (Rear
Seat) (Red)..........................8-53
Rear Seat Alert Warning Light

*

......

.......................................... 8-53
Low Washer Fluid Amount
Warning Light

*

..................... 8-54

Door-ajar Warning Light/Trunk
lid-open Warning Light/Liftgate-
open Warning Light/Hood-open
Warning Light...................... 8-54
KEY Indicator Light (Green)
(Flashing)............................ 8-55
Wrench Indicator Light......... 8-55

Warning Sound is Activated...... 8-56

Lights-On Reminder............. 8-56
Power Switch Not Switched OFF
Reminder Warning Sound.....8-56
Key Removed from Vehicle
Warning Sound....................8-57
Key Left-in-Vehicle Warning
Sound................................. 8-57

8-2

*Some models.

Mazda3_8LX5-EA-23E_Edition2_new

2023-4-17 20:22:43

Key Left-In-Luggage
Compartment/Trunk Warning
Sound (Vehicles With Advanced
Keyless Function)................. 8-58
Door Lock Inoperable Warning
Sound................................. 8-58
Brake System Warning
Sound................................. 8-59
Electric Parking Brake (EPB)
Warning Sound....................8-59

Battery Saving Mode Warning
Sound................................. 8-60

If the Vehicle Becomes Stuck.... 8-61

What to do when the vehicle is
stuck...................................8-61

8-3

Mazda3_8LX5-EA-23E_Edition2_new

2023-4-17 20:22:43

Dealing With an Accident

In case of an accident, react calmly and
perform as follows.
1. Prevention of secondary accident

Move the vehicle to a safe place
(such as a shoulder or a vacant lot)
where it does not obstruct traffic,
and stop the engine.

2. Aiding injured person

If there is any injured person,
provide any possible first aid until
an ambulance or a doctor arrives.
If someone has injured his or her
head, do not move the person
unnecessarily. However, move the
person to a safe place if there is the
possibility of a secondary accident.

3. Call the police

Provide information such as the
location, conditions, and level of
injury, and take directions.

4. Check the name and address of the

other person.

5. Call an Authorized Mazda Dealer

and insurance agency.

What to Do in Case of Emergency

In Case of Emergency

8-4

Mazda3_8LX5-EA-23E_Edition2_new

2023-4-17 20:22:43

Having the Vehicle Towed

We recommend that towing be done
only by an Authorized Mazda Dealer
or a commercial tow-truck service.
 
Proper lifting and towing are necessary
to prevent damage to the vehicle.
Particularly when towing an AWD
vehicle, where all the wheels are
connected to the drive train, proper
transporting of the vehicle is absolutely
essential to avoid damaging the drive
system. Government and local laws
must be followed.
A towed FWD vehicle should have its
drive wheels (front wheels) off the
ground. If excessive damage or other
conditions prevent this, use wheel
dollies.

1. Wheel dollies
When towing a FWD vehicle with the
rear wheels on the ground, release the
parking brake.
 

WARNING

Always tow an AWD vehicle with all
four wheels off the ground.

Towing an AWD vehicle with either the
front or rear wheels on the ground is
dangerous as the drive train could be
damaged, or the vehicle could trail
away from the tow truck and cause an
accident. If the drive train has been
damaged, transport the vehicle on a
flatbed truck.

CAUTION

Do not tow the vehicle pointed
backward with driving wheels on the
ground. This may cause internal
damage to the transmission.

Do not tow with sling-type
equipment. This could damage your
vehicle. Use wheel-lift or flatbed
equipment.

What to Do in Case of Emergency

When Towing is Required

8-5

Mazda3_8LX5-EA-23E_Edition2_new

2023-4-17 20:22:43

If the parking brake cannot be
released when towing the vehicle,
transport the vehicle with all front
and rear wheels raised off the ground
as shown in the figure. If the vehicle
is towed without raising the wheels
off the ground, the brake system
could be damaged.

1. Wheel dollies

Using the Tiedown Hooks

CAUTION

Do not use the front and rear tiedown
eyelets for towing the vehicle.
They have been designed only for
securing the vehicle to a transport
vessel during shipping.
Using the eyelets for any other purpose
could result in the vehicle being
damaged.

1. Remove the tiedown eyelet, the

jack lever and the lug wrench or
equivalent from the luggage
compartment.

4–Door

1. Tiedown eyelet
2. Jack lever
3. Lug wrench

5–Door

What to Do in Case of Emergency

When Towing is Required

8-6

Mazda3_8LX5-EA-23E_Edition2_new

2023-4-17 20:22:43


Content      ..     11      12      13      14     ..