Mazda 3 (2024 year). Manual in english - page 3
 

  Index      Manuals     Mazda 3 (2024 year). Manual in english


Search            copyright infringement  


Content      ..     1      2      3      4      ..


Mazda 3 (2024 year). Manual in english - page 3


Installing Child-Restraint

Systems

Accident statistics reveal that a child is
safer in the rear seat. The front
passenger's seat is clearly the worst
choice for any child under 12, and
with rear-facing child-restraint systems
it is clearly unsafe due to air bags.
 

NOTE

Even if your vehicle is equipped with
front passenger occupant classification
sensor (page 3-18), which
automatically deactivates the front
passenger air bag, a rear seat is the
safest place for a child of any age or
size.

 
Some child-restraint systems now
come with tethers and therefore must
be installed on the seats that take
tethers to be effective.
 
Some child-restraint systems also
employ specially designed ISOFIX/
LATCH

*1

 attachments; refer to " How

to Use the ISOFIX Lower Anchor
(Mexico)/LATCH Lower Anchor
(Except Mexico)"(page 3-67).

*

1 ISOFIX (Mexico)/LATCH (Except

Mexico)

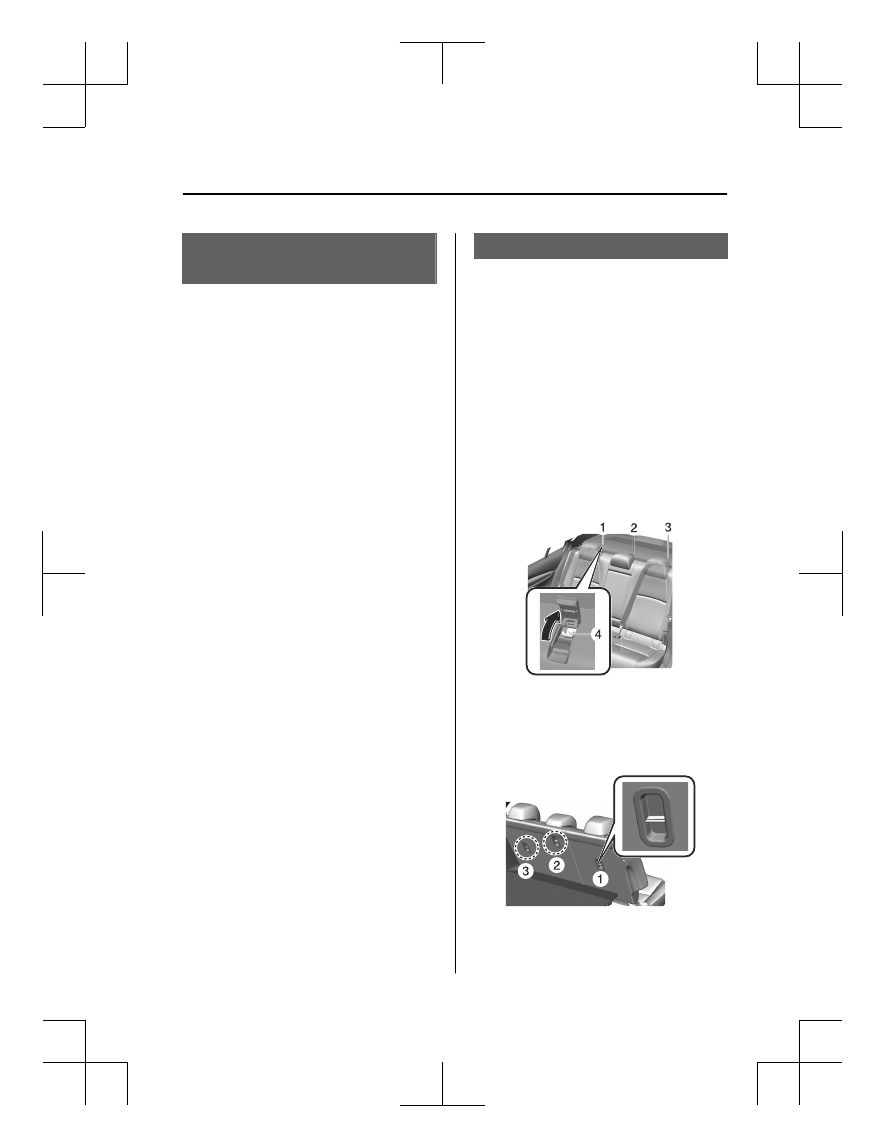
Anchor Bracket Overview

Anchor brackets for securing
child-restraint systems are equipped in
the vehicle. Locate each anchor
position using the illustration.
To install a child-restraint system, if the
seat is equipped with a head restraint,
remove it. Always follow the
instruction manual accompanying the
child-restraint system.
 

Anchor bracket location

Use the indicated anchor bracket
locations when installing a
child-restraint system equipped with a
tether.

(4–Door)

1. For right
2. For center
3. For left
4. Anchor bracket
 

(5–Door)

 
1. For right
2. For center (Except Mexico)

Equipment to Protect Occupants/Pedestrians

Child-restraint Systems

3-57

Mazda3_8LX5-EA-23E_Edition2_new

2023-4-17 20:22:43

3. For left

Warnings and Cautions

for Using the Anchor

Bracket

WARNING

Always attach the tether strap to the
correct tether anchor position.

Attaching the tether strap to the
incorrect tether anchor position is
dangerous. In a collision, the tether
strap could come off and loosen the
child-restraint system. If the
child-restraint system moves it could
result in death or injury to the child.

Use the tether and tether anchor only
for a child-restraint system.

Using the tether or tether anchor to
secure anything but a child-restraint
system is dangerous. This could
weaken or damage the tether or tether
anchor and result in injury.

Always remove the head restraint and
install child-restraint system (except
when installing a backless booster
seat).

Installing a child-restraint system
without removing the head restraint is
dangerous. The child-restraint system
cannot be installed correctly which
may result in death or injury to the
child in a collision.

(Mexico)

If the top tether strap does not reach
the anchor bracket, purchase and use
an extension strap provided by the CRS
manufacturer.

Equipment to Protect Occupants/Pedestrians

Child-restraint Systems

3-58

Mazda3_8LX5-EA-23E_Edition2_new

2023-4-17 20:22:43

(4–Door)

(5–Door)

1. Tether strap

2. Anchor bracket
3. Forward
 

Always install the head restraint and
adjust it to the appropriate position
after removing the child-restraint
system (except when installing a
backless booster seat).

Driving with the head restraint
removed is dangerous as impact to the
occupant's head cannot be prevented
during emergency braking or in a
collision, which could result in a
serious accident, injury or death.
Refer to How to Use the Head
Restraints on page 3-44.

Equipment to Protect Occupants/Pedestrians

Child-restraint Systems

3-59

Mazda3_8LX5-EA-23E_Edition2_new

2023-4-17 20:22:43

How to Use the

Automatic Locking Mode

(Except Mexico)

NOTE

Follow the child-restraint system
manufacturer's instructions carefully. If
you are not sure whether you have a
LATCH system or tether, check in the
child-restraint system manufacturer's
instructions and follow them
accordingly. Depending on the type of
child-restraint system, it may use
LATCH system instead of seat belts or if
the belt goes across the child's chest,
may recommend against using
automatic locking mode.

1. First, adjust the front seat to allow

clearance between the
child-restraint system and the front
seat.
Refer to How to Use the Front Seats
on page 3-34.

2. Make sure the seatback is securely

latched by pushing it back until it is
fully locked.

3. Remove the head restraint.

However, when installing a backless
booster seat, always install the
vehicle head restraint to the seat
where the backless booster seat is
installed.
Refer to How to Use the Head
Restraints on page 3-44.

4. Secure the child-restraint system

with the lap portion of the lap/
shoulder belt. See the
manufacturer's instructions on the
child-restraint system for belt
routing instructions.

5. To get the retractor into the

automatic locking mode, pull the
shoulder belt portion of the seat

belt until the entire length of the
belt is out of the retractor.

6. Push the child-restraint system

firmly into the vehicle seat. Be sure
the belt retracts as snugly as
possible. A clicking noise from the
retractor will be heard during
retraction if the system is in the
automatic locking mode. If the belt
does not lock the seat down tight,
repeat this step.

NOTE

Inspect this function before each
use of the child-restraint system.
You should not be able to pull the
shoulder belt out of the retractor
while the system is in the automatic
locking mode. When you remove
the child-restraint system, be sure
the belt fully retracts to return the
system to emergency locking mode
before occupants use the seat belts.

7. If your child-restraint system

requires the use of a tether strap,
refer to the manufacturer's

Equipment to Protect Occupants/Pedestrians

Child-restraint Systems

3-60

Mazda3_8LX5-EA-23E_Edition2_new

2023-4-17 20:22:43

instructions to hook and tighten the
tether strap.

If You Must Use the Front

Seat for Children

If you cannot put all children in the
rear seat, at least put the smallest
children in the rear and be sure the
largest child up front uses the shoulder
belt over the shoulder.
NEVER put a rear-facing child-restraint
system on the front passenger seat
whether your vehicle is equipped with
an occupant classification sensor or
not.
This seat is also not set up for tethered
child-restraint systems, put them in
one of the rear seat positions set up
with tether anchors.
Likewise the ISOFIX/LATCH

*1

child-restraint system cannot be
secured in the front passenger's seat
and should be used in the second-row
seat.
Do not allow anyone to sleep against
the side window since your vehicle has
side and curtain air bags, it could
cause serious injuries to an out of
position occupant. As children more
often sleep in cars, it is better to put
them in the rear seat. If installing the
child-restraint system on the front seat
is unavoidable, follow these
instructions when using a front-facing
child-restraint system in the front
passenger's seat.

*

1 ISOFIX  (Mexico)/LATCH  (Except

Mexico)

NOTE

To check if your front seats have side
air bags:
Mazda vehicles equipped with side
air bag will have a "SRS AIRBAG" tag
on the outboard shoulder of the
front seats.

To check if your vehicle has curtain
air bags:

Equipment to Protect Occupants/Pedestrians

Child-restraint Systems

3-61

Mazda3_8LX5-EA-23E_Edition2_new

2023-4-17 20:22:43

Mazda vehicles equipped with
curtain air bag will have an "SRS
AIRBAG" marking on the window
pillars along the roof edge.

Warnings and Cautions
for Using the Front Seat

for Children

WARNING

Always move the front passenger seat
as far back as possible if installing a
front-facing child-restraint system on
it is unavoidable.

As your vehicle has front air bags and
doubly so because your vehicle has
side air bags, a front-facing
child-restraint system should be put on
the front passenger seat only when it is
unavoidable.
Even if the front passenger air bag
deactivation indicator light illuminates,
always move the seat as far back as
possible, because the force of a
deploying air bag could cause serious
injury or death to the child.

Never use a rear-facing child-restraint
system in the front seat with an air
bag that could deploy.

Rear-facing child-restraint systems on
the front seat are particularly
dangerous.
Even in a moderate collision, the
child-restraint system can be hit by a
deploying air bag and moved violently
backward resulting in serious injury or
death to the child. Even though you
may feel assured that the front
passenger air bag will not deploy
based on the fact that the front
passenger air bag deactivation
indicator light illuminates, you should
not use a rear-facing child-restraint
system in the front seat.

Equipment to Protect Occupants/Pedestrians

Child-restraint Systems

3-62

Mazda3_8LX5-EA-23E_Edition2_new

2023-4-17 20:22:43

Always remove the head restraint and
install child-restraint system (except
when installing a backless booster
seat).

Installing a child-restraint system
without removing the head restraint is
dangerous. The child-restraint system
cannot be installed correctly which
may result in death or injury to the
child in a collision.

Always install the head restraint and
adjust it to the appropriate position
after removing the child-restraint
system.

Driving with the head restraint
removed is dangerous as impact to the
occupant's head cannot be prevented
during emergency braking or in a
collision, which could result in a
serious accident, injury or death.
Refer to How to Use the Head
Restraints on page 3-44.

Do not allow a child or anyone to
lean over to or against the side
window of a vehicle with side and
curtain air bags.

It is dangerous to allow anyone to lean
over to or against the side window, the
area of the front passenger seat, the
front and rear window pillars and the
roof edge along both sides from which
the side and curtain air bags deploy,
even if a child-restraint system is used.
The impact of inflation from a side or
curtain air bag could cause serious
injury or death to an out of position
child. Furthermore, leaning over to or
against the door could block the side
and curtain air bags and eliminate the
advantages of supplemental
protection. Because the front seats are
equipped with front air bags, the rear
seat is always a better location for
children. Take special care not to allow
a child to lean over to or against the
side window, even if the child is seated
in a child-restraint system.

Equipment to Protect Occupants/Pedestrians

Child-restraint Systems

3-63

Mazda3_8LX5-EA-23E_Edition2_new

2023-4-17 20:22:43

How to Install a

Child-Restraint System

on the Front Passenger's

Seat (With Front

Passenger Occupant

Classification System)

1. Make sure the vehicle power is

switched off.

2. Slide the seat as far back as

possible.

3. Remove the head restraint.

However, when installing a backless
booster seat, always install the
vehicle head restraint to the seat
where the backless booster seat is
installed.

4. Place the child-restraint system on

the seat without putting your
weight on the seat and fasten the
seat belt. See the manufacturer's
instructions on the child-restraint
system for belt routing instructions.

5. To get the retractor into the

automatic locking mode, pull the
shoulder belt portion of the seat
belt until the entire length of the
belt is out of the retractor.

6. Push the child-restraint system

firmly into the vehicle seat. Be sure
the belt retracts as snugly as
possible. A clicking noise from the
retractor will be heard during
retraction if the system is in
automatic locking mode. If the belt
does not lock the seat down tight,
repeat the previous step and also
this one.

NOTE

Inspect this function before each
use of the child-restraint system.
You should not be able to pull the
shoulder belt out of the retractor
while the system is in the
automatic locking mode. When
you remove the child-restraint
system, be sure the belt fully
retracts to return the system to
emergency locking mode before
occupants use the seat belts.

Follow the child-restraint system
manufacturer's instructions
carefully.
Depending on the type of
child-restraint system, it may not
employ seat belts which are in
automatic locking mode.

7. Seat your child safely in the

child-restraint system and secure
the child according to the
instructions from the child-restraint
system manufacturer.

Equipment to Protect Occupants/Pedestrians

Child-restraint Systems

3-64

Mazda3_8LX5-EA-23E_Edition2_new

2023-4-17 20:22:43

8. Switch the vehicle power ON and

make sure the front passenger air
bag deactivation indicator light
illuminates after installing a
child-restraint system on the front
passenger seat.
If the front passenger air bag
deactivation indicator light does
not illuminate, remove the
child-restraint system, switch the
vehicle power to OFF, and then
re-install the child-restraint system
(page 3-18).

WARNING

Do not seat a child in a child-restraint
system on the front passenger seat if
the front passenger air bag
deactivation indicator light does not
illuminate.

While it is always better to install any
child-restraint system on the rear seat,
it is imperative that a child-restraint
system 

ONLY

 be used on the front

passenger seat if the deactivation
indicator light illuminates when the
child is seated in the child-restraint
system (page 3-18). Seating a child in
a child-restraint system installed on the
front passenger seat with the front
passenger air bag deactivation
indicator light not illuminated is
dangerous. If this indicator light does
not illuminate, this means that the
front passenger front and side air bags,
and knee air bags, and seat belt
pretensioners are ready for
deployment. If an accident were to
deploy an air bag, a child in a
child-restraint system sitting in the
front passenger seat could be seriously
injured or killed. If the indicator light
does not illuminate after seating a
child in a child-restraint system on the
front passenger seat, seat a child in a
child-restraint system on the rear seat
and consult an Authorized Mazda
Dealer as soon as possible.

Equipment to Protect Occupants/Pedestrians

Child-restraint Systems

3-65

Mazda3_8LX5-EA-23E_Edition2_new

2023-4-17 20:22:43

Using the ISOFIX Lower

Anchor (Mexico)/LATCH

Lower Anchor (Except

Mexico)

Your Mazda is equipped with ISOFIX/
LATCH

*1

 lower anchors for attachment

of specially designed ISOFIX/LATCH

*1

child-restraint systems in the rear seats.
Both anchors must be used, otherwise
the seat will bounce around and put
the child in danger. Most ISOFIX/
LATCH

*1

 child-restraint systems must

also be used in conjunction with a
tether to be effective. If they have a
tether you must use it to better assure
your child's safety.

*

1 ISOFIX (Mexico)/LATCH (Except

Mexico)

Warnings and Cautions

for Using the ISOFIX

Lower Anchor (Mexico)/

LATCH Lower Anchor

(Except Mexico)

WARNING

Follow the manufacturer's
instructions for the use of the
child-restraint system.

An unsecured child-restraint system is
dangerous. In a sudden stop or a
collision it could move causing serious
injury or death to the child or other
occupants. Make sure the
child-restraint system is properly
secured in place according to the
child-restraint system manufacturer's
instructions.

Never attach two child-restraint
systems to the same ISOFIX/LATCH

*1

lower anchor.

Attaching two child-restraint systems
to the same ISOFIX/LATCH

*1

 lower

anchor is dangerous. In a collision, one
anchor may not be strong enough to
hold two child-restraint system
attachments, and it may break, causing
serious injury or death. If you use the
seat position for another child-restraint
system when an outboard ISOFIX/
LATCH

*1

 position is occupied, use the

center seat belts instead, and the
tether if tether-equipped.

Equipment to Protect Occupants/Pedestrians

Child-restraint Systems

3-66

Mazda3_8LX5-EA-23E_Edition2_new

2023-4-17 20:22:43

Make sure the child-restraint system is
properly secured.

An unsecured child-restraint system is
dangerous. In a sudden stop or a
collision it could move causing serious
injury or death to the child or other
occupants. Follow the child-restraint
system manufacturer's instructions on
belt routing to secure the seat just as
you would with a child in it so that
nobody is tempted to put a child in an
improperly secured seat later on.
When not in use, remove it from the
vehicle or fasten it with a seat belt, or
attach it to BOTH ISOFIX/LATCH

*1

lower anchors for ISOFIX/LATCH

*1

child-restraint systems.

Make sure there are no seat belts or
foreign objects near or around the
ISOFIX/LATCH

*1

 child-restraint

system.

Not following the child-restraint system
manufacturer's instructions when
installing the child-restraint system is
dangerous. If seat belts or a foreign
object prevent the child-restraint
system from being securely attached to
the ISOFIX/LATCH

*1

 lower anchors

and the child-restraint system is
installed improperly, the child-restraint
system could move in a sudden stop or
collision causing serious injury or death
to the child or other occupants. When
installing the child-restraint system,
make sure there are no seat belts or
foreign objects near or around the
ISOFIX/LATCH

*1

 lower anchors.

Always follow the child-restraint
system manufacturer's instructions.

*

1 ISOFIX (Mexico)/LATCH (Except

Mexico)

How to Use the ISOFIX

Lower Anchor (Mexico)/

LATCH Lower Anchor

(Except Mexico)

Installation on rear outboard seat

1. First, adjust the front seat to allow

clearance between the
child-restraint system and the front
seat.
Refer to How to Use the Front Seats
on page 3-34.

2. Make sure the seatback is securely

latched by pushing it back until it is
fully locked.

3. Remove the cover of the

child-restraint system's ISOFIX/
LATCH

*1

 lower anchors to verify the

locations of the ISOFIX/LATCH

*1

lower anchors.

1. ISOFIX/LATCH lower anchor

*1

NOTE

The ISOFIX/LATCH

*1

 lower

anchors marking on the cover
indicates the position of the
ISOFIX/LATCH

*1

 lower anchors

for the attachment of a
child-restraint system.

Equipment to Protect Occupants/Pedestrians

Child-restraint Systems

3-67

Mazda3_8LX5-EA-23E_Edition2_new

2023-4-17 20:22:43

4. Remove the head restraint.

However, when installing a backless
booster seat, always install the
vehicle head restraint to the seat
where the backless booster seat is
installed.
Refer to How to Use the Head
Restraints on page 3-44.

5. Secure the child-restraint system

using BOTH ISOFIX/LATCH

*1

 lower

anchors, following the
child-restraint system
manufacturer's instruction. Pull on
the child-restraint to be sure both
anchors are engaged.

6. If your child-restraint system came

equipped with a tether, that means
it is very important to properly
secure the tether for child safety.
Please carefully follow the
child-restraint system
manufacturer's instructions when
installing tethers.

*

1 ISOFIX (Mexico)/LATCH (Except

Mexico)


Installation on rear center seat

The ISOFIX/LATCH

*1

 lower anchors at

the center of the second-row seat are
much further apart than the sets of
ISOFIX/LATCH

*1

 lower anchors for

child-restraint system installation at
other seating positions. Child-restraint
systems with rigid ISOFIX/LATCH

*1

attachments cannot be installed on the
center seating position. Some ISOFIX/
LATCH

*1

 equipped child-restraint

systems can be placed in the center
position and will reach the nearest
ISOFIX/LATCH

*1

 lower anchors which

are 434 mm (17.1 in) apart. ISOFIX/
LATCH

*1

 compatible child-restraint

systems (with attachments on belt
webbing) can be used at this seating
position only if the child-restraint

system manufacturer's instructions
state that the child-restraint system can
be installed to ISOFIX/LATCH

*1

 lower

anchors that are 434 mm (17.1 in)
apart. Do not attach two child-restraint
systems to the same ISOFIX/LATCH

*1

lower anchor. If your child-restraint
system has a tether, it must also be
used for your child's optimum safety.
 
The procedure for installation on the
rear outboard seats is the same.

*

1 ISOFIX (Mexico)/LATCH (Except

Mexico)

ISOFIX/LATCH

*1

 lower anchor

location

*

1 ISOFIX (Mexico)/LATCH (Except

Mexico)

Equipment to Protect Occupants/Pedestrians

Child-restraint Systems

3-68

Mazda3_8LX5-EA-23E_Edition2_new

2023-4-17 20:22:43

4

Opening/closing

Key......................................... 4-4

Key....................................... 4-4
Warnings and Cautions for Using
the Key................................. 4-4
How to Use the Key............... 4-5
Convenient Ways to Use the
Key....................................... 4-8

Advanced Keyless Entry
System.....................................4-9

Advanced Keyless Entry
System

*

................................. 4-9

Warnings and Cautions for Using
the Advanced Keyless Entry
System.................................. 4-9
How to Use the Advanced Keyless
Entry System........................ 4-10

Doors.................................... 4-11

Warnings and Cautions When
Using the Doors...................4-11
How to Use the Doors......... 4-12
Convenient Ways to Use the
Doors................................. 4-16

Liftgate/Trunk Lid....................4-17

Warnings and Cautions for Using
the Liftgate/Trunk Lid........... 4-17
How to Use the Liftgate/Trunk
Lid...................................... 4-18

Inside Trunk Release Lever (4-
door).....................................4-20

Inside Trunk Release Lever (4-
door)

*

................................. 4-20

Warnings and Cautions for Using
the Inside Trunk Release
Lever...................................4-20
How to Use the Inside Trunk
Release Lever.......................4-21

Hood.....................................4-22

Warnings and Cautions for Using
the Hood............................ 4-22
How to Use the Hood.......... 4-22

Windows............................... 4-24

Power Windows...................4-24
Warnings and Cautions for Using
the Power Windows............. 4-24
How to Use the Power
Windows.............................4-25
Convenient Ways to Use the
Power Windows...................4-26

Moonroof.............................. 4-27

Moonroof

*

.......................... 4-27

Warnings and Cautions for Using
the Moonroof......................4-28
How to Use the Moonroof...........
.......................................... 4-29

Security System.......................4-30

Security System....................4-30
Warnings and Cautions for Using
the Security System.............. 4-30
Immobilizer System..............4-31
Warnings and Cautions for Using
the Immobilizer System........ 4-31

*Some models.

4-1

Mazda3_8LX5-EA-23E_Edition2_new

2023-4-17 20:22:43

How to Use the Immobilizer
System................................ 4-32
Theft-Deterrent System

*

........4-33

How to Use the Theft-Deterrent
System................................ 4-33

Rear Seat Alert........................4-35

Rear Seat Alert

*

....................4-35

Warnings and Cautions for Using
the Rear Seat Alert............... 4-35
How to Use the Rear Seat
Alert................................... 4-36

4-2

*Some models.

Mazda3_8LX5-EA-23E_Edition2_new

2023-4-17 20:22:43

MEMO

4-3

Mazda3_8LX5-EA-23E_Edition2_new

2023-4-17 20:22:43

Key

All doors, fuel-filler lid, and the liftgate
can be locked/unlocked by pressing
the key button.
The key must be carried by the driver.

Key Code Number Plate

An auxiliary key can be ordered based
on the key code number printed on
the key code number plate at an
Authorized Mazda Dealer.

Store the key code number plate in a
safe place (not in the vehicle).

Do not divulge the key number to
others.

Warnings and Cautions

for Using the Key

WARNING

Do not leave the key in your vehicle
with children and keep them in a
place where your children will not
find or play with them.

Leaving children in a vehicle with the
key is dangerous. This could result in
someone being badly injured or even
killed. Children may find these keys to
be an interesting toy to play with and
could cause the power windows or
other controls to operate, or even
make the vehicle move.

CAUTION

Radio equipment like this is
governed by laws in the United
States.
Changes or modifications not
expressly approved by the party
responsible for compliance could
void the user's authority to operate
the equipment.

Because the key (transmitter) uses
low-intensity radio waves, it may not
function correctly under the
following conditions:

The key (transmitter) is carried with
communication devices such as
cellular phones.

The key (transmitter) contacts or is
covered by a metal object.

The key (transmitter) is near
electronic devices such as personal
computers.

Non-Mazda genuine electronic
equipment is installed in the
vehicle.

Opening/closing

Key

4-4

Mazda3_8LX5-EA-23E_Edition2_new

2023-4-17 20:22:43

There is equipment which
discharges radio waves near the
vehicle.

The key (transmitter) may consume
battery power excessively if it
receives high-intensity radio waves.
Do not place the key (transmitter)
near electronic devices such as
televisions or personal computers.

To avoid damage to the key
(transmitter), DO NOT:

Drop the key (transmitter).

Get the key (transmitter) wet.

Disassemble the key (transmitter).

Expose the key (transmitter) to
high temperatures on places such
as the dashboard, under direct
sunlight.

Expose the key (transmitter) to any
kind of magnetic field.

Place heavy objects on the key
(transmitter).

Put the key (transmitter) in an
ultrasonic cleaner.

Put any magnetized objects close
to the key (transmitter).

How to Use the Key

When pressing the button, the
operation indicator light turns on.

1. Operation indicator light
2. Lock button ( )

3. Unlock button ( )

4. Trunk button (4–door) ( )

5. Panic button ( )

Lock button 

Press the lock button with all of the
following conditions met.

The vehicle power is switched OFF.

All the doors are closed.

The doors, liftgate, fuel-filler lid are
locked, the hazard warning lights
operate 1 time.

(With the advanced keyless function)

A beep sound will be heard once.
 
To confirm that all the doors, liftgate,
and fuel-filler lid have been locked,
press the lock button again within 5
seconds. If they are closed and locked,
the horn will sound.

Opening/closing

Key

4-5

Mazda3_8LX5-EA-23E_Edition2_new

2023-4-17 20:22:43

NOTE

The headlights turn on/off by
operating the transmitter. Refer to
Convenient Ways to Use the Light
Switch on page 5-70.

When any door or the liftgate is open
and the lock button is pressed, the
closed doors can be locked. After
that, any other open door or the
liftgate can be locked by closing
them.

To prevent the transmitter from being
left in the vehicle, make sure that the
driver carries the transmitter when
locking the doors with any door
open.

(With theft-deterrent system)

If the lock button is pressed with all
the doors and liftgate closed, the
hazard warning lights will flash and
the theft-deterrent system is armed.

Unlock button 

Press the unlock button while the
vehicle power is switched OFF.
The driver’s door and the fuel-filler lid
are unlocked, the hazard warning lights
operate 2 times, and then a warning
sound is activated 2 times.
Press the unlock button again within 5
seconds to unlock the other doors.
 

(With the advanced keyless function)

The hazard warning lights operate and
a sound is activated 2 times at the
same time.

NOTE

(With the advanced keyless
function)

The sound can be switched on/off
using the Mazda Connect.
Refer to Mazda Connect Owner's
Manual or consult an Authorized
Mazda Dealer.

The 2-step unlocking function can be
set to on/off using Mazda Connect.
Refer to Mazda Connect Owner's
Manual or consult an Authorized
Mazda Dealer.

Trunk button (4–door) ( )

Press and hold the trunk button until
the trunk lid opens.

Panic button 

If you witness from a distance
someone attempting to break into or
damage your vehicle, press and hold
the panic button to activate the
vehicle's alarm. Call emergency
services if necessary.

NOTE

The panic button will work whether
any door or the liftgate/trunk lid is
open or closed.

Turning on the alarm

Pressing the panic button for 1 second
or more will trigger the alarm for about
2 minutes and 30 seconds, and the
following will occur:

The horn sounds intermittently.

The hazard warning lights flash.

Turning off the alarm

The alarm stops by pressing any button
on the key.

Operational Range

The system operates only when the
driver is in the vehicle or within
operational range while the key is
being carried.

Opening/closing

Key

4-6

Mazda3_8LX5-EA-23E_Edition2_new

2023-4-17 20:22:43

Starting the engine

NOTE

Starting the engine may be possible
even if the key is outside of the
vehicle and extremely close to a door
and window, however, always start
the engine from the driver's seat.
If the vehicle is started and the key is
not in the vehicle, the vehicle will not
restart after it is shut off and the
vehicle power is switched off.

The luggage compartment is out of
the assured operational range,
however, if the key (transmitter) is
operable the engine will start.

With the advanced keyless function


1. Interior antenna
2. Operational range
 

Without the advanced keyless
function


1. Interior antenna
2. Operational range
 

NOTE

The engine may not start if the key is
placed in the following areas:

Around the dashboard

In the storage compartments such as
the glove compartment or the center
console

On the rear parcel shelf (4–door)

Opening/closing

Key

4-7

Mazda3_8LX5-EA-23E_Edition2_new

2023-4-17 20:22:43

Convenient Ways to Use

the Key

Sound function

The function that the sound notifies
you of unlocking/locking can be
turned on or off by changing the
setting in Mazda Connect. The volume
of the warning sound can also be
changed.

Auto re-lock function

All doors, the liftgate, and the
fuel-filler lid are locked automatically if
any of the following operations are not
performed within about 60 seconds
after they are unlocked by pressing the
unlock button.

Open any door or liftgate.

The vehicle power is switched to any
position other than off.

NOTE

The time until the door is automatically
locked can be changed.
Refer to the Settings section in the
Mazda Connect Owner's Manual.

Power Saving Function

By turning on the power saving
function of the key, the advanced
keyless entry and the function to start
the engine without removing the key
from a pocket or purse/case are
turned off, and the battery power
consumption of the key can be
reduced.
The remote control function is still
operational by pressing a button on
the key even while the power saving
function is turned on. However, the
remote operation indicator light does
not turn on or flash.

Turning on the power saving function

1. Press the lock button on the key 4

times within 3 seconds.
The key operation indicator light
turns on.

2. Press the lock button for 2 seconds

or longer while the key operation
indicator light is turned on.
The hazard warning lights and a
warning sound operate 1 time, and
the power saving function is turned
on.

Turning off the power saving function

1. Press the lock button on the key 4

times within 3 seconds.
The key operation indicator light
turns on.

2. Press the lock button for 2 seconds

or longer while the key operation
indicator light is turned on.
The hazard warning lights and a
warning sound operate 1 time, and
the power saving function is turned
off.

Opening/closing

Key

4-8

Mazda3_8LX5-EA-23E_Edition2_new

2023-4-17 20:22:43

Advanced Keyless Entry

System

*

The advanced keyless function allows
you to lock/unlock the doors, liftgate,
and fuel-filler lid, open the liftgate/
trunk lid, and starting the engine while
carrying the key.

Warnings and Cautions
for Using the Advanced

Keyless Entry System

WARNING

Radio waves from the key may affect
medical devices such as pacemakers.

Before using the key near people who
use medical devices, ask the medical
device manufacturer or your physician
if radio waves from the key will affect
the device.

Opening/closing

Advanced Keyless Entry System

*Some models.

4-9

Mazda3_8LX5-EA-23E_Edition2_new

2023-4-17 20:22:43

How to Use the

Advanced Keyless Entry

System

The system operates only when the
driver is in the vehicle or within
operational range while the key is
being carried.

NOTE

The advanced keyless entry system
functions can be deactivated to
prevent any possible adverse effect
on a user wearing a pacemaker or
other medical device. If the system is
deactivated, you will be unable to
start the engine by carrying the key.
Consult an Authorized Mazda Dealer
for details. If the advanced keyless
entry system has been deactivated,
you can start the engine by following
the procedure indicated when the
key battery goes dead.
Refer to Starting the engine with a
dead key battery on page 8-10.

The advanced keyless entry system
does not operate while the power
saving function is operating.

When the battery power is low, or in
places where there are high-intensity
radio waves or noise, the operational
range may become narrower or the
system may not operate.

Locking/Unlocking Using Touch
Sensor

1. Exterior antenna
2. 80 cm (31 in)

3. Operational range
 

NOTE

The system may not operate if you
are too close to the windows or door
handles, or liftgate/trunk lid.

If the key is left in the following areas
and you leave the vehicle, the doors
may be locked depending on the
radio wave conditions even if the key
is left in the vehicle.

Around the dashboard

In the storage compartments such
as the glove compartment or the
center console

On the rear parcel shelf (4–door)

Next to a communication device
such as a mobile phone

Locking Using Door-Lock Switch (5–
door)/Unlocking Using Electric
Liftgate/Trunk lid Opener

1. Exterior antenna
2. 80 cm (31 in)
3. Operational range

Opening/closing

Advanced Keyless Entry System

4-10

Mazda3_8LX5-EA-23E_Edition2_new

2023-4-17 20:22:43

Warnings and Cautions

When Using the Doors

WARNING

Opening/closing of the doors must be
done by an adult.

If a person's hand, foot, or neck is
pinched in a door, it could result in
serious injury.

Do not drive the vehicle with the
door-ajar warning light/indication
turned on/displayed.

Otherwise, the door may open
unexpectedly and result in an accident.

Always take all children and pets with
you or leave a responsible person
with them.

Leaving a child or a pet unattended in
a parked vehicle is dangerous. In hot
weather, temperatures inside a vehicle
can become high enough to cause
brain damage or even death.

Do not leave the key in your vehicle
with children and keep them in a
place where your children will not
find or play with them.

Leaving children in a vehicle with the
key is dangerous. This could result in
someone being badly injured or even
killed.

Keep all doors locked when driving.

Unlocked doors in a moving vehicle
are dangerous. Passengers can fall out
if a door is accidentally opened and
can more easily be thrown out in an
accident.

Always close all the windows and
moonroof, lock the doors, fuel-filler
lid, and liftgate/trunk lid and take the
key with you when leaving your
vehicle unattended.

Leaving your vehicle unlocked is
dangerous as children could lock
themselves in a hot vehicle, which
could result in death. Also, a vehicle
left unlocked becomes an easy target
for thieves and intruders.

After closing the doors and the
liftgate/trunk lid, always verify that
they are securely closed.

Doors and the liftgate/trunk lid not
securely closed are dangerous, if the
vehicle is driven with a door and the
liftgate/trunk lid not securely closed,
the door and the liftgate/trunk lid
could open unexpectedly resulting in
an accident.

Always confirm the safety around the
vehicle before opening a door and the
liftgate/trunk lid.

Suddenly opening a door and the
liftgate/trunk lid is dangerous. A
passing vehicle or a pedestrian could
be hit and cause an accident.

CAUTION

Always confirm the conditions around
the vehicle during strong winds or
when parked on an incline before
opening/closing the doors. Neglecting
to check the conditions around the
vehicle could result in fingers getting
caught in the door or a passing
pedestrian being hit, resulting in an
unexpected accident or injury.

Opening/closing

Doors

4-11

Mazda3_8LX5-EA-23E_Edition2_new

2023-4-17 20:22:43

How to Use the Doors

To prevent the key from being left in
the vehicle, make sure that you carry
the key before locking.

Locking/Unlocking Using the Key

Refer to How to Use the Key on page
4-5.

Locking/Unlocking Using the Touch
Sensor (Vehicles with Advanced
Keyless Function)

Locking

Touch the sensing area of the door lock
touch sensor when all of the following
conditions are met.

The vehicle power is switched OFF.

All the doors are closed.

The key is on the sensing area of the
touch sensor.

The following locations are locked by
touching the sensing area of the door
lock touch sensor.

All doors

Fuel-filler lid

Liftgate

When locking, the hazard warning
lights operate one time.
A beep sound operates one time.

Unlocking

When all of the following conditions
are met, touch the sensing area of the
door release touch sensor.

The vehicle power is switched OFF.

The driver’s door is locked.

Three seconds or longer have passed
since the doors were locked.

The key is on the sensing area of the
touch sensor.

(Unlocking from the driver's door)

The following locations are unlocked
by touching the sensing area of the
door release touch sensor of the
driver's door.

Driver’s door

Fuel-filler lid

When unlocking, the hazard warning
lights operate two times.
A beep sound operates two times.

(Unlocking from the front passenger’s
door)

The following locations are unlocked
by touching the sensing area of the
door release touch sensor of the front
passenger's door.

All doors

Fuel-filler lid

Liftgate

When unlocking, the hazard warning
lights operate two times.
A beep sound operates two times.

NOTE

The location to be unlocked can be
changed.

Opening/closing

Doors

4-12

Mazda3_8LX5-EA-23E_Edition2_new

2023-4-17 20:22:43

Refer to Settings section in the
Mazda Connect Owner's Manual or
consult an Authorized Mazda Dealer.

The beep sound can be turned
on/off using Mazda Connect.
Refer to Settings section in the
Mazda Connect Owner's Manual or
consult an Authorized Mazda Dealer.

The system may not operate normally
under the following conditions.

You touch the sensing area of the
door lock touch sensor and the
sensing area of the door release
touch sensor at the same time.

You touch the sensing area of the
touch sensor while wearing gloves.

Foreign matter such as water, ice,
snow, or dirt is on the detection
area of the touch sensor.

The system may operate if the outer
side door handle of a front door is
splashed with water by a car wash or
rain while the key is in the operation
range.

Locking/Unlocking Using the
Door-Lock Switch

The following locations are locked/
unlocked.

All doors

Liftgate

Fuel-filler lid

Driver's door

1. Unlocking
2. Locking

Front passenger's door

1. Unlocking
2. Locking

Locking the doors from the outside
using the door-lock switch

Doors can be locked from the outside
of the vehicle without using the
transmitter.
You can lock the doors by pressing the
lock side of the door-lock switch with
all of the following conditions met,
and then closing all the doors.

The vehicle power is switched OFF.

Any door is open.

The key is not in the vehicle.

After locking by pressing the door-lock
switch, closing all the doors with the
transmitter left in the vehicle unlocks

Opening/closing

Doors

4-13

Mazda3_8LX5-EA-23E_Edition2_new

2023-4-17 20:22:43

all doors, the liftgate, and the fuel-filler
lid.

Door-lock switch on liftgate (With the
advanced keyless function)

When all of the following conditions
are met, press the door-lock switch
and then close the liftgate.

You are carrying the transmitter.

The vehicle power is switched OFF.

All the doors are closed.

The following locations are locked by
pressing the door-lock switch.

All doors

Fuel-filler lid

Liftgate

When locking, the hazard warning
lights and a beep sound operate 1
time.

NOTE

To prevent the transmitter from being
left in the vehicle, make sure that the
driver carries the transmitter when
locking the doors with any door
open.

After locking by pressing the
door-lock switch and if the liftgate is
closed last with the transmitter left in
the vehicle, the liftgate will not be
locked.

Locking/Unlocking Using the
Door-Lock Knob

Locking/unlocking only the door
where the door-lock knob is operated.

1. Unlocking
2. Locking

Locking the doors from the outside
using the door-lock knob

A door can be locked by turning the
inside lock knob to the lock side and
closing the door.

NOTE

After locking by pressing the
door-lock switch, if the liftgate is
closed last with the transmitter left in
the vehicle, the liftgate will not be
locked.

In the following cases, the doors are
unlocked to prevent the key from
being left in the vehicle.

When the vehicle power is
switched to ACC or ON, and the
lock knob on the driver's door is
turned to the lock side while either
a door or the liftgate is open.

The key is left in the vehicle.

Locking Using the Vehicle Speed
Sensing Auto Door Lock Function

All the doors, the liftgate, the
fuel-filler lid are locked when the
vehicle speed exceeds 20 km/h (12
mph).

Opening/closing

Doors

4-14

Mazda3_8LX5-EA-23E_Edition2_new

2023-4-17 20:22:43

All the doors, the fuel lid, and the
liftgate are unlocked when the
vehicle power is switched OFF.

Refer to Settings section in the Mazda
Connect Owner's Manual or consult
an Authorized Mazda Dealer.

Using the Child Safety Lock

This will prevent the doors from being
opened by a child while seated in the
rear seat.
1. Open the rear door.
2. Remove the auxiliary key.
3. Turn the child safety lock to the lock

side.
When the rear door is closed, it
cannot be opened using the interior
door handle.
When not using the child safety
lock, turn the child safety lock to
the unlock side.

1. Auxiliary key
2. Locking
3. Unlocking

Impact detection door-lock unlock
system

This system automatically unlocks all
the doors and the liftgate if the vehicle
receives a strong impact such as from
an accident. By unlocking
automatically, occupants can be
rescued from outside the vehicle.
If the vehicle receives a strong impact
while the vehicle power is switched

ON, all the doors and the liftgate will
be unlocked automatically after about
6 seconds.
The doors and liftgate may not unlock
depending on how an impact is
applied, the force of the impact, and
other conditions of the accident.

Opening/closing

Doors

4-15

Mazda3_8LX5-EA-23E_Edition2_new

2023-4-17 20:22:43

Convenient Ways to Use

the Doors

Proximity Type Auto Lock Function
(With the Advanced Keyless Function)

You can set the vehicle to lock
automatically when you leave the
detection area of the touch sensor.
Refer to Mazda Connect Owner's
Manual or consult an Authorized
Mazda Dealer.
A sound is activated one time when
closing all the doors and the liftgate/
trunk lid while the key is being carried.
If you proceed to leave the operation
range, the vehicle is locked
automatically (it is locked
automatically after about 30 seconds
even if you do not leave the operation
range).

NOTE

However, they are not locked under
the following conditions.

Another key is left inside the vehicle.

The driver’s door is already locked.

Auto re-lock function

The vehicle is locked automatically by
the auto re-lock function if you do not
perform any of the following
operations within about 60 seconds
after touching the detection area of the
touch sensor or unlocking with the key.

Open any door or liftgate/trunk lid.

Switch the vehicle power to a
position other than OFF.

The time required until automatic
locking occurs can be changed.
Refer to Mazda Connect Owner's
Manual or consult an Authorized
Mazda Dealer.

Opening/closing

Doors

4-16

Mazda3_8LX5-EA-23E_Edition2_new

2023-4-17 20:22:43

Warnings and Cautions

for Using the Liftgate/

Trunk Lid

WARNING

Do not allow people to ride in the
luggage compartment/trunk.

During sudden braking or a collision,
the person in the luggage
compartment/trunk could be seriously
injured or killed.

Always drive the vehicle with the
liftgate/trunk lid closed.

If the liftgate/trunk lid opens while
driving the vehicle, the luggage may fall
out and lead to an accident. In
addition, If the vehicle is driven with
the liftgate/trunk lid open, the exhaust
gas may penetrate the cabin and it
could cause carbon monoxide
poisoning.

Do not stack or leave loaded luggage
unsecured in the luggage
compartment.

Otherwise, the luggage may move or
collapse, resulting in injury or an
accident. In addition, do not load
luggage higher than the seatbacks. It
may affect the side or rear field of view.
If the air bags deploy, the cargo may
scatter which could result in serious
injury or death.

After closing the liftgate/trunk lid,
make sure that it is securely closed.

Driving the vehicle with the liftgate/
trunk lid not fully closed is dangerous
as a person or an object could fall out
of the vehicle resulting in a serious
accident, injury, or death.

Do not drive the vehicle with the
liftgate-ajar/trunk lid-ajar warning
indication displayed.

Otherwise, the liftgate/trunk lid may
open unexpectedly and result in an
accident.

CAUTION

Remove snow or ice on the liftgate/
trunk lid before opening the liftgate/
trunk lid. When opening the liftgate/
trunk lid, it could slam shut by the
weight of snow or ice, resulting in
injury.

Be careful when opening/closing the
liftgate/trunk lid during strong
winds. Otherwise, it could close
suddenly resulting in injury.

When opening the liftgate/trunk lid,
fully open it and make sure that it
stays open. If the liftgate/trunk lid is
only opened partially, it could slam
shut by vibration or wind gusts
resulting in injury.

Stop the engine when loading or
unloading cargo in the luggage
compartment/trunk. Otherwise, you
could get burned by the heat of the
exhaust gas.

Be careful not to pinch your hand
when closing the liftgate/trunk lid. It
may result in an injury if your hand is
caught.

Opening/closing

Liftgate/Trunk Lid

4-17

Mazda3_8LX5-EA-23E_Edition2_new

2023-4-17 20:22:43

Be careful not to apply excessive
force to the damper stay on the
liftgate such as by putting your hand
on the stay. Otherwise, the damper
stay may bend and affect the liftgate
operation.

1. Damper stay

Do not modify or replace the liftgate
damper stay. Consult an Authorized
Mazda Dealer if a liftgate damper
stay is deformed or damaged for
reasons such as a collision or if there
is some other problem.

How to Use the Liftgate/

Trunk Lid

Opening the Liftgate (5–door)

Using the electric liftgate opener

1. Stop the vehicle.
2. Unlock the door.
3. Press the electric liftgate opener.

4. Lift the liftgate.

NOTE

(Vehicles with advanced keyless
function)

The liftgate can be opened even while
the doors and the liftgate are locked by
pressing the electric liftgate opener
while carrying the key.

Opening the Trunk Lid (4–door)

Using the trunk lid release button

1. Stop the vehicle.
2. Push the trunk lid release button.

Opening/closing

Liftgate/Trunk Lid

4-18

Mazda3_8LX5-EA-23E_Edition2_new

2023-4-17 20:22:43

Using the electric trunk lid opener

*

1. Stop the vehicle.
2. Unlock the doors.
3. Press the electric trunk lid opener

on the trunk lid and raise the trunk
lid when the latch releases.

NOTE

(Vehicles with advanced keyless
function)

The trunk lid can be opened even
while the doors and the trunk lid are
locked by pressing the electric trunk lid
opener while carrying the key.

Closing the Liftgate/Trunk Lid

1. Lower the liftgate/trunk lid slowly

using the liftgate/trunk lid recess.

2. Press down the liftgate/trunk lid to

close.

(5–door)

(4–door)

Opening/closing

Liftgate/Trunk Lid

*Some models.

4-19

Mazda3_8LX5-EA-23E_Edition2_new

2023-4-17 20:22:43

Inside Trunk Release

Lever (4-door)

*

Your vehicle is equipped with an inside
trunk release lever that provides a
means of escape for children and
adults in the event they become locked
inside the trunk.
 
No matter how careful adults might be
with keys and locking their cars,
parents should be aware that children
may be tempted to play around
vehicles and use the trunk as a hiding
place.
 
Adults are advised to familiarize
themselves with the operation and
location of the inside trunk release
lever so that all children can be told
about it in an appropriate way, keeping
in mind that most vehicles do not have
such levers.

Warnings and Cautions

for Using the Inside Trunk

Release Lever

WARNING

Close the trunk lid, be sure the seat
backs are latched and do not allow
children to play inside the vehicle.

Leaving the trunk lid open or leaving
children in the vehicle with the keys is
dangerous. Children could open the
trunk lid and climb inside resulting in
possible injury or death from heat
exposure.

Always keep the car from being a
tempting place to play by latching the
rear seats, doors and the trunk, and
keeping the keys where children can
not play with them.

Leaving children or animals unattended
in a parked vehicle is dangerous.
Babies left sleeping and children who
lock themselves in cars or trunks can
die very quickly from heat prostration.
Do not leave your children or pets
alone in a car at any time. Do not leave
the car, the rear folding seats or the
trunk unlocked.

Opening/closing

Inside Trunk Release Lever (4-door)

4-20

*Some models.

Mazda3_8LX5-EA-23E_Edition2_new

2023-4-17 20:22:43


Content      ..     1      2      3      4      ..