Mazda B4000 4WD Truck (2004 year). Instruction - part 2


  Index      Mazda     Mazda B4000 4WD Truck - instruction 2004 year in english


Search            


Content   ..   1  2  3   ..


Mazda B4000 4WD Truck (2004 year). Instruction - part 2


reduction system is manufactured under license from Dolby Laboratories
Licensing Corporation. Dolby

t and the double-D symbol are registered

trademarks of Dolby

t Laboratories Licensing Corporation.

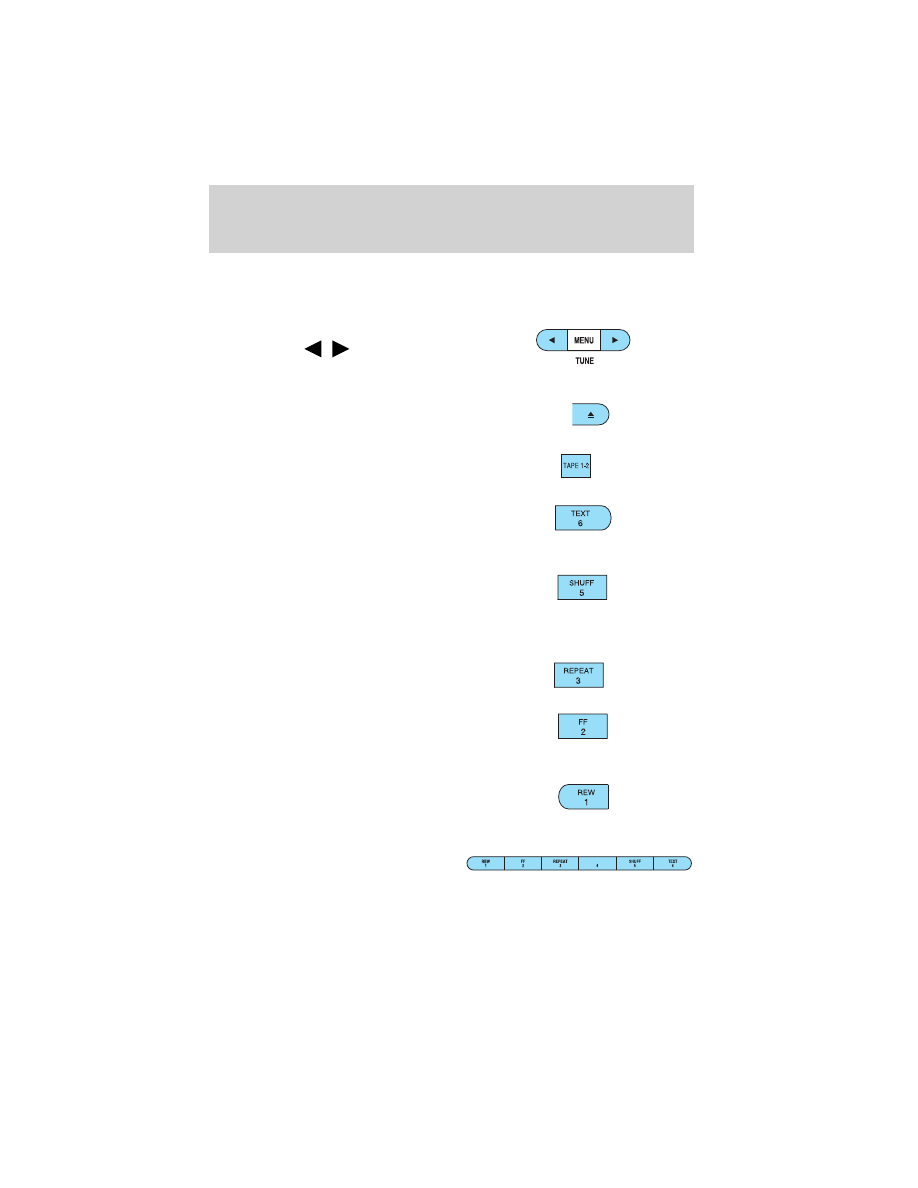
5. TUNE: Press to manually go

down/up (

/

) the radio

frequency and also to select
various settings in menu mode.

6. Tape eject: Press to eject the

tape.

7. Tape 1–2: Press to change

playing sides of the tape.

8. TEXT: In MP3 mode, press to

view the next 12 characters in
the MP3 Music name/file name
of the current MP3 track and directory.

9. SHUFF (Shuffle): In CD or

MP3 mode, press to play the
tracks on the current CD/MP3
in random order. In MP3 directory mode, press to play the tracks
within the current directory in random order.

10. REPEAT: Press to repeat the

current CD/MP3 track.

11. FF (Fast forward): In tape

mode, press to fast forward the
tape. In CD mode, press to
manually advance in a CD track.

12. REW (Rewind): In tape mode,

press to rewind the tape. In CD
mode, press to manually reverse
in a CD track.

13. Memory presets: To set a

station: Select frequency band
AM/FM; tune to a station, press
and hold a preset button until sound returns. To select a preset
station, press the desired memory preset button.

Entertainment Systems

24

14. AM/FM: Press to select

AM/FM1/FM2 frequency band.

15. SEEK/TRACK: In radio mode, press

/

to access the

next/previous strong station. In CD and MP3 flat file mode, press to
access the next track. In MP3 directory mode, press to select the
next/previous track in the current directory.

16. Scan: In radio mode, scan

through the available stations.
In tape mode, you may set
SCAN on or off. If activated, the player will scan the tape and plays a
short Introduction of each song. In CD and MP3 flat file mode, you
may set the scan on or off. If activated, the system will scan through
each track. In MP3 directory mode, you may set scan on or off. If
activated, the system will scan in the current directory.

17. ON/OFF/Volume: Press to turn

ON/OFF. Turn to
increase/decrease volume.
If the volume is set above a
certain level and the ignition is
turned off, the volume will come
back on at a “nominal” listening level when the ignition switch is
turned back on.

18. CD: Press to enter CD mode. If

a CD is already in the system,
the disc will begin play.

19. CD slot: Insert a CD, label side

up.

CD units are designed to play commercially pressed 12 cm (4.75
in) audio compact discs only. Due to technical incompatibility,
certain recordable and re-recordable compact discs may not
function correctly when used in Mazda CD players. Irregular
shaped CDs, CDs with a scratch protection film attached, and CDs
with homemade paper (adhesive) labels should not be inserted
into the CD player. The label may peel and cause the CD to
become jammed. It is recommended that homemade CDs be
identified with permanent felt tip marker rather than adhesive
labels. Ballpoint pens may damage CDs. Please contact your
dealer for further information.

Entertainment Systems

25

PREMIUM AM/FM STEREO CD6/MP3

1. AM/FM: Press to select

AM/FM1/FM2 frequency bands.

2. CD: Press to enter CD mode. If

a CD is already in the system,
the disc will start playing.

3. EJ (CD eject): Press to eject

the CD. Press and hold to eject
all CDs.

4. CLK (Clock): Press CLK until

SELECT HOUR or SELECT
MINUTE is displayed. Press
MENU

to adjust the

hours/minutes. Press CLK to display the time when the ignition is
off.

5. MUTE: Press to mute the

playing media. Press again to
return to the playing media.

6. MENU: Press MENU repeatedly

to toggle through the following
modes and use

/

to make

adjustment in those modes.

Autoset: Allows you to set the
strongest local radio stations
without losing your original
manually set preset stations for

AM/FM1/FM2 . Press MENU to access. Use

MENU

to set.

When the six strongest stations are filled, the station stored in preset 1
will begin playing. If there are less than six strong stations, the system
will store the last one in the remaining presets.

Bass: Press

MENU

to decrease/increase the bass setting.

Treble: Press

MENU

to decrease/increase the treble setting.

Balance: Press

MENU

to adjust the audio between the left and

right speakers.

Fade: Press

MENU

to adjust the audio between the front and

rear speakers.

Next/previous directory: In MP3 mode, press MENU

/

to go to

the previous/next directory.

Flat file/directory mode: In MP3 mode, press MENU to access this

feature. Use

MENU

to select flat file mode or directory mode.

Track #/normal music name/file name: Press MENU to access and

use

/

to scroll through MP3 display options (track #, normal music

name or file name).

7. TUNE/DISC: Press to manually go down/up (

/

) the radio

frequency, select the previous/next CD or to select various settings

in menu mode. In MP3 directory mode, press

/

to access the

previous/next directory

8. TEXT: In MP3 normal music name/file name mode, press to view the

next 12 characters in the MP3 music name/filename of the current
MP3 track and directory.

Entertainment Systems

27

9. SHUFF (Shuffle): Press to

play the tracks on the current
CD/MP3 in random order. In
MP3 directory mode, press to play the tracks within the current
directory in random order.

10. REPEAT: Press to repeat the

current CD/MP3 track.

11. FF (Fast forward): Press to

manually advance in a CD track.

12. REW (Rewind): Press to

manually reverse in a CD track.

13. Memory presets: To set a

station: Select frequency band
AM/FM; tune to a station, press
and hold a preset button until sound returns. To select a preset
station, press the desired memory preset.

14. SEEK/TRACK: In radio, CD and MP3 flat file mode, press

/

to access the next/previous strong station or track. In MP3 directory
mode, press to select the next/previous track in the current
directory.

15. SCAN: In radio, CD and MP3

flat file mode, press for a brief
sampling of radio stations or
CD/MP3 tracks. In MP3 directory mode, press to hear a brief
sampling of all tracks in the current directory. Press again to stop.

16. ON/OFF/Volume: Press to turn

ON/OFF. Turn to
increase/decrease volume.
If the volume is set above a
certain level and the ignition is

CD units are designed to play commercially pressed 12 cm (4.75
in) audio compact discs only. Due to technical incompatibility,
certain recordable and re-recordable compact discs may not
function correctly when used in Mazda CD players. Irregular
shaped CDs, CDs with a scratch protection film attached, and CDs
with homemade paper (adhesive) labels should not be inserted
into the CD player. The label may peel and cause the CD to
become jammed. It is recommended that homemade CDs be
identified with permanent felt tip marker rather than adhesive
labels. Ballpoint pens may damage CDs. Please contact your
dealer for further information.

RADIO FREQUENCIES

AM and FM frequencies are established by the Federal Communications
Commission (FCC) and the Canadian Radio and Telecommunications
Commission (CRTC). Those frequencies are:

AM - 530, 540–1700, 1710 kHz

FM- 87.7, 87.9–107.7, 107.9 MHz

RADIO RECEPTION FACTORS

There are three factors that can affect radio reception:
• Distance/strength: The further you travel from an FM station, the

weaker the signal and the weaker the reception.

• Terrain: Hills, mountains, tall buildings, power lines, electric fences,

traffic lights and thunderstorms can interfere with your reception.

• Station overload: When you pass a broadcast tower, a stronger signal

may overtake a weaker one and play while the weak station frequency
is displayed.

CASSETTE/PLAYER CARE

Do:
• Use only cassettes that are 90 minutes long or less.
• Tighten very loose tapes by inserting a finger or pencil into the hole

and turning the hub.

• Remove loose labels before inserting tapes.
• Allow tapes which have been subjected to extreme heat, humidity or

cold to reach a moderate temperature before playing.

• Clean the cassette player head with a cassette cleaning cartridge after

10–12 hours of play to maintain good sound/operation.

Entertainment Systems

29

Don’t:
• Expose tapes to direct sunlight, extreme humidity, heat or cold.
• Leave tapes in the cassette player for a long time when not being

played.

CD/CD PLAYER CARE

Do:
• Handle discs by their edges only. Never touch the playing surface.
• Inspect discs before playing. Clean only with an approved CD cleaner

and wipe from the center out.

Don’t:
• Expose discs to direct sunlight or heat sources for extended periods

of time.

• Insert more than one disc into each slot of the CD changer magazine.
• Clean using a circular motion.
CD units are designed to play commercially pressed 12 cm (4.75
in) audio compact discs only. Due to technical incompatibility,
certain recordable and re-recordable compact discs may not
function correctly when used in Mazda CD players. Irregular
shaped CDs, CDs with a scratch protection film attached, and CDs
with homemade paper (adhesive) labels should not be inserted
into the CD player. The label may peel and cause the CD to
become jammed. It is recommended that homemade CDs be
identified with permanent felt tip marker rather than adhesive
labels. Ball point pens may damage CDs. Please contact your
dealer for further information.

AUDIO SYSTEM WARRANTY AND SERVICE

Refer to the Warranty Guide for audio system warranty information. If
service is necessary, see your authorized Mazda dealership.

Entertainment Systems

30

HEATER ONLY SYSTEM
(IF EQUIPPED)

1. Fan speed adjustment:

Controls the volume of air
circulated in the vehicle.

2. Temperature selection:

Controls the temperature of the
airflow in the vehicle.

3. Air flow selections: Controls the direction of the airflow in the

vehicle. See the following for a brief description on each control.

Distributes outside air through the instrument panel vents.

OFF: Outside air is shut out and the fan will not operate.

Distributes outside air through the instrument panel vents and the

floor vents.

Distributes outside air through the floor vents.

Distributes outside air through the windshield defroster vents and

floor vents.

Distributes outside air through the windshield defroster vents.

OPERATING TIPS

• To reduce fog build up on the windshield during humid weather, place

the air flow selector in the

position.

• To reduce humidity build up inside the vehicle during cold or warm

weather, do not drive with the air flow selector in the OFF position.

• Under normal weather conditions, do not leave the air flow selector in

OFF when the vehicle is parked. This allows the vehicle to “breathe”
using the outside air inlet vents.

• Do not put objects under the front seats that will interfere with the air

flow to the back seats.

• Remove any snow, ice or leaves from the air intake area at the base of

the windshield.

To aid in side window defogging/demisting in cold weather:

1. Select

2. Set the temperature control to full heat

3. Set the fan speed to HI

Climate Controls

Climate Controls

31

4. Direct the outer instrument panel vents towards the side windows

To increase airflow to the outer instrument panel vents, close the vents
located in the middle of the instrument panel.

WARNING: Do not place objects on top of the instrument panel
as these objects may become projectiles in a collision or sudden
stop.

MANUAL HEATING AND AIR CONDITIONING SYSTEM
(IF EQUIPPED)

1. Fan speed adjustment:

Controls the volume of air
circulated in the vehicle.

2. Temperature selection:

Controls the temperature of the
airflow in the vehicle.

3. Air flow selections: Controls the direction of the airflow in the

vehicle. See the following for a brief description on each control.

MAX A/C (if equipped): A/C compressor is ON. Recirculated air flows
from the instrument panel vents only. Temperature of air is not
adjustable (cold only).

A/C (if equipped): A/C compressor is ON. Outside air flows from the
instrument panel vents only.

Distributes outside air through the instrument panel vents only.

(A/C compressor is OFF).

OFF: Outside air is shut off and the fan motor does not operate.

Distributes outside air through the instrument panel vents and the

floor vents. (A/C compressor is ON).

Distributes outside air through the floor vents. (A/C compressor is

OFF).

Distributes outside air through the windshield defroster vents and

the floor vents. (A/C compressor is ON).

Distributes outside air through the windshield defroster vents only.

(A/C compressor is ON).

Climate Controls

32

OPERATING TIPS

• To reduce fog build up on the windshield during humid weather, place

the air flow selector in the

position.

• To reduce humidity build up inside the vehicle: do not drive with the

air flow selector in the OFF position.

• Under normal weather conditions, do not leave the air flow selector in

MAX A/C or OFF when the vehicle is parked. This allows the vehicle
to “breathe” using the outside air inlet vents.

• Do not put objects under the front seats that will interfere with the

airflow to the back seats.

• Remove any snow, ice or leaves from the air intake area at the base of

the windshield.

To aid in side window defogging/demisting in cold weather:

1. Select

.

2. Modulate the temperature control to maintain comfort.

3. Set the fan speed to HI

4. Direct the outer instrument panel vents towards the side windows

To increase airflow to the outer instrument panel vents, close the vents
located in the middle of the instrument panel.

WARNING: Do not place objects on top of the instrument panel
as these objects may become projectiles in a collision or sudden
stop.

Climate Controls

33

HEADLAMP CONTROL

Turns the lamps off.

Turns on the parking

lamps, instrument panel lamps,
license plate lamps and tail lamps.

Turns the headlamps on.

FOG LAMP CONTROL (IF EQUIPPED)

The fog lamps can only be turned
on when the headlamp control is in
the low beam position.

Press the foglamp control to activate
the fog lamps. The fog lamp
indicator light will illuminate. When
the highbeams are activated, the fog
lamps will not operate.

Press the fog lamp control again to deactivate the fog lamps.

Daytime running lamps (DRL) (if equipped)

Turns the headlamps on with a reduced output.

To activate:
• the ignition must be in the ON position and
• the headlamp control is in the OFF or parking lamp.

WARNING: Always remember to turn on your headlamps at
dusk or during inclement weather. The Daytime Running Lamp
(DRL) system does not activate your parking lights or side
marker lights and generally may not provide adequate lighting
during these conditions. Failure to activate your headlamps
under these conditions may result in a collision.

OFF

Lights

Lights

34

High beams

After turning the headlamps on,
push the lever toward the
instrument panel to activate. Pull
the lever towards you to deactivate.

Flash to pass

Pull toward you slightly to activate
and release to deactivate.

PANEL DIMMER CONTROL

Use to adjust the brightness of the
instrument panel and all applicable
switches in the vehicle during
headlamp and parklamp operation.

Move the control up or down to
adjust the intensity of the panel
lighting.

Move the control to the full upright
position, past detent, to turn on the interior lamps.

AIMING THE HEADLAMPS

The headlamps on your vehicle are properly aimed at the assembly plant.
If your vehicle has been in an accident the alignment of your headlamps
should be checked by your authorized Mazda dealer.

DIM

Lights

35

TURN SIGNAL CONTROL

• Push down to activate the left

turn signal.

• Push up to activate the right turn

signal.

COURTESY/READING LAMPS (IF EQUIPPED)

The courtesy lamp lights when:
• any door is opened.
• the instrument panel dimmer

switch is held up until the
courtesy lamps come on.

• the remote entry controls are

pressed and the ignition is OFF.

The reading lamps can be turned on by moving the switch on the dome
lamp to either the left or the right.

BULBS

Replacing exterior bulbs

Check the operation of all the bulbs frequently.

Using the right bulbs

Replacement bulbs are specified in the chart below. Headlamp bulbs
must be marked with an authorized “D.O.T.” for North America to assure
lamp performance, light brightness and pattern and safe visibility.

NOTE: The correct bulbs will not damage the lamp assembly or void the
lamp assembly warranty and will provide quality bulb burn time.

Lights

36

Function

Number of bulbs

Trade number

Park/turn lamps
(front)

2

3157 AK (amber)

Headlamps

2

9003

Rear stop/tail lamps

2

3157K

Rear turn lamps

2

3156K

Rear license plate
lamps

2

3156K/168

Backup lamp

2

3156K

Rear/turn/sidemarker

2

916NA (amber)

Fog lamp (if
equipped)

2

899

Cargo lamp

1

211-2

Interior overhead lamp

1

912 (906)

Front door courtesy
lamp

1

168

Map lamps

2

168 (T10)

Ashtray lamp

1

161

All replacement bulbs are clear in color except where noted.

To replace all instrument panel lights - see your dealer.

Replacing the interior bulbs

Check the operation of the following interior bulbs frequently:
• interior overhead lamp
• map lamp
For bulb replacement, see an authorized Mazda dealer.

Replacing headlamp bulbs

NOTE: The procedure can be difficult. Your Mazda dealer has the proper
tools, training and parts to perform this task. If you have difficulty with
this, vistit your local Mazda dealer.

Lights

37

WARNING: Handling Halogen Bulbs: When a halogen bulb
breaks, it is dangerous. These bulbs contain pressurized gas. If
one is broken, it will explode and serious injuries could be
caused by the flying glass. If the glass portion of the bulb is
touched with bare hands, body oil could cause the bulb to
overheat and explode when lit. Never touch the glass portion of
the bulb with your bare hands and always wear eye protection
when handling or working around halogen bulbs.
Children and Halogen Bulbs: Playing with a halogen bulb is
dangerous. Serious injuries could be caused by dropping a
halogen bulb or breaking in some other way. Always keep
halogen bulbs out of the reach of children.

To remove the headlamp bulb:

1. Make sure headlamp switch is in

OFF position, then open the
hood.

2. At the back of the headlamp,

pry up the two retainer pins to
release the headlamp assembly
from the vehicle and pull
headlamp forward.

3. Remove the bulb retaining ring

by rotating it counterclockwise
(when viewed from the rear) to
free it from the bulb socket, and
slide the ring off the plastic
base. Keep the ring to retain the
new bulb.

4. Without turning, remove the old

bulb by gently pulling it straight
back out of the lamp assembly.

To install the new bulb:

Handle a halogen headlamp bulb carefully and keep out of
children’s reach. Grasp the bulb only by its plastic base and do
not touch the glass. The oil from your hands could cause the bulb
to break the next time the headlamps are operated. Always wear
safety glasses while handling bulbs.

NOTE: If the bulb is accidentally touched, it should be cleaned with
rubbing alcohol before being used.

1. With the flat side of the bulb’s plastic base facing upward, insert the

glass end of the bulb into the lamp assembly. You may need to turn
the bulb left or right to align the grooves in the plastic base with the
tabs in the lamp assembly. When the grooves are aligned, push the
bulb into the lamp assembly until the plastic base contacts the rear
of the lamp assembly.

2. Install the bulb retaining ring over the plastic base until it contacts

the rear of the socket by rotating clockwise until you feel a “stop.”

3. Install the electrical connector into the plastic base until it snaps,

locking it into position.

4. Install the headlamp on vehicle, push rearward and secure with two

retainer pins.

5. Turn the headlamps on and make sure they work properly. If the

headlamp was correctly aligned before you changed the bulb, you
should not need to align it again.

Replacing front side marker bulbs

1. Open the hood.

2. At the back of the headlamp,

pry up the two retainer pins to
release the headlamp assembly
from the vehicle and pull
headlamp forward.

Lights

39


Content   ..   1  2  3   ..