Mazda B4000 4WD Truck (2004 year). Instruction - part 1


  Index      Mazda     Mazda B4000 4WD Truck - instruction 2004 year in english


Search            


Content   ..    1  2   ..


Mazda B4000 4WD Truck (2004 year). Instruction - part 1


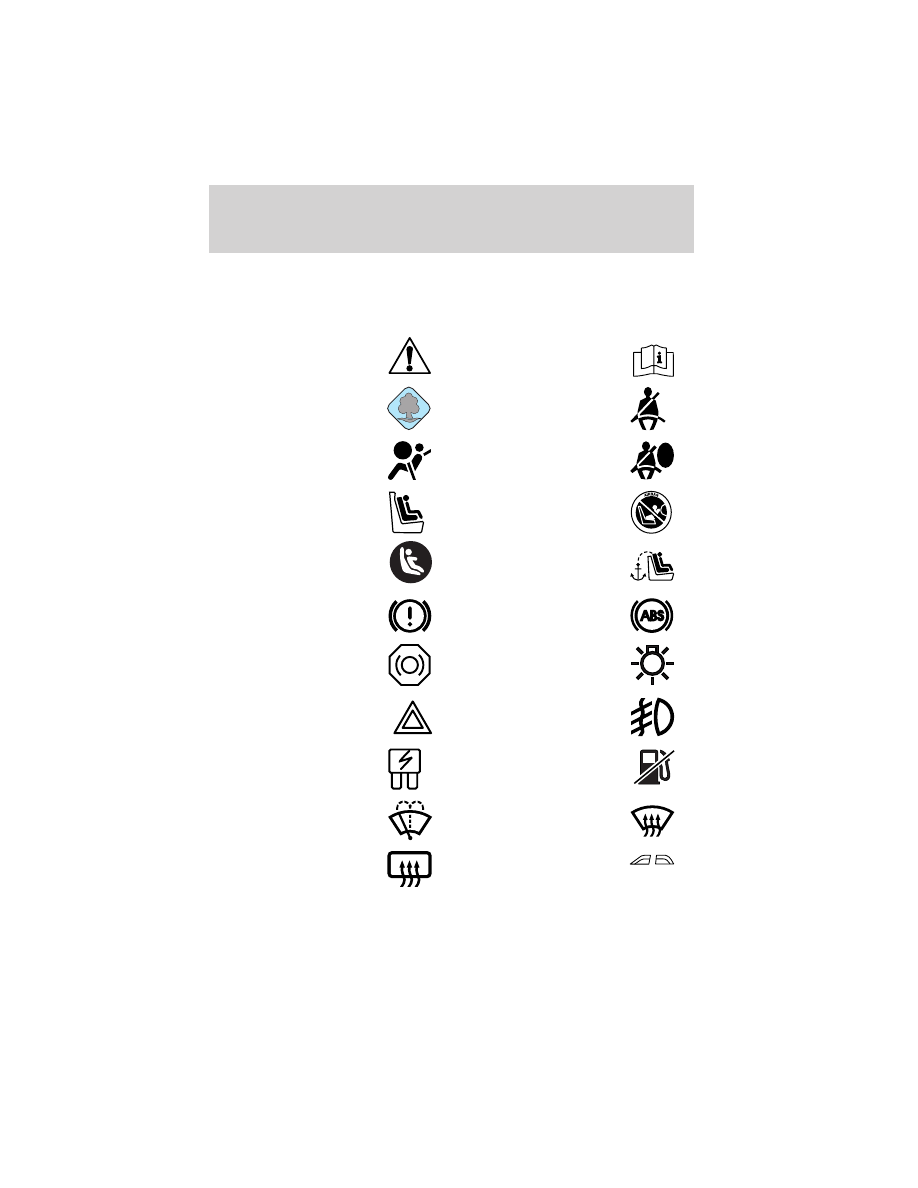
These are some of the symbols you may see on your vehicle.

Vehicle Symbol Glossary

Safety Alert

See Owner’s Guide

Protecting the
Environment

Fasten Safety Belt

Air Bag-Front

Air Bag-Side

Child Seat

Child Seat Installation
Warning

Child Seat Lower
Anchor

Child Seat Tether
Anchor

Brake System

Anti-Lock Brake System

Brake Fluid -
Non-Petroleum Based

Master Lighting Switch

Hazard Warning Flasher

Fog Lamps-Front

Fuse Compartment

Fuel Pump Reset

Windshield Wash/Wipe

Windshield
Defrost/Demist

Rear Window
Defrost/Demist

Power Windows

Introduction

8

Vehicle Symbol Glossary

Power Window Lockout

Personal Alarm System
Feature

Engine Oil

Engine Coolant

Engine Coolant
Temperature

Do Not Open When Hot

4wd control*

(pg. 120)

Audio system

(pg. 18)

Auxiliary power point

(pg. 45)

Fog lamp control

(pg. 34)

Climate control system

(pg. 31)

Passenger air bag

deactivate switch

(pg. 84)

Cigar lighter

* if equipped

Instrument Cluster

11

WARNING LIGHTS AND CHIMES

Warning lights and gauges can alert you to a vehicle condition that may
become serious enough to cause expensive repairs. A warning light may
illuminate when a problem exists with one of your vehicle’s functions.
Many lights will illuminate when you start your vehicle to make sure the
bulb works. If any light remains on after starting the vehicle, have the
respective system inspected immediately.

Check engine: The Check Engine
indicator light illuminates when the
ignition is first turned to the ON
position to check the bulb. Solid
illumination after the engine is started indicates the On Board
Diagnostics System (OBD-II) has detected a malfunction. Refer to On
board diagnostics (OBD-II) 
in the Maintenance and Specifications
chapter. If the light is blinking, engine misfire is occurring which could
damage your catalytic converter. Drive in a moderate fashion (avoid
heavy acceleration and deceleration) and have your vehicle serviced
immediately.

WARNING: Under engine misfire conditions, excessive exhaust
temperatures could damage the catalytic converter, the fuel
system, interior floor coverings or other vehicle components,
possibly causing a fire.

Instrument Cluster

12

Check fuel cap: Illuminates when
the fuel cap may not be properly
installed. Check the fuel filler cap if
this light remains on. Continued
driving with this light on may cause
the Check Engine warning light to
come on.

It may take a long period of time for the system to detect an
improperly installed or properly re-installed fuel filler cap
depending on driving and fuel tank level conditions. 
Refer to Fuel
filler cap 
in the Maintenance and Specifications chapter.

Brake system warning light: To
confirm the brake system warning
light is functional, it will
momentarily illuminate when the
ignition is turned to the ON position
when the engine is not running, or in a position between ON and START,
or by applying the parking brake when the ignition is turned to the ON
position. If the brake system warning light does not illuminate at this
time, seek service immediately from your dealership. Illumination after
releasing the parking brake indicates low brake fluid level or a failure to
brake proportioning and the brake system should be inspected
immediately by your servicing dealership.

WARNING: Driving a vehicle with the brake system warning
light on is dangerous. A significant decrease in braking
performance may occur. It will take you longer to stop the
vehicle. Have the vehicle checked by your dealer immediately.

Anti-lock brake system: If the
ABS light stays illuminated or
continues to flash, a malfunction has
been detected; have the system
serviced immediately. Normal
braking is still functional unless the brake warning light also is
illuminated.

!

BRAKE

ABS

Instrument Cluster

13

Air bag readiness: If this light fails
to illuminate when ignition is turned
to ON, continues to flash or remains
on, have the system serviced
immediately. A chime will also
sound when a malfunction in the supplemental restraint system has been
detected.

Safety belt: Reminds you to fasten
your safety belt. A chime will also
sound to remind you to fasten your
safety belt. Refer to the Seating
and safety restraints 
chapter.

Charging system: Illuminates when
the battery is not charging properly.

Engine oil pressure: Illuminates
when the oil pressure falls below the
normal range, refer to Engine oil in
the Maintenance and
specifications 
chapter.

Engine coolant temperature:
Illuminates when the engine coolant
temperature is high. Stop the
vehicle as soon as possible , switch off the engine and let cool. Refer to
Engine coolant in the Maintenance and specifications chapter.

WARNING: Never remove the coolant recovery cap while the
engine is running or hot.

Low fuel: Illuminates when the fuel
level in the fuel tank is at or near
empty (refer to Fuel gauge in this
chapter).

Door ajar: Illuminates when the
ignition is in the ON position and
any door is open.

Instrument Cluster

14

Overdrive off (if equipped):
Illuminates when the overdrive
function of the transmission has
been turned off, refer to the
Driving chapter.

If the light does not come on or the light flashes

steadily, have your vehicle serviced as soon as possible, damage
to the transmission could occur.

Four wheel drive low (if
equipped): 
Illuminates when
four-wheel drive low is engaged.

NOTE: If the light continues to
flash have the system serviced.

Four wheel drive high (if
equipped): 
Illuminates when
four-wheel drive high is engaged. It
may also illuminate when the 4WD LOW is engaged, refer to the Driving
chapter for more information.

NOTE: If the light continues to flash have the system serviced.

Anti-theft system: Flashes when
the Securilock

y Passive Anti-theft

System has been activated.

Speed control: Illuminates when
the speed control is engaged. Turns
off when the speed control system
is disengaged.

Turn signal: Illuminates when the
left or right turn signal or the
hazard lights are turned on. If the
indicators stay on or flash faster, check for a burned out bulb.

High beams: Illuminates when the
high beam headlamps are turned on.

Key-in-ignition warning chime: Sounds when the key is left in the
ignition in the OFF/LOCK or ACC position and the driver’s door is
opened.

O/D

OFF

4x4

LOW

4x4

Instrument Cluster

15

Headlamps on warning chime: Sounds when the headlamps or parking
lamps are on, the ignition is off (the key is not in the ignition) and the
driver’s door is opened.

Door ajar warning chime: Sounds when any door is opened (or not
fully closed).

GAUGES

Speedometer: Indicates the
current vehicle speed.

Engine coolant temperature
gauge: 
Indicates engine coolant
temperature. At normal operating
temperature, the needle will be in
the normal range (between “H” and
“C”). If it enters the red section,
the engine is overheating. Stop
the vehicle as soon as safely
possible, switch off the engine and let the engine cool.

Refer to Engine coolant in the Maintenance and specifications
chapter.

WARNING: Never remove the coolant reservoir cap and/or the
radiator cap while the engine is running or hot, this may result
in serious burns.

Odometer: Registers the total
kilometers (miles) of the vehicle.

Trip odometer: Registers the
kilometers (miles) of individual
journeys. To reset, depress the
control button.

Tachometer: Indicates the engine
speed in revolutions per minute.
Driving with your tachometer
pointer continuously at the top of
the scale may damage the engine.

Fuel gauge: Indicates
approximately how much fuel is left
in the fuel tank (when the ignition
is in the ON position). The fuel
gauge may vary slightly when the
vehicle is in motion or on a grade.

NOTE: The FUEL icon and arrow
indicates which side of the vehicle
the fuel filler door is located.

Refer to Filling the tank in the Maintenance and Specifications
chapter for more information.

AM/FM STEREO (IF EQUIPPED)

1. AM/FM: Press to select

AM/FM1/FM2 frequency bands.

2. CLK: Press until SELECT

HOUR / SELECT MINUTE
appears.
Press

AUDIO

to adjust

the hours/minutes.
Press CLK to display the time when the ignition is off.

3. AUDIO: Press AUDIO to toggle

through the following modes
and use

/

to make

adjustments in those modes.

Bass: Press

AUDIO

to decrease/increase the bass setting.

Treble: Press

4. Tune: Press to manually go down/up (

/

) the radio frequency

and in audio mode to select various settings.

5. Memory presets: To set a

station: Select frequency band
AM/FM; tune to a station, press
and hold a preset button until sound returns. To tune a preset
station, press the desired memory preset.

6. SEEK: Press

SEEK

to

access the previous or next
radio station. If pressed for less
than .5 seconds, the system will seek to the next or previous station.

7. ON/OFF/Volume: Press to turn

the system ON/OFF. Turn to
adjust the volume levels.
If the volume is set above a
certain level, and the ignition is
turned off, the volume will come
back to a “nominal” listening level when the ignition is turned back
on.

AM/FM STEREO CD

1. CD eject: Press to eject the

CD.

2. CLK (Clock):Press CLK until

SELECT HOUR or SELECT
MINUTE is displayed. Press

TUNE

to adjust the

hours/minutes. Press CLK to display the time when the ignition is
off.

3. MUTE:Press to mute the

playing media. Press again to
return to the playing media.

4. MENU: Press MENU repeatedly

to toggle through the following
modes and use

/

to make

adjustment in those modes.

Autoset: Press

MENU

to

set the strongest local radio stations
for AM/FM1/FM2 without losing
your original manually set preset
stations.
When the six strongest stations are filled, the station stored in preset 1
will begin playing. If there are less than six strong stations, the system
will store the last one in the remaining presets.

Bass: Press

MENU

to decrease/increase the bass setting.

Treble: Press

MENU

to decrease/increase the treble setting.

Balance: Press

MENU

to adjust the audio between the left and

right speakers.

Fade: Press

MENU

to adjust the audio between the front and

rear speakers.

5. TUNE: Press to manually go

down/up (

/

) the radio

frequency and also to select
various settings in menu mode.

Entertainment Systems

20

6. SHUFF (Shuffle): Press to

play the tracks on the current
CD in random order.

7. REPEAT:Press to repeat the

current CD track.

8. FF (Fast forward): Press to

manually advance in a CD track.

9. REW (Rewind): Press to

manually reverse in a CD track.

10. Memory presets: To set a

station: Select frequency band
AM/FM; tune to a station, press
and hold a preset button until sound returns. To recall a previously
set station, press the desired memory preset button briefly.

11. SEEK/TRACK: Press to access the next/previous strong station. In

CD mode, press to advance to the next/previous track.

12. SCAN: Press to toggle between

SCAN ON and SCAN OFF. When
activated, the system scans up
through and plays a brief sampling of available radio stations or CD
tracks. Press again to stop.

13. AM/FM:Press to select

AM/FM1/FM2 frequency band.

14. ON/OFF/Volume: Press to turn

ON/OFF. Turn to
increase/decrease volume.
If the volume is set above a
certain level and the ignition is
turned off, the volume will come
back on at a “nominal” listening level when the ignition switch is
turned back on.

15. CD: Press to enter CD mode. If

a CD is already present in the
system, the disc will begin to
play.

Entertainment Systems

21

16. CD slot: Insert a CD label side

up.

CD units are designed to play commercially pressed 12 cm (4.75
in) audio compact discs only. Due to technical incompatibility,
certain recordable and re-recordable compact discs may not
function correctly when used in Mazda CD players. Irregular
shaped CDs, CDs with a scratch protection film attached, and CDs
with homemade paper (adhesive) labels should not be inserted
into the CD player. The label may peel and cause the CD to
become jammed. It is recommended that homemade CDs be
identified with permanent felt tip marker rather than adhesive
labels. Ballpoint pens may damage CDs. Please contact your
dealer for further information.

AM/FM STEREO TAPE/CD/MP3

1. CD eject: Press to eject the

CD.

2. CLK (Clock): Press CLK until

SELECT HOUR or SELECT
MINUTE is displayed. Press
MENU

to adjust the hours/minutes.

Press CLK to display the time of day when the ignition is off.

3. MUTE: Press to mute the

playing media. Press again to
return to the playing media.

4. MENU: Press MENU repeatedly

to toggle through the following
modes and use

/

to make

adjustment in those modes.

Autoset: Press MENU to access the
autoset setting. Allows you to set the
strongest local radio stations without
losing your original manually set
preset stations for AM/FM1/FM2 . Use

MENU

to set.

When the six strongest stations are filled, the station stored in preset 1 will
begin playing. If there are less than six strong stations, the system will
store the last one in the remaining presets. Press again to disengage.

Bass: Press

MENU

to decrease/increase the level of bass.

Treble: Press

MENU

to decrease/increase the level of treble.

Balance: Press

MENU

to adjust the audio between the left and

right speakers.

Fade: Press

MENU

to adjust the audio between the front and

rear speakers.

Next/previous directory: In MP3 mode, press

MENU

to go to

the previous or next MP3 directory.

Flat file/directory mode: Press

MENU

to select Flat file mode

or Directory mode.

Track number/music name/file name: In MP3 mode, press
MENU

to view by track number, music name or file name.

Dolby:

Dolby

noise reduction: Reduces tape noise and hiss.

Press

MENU

to cycle Dolby ON/OFF. The Dolby

t noise

Entertainment Systems

23


Content   ..    1  2   ..