Mazda B3000 (2002 year). Instruction - part 7


  Index      Mazda     Mazda B3000 - instruction 2002 year in english


Search            


Content   ..  5  6  7  8   ..


Mazda B3000 (2002 year). Instruction - part 7


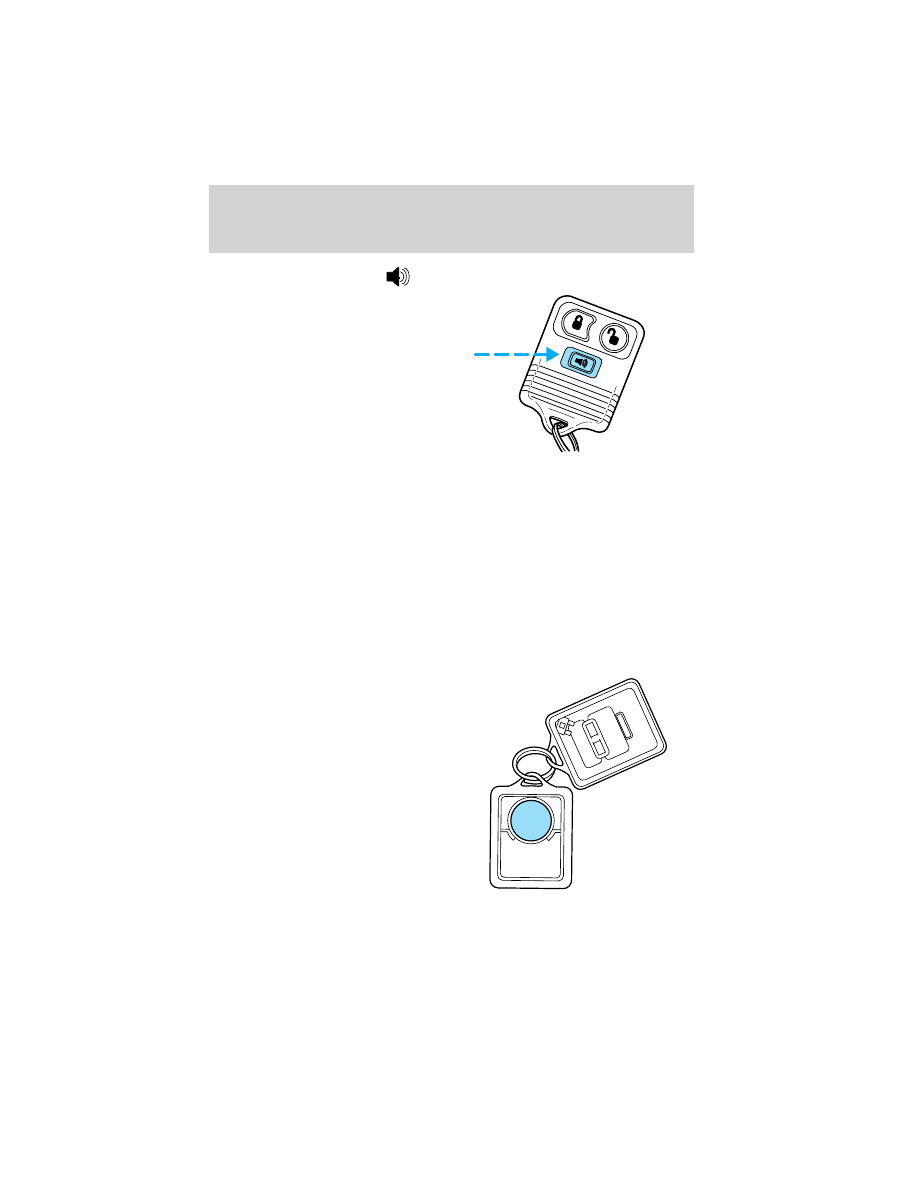
Sounding a panic alarm

Press this control to activate the
alarm.

To deactivate the alarm, press the
control again or turn the ignition to
ACC or ON.

Panic alarm will only operate with
the ignition in the OFF position.

Replacing the battery

The transmitter is powered by one coin type three-volt lithium battery
CR2032 or equivalent. Typical operating range will allow you to be up to
10 meters (33 feet) away from your vehicle. A decrease in operating
range can be caused by:
• Weather conditions
• Nearby radio towers
• Structures around the vehicle
• Other vehicles parked next to the vehicle
To replace the battery:

1. Twist a thin coin between the

two halves of the transmitter
near the key ring.

DO NOT TAKE THE FRONT
PART OF THE TRANSMITTER
APART. Damage to the
transmitter may result in
operation failure.

2. Place the positive (+) side of

new battery in the same
orientation. Refer to the
diagram inside the transmitter
unit.

3. Snap the two halves back

together.

Locks and Security

100

Replacing lost transmitters

If a remote transmitter has been lost
and you would like to remove it
from the vehicle’s memory, or you
would like to purchase additional
remote transmitters and have them
programmed to your vehicle:
• Take all your vehicle’s

transmitters to your dealer for
programming, or

• Perform the programming

procedure yourself.

Programming remote transmitters

It is necessary to have all (maximum of four — original and/or new) of
your remote transmitters available prior to beginning this procedure.

NOTE: This procedure must be completed within the specified times. If
not completed within the specified time period, reprogramming
procedures must be restarted from the beginning.

To program the transmitters yourself:
• Place the key in the ignition and

turn from 2 (LOCK) to 3 (OFF)
and cycle between 3 (OFF) and
4(ON) eight times in rapid
succession (within 10 seconds)
with the eighth turn ending in the
4 (ON) position. The doors will
lock/unlock to confirm that
programming mode has been
entered.

• Within 20 seconds, program a

remote transmitter by pressing any button on a transmitter. The doors
will lock/unlock to confirm that the remote transmitter has been
programmed. (If more than 20 seconds pass before pressing a remote
transmitter button, the programming mode will exit and the procedure
will have to be repeated.)

• Repeat the previous step to program additional remote transmitters.

The doors will lock/unlock to confirm that each remote transmitter has
been programmed.

3

2

1

5

4

Locks and Security

101

• When you have completed programming the remote transmitters, turn

the ignition to 3 (OFF). Again the doors will lock/unlock to confirm
programming has been completed.

SECURILOCK

Y

PASSIVE ANTI-THEFT SYSTEM

SecuriLock

y passive anti-theft system is an engine immobilization

system. This system is designed to prevent the engine from being started
unless a coded key is used.
NOTE: The SecuriLock

y passive anti-theft system is not compatible

with non-Mazda aftermarket remote start systems. Use of these systems
may result in vehicle starting problems and a loss of security protection.

THEFT INDICATOR

The theft indicator is the flashing red indicator located on top of the
instrument panel.
• When the ignition is in the OFF position, the indicator will flash once

every 2 seconds to indicate the SecuriLock

y system is functioning as

a theft deterrent.

• When the ignition is in the ON position, the indicator will glow for 3

seconds to indicate normal system functionality.

If a problem occurs with the SecuriLock

y system, the indicator will flash

rapidly or glow steadily when the ignition is in the ON position. If this
occurs, the vehicle should be taken to an authorized dealer for service.

Automatic arming

The vehicle is armed immediately
after switching the ignition to the 3
(OFF) position. The

THEFT

indicator in the instrument cluster
will flash every two seconds when
the vehicle is armed.

Automatic disarming

Switching the ignition to the 4 (ON) position with a coded key disarms
the vehicle. The

THEFT

indicator will illuminate for three seconds and

then go out. If the

THEFT

indicator stays on for an extended period of

time or flashes rapidly, have the system serviced by your authorized
Mazda dealership.

3

2

1

5

4

Locks and Security

102

Key information

Your vehicle is supplied with two coded keys. Only a coded key will
start your vehicle. Spare coded keys can be purchased from your
authorized Mazda dealership. Your dealership can program your key or
you can “do it yourself.” Refer to Programming spare keys.

The SecuriLock

passive anti-theft system is not compatible with

aftermarket remote start systems. Use of these systems may
result in vehicle starting problems and a loss of security
protection.

NOTE: Large metallic objects, electronic devices on the key chain that
can be used to purchase gasoline or similar items, or a second key on the
same key ring as the coded key may cause vehicle starting issues.

NOTE: If present, you need to keep these objects from touching the
coded key while starting the engine.

NOTE: These objects and devices cannot damage the coded key, but
can cause a momentary issue if they are too close to the key during
engine start.

NOTE: If a problem occurs, turn ignition OFF and restart the engine
with all other objects on the key ring held away from the ignition key.
Check to make sure the encoded ignition key is an approved Mazda
encoded ignition key.

If your keys are lost or stolen you will need to do the following:
• Use your spare key to start the vehicle. or
• Have your vehicle towed to an authorized Mazda dealership. . The key

codes will need to be erased from your vehicle and new key codes will
need to be re-coded.

Replacing coded key can be very costly and you may want to store an
extra programmed key away from the vehicle in a safe place to prevent
an unforeseen inconvenience.

WARNING: If an unprogrammed key is used in the ignition it
will cause a “no start” condition.

Programming spare keys

A maximum of eight keys can be coded to your vehicle. Only
SecuriLock

y keys can be used. To program a coded key yourself, you

will need two previously programmed coded keys (keys that already
operate your vehicle’s engine) and the new unprogrammed key(s) readily
accessible for timely implementation of each step in the procedure.

Locks and Security

103

If two previously programmed coded keys are not available, you must
bring your vehicle to your dealership to have the spare coded key(s)
programmed.

NOTE: Please read and understand the entire procedure before you
begin.

NOTE: This procedure must be completed within the specified times. If
not completed within the specified time period, the reprogramming
procedure must be restarted from the beginning.

1. Insert the first previously

programmed coded key into
the ignition and turn the
ignition from 3 (OFF) to 4 (ON)
(maintain ignition in 4 (ON) for
at least one second).

2. Turn ignition to 3 (OFF) then 2

(LOCK) and remove the first
coded key from the ignition.

3. Within ten seconds of removing

the first coded key, insert the second previously programmed coded
key 
into the ignition and turn the ignition from 3 (OFF) to 4 (ON)
(maintain ignition in 4 (ON) for at least one second but no more
than ten seconds).

4. Turn the ignition to 3 (OFF) then 2 (LOCK) and remove the second

coded key from the ignition.

5. Within 20 seconds of removing the second coded key, insert the

new unprogrammed key (new key/valet key) into the ignition and
turn the ignition from 3 (OFF) to 4 (ON) (maintain ignition in 4
(ON) for at least one second). This step will program your new key
to a coded key.

6. To program additional new unprogrammed key(s), repeat this

procedure from step 1.

If successful, the new coded key(s) will start the vehicle’s engine and the
theft indicator will illuminate for three seconds and then go out.

If not successful, the new coded key(s) will not start the vehicle’s engine
and the theft indicator will flash on and off and you may repeat steps 1
through 6. If failure repeats, bring your vehicle to your authorized Mazda
dealership to have the new spare key(s) programmed.

3

2

1

5

4

Locks and Security

104

SEATING

Adjusting the front manual seat

WARNING: Never adjust the driver’s seat or seatback when the
vehicle is moving. Sudden braking or a collision could cause
serious injury. Adjust the seat only when the vehicle is stopped.

WARNING: Do not pile cargo higher than the seatbacks to
reduce the risk of injuring people in a collision or sudden stop.

WARNING: Always drive and ride with your seatback upright
and the lap belt snug and low across the hips.

WARNING: Sitting in a reclined position while the vehicle is
moving is dangerous because you don’t get the full protection
from seat belts. During sudden braking or a collision, you can
slide under the lap belt and suffer serious internal injuries. For
maximum protection, sit well back and upright.

Lift handle to move seat forward or
backward.

Seating and Safety Restraints

105

Pull lever up to adjust seatback.

Using the manual lumbar support (if equipped)

Turn the lumbar support control
clockwise to increase firmness.

Turn the lumbar support control
counterclockwise to increase
softness.

REAR SEATS

Center facing jump seat (2 door SuperCab) (if equipped)

To open, pull inboard and down on the seat handle.

To stow the seat, pull seat bottom back to the fully upright position.

WARNING: Do not install a child seat in a center facing jump
seat.

Seating and Safety Restraints

106

Center facing jump seat (4 door CabPlus) (if equipped)

To open, pull seat assembly down,
then raise seatback.

To stow the seat, fold seat back
down and raise seat assembly to the
fully upright position.

WARNING: Do not install a
child seat in a center facing
jump seat.

SAFETY RESTRAINTS

Safety restraints precautions

WARNING: Always drive and ride with your seatback upright
and the lap belt snug and low across the hips.

WARNING: To reduce the risk of injury, make sure children sit
where they can be properly restrained.

WARNING: Never let a passenger hold a child on his or her lap
while the vehicle is moving. The passenger cannot protect the
child from injury in a collision.

WARNING: All occupants of the vehicle, including the driver,
should always properly wear their safety belts, even when an
air bag (SRS) is provided.

WARNING: It is extremely dangerous to ride in a cargo area,
inside or outside of a vehicle. In a collision, people riding in
these areas are more likely to be seriously injured or killed. Do
not allow people to ride in any area of your vehicle that is not
equipped with seats and safety belts. Be sure everyone in your
vehicle is in a seat and using a safety belt properly.

Seating and Safety Restraints

107

WARNING: In a rollover crash, an unbelted person is
significantly more likely to die or be seriously injured than a
person wearing a seat belt.

WARNING: In a rollover crash, an unbelted person is
significantly more likely to die than a person wearing a safety
belt.

WARNING: Each seating position in your vehicle has a specific
safety belt assembly which is made up of one buckle and one
tongue that are designed to be used as a pair. 1) Use the
shoulder belt on the outside shoulder only. Never wear the
shoulder belt under the arm. 2) Never swing the safety belt
around your neck over the inside shoulder. 3) Never use a
single belt for more than one person.

WARNING: On four-door SuperCab vehicles, do not open the
rear door when the rear seat belt is still buckled.

Combination lap and shoulder belts

1. Insert the belt tongue into the

proper buckle (the buckle
closest to the direction the
tongue is coming from) until
you hear a snap and feel it
latch. Make sure the tongue is
securely fastened in the buckle.

Seating and Safety Restraints

108

2. To unfasten, push the release

button and remove the tongue
from the buckle.

The front outboard safety restraints in the vehicle are combination lap
and shoulder belts. The front passenger outboard safety belt has two
types of locking modes described below:

Energy Management Feature

• This vehicle has a seat belt system with an energy management

feature at the front outboard seating positions to help further reduce
the risk of injury in the event of a head-on collision.

• This seat belt system has a retractor assembly that is designed to pay

out webbing in a controlled manner. This feature is designed to help
reduce the belt force acting on the occupant’s chest.

Vehicle sensitive mode

The vehicle sensitive mode is the normal retractor mode, allowing free
shoulder belt length adjustment to your movements and locking in
response to vehicle movement. For example, if the driver brakes
suddenly or turns a corner sharply, or the vehicle receives an impact of
approximately 8 km/h (5 mph) or more, the combination safety belts will
lock to help reduce forward movement of the driver and passengers.

Automatic locking mode

In this mode, the shoulder belt is automatically pre-locked. The belt will
still retract to remove any slack in the shoulder belt.

The automatic locking mode is not available on the driver safety belt.

When to use the automatic locking mode

• Any time a child safety seat is installed in a passenger front seat.

Refer to Safety Restraints for ChildrenSafety Seats for Children,
or Passenger air bag On/Off switch later in this chapter.

Seating and Safety Restraints

109

How to use the automatic locking mode

• Buckle the combination lap and

shoulder belt.

• Grasp the shoulder portion and

pull downward until the entire
belt is extracted.

• Allow the belt to retract. As the belt retracts, you will hear a clicking

sound. This indicates the safety belt is now in the automatic locking
mode.

How to disengage the automatic locking mode

Disconnect the combination lap/shoulder belt and allow it to retract
completely to disengage the automatic locking mode and activate the
vehicle sensitive (emergency) locking mode.

Seating and Safety Restraints

110

WARNING: After any vehicle collision, the entire seat belt
system should be checked for proper operation by a qualified
technician. Verify that the

(automatic locking retractors” in all

outboard seating positions are functioning properly.
Additionally check that the

(automatic locking modefeature

for child safety seat in the passenger outboard seating position
is functioning properly.

WARNING: BELT AND RETRACTOR ASSEMBLY MUST BE
REPLACED if the seat belt assembly “automatic locking
retractor” feature or any other seat belt function is not
operating properly when checked according to the procedures in
Workshop Manual.

WARNING: Failure to replace the Belt and Retractor assembly
could increase the risk of injury in collisions.

Safety belt pretensioner

Your vehicle is equipped with safety belt pretensioners at the driver and
front outboard passenger seating positions.
The safety belt pretensioners are designed to activate during certain
frontal or near-frontal collisions with sufficient longitudinal deceleration.
A safety belt pretensioner is a device which tightens the webbing of the
lap and shoulder belts in such a way that they fit more snugly against
the body.
The driver and front outboard passenger safety belt system (including
retractors, buckle assembly, pretensioner assembly with seat and height
adjusters) must be replaced if the vehicle is involved in a collision that
results in the activation of the safety belt pretensioners. Refer to the
Safety belt maintenance section in this chapter.

WARNING: Failure to replace the safety belt assembly under
the above conditions could result in severe personal injuries in
the event of a collision.

Front safety belt height adjustment

Your vehicle has safety belt height adjustments for the driver and front
passenger. Adjust the height of the shoulder belt so the belt rests across
the middle of your shoulder.

Seating and Safety Restraints

111

• Regular Cab and 4–door Cab Plus

• 2–door Cab Plus

To lower the shoulder belt height, push the button and slide the height
adjuster down. To raise the height of the shoulder belt, slide the height
adjuster up. Pull down on the height adjuster to make sure it is locked in
place.

WARNING: Position the safety belt height adjusters so that the
belt rests across the middle of your shoulder. Failure to adjust
the safety belt properly could reduce the effectiveness of the
seat belt and increase the risk of injury in a collision.

Seating and Safety Restraints

112

Lap belts

Adjusting the center lap belt

The lap belt does not adjust automatically.

WARNING: The lap belts should fit snugly and as low as
possible around the hips, not around the waist. Failure to
position the lap belt correctly may cause serious injury in an
accident.

Insert the tongue into the correct
buckle (the buckle closest to the
direction the tongue is coming
from). To lengthen the belt, turn the
tongue at a right angle to the belt
and pull across your lap until it
reaches the buckle. To tighten the
belt, pull the loose end of the belt
through the tongue until it fits
snugly across the hips.

Shorten and fasten the belt
when not in use to keep the belt
away from door openings and
available after unfolding the
seats.

Adjusting the rear center facing jump seat lap belt (if equipped)

The lap belt will adjust automatically. To fasten, grasp the tongue, and
with a continuous motion, pull out enough webbing to buckle the tongue
into the correct buckle. If you did not pull out enough webbing to reach
the buckle, allow the tongue to retract fully before trying to pull it out
again.

Seating and Safety Restraints

113

WARNING: The lap belts should fit snugly and as low as possible
around the hips, not around the waist. Failure to position the lap
belt correctly may cause serious injury in an accident.

If you need to lengthen the belt, unfasten it and repeat the procedure
above.

To unfasten the belt, push in the release button prior to opening the rear
door.

Safety belt extension assembly

If the safety belt assembly is too short for you, even when fully
extended, 20 cm (8 inches) can be added to the safety belt assembly by
adding a safety belt extension assembly. Safety belt extension assemblies
can be obtained from your authorized Mazda dealership.

Use only extensions manufactured by the same supplier as the safety
belt. Manufacturer identification is located at the end of the webbing on
the label. Also, use the safety belt extension only if the safety belt is too
short for you when fully extended.

NOTE:Do not use extensions to change the fit of the shoulder belt
across the torso.

Safety belt warning light and indicator chime

The seat belt warning light illuminates in the instrument cluster and a
chime sounds to remind the occupants to fasten their safety belts.

Conditions of operation

If...

Then...

The driver’s safety belt is not
buckled before the ignition switch
is turned to the ON position...

The safety belt warning light
illuminates 1-2 minutes and the
warning chime sounds 4-8
seconds.

The driver’s safety belt is buckled
while the indicator light is
illuminated and the warning chime
is sounding...

The safety belt warning light and
warning chime turn off.

The driver’s safety belt is buckled
before the ignition switch is turned
to the ON position...

The safety belt warning light and
indicator chime remain off.

Seating and Safety Restraints

114

BeltMinder

The BeltMinder feature is a supplemental warning to the safety belt
warning function. This feature provides additional reminders to the
driver that the driver’s safety belt is unbuckled by intermittently
sounding a chime and illuminating the safety belt warning lamp in the
instrument cluster.

If...

Then...

The driver’s safety belt is not
buckled before the vehicle has
reached at least 5 km/h (3
mph) and 1-2 minutes have
elapsed since the ignition
switch has been turned to
ON...

The BeltMinder feature is activated -
the safety belt warning light
illuminates and the warning chime
sounds for 6 seconds every 30
seconds, repeating for approximately
5 minutes or until driver’s safety belt
is buckled.

The driver’s safety belt is
buckled while the safety belt
indicator light is illuminated
and the safety belt warning
chime is sounding...

The BeltMinder feature will not
activate.

The driver’s safety belt is
buckled before the ignition
switch is turned to the ON
position...

The BeltMinder feature will not
activate.

The purpose of the Safety Belt Warning Chime/Light is to remind
occupants of the vehicle to wear safety belts all of the time.

Seating and Safety Restraints

115


Content   ..  5  6  7  8   ..