Mazda B3000 (2002 year). Instruction - part 4


  Index      Mazda     Mazda B3000 - instruction 2002 year in english


Search            


Content   ..  2  3  4  5   ..


Mazda B3000 (2002 year). Instruction - part 4


Setting the clock

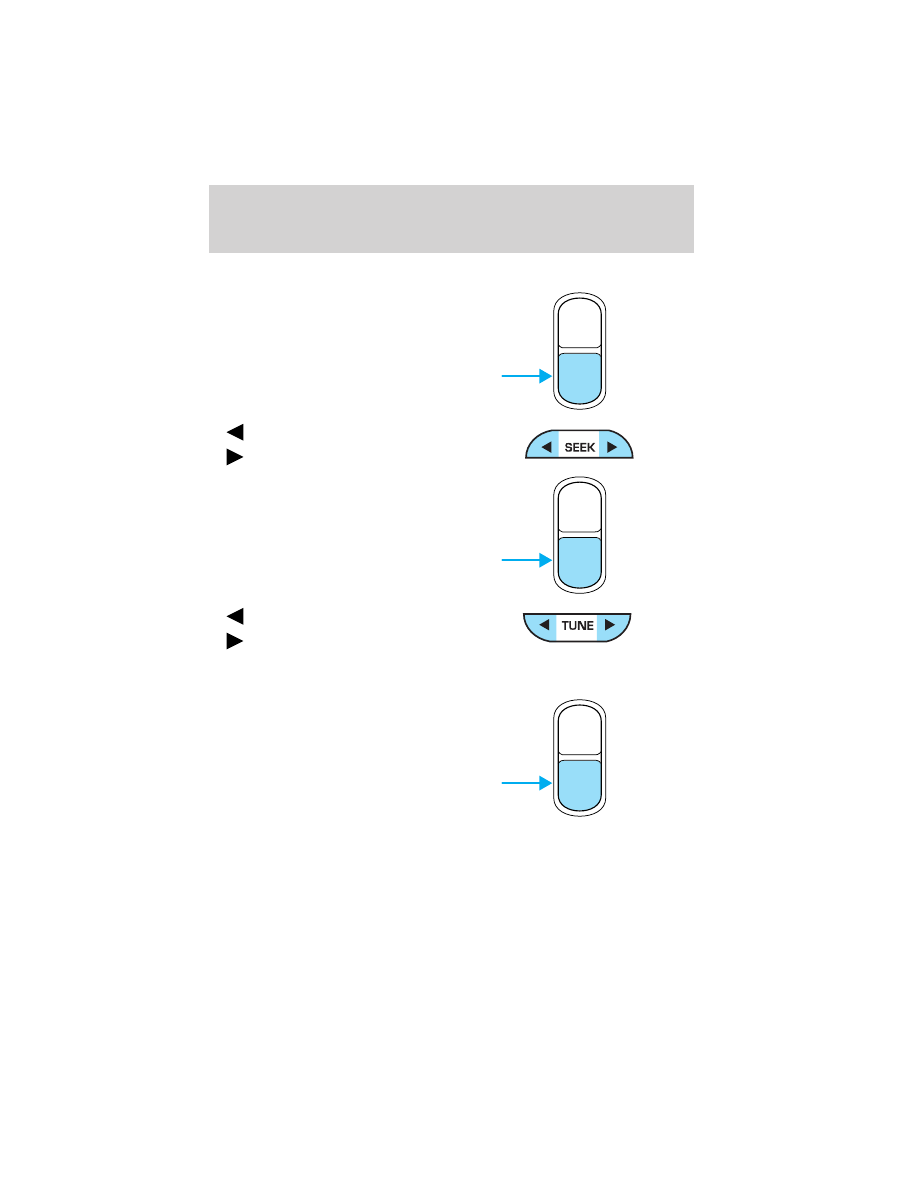
To set the hour, press and hold the
CLK control and press SEEK:

to decrease hours and

to increase hours.

To set the minute, press and hold
the CLK control and press TUNE:

to decrease minutes and

to increase minutes.

If your vehicle has a separate clock, (other than the digital radio
display), the CLK control will not function in the above manner.

The CLK control will allow you to
switch between media display mode
(radio station, stereo information,
etc.) and clock display mode (time).
When in clock mode, the media
information will display for 10
seconds, when the radio is turned
on, and then revert to clock
information. Any time that the
media is changed, (new radio station, etc.), the media information will
again display for 10 seconds before reverting back to the clock. In media
mode, the media information will always be displayed.

AUTO

CLK

AUTO

CLK

AUTO

CLK

Entertainment Systems

52

Mute mode

Press the MUTE control to mute the
playing media. Press the MUTE
control again to return to the
playing media.

PREMIUM AM/FM STEREO IN DASH SIX CD RADIO

Volume/power control

Press the control to turn the audio
system on or off. Turn the control to
raise or lower volume.

If the volume is set above a certain level and the ignition is turned off,
the volume will come back on at a “nominal” listening level when the
ignition switch is turned back on.

EJ

MUTE

LOAD

EJ

SHUF

COMP

MUTE

SEL

BAL

BASS

FADE

TREB

SCAN

DISC

TUNE

PUSH ON

CD

1

2

3

4

5

6

MENU

AM
FM

SEEK

REW

FF

PUSH ON

Entertainment Systems

53

AM/FM select

The AM/FM select control works in
radio and CD modes.

AM/FM select in radio mode

This control allows you to select AM or FM frequency bands. Press the
control to switch between AM, FM1 or FM2 memory preset stations.

AM/FM select in CD mode

Press this control to stop CD play and begin radio play.

Tune/disc adjust

The tune control works in radio or CD mode.

Tune adjust in radio mode

• Press

to move to the next

frequency down the band
(whether or not a listenable
station is located there). Hold the control to move through the
frequencies quickly.

• Press

to move to the next frequency up the band (whether or not

a listenable station is located there). Hold for quick movement.

Disc adjust for CD mode

• Press

to select the previous

disc. (Play will begin on the first
track of the disc unless shuffle
mode is engaged.) Refer to Shuffle feature for more information. Hold
the control to continue reversing through the discs.

• Press

to select the next disc. Hold the control to fast-forward

through the remaining discs.

Seek function

The seek function works in radio or CD mode.

CD

AM
FM

DISC

TUNE

DISC

TUNE

Entertainment Systems

54

Seek function in radio mode

• Press

to find the next

listenable station down the
frequency band. SEEK DOWN
will display.

• Press

to find the next listenable station up the frequency band.

SEEK UP will display.

Seek function in CD mode

• Press

to seek to the previous

track of the current disc. If the
beginning of the disc is reached,
the CD player seeks to the
beginning of the last track on the current disc and begins playing.

• Press

to seek forward to the next track of the current disc. After

the last track has been completed, the first track of the current disc
will automatically replay.

Scan function

The scan function works in radio or
CD mode.

Scan function in radio mode

Press the SCAN control to hear a brief sampling of all listenable stations
on the frequency band. Press the SCAN control again to stop the scan
mode.

Scan function in CD mode

Press the SCAN control to hear a short sampling of all selections on the
CD. (The CD scans in a forward direction, wrapping back to the first
track at the end of the CD.) To stop on a particular selection, press the
control again.

Autostore

Autostore allows you to set the strongest local radio stations without
losing your original manually set preset stations. This feature is helpful
on trips when you travel between cities with different radio stations.

Entertainment Systems

55

Starting autostore

1. Press and momentarily hold the AM/FM control.

2. AUTOSET will flash in the

display as the frequency band is
scrolled through.

3. When the six strongest stations are filled, the station stored in

memory preset control 1 will start playing.

If there are fewer than six strong stations available on the frequency
band, the remaining memory preset controls will all store the last strong
station available.

To deactivate autoset and return to your audio system’s manually set
memory stations, press the AM/FM control again.

Radio station memory preset

The radio is equipped with six station memory preset controls. These
controls can be used to select up to six preset AM stations and twelve
FM stations (six in FM1 and six in FM2).

Setting memory preset stations

1. Select the frequency band with the AM/FM select control. Press the

AM/FM control to toggle between AM, FM1, or FM2.

2. Press the SEEK control to access the next listenable station up or

down the frequency band. Press the TUNE control to go up or down
the listening band in individual increments.

3. Select a station. Refer to Seek function for more information on

selecting a station.

4. Press and hold a memory preset control. The playing media will

mute momentarily. When the sound returns, the station is held in
memory on the control you selected. The display will read SAVED.

CD

AM
FM

Entertainment Systems

56

CD select

CD mode may be entered by
pressing the CD control and the
LOAD control. Load the CD into the
audio system. The first track of the
disc will begin playing. After that, CD play will begin where it stopped
last.

If an alternative CD is desired, press the corresponding preset control
(1–6) of a loaded CD, or press the TUNE control to access the other
loaded CDs.

NO CD will display if the CD control is activated when there is not a CD
present in the audio system.

If the CD control is pressed followed by with a preset number and that
particular slot is empty, NO CD will display and the system will begin to
play the next available disc.

CD units are designed to play commercially pressed 12 cm (4.75
in) audio compact discs only. Due to technical incompatibility,
certain recordable and re-recordable compact discs may not
function correctly when used in Mazda CD players. Irregular
shaped CDs, CDs with a scratch protection film attached, and CDs
with homemade paper (adhesive) labels should not be inserted
into the CD player. The label may peel and cause the CD to
become jammed. It is recommended that homemade CDs be
identified with permanent felt tip marker rather than adhesive
labels. Ball point pens may damage CDs. Please contact your
dealer for further information.

Display description

Six circles are always lit in the digital display. These signify the six CD
slots in the audio system. When a disc is loaded into a particular slot
(1–6), the number inside that specific circle lights. If the circle is empty,
there is no CD in that particular slot.

Load

The load feature allows you to load
single CDs into the player internal
to the radio.

This six disc CD player is equipped with a CD door. Compact
discs should only be inserted into the player after the CD door
has been opened by the player. Do not attempt to force the door
open. Compact discs should only be loaded by pressing the LOAD
control.

CD

AM
FM

LOAD

Entertainment Systems

57

Press the LOAD control. (You can choose which slot will be loaded by
pressing the desired preset number. If you do not choose a slot, the
system will choose the next available one.) Wait until the CD door opens.
Load the CD into the player. LOADING CD# is displayed. When the CD
has been loaded, the door will close and the CD will begin to play. For
example, to load a CD into slot 2, press the LOAD control and then press
preset 2.

Auto load

This feature allows you to autoload
up to 6 discs into the multi disc CD
player internal to the radio.

Press and hold the LOAD control until AUTOLOAD # is displayed. The
CD door will open. Load the desired discs, one at a time. The CD is
loaded into position and the audio system will display CD#. Each time
the CD door opens, INSERT CD# is displayed. The door will close and
the player will move to the next slot after each disc has been loaded.
The process is repeated until all 6 slots are full. The audio system plays
the last CD loaded and the display is updated. If some slots are already
full and autoload is activated, the system will fill all empty slots.

Eject

Press the EJ control to stop and
eject a CD. You can choose which
CD will be ejected by pressing the
EJ control and the desired preset number (1–6). For example, to eject
CD 2, press the EJ control and then press the preset 2 control. If you do
not choose a specific CD, the player will eject the current CD.

If a CD is ejected and not removed from the door of the CD player, the
player will automatically reload the CD. This feature may be used when
the ignition is ON or OFF.

Auto eject

Press and momentarily hold the EJ
control to engage auto eject. All CDs
which are present in the player will
be ejected one at a time. If a CD is ejected and not removed from the
door of the CD player, the player will automatically reload the CD. This
feature may be used when the ignition is ON or OFF.

LOAD

EJ

EJ

Entertainment Systems

58

Rewind

The rewind control works in CD
modes.

Press and hold the REW control
until the desired selection is reached. If the beginning of the disc is
reached, the CD will begin play at the first track. Release the control to
disengage rewind mode.

When in rewind mode, your audio system will automatically lower the
volume level of the playing media.

Fast forward

The fast forward control works in
CD modes.

Press and hold the FF control until
the desired selection is reached. If the end of the disc is reached, the CD
will return to the first track. Release the control to disengage fast
forward mode.

When in fast forward mode, your audio system will automatically lower
the volume level of the playing media.

Shuffle feature

Press the SHUF control until the
desired shuffle mode is displayed.
The audio system will then engage
the desired shuffle mode.

When engaged, the shuffle feature has two different modes: SHUFFLE
DISC and SHUFFLE TRK.

SHUFFLE DISC randomly plays tracks from all the discs presently in the
audio system.

SHUFFLE TRK plays all the tracks on the current disc in random order.

Compression feature

The compression feature operates in CD mode and brings soft and loud
CD passages together for a more consistent listening level.

Press the COMP control until COMP
ON is displayed.

REW

FF

REW

FF

Entertainment Systems

59

Bass adjust

The bass adjust control allows you
to increase or decrease the audio
system’s bass output.

Press the BASS control. Use the
SEL control to increase or decrease
the amount of bass.

Treble adjust

The treble adjust control allows you
to increase or decrease the audio
system’s treble output.

Press the TREB control. Use the
SEL control to increase or decrease
the amount of treble.

Speaker balance adjust

Speaker sound distribution can be
adjusted between the right and left
speakers.

Press the BAL control. Use the SEL
control to adjust the sound between
the left and right speakers.

Speaker fade adjust

Speaker sound can be adjusted
between the front and rear
speakers.

Press the FADE control. Use the
SEL control to adjust the sound
between the front and rear speakers.

Menu mode

The MENU control allows you to
access many different features
within your audio system. There are
three sets of menus available
depending upon which mode or feature is activated.

SEL

BASS

TREB

+

SEL

BASS

TREB

+

BAL

FADE

SEL

+

BAL

FADE

SEL

+

Entertainment Systems

60

While in FM mode, two menus are available. If RDS is turned OFF, you
can access the following:
• SELECT HOURS — Refer to Setting the clock.
• SELECT MINUTES — Refer to Setting the clock.
• RDS OFF — Refer to Radio data system feature.
If RDS is turned ON, you can access the following:
• TRAFFIC ON/OFF-Refer to Traffic announcements.
• FIND type-Refer to Program type.
• SHOW (NAME, TYPE, NONE)- Refer to Radio data system feature.
• RDS ON— Refer to Radio data system feature.
• SELECT HOURS — Refer to Setting the clock.
• SELECT MINUTES —Refer to Setting the clock.
When in CD mode, you can access: SELECT HOURS, SELECT MINUTES
or COMP ON/OFF.

SELECT HOURS, SELECT MINUTES— Allows you to adjust the hours
and minutes. Refer to Setting the clock.

TRAFFIC ON/OFF— Traffic announcements can be programmed as local
or distant. Refer to Traffic announcements.

RDS ON/OFF— This feature allows your audio system to receive text
information from RDS-equipped FM radio stations. Refer to Radio Data
System feature.

FIND type — Allows you to select your desired FM program type and
search for that selection.

SHOW — Allows you to select from NAME (displays the name of the
radio station), TYPE (displays the RDS program type: rock, jazz, etc.), or
NONE (deactivates the RDS display).

Traffic announcements

This feature allows you to hear
traffic announcements. When in this
mode, traffic announcements will
interrupt radio and CD play.

When in FM mode and RDS is
activated, press the MENU until TRAFFIC OFF displays. Press the SEL
control to engage the feature. The display will read TRAFFIC ON.

SEL

+

MENU

Entertainment Systems

61

This feature also allows you to control the volume of traffic
announcements. With the display reading TRAFFIC ON, adjust the
volume using the volume control to the desired level. The volume level
will show at the bottom of the display. Interrupting traffic
announcements will be at the selected volume level.
To disengage the feature, press the MENU control until TRAFFIC ON
displays. Press the SEL control. The display will read TRAFFIC OFF.

RDS traffic seek feature

When in traffic mode, you can use the SEEK feature to seek up or down
the listenable traffic capable frequencies.
With the RDS activated, press MENU until TRAFFIC ON is displayed.
Press and hold the SEEK control until the desired selection is reached.
The feature disengages when the control is released.

RDS traffic scan feature

When in traffic mode, you can use the SCAN feature to scan up the
frequency band for listenable traffic capable frequencies.
With the RDS activated, press the MENU control until TRAFFIC ON is
displayed. Press the SCAN control. SCAN TRAFFIC will display. The
audio system will scan to all traffic capable frequencies. If no valid
stations are found after one pass, the scan function is cancelled and NOT
FOUND displays.
Traffic announcements are not available in most U.S. markets.

Radio data system (RDS) feature

This feature allows your audio
system to receive text information
from RDS-equipped FM radio
stations.

To activate RDS:
• When in FM mode, press the MENU control until RDS OFF displays.

• Press the SEL control to engage this feature (RDS ON).
RDS features:
Once the RDS feature is on, press the MENU control to scroll through
the following selections:

Traffic announcements

This feature allows you to hear traffic announcements while in CD mode.
These announcements are broadcast by traffic capable RDS stations.
When in this mode, traffic announcements will interrupt radio and CD
play.

SEL

+

MENU

Entertainment Systems

62

• Press the MENU control until TRAFFIC is displayed.
• Press the SEL control to engage the feature. The display will read

TRAFFIC ON.

This feature also allows you to control the volume of traffic
announcements. With the display reading TRAFFIC ON, adjust the
volume using the volume control to the desired level. The volume level
will show at the bottom of the display. Interrupting traffic
announcements will be at the selected volume level.

To disengage the feature, press the MENU control until TRAFFIC ON
displays. Press the SEL control. The display will read TRAFFIC OFF.

Traffic announcements are not available in most U.S. markets.

Program type

This feature allows you to search for RDS stations selectively by their
program type.

Press the MENU control until FIND
program type is displayed.

Use the SEL control to select the
program type. With the feature on,
use the SEEK or SCAN control to
find the desired program type from the following selections:
• Classic
• Country
• Info
• Jazz
• Oldies
• R & B
• Religious
• Rock
• Soft
• Top 40

SEL

+

MENU

Entertainment Systems

63

Show

This feature allows you to select the
type of RDS broadcast information
the radio will regularly show in the
display.

With RDS activated, press the
MENU control until SHOW is
displayed.

Use the SEL control to select TYPE
(displays the RDS program type:
rock, jazz, etc), NAME (displays the name of the radio station) or NONE
(deactivates the RDS display).

Mute mode

Press the control to mute the
playing media. Press the control
again to return to the playing media.

Setting the clock

Press the MENU control until
SELECT HOUR or SELECT
MINUTE is displayed. (The menu
mode must be engaged to enable
clock mode).

Use the SEL control to manually set
the time.
• Press

to increase

hours/minutes.

• Press

to decrease

hours/minutes.

Press the MENU control again to disengage the clock mode.

CLEANING COMPACT DISCS

Inspect all discs for contamination before playing. If necessary, clean
discs only with an approved CD cleaner and wipe from the center out to
the edge. Do not use circular motion.

SEL

+

MENU

SEL

+

MENU

SEL

Entertainment Systems

64

MP3 DISC QUALITY FACTORS

The MACH

t MP3 music system is designed for use with CD-DA (regular

audio discs), CD-R and CD-RW discs. Discs must comply with ISO 9660
and Joliet standards.

Several factors can effect disc playback quality:
• Disc capacity — Each disc contains about 650 MB of storage capacity.

We do not recommend using high capacity discs containing 700MB of
storage.

• Disc type — Some CD-RW discs may operate inconsistently and may

cause an error message to appear. We recommend burning MP3 files
onto CD-R discs.

• Disc finalization — The disc may be left open for the purpose of

adding sessions to it at a later time, but be sure to close each session
or the disc will not play.

• Bit rate — The player supports bit rates from 56–320 kbps, as well as

variable bit rate MP3 files, but lower bit rates will have a noticeable
effect on sound quality and are recommended only for speech or low
fidelity music material. We recommend that you encode MP3 files
using a high quality encoder.

• PC configuration — Encoding MP3 files requires intensive use of your

computer’s resources. Follow the PC configuration recommendations
of the encoder software vendor. We recommend that you avoid
running other software applications on your PC during MP3 encoding
to avoid undesirable noise and distortion.

CD, MP3 AND CD PLAYER CARE

• Handle discs by their edges only. Never touch the playing surface.
• Do not expose discs to direct sunlight or heat sources for extended

periods of time.

• Do not insert more than one disc into the slot of the CD player (if

equipped).

• Always store discs out of direct sunlight. Excessive heat may damage

or warp discs.

• Use care when handling and playing CD-R and CD-RW discs, which

are more susceptible to damage from heat, light and stress than are
regular CDs.

• Always insert and remove a disc by holding the disc flat, with the

playing surface facing down, in order to prevent damage to the disc or
the player.

Entertainment Systems

65

• Never insert any object other than a compact disc into the player, as

doing so may damage the player and may cause injury to you.

• Do not disassemble the player. The laser used in disc playback is

extremely harmful to the eyes.

CD units are designed to play commercially pressed 12 cm (4.75
in) audio compact discs only. Due to technical incompatibility,
certain recordable and re-recordable compact discs may not
function correctly when used in Mazda CD players. Irregular
shaped CDs, CDs with a scratch protection film attached, and CDs
with homemade paper (adhesive) labels should not be inserted
into the CD player. The label may peel and cause the CD to
become jammed. It is recommended that homemade CDs be
identified with permanent felt tip marker rather than adhesive
labels. Ball point pens may damage CDs. Please contact your
dealer for further information.

CLEANING CASSETTE PLAYER (IF EQUIPPED)

Clean the tape player head with a cassette cleaning cartridge after 10 to
12 hours of play in order to maintain the best sound and operation.

CASSETTE AND CASSETTE PLAYER CARE

• Use only cassettes that are 90 minutes long or less.
• Do not expose tapes to direct sunlight, high humidity, extreme heat or

extreme cold. Allow tapes that may have been exposed to extreme
temperatures to reach a moderate temperature before playing.

• Tighten very loose tapes by inserting a finger or pencil into the hole

and turning the hub.

• Remove loose labels before inserting tapes.
• Do not leave tapes in the cassette player for a long time when not

being played.

RADIO FREQUENCY INFORMATION

The Federal Communications Commission (FCC) and the Canadian Radio
and Telecommunications Commission(CRTC) establish the frequencies
AM and FM stations may use for their broadcasts. Allowable frequencies
are:

AM 530, 540–1600, 1610 kHz

FM 87.7, 87.9–107.7, 107.9 MHz

Not all frequencies are used in a given area.

Entertainment Systems

66

RADIO RECEPTION FACTORS

Three factors can affect radio reception:
• Distance/strength. The further an FM signal travels, the weaker it is.

The listenable range of the average FM station is approximately 40 km
(24 miles). This range can be affected by “signal modulation.” Signal
modulation is a process radio stations use to increase their
strength/volume relative to other stations.

• Terrain. Hills, mountains and tall buildings between your vehicle’s

antenna and the radio station signal can cause FM reception problems.
Static can be caused on AM stations by power lines, electric fences,
traffic lights and thunderstorms. Moving away from an interfering
structure (out of its “shadow”) returns your reception to normal.

• Station overload. Weak signals are sometimes captured by stronger

signals when you pass a broadcast tower. A stronger signal may
temporarily overtake a weaker signal and play while the weak station
frequency is displayed.

The audio system automatically switches to single channel reception if it
will improve the reception of a station normally received in stereo.

AUDIO SYSTEM WARRANTIES AND SERVICE

Refer to the Warranty Guide for audio system warranty information.

If service is necessary, see your authorized Mazda dealership.

Entertainment Systems

67


Content   ..  2  3  4  5   ..