Lexus NX450H+ (2022 year). Manual in english - page 4
 

  Index      Manuals     Lexus NX450H+ (2022 year). Manual in english


Search            copyright infringement  


Content      ..     2      3      4      5     ..


Lexus NX450H+ (2022 year). Manual in english - page 4


2

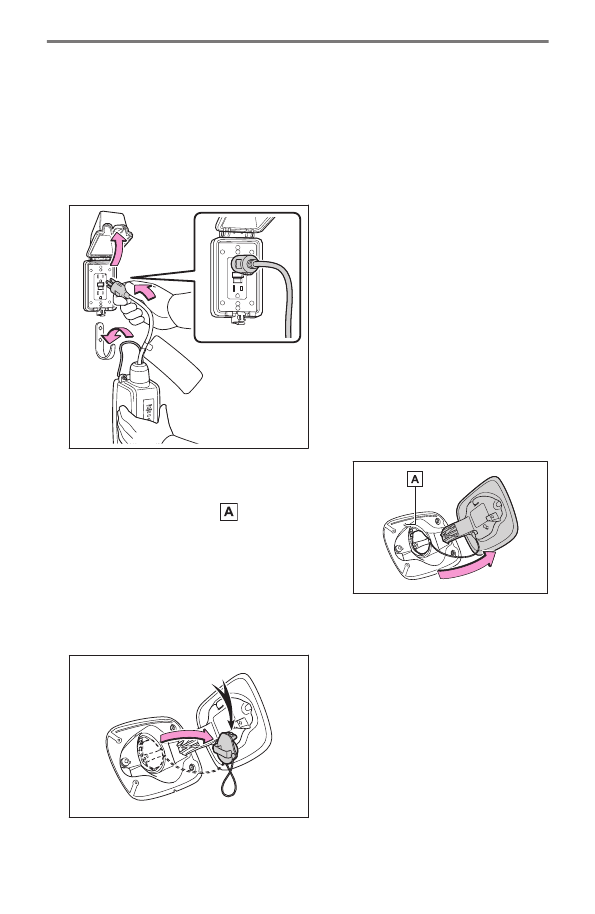
Insert the AC charging cable into the outlet of the external power source.

Make sure to hold the body of the plug and insert it firmly into the outlet.
Check that the power indicator on the CCID (Charging Circuit Interrupting Device) is
illuminated.
In order to reduce the load on the electrical socket and plug, when inserting the plug,
use a string, etc., to hang the CCID (Charging Circuit Interrupting Device) on a hook
or equivalent.

3

Unlock the doors and push the charging port
lid to open it.

The AC charging inlet light 

 will illuminate.

4

Remove the AC charging inlet cap and secure it into the holder on the
charging port lid.

5

Remove the AC charging connector cap and secure it to the cable.

1-3. Charging with the plug-in hybrid system

72

6

Insert the charging connector into the AC charging inlet.

Align the guide position on the bottom of the charging connector, and push the
charging connector straight into the AC charging inlet as far as possible.
Once a click sound is heard, check that the charging connector is securely locked.
When the charging connector is inserted straight as far as possible, it will automatically
lock.

7

Confirm that the charging indicator of the charging port is illuminated.

Charging will not start if the charging indicator does not illuminate when the charging
connector is inserted.
If the charging indicator is flashing, the charging schedule is registered.
The charging indicator will turn off when charging is completed.
The charging indicator will also turn off when charging is interrupted.

1-3. Charging with the plug-in hybrid system

73

1

Befor

e driving

INFORMATION

If the charging indicator of the charging port flashes after connecting the AC
charging cable

The charging schedule is registered and charging cannot be performed. To cancel
charging using the charging schedule and start charging, perform any of the follow-
ing procedures.

Turn [Charge now] ON

While the charging indicator is flashing, remove and reconnect the charging
connector within 5 seconds

While charging

When the power switch is turned to ON and the energy monitor is displayed on the
center display, the AC charging connector is displayed on the energy monitor and
the flow of electricity during charging is displayed.

Handling the charging cable after charging has completed

1

Unlock the doors to unlock the charging connector.

The charging connector will be unlocked and the AC charging inlet light will illuminate
when the doors are unlocked.

2

Pull the charging connector towards you while pressing the latch release
button.

If the latch release button is pressed during charging (while the charging indicator is
illuminated), charging will be interrupted.

1-3. Charging with the plug-in hybrid system

74

INFORMATION

When removing the charging connector

Press the latch release button, check that the lever raises up, and then pull the
charging connector towards you.
If the lever does not raise up even after the latch release button is pressed, the
charging connector is locked. If this occurs, unlock the doors using the smart access
system with push-button start or wireless remote control to unlock the charging
connector.

3

Attach the charging connector cap.

4

Attach the AC charging inlet cap and close the charging port lid.

Lock the doors to lock the charging port lid.

1-3. Charging with the plug-in hybrid system

75

1

Befor

e driving

5

Remove the plug from the outlet when the charging equipment will not be used
for a prolonged period of time.

Hold the body of the plug when removing.
Make sure to put the cable away immediately after disconnecting.
When leaving the plug inserted, inspect the plug and connector once a month to check
if dirt or dust has accumulated.

WARNING

Remove the plug if it will not be used for a long time. Dirt and dust may accumulate
plug or outlet, which could cause a malfunction or fire, possibly leading to death or
serious injury.

NOTICE

Store the AC charging cable out of reach from infants and children.

After disconnecting the charging connector from the AC charging inlet, make
sure to put on the AC charging inlet cap and close the charging port lid. If the
AC charging inlet cap is not put on, water or foreign objects may enter the AC
charging inlet, which could lead to vehicle damage.

After removing the plug from the outlet, keep it in a safe place free from moisture
and dust. The AC charging cable or plug may be damaged if the cable is stepped
on or ridden over by the vehicle.

1-3. Charging with the plug-in hybrid system

76

Useful plug-in hybrid system charging functions

Charging schedule function and operation

Charging can be carried out at the desired time by registering the charging
schedule on the center display

*1

. Also, it is possible to set the charging schedule to

one’s preferences, such as having charging complete by a certain departure time
or be carried out at the same time on certain days.
When registering the charging schedule, the following settings can be changed.

Select the charging mode

Charging modes can be selected.

[Start at set time]
Starts charging at the set time

*2*3

 and finishes charging when fully charged.

[Departure time]
Starts charging to finish at the set time.

*4*5

[Repeat] setting

The periodic charging schedule can be set by selecting your desired day of the
week.

If no days are selected, charging is only carried out once.

Turning [Charge now] on and off

If even one charging schedule is registered, charging does not start until the
set time, even if the AC charging cable is connected to the vehicle. To start
charging without changing the charging schedule setting, turn [Charge now] on

*1 : 

For details on how to operate the center display screen, refer to "MULTIMEDIA

OWNER'S MANUAL".

*2 : 

There might be a slight error in the timing when charging starts due to the state of the

hybrid battery (traction battery).

*3 : 

Charging schedule function is performed in accordance with the clock in the multi-in-

formation display. Before registering the charging schedule, check the clock settings

to the proper time.
Before registering a charging time to the charge schedule, make sure that [Set time

automatically] on the center display is turned on.

*4 : 

When the system determines that there is no time to finish charging by the set

scheduled departure time, it starts charging. Check the charging schedules.

*5 : 

If sudden changes in temperature or changes in the condition of the power source

occur while charging, charging may not end exactly at the time estimated by the

system.

1-3. Charging with the plug-in hybrid system

77

1

Befor

e driving

to temporarily cancel the charging schedule and enable charging after connecting
the AC charging cable.

*6*7

WARNING

When performing the setting operation while the hybrid system is operated, ensure that
the vehicle is parked in a place with adequate ventilation. In a closed area such as a
garage, exhaust gases including harmful carbon monoxide (CO) may collect and enter
the vehicle. This may lead to a serious health hazard.

NOTICE

To prevent 12-volt battery discharge, ensure that the hybrid system is operating while
setting up the display features.

INFORMATION

Calendar settings

The current date and time is automatically set using GPS. However, if the automatic
setting of the clock is turned off on the center display, it will be necessary to manually set
the date and time. For details, refer to the "MULTIMEDIA OWNER'S MANUAL".
If the calendar settings check screen is displayed when an attempt was made to register a
charge schedule, check that the correct date is set. If it is incorrect, be sure to correct it.
If the calendar information is wrong, the charging schedule function will not operate
normally.

Charging schedule

The charging schedule cannot be set while driving.

A maximum of 15 charging schedules can be registered.

To make sure that the charging schedule function operates correctly

Check the following items.

Adjust the clock to the correct time

*8

The calendar is set to the correct date

*8

Check that the power switch is turned off

After registering the charging schedule, connect the AC charging cable

*6 : 

[Charge now] can also be turned on/off on the multi-information display.

*7 : 

If the charging connector is disconnected when the charging schedule is set and

[Charge now] is on, [Charge now] will turn off.

*8 : 

For the setting procedure for the clock and calendar, refer to the "MULTIMEDIA

OWNER'S MANUAL".

1-3. Charging with the plug-in hybrid system

78

The charging start time is determined based on the charging schedule at the time that
the AC charging cable was connected.

After connecting the AC charging cable, check that the charging indicator of the
charging port flashes

Do not use an socket that has a power cut off function (including a timer function)
Use an socket that constantly supplies electricity. For sockets where the power is cut
off due to a timer function, etc., charging may not be carried out according to plan if
the power is cut off during the set time.

When the AC charging cable remains connected to the vehicle

Even if multiple consecutive charging schedules are registered, the next charge will
not be carried out according to the charging schedule until the AC charging cable
is removed and reconnected after charging completes. Also, when the hybrid battery
(traction battery) is fully charged, charging according to the charging schedule will not be
carried out.

Smartphone link

It may be necessary to use a smartphone with a dedicated app to change the next
charging schedule.

When charging schedule setting operations are canceled

When the vehicle is in the following conditions, charging schedule setting operations are
canceled.

The power switch is turned off before the settings are confirmed

The vehicle starts off

A display with a higher priority than that of the charging schedule setting is shown

When charging schedules are ignored

When the following operations are performed while the charging schedule is on standby,
charging schedule is temporarily canceled and charging is started.

When turning My Room Mode on

When turning [Charge now] on

When an operation that temporarily cancel charging using the charging schedule

Effects of outside temperature

When the charging mode is set to[Departure time], charging schedule may be ignored
due to the outside temperature and charging may start.

Traction battery heater/Traction battery cooler

When charging is carried out using the charging schedule, the hybrid battery (traction
battery) heating or cooling function may operate according to the temperature of the
hybrid battery (traction battery).

1-3. Charging with the plug-in hybrid system

79

1

Befor

e driving

When the charging mode is set to [Start at set time], the function starts at the set
charging start time.

Traction battery heater: When the charging mode is set to [Departure time], the
function starts automatically to complete heating by the desired departure time.

Traction battery cooler: When the charging mode is set to [Departure time], cooling
starts approximately 30 minutes before the charging start time. However, if there is no
time to finish charging by the charging schedule, the hybrid battery (traction battery)
cooling time may be shortened and traction battery cooler may not operate.

Displaying the charging schedule screen on the center display

Setting operations related to the charging schedule are performed on the charging
schedule screen.

1

With the power switch in ON, select 

 on the center display.

*9

2

Select [Charging schedule].

The charging schedule screen will be displayed.

How to read the charging schedule screen on the center display

A

Charging schedules

Displays the week-long registered charging schedule in a list using icons.

B

[Add] switch

Select to add a new item to the charging schedule.

*9 : 

Charging schedule settings cannot be changed when the power switch is in ACC.

1-3. Charging with the plug-in hybrid system

80

C

[Edit] switch

Select to change or delete registered items on the charging schedule.

D

[Charge now] switch

Select to [Charge now] to on.

The following content is displayed on the calendar.

Display

Content

Gray line

*10

Current time

Green icon The charging mode is set to [Departure time].

Blue icon

The charging mode is set to [Start at set time].

It may be necessary to use a smartphone with a dedicated app to change the next
charging schedule.
When [Charge now] is on, the icon will move to the position of the gray line.

Registering the charging schedule on the center display

1

Display the charging schedule screen.

2

Select [Add].

The edit charging event screen will be displayed on the screen.

3

Change the schedule to the desired time.

▶ 

Charging mode

Select [Start at set time] or [Departure time] to set the desired charging mode.
When [Start at set time] is selected:
Set the time to start charging (start time) and then select [OK].
[Departure time] is selected:
Set the time which you would like charging to end (departure time) and then select
[OK].

*10 : 

A row with a ash line indicates the current time.

1-3. Charging with the plug-in hybrid system

81

1

Befor

e driving

▶ 

[Repeat] setting

Charging will be repeated for the set day(s) on the charging schedule. It is possible to
turn more than one day on.
If no days are selected, charging is only carried out once according to the charging
schedule for the next 24 hours.

4

After setting operations are complete, select [Save].

The charging schedule is registered and an icon is added to the calendar.

To cancel registration of the charging schedule, select 

 .

After setting operations are complete, when the power switch is turned off and the AC
charging cable is connected to the vehicle, charging is carried out according to the
charging schedule settings.

INFORMATION

When a charging schedule has been registered

When all the items in the charging schedule are turned off, icons are not displayed
on the charging schedule screen. The icons will be displayed when they are set to on
using the scheduled events screen.

Switching charging schedules between on and off on the center display

1

Display the charging schedule screen.

2

Select [Edit].

The scheduled events screen will be displayed on the screen.

3

From the items displayed on the screen, select 

 or 

 in the row

of the charging schedule you wish to change.

If the charging schedule you wish to change is not displayed on the screen, scroll the list
up and down to display it.
Each time the switch is selected, Charging Schedule will turn on/off.

1-3. Charging with the plug-in hybrid system

82

Changing the registered charging schedules on the center display

1

Display the charging schedule screen.

2

Select [Edit].

The scheduled events screen will be displayed on the screen.

3

Select [Edit].

4

From the items displayed on the screen, select the charging schedule you wish
to change.

5

Set the desired time/day.

When changing the [Start at set time] of the charging schedule:
Set the time (start time)/day to start charging and then select [OK].
When changing the [Departure time] of the charging schedule:
Set the time which you would like charging to end (departure time) and then select
[OK].
[Repeat]setting:
Charging will be repeated for the set day(s) on the charging schedule. It is possible to
turn more than one day on.
If no days are selected, charging is only carried out once according to the charging
schedule for the next 24 hours.

6

After setting operations are complete, select [Save].

When a setting is changed, its icon on the calendar also changes.

To cancel changes made to the charging schedule, select 

 .

After setting operations are complete, when the power switch is turned off and the AC
charging cable is connected to the vehicle, charging is carried out according to the
charging schedule settings.

Deleting a registered charging schedule on the center display

1

Display the charging schedule screen.

2

Select [Edit].

1-3. Charging with the plug-in hybrid system

83

1

Befor

e driving

The scheduled events screen will be displayed on the screen.

3

Select [Edit].

4

From the items displayed on the screen, select the charging schedule you wish
to delete.

5

Select [Delete].

A deletion confirmation message will be displayed.

6

Select [Delete] to delete the selected charging schedule.

To cancel deletion, select [Cancel].
When a charging schedule is deleted, its icon is also deleted from the calendar.

Displaying the [Next charging event] on the center display

Turn the power switch off.

According to the set charging schedule, the [Next charging event] will be displayed.

When [OK] is selected: The next scheduled charging screen will be closed.
When [Charge now] is selected: [Charge now] will be turned on.

INFORMATION

[Next charging event]

After charging completes, the [Next charging event] on the display will not change
until the AC charging cable is removed, after charging is performed according to the
[Next charging event].

1-3. Charging with the plug-in hybrid system

84

Turning on [Charge now] on the center display

1

Display the charging schedule screen.

2

Select 

 of [Charge now].

Each time the switch is selected, [Charge now] will turn on/off.
After setting operations are complete, charging starts when the AC charging cable is
connected.

Turning on [Charge now] on the multi-information display

1

Turn the power switch off.

The closing display screen is displayed on the multi-information display.

2

Vehicles without a head-up display: Press 

 of the meter control switch.

*11

Ve-

hicles with a head-up display: Press the steering wheel switch at the position
where [YES] is displayed on the multi-information display.

After setting operations are complete, charging starts when the AC charging cable is
connected.

INFORMATION

When the power switch is turned off

When the power switch is turned off, the charging schedule (next scheduled charg-
ing) will be displayed on the closing display and the registered details can be
checked.

*12

*11 : 

Each time 

 is pressed, [Charge now] will turn on/off.

*12 : 

The closing display screen may not be displayed during charging.

1-3. Charging with the plug-in hybrid system

85

1

Befor

e driving

My Room Mode mode function and operation

When the AC charging cable is connected to the vehicle, electrical components
such as the air conditioning system or audio system can be used using the external
power source.

INFORMATION

While using My Room Mode

Any of the following may occur.

When the remaining charge of the hybrid battery (traction battery) reaches the lower
limit, the air conditioning system automatically turns off.
In this situation, the air conditioning system cannot be used until the remaining charge
of the hybrid battery (traction battery) increases. Turn the power switch off and use
My Room Mode after the remaining charge of the hybrid battery (traction battery) is
restored.

When the outside temperature is low, the heater output may be limited due to the air
conditioning system operation being restricted.

Warning lights and indicators such as electric power steering system warning light
(yellow) and malfunction indicator lamp may turn on, but this is not a malfunction.

When a charging schedule is registered

When My Room Mode starts while the charging schedule is on standby, charging
schedules are ignored and charging starts.

Meter display during charging

If My Room Mode is not turned on for approximately 100 seconds after the power switch
is turned on during charging, the power switch will automatically turn off.

Starting My Room Mode

WARNING

When using My Room Mode, make sure to observe the following precautions.

Do not leave children, people who need assistance, or pets inside the vehicle.
The system may turn off automatically and the interior temperature may become
high or low, resulting in heat stroke, dehydration or hypothermia. Devices such as the
wipers can also be used, which may lead to mistaken operation and an accident.

Check the safety around the vehicle carefully before use.

1

Connect the AC charging cable to the vehicle and start charging.

2

Turn the power switch on during charging.

The setting screen of My Room Mode is displayed automatically on the center display.

1-3. Charging with the plug-in hybrid system

86

3

Select [Yes].

My Room Mode starts and systems such as the air conditioning system and audio
system can be used inside the vehicle.
When not using My Room Mode, select [No].

To stop My Room Mode, turn the power switch off.

1-3. Charging with the plug-in hybrid system

87

1

Befor

e driving


Content      ..     2      3      4      5     ..