Lexus UX250h (2023 year). Manual in english - page 8
 

  Index      Manuals     Lexus UX250h (2023 year). Manual in english


Search            copyright infringement  


Content      ..     6      7      8      9     ..


Lexus UX250h (2023 year). Manual in english - page 8


138

3-3. Adjusting the seats

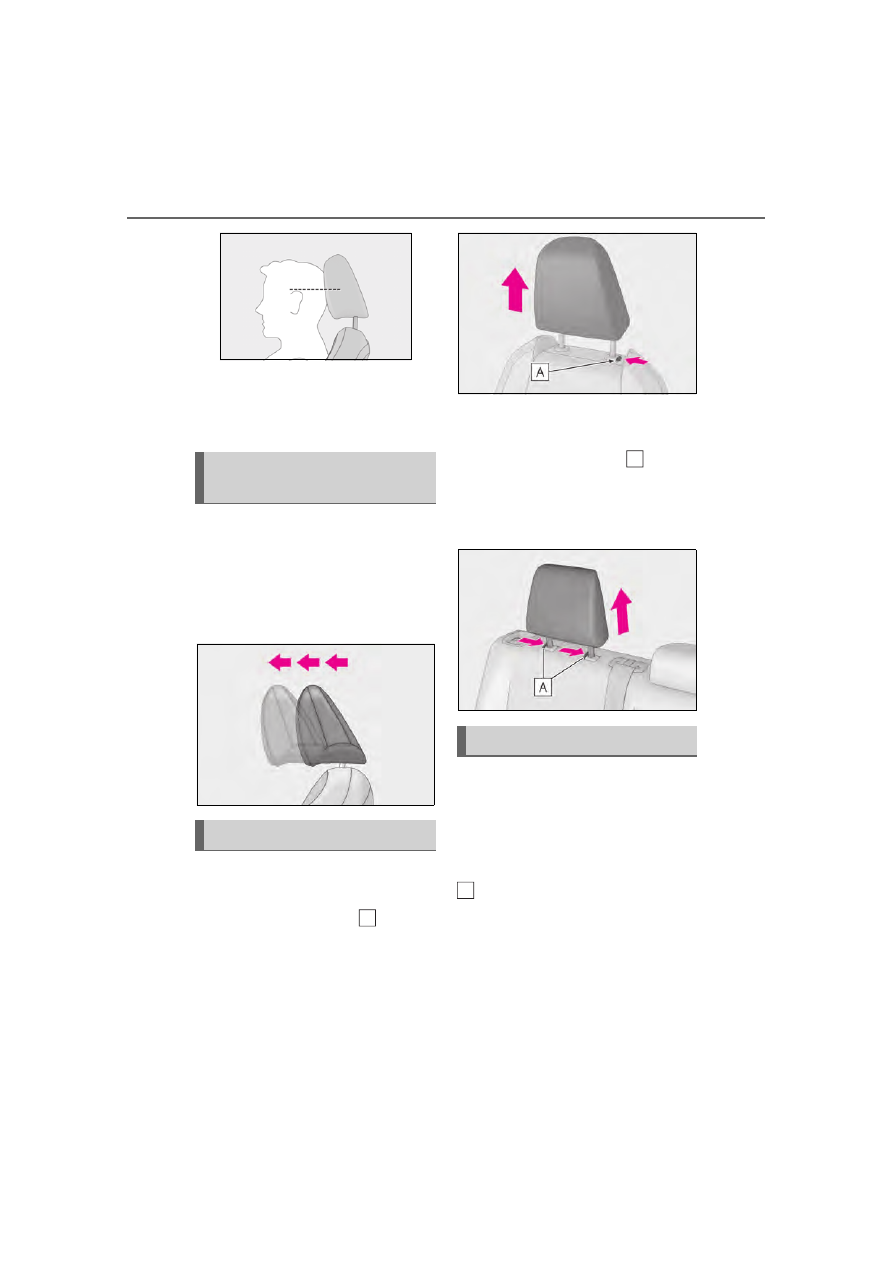
Adjusting the center rear seat head 

restraint

Always raise the head restraint one level 

from the stowed position when using.

The position of the head restraint for 
the front seat can be adjusted forward 
in 4 stages.

If the head restraint is pulled forward from 
the foremost position, it will return to the 
rearmost position.

Front and center rear seats

Pull the head restraint up while press-
ing the lock release button 

.

If the head restraint touches the ceiling, 
making the removal difficult, change 
the seat height or angle. (

P.131)

Outboard rear seats

Pull the head restraint up while press-
ing the lock release buttons 

.

If the head restraint touches the ceiling, 
making the removal difficult, change 
the seat angle. (

P.132)

Front and center rear seats

Align the head restraint with the instal-
lation holes and push it down to the 
lock position.
Press and hold the lock release button 

 when lowering the head restraint.

Horizontal adjustment (if 
equipped)

Removing the head restraints

A

Installing the head restraints

A

A

139

3-3. Adjusting the seats

3

Before drivi

ng

Outboard rear seats

Align the head restraint with the instal-
lation holes and push it down to the 
lowest lock position.

140

3-4. Adjusting the steering wheel and mirrors

3-4.Adjusting the steering wheel and mirrors

Manual type

1

Hold the steering wheel and push 
the lever down.

2

Adjust to the ideal position by mov-
ing the steering wheel horizontally 
and vertically.

After adjustment, pull the lever up to 

secure the steering wheel.

Power type

Operating the switch moves the steer-
ing wheel in the following directions:

1

Up

2

Down

3

Toward the driver

4

Away from the driver

The steering wheel can be adjusted 

when (power type)

The power switch is in ACC or ON

*

.

*

: If the driver’s seat belt is fastened, the 

steering wheel can be adjusted regard-
less of power switch mode.

Automatic adjustment of the steering 

position (if equipped)

A desired steering position can be entered 

to memory and recalled automatically by 

the driving position memory system. 

(

P.134)

Power easy access system (if equipped)

The steering wheel and driver’s seat move 

in accordance with power switch mode and 

the driver’s seat belt condition. (

P.133)

After adjusting the steering wheel 

(manual type)

Make sure that the steering wheel is 

securely locked.
The horn may not sound if the steering 

wheel is not securely locked.

Customization

The steering wheel movement can be 

changed. (Customizable features: 

P.431)

Steering wheel

Adjustment procedure

141

3-4. Adjusting the steering wheel and mirrors

3

Before drivi

ng

Press on or close to the 

 mark.

The height of the rear view mirror can 
be adjusted to suit your driving pos-
ture.
Adjust the height of the rear view mir-
ror by moving it up and down.

Manual anti-glare inside rear view 
mirror

Reflected light from the headlights of 
vehicles behind can be reduced by 
operating the lever.

WARNING

Caution while driving

Do not adjust the steering wheel while 

driving.

Doing so may cause the driver to mis-

handle the vehicle and cause an acci-

dent, resulting in death or serious injury.

After adjusting the steering wheel 

(manual type)

Make sure that the steering wheel is 

securely locked.
Otherwise, the steering wheel may move 

suddenly, possibly causing an accident, 

and resulting in death or serious injury.

Sounding the horn

Inside rear view mirror

The rear view mirror’s position can 
be adjusted to enable sufficient 
confirmation of the rear view.

Adjusting the height of rear view 
mirror

WARNING

Caution while driving

Do not adjust the position of the mirror 

while driving.

Doing so may lead to mishandling of the 

vehicle and cause an accident, resulting 

in death or serious injury.

Anti-glare function

142

3-4. Adjusting the steering wheel and mirrors

Normal position

Anti-glare position

Auto anti-glare inside rear view mir-
ror

Responding to the level of brightness 
of the headlights of vehicles behind, the 
reflected light is automatically 
reduced.
Turn the automatic anti-glare function 
mode on/off

When the automatic anti-glare function is 
in ON mode, the indicator 

 illuminates. 

The function will set to ON mode each 
time the power switch is turned to ON.
Pressing the button turns the function to 
OFF mode. (The indicator 

 also turns 

off.)

To prevent sensor error (vehicles with 

auto anti-glare inside rear view mirror)

To ensure that the sensors operate prop-

erly, do not touch or cover them.

A
B

A

A

143

3-4. Adjusting the steering wheel and mirrors

3

Before drivi

ng

1

To select a mirror to adjust, press 
the switch.

Left

Right

2

To adjust the mirror, press the 
switch.

Up

Left

Down

Right

Mirror angle can be adjusted when

The power switch is in ACC or ON.

Defogging the mirrors

The outside rear view mirrors can be 

cleared using the mirror defoggers. Turn on 

the rear window defogger to turn on the 

outside rear view mirror defoggers. 

(

P.276)

Auto anti-glare function (if equipped)

When the anti-glare inside rear view mirror 

is set to automatic mode, the driver’s side 

outside rear view mirror will activate in con-

junction with the anti-glare inside rear view 

mirror to reduce reflected light. (

P.141)

Automatic adjustment of the mirror 

angle (vehicles with driving position 

memory)

A desired mirror face angle can be entered 

to memory and recalled automatically by 

the driving position memory. (

P.133)

Outside rear view mirrors

The rear view mirror’s position can 
be adjusted to enable sufficient 
confirmation of the rear view.

WARNING

Important points while driving

Observe the following precautions while 

driving.

Failing to do so may result in loss of con-

trol of the vehicle and cause an accident, 

resulting in death or serious injury.

Do not adjust the mirrors while driving.

Do not drive with the mirrors folded.

Both the driver and passenger side 

mirrors must be extended and prop-

erly adjusted before driving.

Adjustment procedure

A
B

A
B
C
D

144

3-4. Adjusting the steering wheel and mirrors

Manual type

Push the mirror back in the direction of the 
vehicle’s rear.

Power type

1

Fold

2

Extend

Putting the outside rear view mirror folding 
switch in the neutral position sets the mir-
rors to automatic mode. Automatic mode 
allows the folding or extending of the mir-
rors to be linked to locking/unlocking of 
the doors.

Using automatic mode in cold weather 

(power type)

When automatic mode is used in cold 

weather, the door mirror could freeze up 

and automatic stowing and return may not 

be possible. In this event, after removing 

any ice and snow from the door mirror, 

operate the mirror using manual mode or 

move it by hand.

Customization

The automatic mirror folding and extending 

operation can be changed. (Customizable 

features: 

P.431)

When the mirror select switch is in the 
“L” or “R” position, the outside rear 
view mirrors will automatically angle 
downwards when the vehicle is revers-
ing in order to give a better view of the 
ground. 
To disable this function, move the mir-
ror select switch to the neutral position 
(between “L” and “R”)

Adjusting the mirror angle when 
the vehicle is reversing

With the shift lever in R, adjust the mir-
ror angle at a desired position.
The adjusted angle will be memorized 
and the mirror will automatically tilt to 
the memorized angle whenever the 
shift lever is shifted to R from next time.

WARNING

When the mirror defoggers are oper-

ating

Do not touch the rear view mirror sur-

faces, as they can become very hot and 

burn you.

Folding and extending the mir-
rors

WARNING

When a mirror is moving

To avoid personal injury and mirror mal-

function, be careful not to get your hand 

caught by the moving mirror.

Linked mirror function when 
reversing (vehicles with driving 
position memory)

145

3-4. Adjusting the steering wheel and mirrors

3

Before drivi

ng

The memorized downward tilt position of 
the mirror is linked to the normal position 
(angle adjusted with the shift lever in other 
than R). Therefore, if the normal position is 
changed after adjustment, the tilt position 
will also change.
When the normal position is changed, 
readjust the angle in reversing.

146

3-5. Opening, closing the windows and moon roof

3-5.Opening, closing the windows and moon roof

The power windows can be opened 
and closed using the switches.

1

Closing

2

One-touch closing

*

3

Opening

4

One-touch opening

*

*

: To stop the window partway, operate 

the switch in the opposite direction.

The power windows can be operated 

when

The power switch is in ON.

Operating the power windows after 

turning the hybrid system off

The power windows can be operated for 

approximately 45 seconds even after the 

power switch is turned to ACC or OFF. 

They cannot, however, be operated once 

either front door is opened.

Jam protection function

If an object becomes jammed between the 

window and the window frame while the 

window is closing, window movement is 

stopped and the window is opened slightly.

Catch protection function

If an object becomes caught between the 

door and window while the window is open-

ing, window movement is stopped.

When the window cannot be opened or 

closed

When the jam protection function or catch 

protection function operates unusually and 

the side window cannot be opened or 

closed, perform the following operations 

with the power window switch of that door.

Stop the vehicle. With the power switch 

in ON, within 4 seconds of the jam pro-

tection function or catch protection func-

tion activating, continuously operate the 

power window switch in the one-touch 

closing direction or one-touch opening 

direction so that the side window can be 

opened and closed.

If the side window cannot be opened and 

closed even when performing the above 

operations, perform the following proce-

dure for function initialization.

1

Turn the power switch to ON.

2

Pull and hold the power window switch 

in the one-touch closing direction and 

completely close the side window.

3

Release the power window switch for a 

moment, resume pulling the switch in 

the one-touch closing direction, and 

hold it there for approximately 6 sec-

onds or more.

4

Press and hold the power window 

switch in the one-touch opening direc-

tion. After the side window is com-

pletely opened, continue holding the 

switch for an additional 1 second or 

more.

5

Release the power window switch for a 

moment, resume pushing the switch in 

the one-touch opening direction, and 

hold it there for approximately 4 sec-

onds or more.

6

Pull and hold the power window switch 

in the one-touch closing direction 

again. After the side window is com-

pletely closed, continue holding the 

switch for a further 1 second or more.

If you release the switch while the window is 

moving, start again from the beginning.

If the window reverses and cannot be fully 

closed or opened, have the vehicle 

inspected by your Lexus dealer.

Power windows

Opening and closing the power 
windows

147

3-5. Opening, closing the windows and moon roof

3

Before drivi

ng

Door lock linked window operation

The power windows can be opened and 
closed using the mechanical key.

*


(

P.396)

The power windows can be opened using 
the wireless remote control.

*

 (

P.110)

*

: These settings must be customized at 

your Lexus dealer.

Power windows open warning buzzer

The buzzer sounds and “Window Open” is 

shown on the multi-information display in 

the instrument cluster when the power 

switch is turned off and the driver’s door is 

opened with the power windows open.

Customization

Setting (e.g. linked door lock operation) 

can be changed.

(Customizable features: 

P.431)

This function is designed to prevent 
children from accidentally opening or 
closing a passenger window.
Press the switch.

WARNING

Observe the following precautions.

Failing to do so may result in death or 

serious injury.

Closing the windows

The driver is responsible for all the 

power window operations, including 

the operation for the passengers. In 

order to prevent accidental operation, 

especially by a child, do not let a child 

operate the power windows. It is possi-

ble for children and other passengers 

to have body parts caught in the power 

window. Also, when riding with a child, 

it is recommended to use the window 

lock switch. (

P.147)

Check to make sure that all passen-

gers do not have any part of their body 

in a position where it could be caught 

when a window is being operated.

When using the wireless remote con-

trol or mechanical key and operating 

the power windows, operate the 

power window after checking to make 

sure that there is no possibility of any 

passenger having any of their body 

parts caught in the window. Also do 

not let a child operate window by the 

wireless remote control or mechanical 

key. It is possible for children and other 

passengers to get caught in the power 

window.

When exiting the vehicle, turn the 

power switch off, carry the key and exit 

the vehicle along with the child. There 

may be accidental operation, due to 

mischief, etc., that may possibly lead to 

an accident.

Jam protection function

Never use any part of your body to 

intentionally activate the jam protec-

tion function.

The jam protection function may not 

work if something gets jammed just 

before the window is fully closed. Be 

careful not to get any part of your body 

jammed in the window.

Catch protection function

Never use any part of your body or 

clothing to intentionally activate the 

catch protection function.

The catch protection function may not 

work if something gets caught just 

before the window is fully opened. Be 

careful not to get any part of your body 

or clothing caught in the window.

Preventing accidental opera-
tion (window lock switch)

148

3-5. Opening, closing the windows and moon roof

The indicator 

 will come on and the 

passenger window will be locked.

The power windows can be operated 

when

The power switch is in ON.

When the 12-volt battery is discon-

nected

The window lock switch is disabled. If nec-

essary, press the window lock switch after 

reconnecting the 12-volt battery.

*

: If equipped

Opening and closing

1

Opens the moon roof

*

The moon roof tilts up and then fully opens.

2

Closes the moon roof

*

*

: Lightly press either side of the moon roof 

switch to stop the moon roof partway.

Tilting up and down

1

Tilts the moon roof up

*

2

Tilts the moon roof down

*

*

: Lightly press either side of the moon roof 

switch to stop the moon roof partway.

A

Moon roof

*

Use the overhead switches to open 
and close the moon roof and tilt it 
up and down.

Operating the moon roof

149

3-5. Opening, closing the windows and moon roof

3

Before drivi

ng

The moon roof can be operated when

The power switch is in ON.

Operating the moon roof after turning 

the hybrid system off

The moon roof can be operated for approx-

imately 45 seconds after the power switch 

is turned to ACC or OFF. It cannot, how-

ever, be operated once either front door is 

opened.

Jam protection function

If an object is detected between the moon 

roof and the frame while the moon roof is 

closing or tilting down, travel is stopped and 

the moon roof opens slightly.

Sunshade

The sunshade can be opened and closed 

manually. However, the sunshade will open 

automatically when the moon roof is 

opened.

Door lock linked moon roof operation

The moon roof can be opened and 
closed using the mechanical key.

*


(

P.396)

The moon roof can be opened using the 
wireless remote control.

*

 (

P.110)

*

: These settings must be customized at 

your Lexus dealer.

When the moon roof does not close nor-

mally

Perform the following procedure:

1

Stop the vehicle.

2

Press and hold the “CLOSE” switch.

*

The moon roof will close, reopen and pause 

for approximately 10 seconds. Then it will 

close again and stop at the completely 

closed position.

3

Check to make sure that the moon roof 

is completely closed and then release 

the switch.

*

: If the switch is released at the incorrect 

time, the procedure will have to be per-
formed again from the beginning.

If the moon roof does not fully close even 

after performing the above procedure cor-

rectly, have the vehicle inspected by your 

Lexus dealer.

If the moon roof does not move normally

If the moon roof does not open or close 

normally or the automatic opening function 

does not operate, perform the following ini-

tialization procedure.

1

Stop the vehicle.

2

Press and hold the “DOWN” switch.

*

The moon roof will stop at the tilt-up posi-

tion. After that, it will open, close, tilt up, tilt 

down, and stop at the fully closed position.

3

Confirm that the moon roof has com-

pletely stopped and release the switch.

*

: If you release the switch while the moon 

roof is moving, perform the procedure 
again from the beginning.

If, after performing the above procedures 

correctly, the moon roof still does not open 

or close normally or the automatic opening 

function does not operate, have the vehicle 

inspected by your Lexus dealer.

Moon roof open warning buzzer

The buzzer sounds and “Moon Roof Open” 

is shown on the multi-information display in 

the instrument cluster when the power 

switch is turned off and the driver’s door is 

opened with the moon roof open.

Customization

Some functions can be customized. 

(

P.431)

WARNING

Observe the following precautions.
Failure to do so may cause death or seri-

ous injury.

Opening the moon roof

Do not allow any passengers to put 

their hands or heads outside the vehi-

cle while it is moving.

Do not sit on top of the moon roof.

150

3-5. Opening, closing the windows and moon roof

WARNING

Opening and closing the moon roof

The driver is responsible for moon roof 

opening and closing operations.

In order to prevent accidental opera-

tion, especially by a child, do not let a 

child operate the moon roof. It is possi-

ble for children and other passengers 

to have body parts caught in the moon 

roof.

Check to make sure that all passen-

gers do not have any part of their body 

in a position where it could be caught 

when the moon roof is being operated.

When using the wireless remote con-

trol or mechanical key and operating 

the moon roof, operate the moon roof 

after checking to make sure that there 

is no possibility of any passenger hav-

ing any of their body parts caught in 

the moon roof. Also, do not let a child 

operate moon roof by the wireless 

remote control or mechanical key. It is 

possible for children and other pas-

sengers to get caught in the moon 

roof.

When exiting the vehicle, turn the 

power switch off, carry the key and exit 

the vehicle along with the child. There 

may be accidental operation, due to 

mischief, etc., that may possibly lead to 

an accident.

Jam protection function

Never use any part of your body to 

intentionally activate the jam protec-

tion function.

The jam protection function may not 

work if something gets caught just 

before the moon roof is fully closed. 

Also, the jam protection function is not 

designed to operate while the moon 

roof switch is being pressed. Take care 

so that your fingers, etc. do not get 

caught.

151

4

4

Dr

ivi

ng

Driving

4-1. Before driving

Driving the vehicle.....................

152

Cargo and luggage...................

158

Vehicle load limits......................

160

Trailer towing................................

161

Dinghy towing ..............................

161

4-2. Driving procedures

Power (ignition) switch ............

163

EV drive mode ............................

167

Hybrid transmission ..................

169

Turn signal lever..........................

173

Parking brake ..............................

174

Brake Hold....................................

177

ASC (Active Sound Control)

178

4-3. Operating the lights and wipers

Headlight switch.........................

180

AHB (Automatic High Beam)

.........................................................

183

Fog light switch ...........................

186

Windshield wipers and washer

.........................................................

187

Rear window wiper and washer

..........................................................

191

4-4. Refueling

Opening the fuel tank cap......

193

4-5. Using the driving support sys-

tems

Lexus Safety System + 2.5.....

195

PCS (Pre-Collision System)..

199

LTA (Lane Tracing Assist).....

209

RSA (Road Sign Assist)...........

218

Dynamic radar cruise control 

with full-speed range..............

221

BSM (Blind Spot Monitor)....

232

PKSA (Parking Support Alert)

.......................................................

236

Intuitive parking assist.............

237

RCTA (Rear Cross Traffic Alert) 

function.......................................

244

PKSB (Parking Support Brake)

.......................................................

249

Parking Support Brake function 

(static objects).........................

254

Parking Support Brake function 

(rear-crossing vehicles) ......

256

Driving mode select switch ..

258

Driving assist systems..............

260

4-6. Driving tips

Hybrid Electric Vehicle driving 

tips................................................

265

Winter driving tips....................

267

Utility vehicle precautions.....

270

152

4-1. Before driving

4-1.Before driving

Starting the hybrid system

P.163

Driving

1

With the brake pedal depressed, 
shift the shift lever to D. (

P.169)

2

If the parking brake is in manual 
mode, release the parking brake. 
(

P.174)

3

Gradually release the brake pedal 
and gently depress the accelerator 
pedal to accelerate the vehicle.

Stopping

1

With the shift lever in D, depress 
the brake pedal.

2

If necessary, set the parking brake. 
(

P.174)

If the vehicle is to be stopped for an 

extended period of time, shift the shift lever 

to P. (

P.169)

Parking the vehicle

1

With the shift lever in D, depress 
the brake pedal.

2

If the parking brake is in manual 
mode, set the parking brake 
(

P.174), and shift the shift lever to 

P (

P.169).

3

Press the power switch to stop the 
hybrid system.

4

Lock the door, making sure that 
you have the electronic key on your 
person.

If parking on a hill, block the wheels as 

needed.

Starting off on a steep uphill

1

Make sure that the parking brake is 
set with the brake pedal depressed, 
and then shift the shift lever to D.

2

Release the brake pedal and gently 
depress the accelerator pedal.

3

Release the parking brake.

When starting off on a uphill

The hill-start assist control will be activated. 
(

P.260)

For fuel-efficient driving

Keep in mind that Hybrid Electric Vehicles 

are similar to conventional vehicles, and it is 

necessary to refrain from activities such as 

sudden acceleration. (

P.265)

Driving in the rain

Drive carefully when it is raining, because 

visibility will be reduced, the windows 

may become fogged-up, and the road 

will be slippery.

Drive carefully when it starts to rain, 

because the road surface will be espe-

cially slippery.

Refrain from high speeds when driving on 

an expressway in the rain, because there 

may be a layer of water between the tires 

and the road surface, preventing the 

steering and brakes from operating 

properly.

Restraining the hybrid system output 

(Brake Override System)

When the accelerator and brake pedals 

are depressed at the same time, the 

hybrid system output may be restrained.

A warning message is displayed on the 

multi-information display while the sys-

tem is operating.

Driving the vehicle

The specified procedures should be 
observed to ensure safe driving:

Driving procedure

153

4-1. Before driving

4

Dr

ivi

ng

Breaking in your new Lexus

To extend the life of the vehicle, observing 

the following precautions is recommended:

For the first 200 miles (300 km):

Avoid sudden stops.

For the first 1000 miles (1600 km):

• Do not drive at extremely high speeds.

• Avoid sudden acceleration.

• Do not drive continuously in low gears.

• Do not drive at a constant speed for 

extended periods.

Operating your vehicle in a foreign 

country

Comply with the relevant vehicle registra-

tion laws and confirm the availability of the 

correct fuel. (

P.409)

WARNING

Observe the following precautions.

Failure to do so may result in death or 

serious injury.

When starting the vehicle

Always keep your foot on the brake 

pedal while stopped with the “READY” 

indicator is illuminated. This prevents the 

vehicle from creeping.

When driving the vehicle

Do not drive if you are unfamiliar with 

the location of the brake and accelera-

tor pedals to avoid depressing the 

wrong pedal.

• Accidentally depressing the accelera-

tor pedal instead of the brake pedal 

will result in sudden acceleration that 

may lead to an accident.

• When backing up, you may twist your 

body around, leading to difficulty in 

operating the pedals. Make sure to 

operate the pedals properly.

• Make sure to keep a correct driving 

posture even when moving the vehicle 

only slightly. This allows you to depress 

the brake and accelerator pedals 

properly.

• Depress the brake pedal using your 

right foot. Depressing the brake pedal 

using your left foot may delay 

response in an emergency, resulting in 

an accident.

The driver should pay extra attention 

to pedestrians when the vehicle is 

powered only by the electric motor 

(traction motor). As there is no engine 

noise, the pedestrians may misjudge 

the vehicle’s movement. Even though 

the vehicle is equipped with the 

Acoustic Vehicle Alerting System, 

drive with care as pedestrians in the 

vicinity may still not notice the vehicle if 

the surrounding area is noisy.

Do not drive the vehicle over or stop 

the vehicle near flammable materials.

The exhaust system and exhaust gases 

can be extremely hot. These hot parts 

may cause a fire if there is any flamma-

ble material nearby.


Content      ..     6      7      8      9     ..