Lexus RC F (2022 year). Manual in english - page 4
 

  Index      Manuals     Lexus RC F (2022 year). Manual in english


Search            copyright infringement  


Content      ..     2      3      4      5     ..


Lexus RC F (2022 year). Manual in english - page 4


70

2-1. Instrument cluster

Engine oil temperature gauge

Displays the engine oil temperature. If the engine oil temperature gauge indicator (

enters the red zone, the indicator will turn red and start flashing.

Tachometer

Displays the engine speed in revolutions per minute

Digital speedometer
Analog speedometer
Shift position/shift range/gear position (

P.132)

Odometer and trip meter display (

P.72)

Speed indicator

When the vehicle reaches the set 
speed, the speed unit display will turn 
yellow.

The indicators will be displayed in yellow 
(corresponding to a speed set by a user) or 
red (fixed at 100 mph [160 km/h])

*

.

This setting can be enabled on the 
multi-information display.

*

: Always observe the legal speed limit 

when driving on public roads.

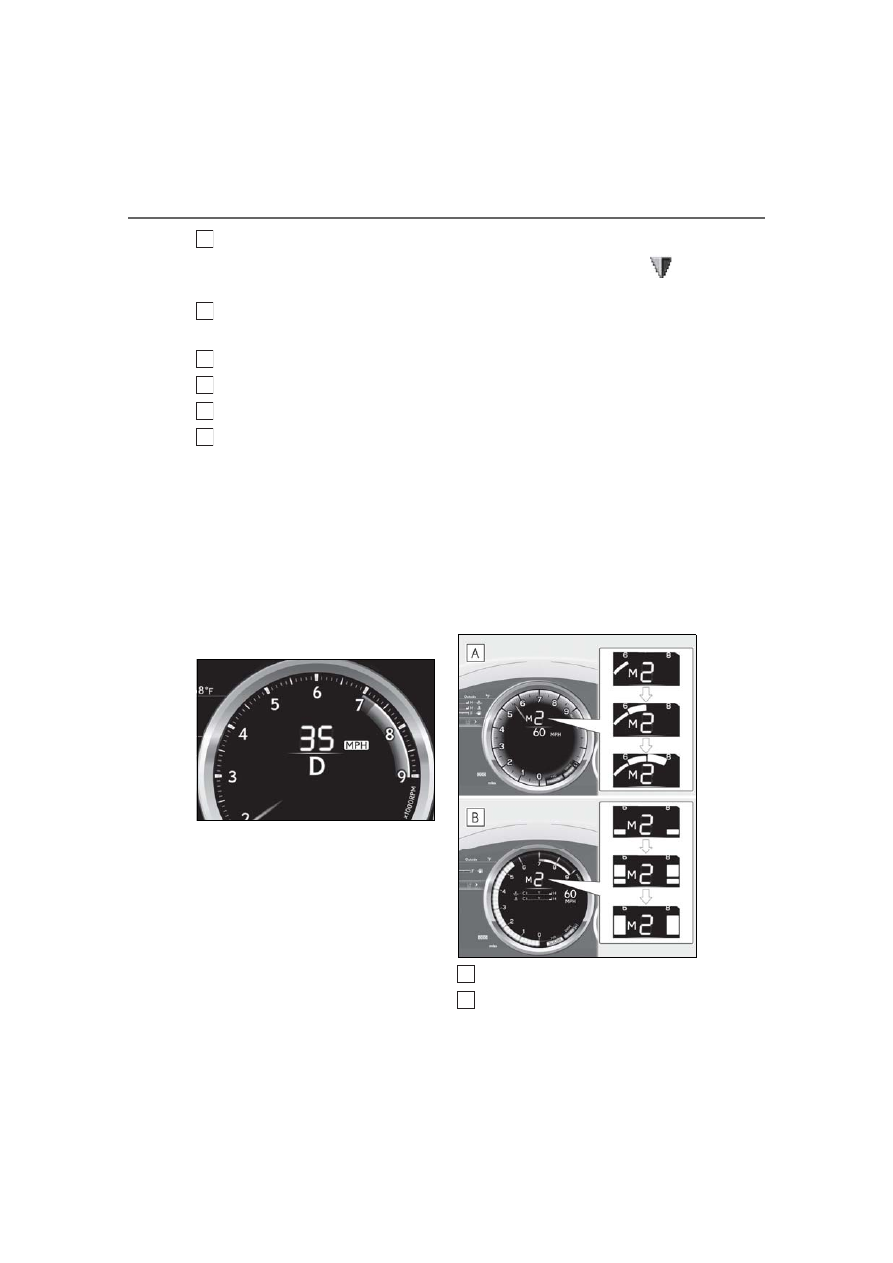
Rev indicator (SPORT S 
mode/SPORT S+ mode)

When the shift lever is in M, an indica-
tor on the tachometer will be displayed 
in 3 steps. When the 3rd level indicator 
is displayed, the indicator will flash and 
a buzzer will sound to notify you of 
shift-up timing.

The indicator may be displayed when 
downshifting, depending on the engine 
speed.
These illustrations show the default meter 
display for SPORT S mode and SPORT S+ 
mode. The meter displays for SPORT S 
mode and SPORT S+ mode can be 
changed on the settings display of the 
multi-information display.

SPORT S mode
SPORT S+ mode

E

F

G

H

I

J

A
B

71

2-1. Instrument cluster

2

Vehi

cle

 status 

inform

ati

on a

nd i

ndic
ators

Rev peak (Normal mode/SPORT 
S mode)

The engine speed reaches or exceeds 
3600 rpm, an afterimage of the 
tachometer will be displayed at the 
highest engine speed for approxi-
mately 1 second.

Meter display and layout

If the drive mode is changed, some of 
the meter displays and the gauge lay-
out will be changed. (

P.192)

The meters and display illuminate when

The engine switch is in IGNITION ON 

mode.

Welcome illumination of the analog 

speedometer

When the driver’s door is opened, the 

analog speedometer will illuminate. Then, 

when the driver’s door is closed, the ana-

log speedometer will illuminate and go 

off (pulsate) 3 times.

In the following situations, the analog 

speedometer will not pulsate even 

though the driver’s door is opened and 

closed:

• Within 60 seconds after the analog 

meter pulsation completes

• Within 60 seconds of turning the engine 

switch off

Variable red zone

To help protect the engine, the engine 

speed is controlled by starting the red zone 

of the tachometer at different engine 

speeds ranging from 3700 rpm to 7300 

rpm depending on the engine coolant tem-

perature. Before driving under extremely 

high load conditions, make sure to suffi-

ciently warm up the engine.

Eco driving meter

The number of blue segments displayed 

on the eco driving meter 

decreases/increases depending on the 

vehicle acceleration. Use this meter as a 

guideline when you wish to drive in an 

eco-friendly manner that reduces fuel 

consumption.

However, on a downward grade where 

the vehicle can accelerate without the 

accelerator pedal being depressed, the 

eco driving meter may not display the 

eco-driving state correctly.

When the shift lever is moved to P, N or 

R, the segments will turn gray and the eco 

driving meter will not operate.

Dimming the analog speedometer light-

ing

The analog speedometer lighting will be 

dimmed when the ambient light is bright, 

such as during the daytime, and SPORT S 

or SPORT S+ mode is selected.

Outside temperature display

In the following situations, the correct 

outside temperature may not be dis-

played, or the display may take longer 

than normal to change:

• When stopped, or driving at low speeds 

(less than 12 mph [20 km/h])

• When the outside temperature has 

Changing the display

72

2-1. Instrument cluster

changed suddenly (at the entrance/exit of 

a garage, tunnel, etc.)

When “_ _” or “E” is displayed, the system 

may be malfunctioning.

Take your vehicle to your Lexus dealer.

Pop-up display

In some situations, such as when a switch 

operation is performed, a pop-up display 

will be temporarily displayed on the 

multi-information display.

Some pop-up displays can be set on/off. 

(

P.81)

Liquid crystal display

Small spots or light spots may appear on the 

display. This phenomenon is characteristic 

of liquid crystal displays, and there is no 

problem continuing to use the display.

Customization

The meter display can be customized on 

the multi-information display. (

P.358)

Display items

Odometer

Displays the total distance the vehicle has 
been driven.

Trip meter A/trip meter B

Displays the distance the vehicle has been 
driven since the meter was last reset. Trip 
meters A and B can be used to record and 
display different distances independently.
To reset, display the desired trip meter and 
press and hold the odometer/trip meter 
and trip meter reset button.

Changing the display

Each time the “ODO TRIP” switch is 
pressed, the displayed item will be 
changed. When the trip meter is dis-
played, pressing and holding the switch 

WARNING

The information display at low tem-

peratures

Allow the interior of the vehicle to warm 

up before using the liquid crystal infor-

mation display. At extremely low tem-

peratures, the information display 

monitor may respond slowly, and display 

changes may be delayed.

For example, there is a lag between the 

driver’s shifting and the new gear number 

appearing on the display. This lag could 

cause the driver to downshift again, 

causing rapid and excessive engine brak-

ing and possibly an accident resulting in 

death or injury.

NOTICE

To prevent damage to the engine and 

its components

Do not let the indicator of the tachom-

eter enter the red zone, as it rep-

resents the engine speed range which 

exceeds the maximum safe engine 

speed.

In the following situations, the engine 

may be overheating. In this case, 

immediately stop the vehicle in a safe 

place, and check the engine after it has 

cooled completely. (

P.336)

• The engine coolant temperature 

gauge indicator (

) is in the red 

zone and flashing.

• The engine oil temperature gauge 

indicator (

) is in the red zone and 

flashing.

Odometer and trip meter dis-
play

73

2-1. Instrument cluster

2

Vehi

cle

 status 

inform

ati

on a

nd i

ndic
ators

will reset the trip meter.

The brightness of the instrument panel 
lights can be adjusted.

Darker
Brighter

Instrument panel brightness adjustment

The instrument panel brightness levels 

when the tail lights are on and off can be 

adjusted individually. However, when the 

surroundings are bright (daytime, etc.), 

turning on the tail lights will not change the 

instrument panel brightness. At this time, 

any adjustments made to the instrument 

panel brightness levels will be applied to 

both settings at once.

Display

Content display area

By selecting menu icons on the 
multi-information display, a variety of 
driving-related information can be dis-
played. The multi-information display 
can also be used to change display set-
tings and other vehicle settings.
Warning or suggestion/advice pop-up 
displays are also displayed in certain 
situations.

Sub-content display area

Displays some “F” content in conjunc-
tion with the content display area.

Changing the instrument panel 
light brightness

A
B

Multi-information display

The multi-information display pres-
ents the driver with a variety of 
vehicle data.

Displays and menu icons

74

2-1. Instrument cluster

Menu icons

The menu icons will be displayed by 
pressing 

 or 

 of the meter con-

trol switch.

Start-up display

When the engine is started, the name of the 

vehicle is displayed on the multi-information 

display.

While the start-up display is being dis-

played, the meter display cannot be 

changed even if the drive mode is changed. 

When the start-up display is finished, the 

meter display for the currently selected 

mode will be displayed.

Liquid crystal display

P.72

The multi-information display is oper-
ated using the meter control switches.

/

: Select menu icons

/

: Change displayed con-

tent, scroll up/down the screen and 
move the cursor up/down
Press: Enter/Set
Press and hold: Reset
Return to the previous screen

Pressing and holding the switch will display 
the first screen of the selected menu icon.

Press: Display the top screen
Press and hold: Register current 
screen as the top screen
Call sending/receiving and history 
display

Linked with the hands-free system, sending 
or receiving call is displayed. For details 
regarding the hands-free system, refer to 
the “NAVIGATION AND MULTIMEDIA 

Drive information

“F” content

Navigation system-linked dis-
play (if equipped)

Audio system-linked display

Driving assist system informa-
tion

Warning message display

Settings display

WARNING

The information display at low tem-

peratures

P.72

Changing the meter display

A

B

C

D

E

75

2-1. Instrument cluster

2

Vehi

cle

 status 

inform

ati

on a

nd i

ndic
ators

SYSTEM OWNER’S MANUAL”.

Registering a top screen

The displayed top screen can be 
changed to a registered screen of your 
choice.
To register a screen as the top screen, 
display the desired screen and press 
and hold 

.

A message asking to confirm if reg-
istration is desired will be displayed. 
If the selected screen cannot be 
registered, a registration failure 
message will be displayed.

When no screen has been regis-
tered, the drive information screen 
will be displayed.

Resetting drive information

To reset the average fuel economy 
(after reset)/average vehicle speed 
(after reset)/elapsed time (after reset) 
that are displayed on 

, display the 

desired item and press and hold 

.

If both of the displayed items are resetta-
ble, a message will be displayed asking 
which item(s) to reset.

Drive information 1/Drive infor-
mation 2/Drive information 3

Select to display various drive data.
Up to 2 of the following items can be 
selected for each drive information 
screen:
Items displayed can be switched by 

pressing 

 or 

 of the meter con-

trol switches to select 

 and pressing 

 or 

.

Use the displayed values as a reference 
only.

Drive information 1

• Current fuel consumption
• Average fuel economy (after reset)

Drive information 2

• Distance (driving range)
• Average vehicle speed (after reset)

Drive information 3

• Average fuel economy (after refuel)
• Elapsed time (after start)

Displayed items (listed below) can be 
changed on 

. (

P.81)

Current fuel consumption

Displays instantaneous current fuel con-
sumption

Average fuel economy

• After reset: Displays average fuel con-

sumption since display reset

*1, 2

• After start: Displays average fuel con-

sumption since engine start

*2

• After refuel: Displays average fuel con-

sumption since refuel

*2, 3

Average vehicle speed

• After reset: Displays average vehicle 

speed since display reset

*1

• After start: Displays average vehicle 

speed since engine start

Elapsed time

• After reset: Displays elapsed time since 

the display was reset

*1

Content displayed as drive infor-
mation

76

2-1. Instrument cluster

• After start: Displays elapsed time since 

engine start

Distance

• Driving range: Displays driving range 

with remaining fuel

*3, 4

• After  start:  Displays drive distance since 

vehicle start

Other

Blank: No item

*1

: Resetting: 

P.75

*2

: Use the displayed fuel consumption as a 

reference.

*3

: When only a small amount of fuel is 

added to the tank, the display may not 
be updated.
When refueling, turn the engine switch 
off. If the vehicle is refueled without 
turning the engine switch off, the display 
may not be updated.

*4

: This distance is computed based on 

your average fuel consumption. As a 
result, the actual distance that can be 
driven may differ from that displayed.

Eco Driving Indicator

During Eco-friendly acceleration (Eco 
driving), the Eco Driving Indicator 
Light will turn on.
When the acceleration exceeds the 
Zone of Eco driving, or when the vehi-
cle is stopped, the light turns off.

Eco Driving Indicator will not operate 
under the following conditions:

The shift lever is in any position 
other than D.

A paddle shift switch is operated.

Neither normal mode nor Eco drive 
mode is selected. (

P.192)

The vehicle speed is approximately 
80 mph (130 km/h) or higher.

Tire pressure

P.273

Gear positions

Displays the current gear position 
when the shift lever is in D or M.

Vehicle sway warning

Detects the sway of the vehicle within a 
lane, which is often associated with a 
decrease in the driver’s attention level, 
and displays the decrease in attention 
using a bar display.
The shorter the bar length, the more 
the driver may need to rest.

This display is a part of the LDA (Lane 
Departure Alert with steering control) sys-
tem. The display is enabled when the oper-
ating conditions of the vehicle sway 
warning are met. (

P.165)

Units

The units of measure used can be 
changed while driving.

Unlike the units setting performed on 

the units setting performed on 

 can be 

changed while driving.

Blank (No items)

Displays no drive information contents.

77

2-1. Instrument cluster

2

Vehi

cle

 status 

inform

ati

on a

nd i

ndic
ators

Tire pressure

It may take a few minutes to display the 

tire inflation pressure after the engine 

switch is turned to IGNITION ON mode. 

It may also take a few minutes to display 

the tire inflation pressure after inflation 

pressure has been adjusted.

“---” may be displayed if the tire position 

information cannot be determined due to 

unfavorable radio wave conditions.

Tire inflation pressure changes with tem-

perature. The displayed values may also 

be different from the values measured 

using a tire pressure gauge.

Lap timer

Measures and displays current lap time 
and previous lap times

Reading the display

Measured lap times since the timer was 
last reset are displayed as follows:
• Content  display  area

Total lap time
Past lap times
Fastest lap (marked with a star)

• Sub-content  display  area

Current lap time
Most recent lap time

Operating the meter control 
switches

Press: Start/stop lap timer
Press and hold: Reset

: Mark off one lap

: Change displayed content

While a lap time is being measured, the 
display can be changed to show the follow-
ing content:
• Torque distribution (if equipped)
• G-force
• Tire pressure
• Rear  wing  position

Resetting/saving measured lap 
times

After stopping the lap timer, press and hold 

.

When a confirmation screen is displayed, 

“F” content

A
B
C

A
B

A

B

78

2-1. Instrument cluster

select to reset/save the measured lap 
times.
When saved, the lap time data will be dis-
played on the history screen. (

P.78)

History (Lap timer)

Displays the saved lap times

Reading the display

• History top screen

Total lap time
Fastest lap time

• Past  lap  screen

Page
Past lap times (20 most recent lap 
times)

Press 

/

 to scroll up and down the 

screen.

Switching the display

To display the past lap screen, press 

.

To return to the history top screen, 

press 

.

Deleting history

When the history top screen is displayed, 
press and hold 

 to display a confir-

mation screen.

To delete the history, follow the instructions 
displayed on the screen.

Torque distribution (if equipped)

Displays the distribution of driving 
torque between the left and right rear 
wheels

Reading the display

• Normal display
Displays the amount of drive torque 
applied to the left and right rear wheels 
through bars that fluctuate in length on the 
content display area.

• Advanced display
Displays the difference in torque applied to 
the left and right rear wheels through dis-
played segments on the sub-content dis-
play area in addition to the bar display.
The greater the number of segments dis-
played, the greater the difference in torque 
is.

A
B

A
B

79

2-1. Instrument cluster

2

Vehi

cle

 status 

inform

ati

on a

nd i

ndic
ators

Switching the display

To switch to advanced display, press 

.

To return to normal display, press 

.

Peak hold function (advanced dis-
play only)

If the difference in torque of 4 segments or 
more is applied to the left or right rear 
wheel, a yellow outline will be displayed for 
the highest segment that was reached, for 
a certain amount of time.

G-force

Displays lateral G-forces on the vehi-
cle
Also displays, around the periphery of 
the G-force display, the left and right 
steering amount, accelerator pedal 
input, and brake fluid pressure

Reading the display

• Normal display
Displays the following on the content dis-
play area

Acceleration G-force on the vehi-
cle
Current G-force value (analyzed 
value of front/rear and left/right 
G-forces)
Accelerator pedal input
Brake fluid pressure
Steering amount

• Advanced display
Displays the following on the sub-content 
display area and content display area

Content display area

Acceleration G-force on the vehi-
cle
Record of the maximum G-forces
Value of the maximum G-force 
since display reset (analyzed value 
of front/rear and left/right 
G-forces)
Accelerator pedal input

A

B

C
D

E

A

B
C

D

80

2-1. Instrument cluster

Brake fluid pressure
Steering amount

Sub-content display area

G-force direction
Current G-force value (analyzed 
value of front/rear and left/right 
G-forces)

This display is intended for use as a guide-
line. Depending on factors such as the road 
surface condition, temperature and vehicle 
speed, the display may not show the actual 
condition of the vehicle.

Switching the display

To switch to advanced display, press 

.

To return to normal display, press 

.

Resetting the record of maximum 
G-forces

With the record of maximum G-forces dis-
played, press and hold 

 to reset the dis-

play.

Peak hold function (advanced dis-
play only)

If lateral G-forces of 0.5 G or greater are 
generated, the G-force value displayed on 
the sub-content display area will turn yel-
low and be held for 3 seconds.

Rear wing position (vehicles with 
an active rear wing)

Displays the raised/retracted state of 
the active rear wing

Using the lap timer

If the engine is stopped while a lap is being 

timed, the lap timer will stop and the lap 

time up to that point will be recorded.

Torque distribution display (if equipped)

Torque distribution may not be displayed 

correctly in some cases, such as when the 

vehicle passes over road expansion joints.

G-force display

The G-force values may not be zero even 

when the vehicle is parked, such as when 

it is parked on an incline.

The steering amount, accelerator pedal 

input, and brake fluid pressure displays 

are disabled until the engine has warmed 

up (the variable red zone of the tachome-

ter has retracted to 7300 rpm).

After the engine has warmed up, these 

displays will be enabled.

Depending on the vehicle usage condi-

tions, the brake fluid pressure display may 

not reach its maximum reading even 

though the brake pedal is fully depressed.

If a battery terminal is disconnected and 

reconnected, the steering amount display 

may be disabled temporarily. After driv-

ing the vehicle for a while, the display will 

be enabled.

E
F

A
B

81

2-1. Instrument cluster

2

Vehi

cle

 status 

inform

ati

on a

nd i

ndic
ators

Select to display the following naviga-
tion system-linked information.

Route guidance to destination

Compass display (heading-up dis-
play)

Select to enable selection of an audio 
source or track on the meter using the 
meter control switches.

Select to display the operational status 
of the following systems:

Dynamic radar cruise control 
(

P.171)

LDA (Lane Departure Alert with 
steering control) (

P.164)

Select to display warning messages 
and measures to be taken if a malfunc-
tion is detected. (

P.308)

Meter display settings that can be 
changed

Language

Select to change the language on the dis-
play.

Units

Select to change the units of measure dis-
played.

 Eco Driving Indicator Light 

(

P.76)

Select to enable/disable the Eco Driving 
Indicator Light.

 Switch settings

Displays a procedure to register a desired 
screen to 

.

You can register 1 screen as a shortcut, 
which can be displayed by pressing 

.

Drive information screen (

P.75)

Select to select up to 2 items that will be 
displayed on each Drive information 
screen (Drive information 1 screen, Drive 
information 2 screen, and Drive informa-
tion 3 screen) respectively.

Pop-up display (

P.72)

Select to enable/disable the pop-up dis-
play.
• Intersection Guidance (if equipped)
• Telephone
• Audio Feedback
• Volume Feedback
• Adjust  Brightness
• TVD MODE (if equipped)

Rev indicator (

P.70)

• Select to enable/disable the Rev indica-

tor.

• Select to set the desired engine speed at 

which the Rev indicator will begin to be 
displayed.

Rev peak (

P.71)

Select to enable/disable the Rev peak.

Navigation system-linked dis-
play (if equipped)

Audio system-linked display

Driving support system informa-
tion display

Warning message display

Settings display

82

2-1. Instrument cluster

Gauge options

Select to change the displayed meters for 
each applicable drive mode.

Default setting

Select to reset the meter display settings to 
the default setting.

Vehicle functions and settings that 
can be changed

P.358

Suspension of the settings display

Some settings cannot be changed while 

driving. When changing settings, park 

the vehicle in a safe place.

If a warning message is displayed, opera-

tion of the settings display will be sus-

pended.

When disconnecting and reconnecting 

battery terminals

The following information data will be reset:

Drive information

Lap timer: Measured lap times, history

G-force: Record of the maximum 

G-forces

Customization

Some functions can be customized. 

(

P.358)

WARNING

Caution for use while driving

When operating the multi-information 

display while driving, pay extra atten-

tion to the safety of the area around the 

vehicle.

Do not look continuously at the 

multi-information display while driving 

as you may fail to see pedestrians, 

objects on the road, etc. ahead of the 

vehicle.

Cautions during setting up the dis-

play

As the engine needs to be running 

during setting up the display, ensure that 

the vehicle is parked in a place with ade-

quate ventilation. In a closed area such as 

a garage, exhaust gases including harm-

ful carbon monoxide (CO) may collect 

and enter the vehicle. This may lead to 

death or a serious health hazard.

NOTICE

While setting up the display

To prevent battery discharge, ensure that 

the engine is running while setting up the 

display features.

83

2-1. Instrument cluster

2

Vehi

cle

 status 

inform

ati

on a

nd i

ndic
ators

Center Display
“MENU” button
Touchpad

Trip information

Press the “MENU” button on the 
Remote Touch, then select 

 on the 

menu screen, and then select “ECO”.
If a screen other than “Trip Information” 
is displayed, select “Trip Information”.

Resetting the consumption data
Fuel consumption in the past 15 
minutes
Current fuel consumption
Average vehicle speed since the 
engine was started.
Elapsed time since the engine was 
started.
Cruising range

Average fuel consumption for the past 
15 minutes is divided by color into past 
averages and averages attained since 
the engine switch was last turned to 
IGNITION ON mode. Use the dis-
played average fuel consumption as a 
reference.

The image is an example only, and may 
vary slightly from actual conditions.

History

Press the “MENU” button on the 
Remote Touch, then select 

 on the 

menu screen, and then select “ECO”.
If a screen other than “History” is dis-
played, select “History”.

Fuel consumption informa-
tion

Fuel consumption information can 
be displayed on the Center Display.

Vehicles with a 10.3-inch display: 
The fuel consumption information 
can be displayed and operated on 
the side display.

System components

Consumption

A
B
C

A
B

C
D

E

F

84

2-1. Instrument cluster

Best recorded fuel consumption
Latest fuel consumption
Previous fuel consumption record
Resetting the history data
Updating the latest fuel consump-
tion data

The average fuel consumption history 
is divided by color into past averages 
and the average fuel consumption 
since the last updated. Use the dis-
played average fuel consumption as a 
reference.

The image is an example only, and may 
vary slightly from actual conditions.

Updating the history data

Update the latest fuel consumption by 

selecting “Clip” to measure the current fuel 

consumption again.

Resetting the data

The fuel consumption data can be deleted 

by selecting “Clear”.

Cruising range

Displays the estimated maximum distance 

that can be driven with the quantity of fuel 

remaining.
This distance is computed based on your 

average fuel consumption. 

As a result, the actual distance that can be 

driven may differ from that displayed.

Display the vehicle information on the 
side display (

P.210), and then select 

 or 

 to display the desired 

screen. 
The image is an example only, and may 
vary slightly from actual conditions.

Trip information (type A)

Displays the average fuel consumption 
for the past 10 minutes in 1 minute 
intervals, as well as the cruising range.

Use the displayed average fuel consump-
tion as a reference.

Trip information (type B)

Displays the cruising range, latest fuel 
consumption and the amount of time 
elapsed since the engine was started.

Use the displayed average fuel consump-
tion as a reference.

A
B
C
D

E

Using the side display (vehicles 
with a 10.3-inch display)

85

2-1. Instrument cluster

2

Vehi

cle

 status 

inform

ati

on a

nd i

ndic
ators

History

Displays the average fuel consumption 
and highest fuel consumption.

Use the displayed average fuel consump-
tion as a reference.


Content      ..     2      3      4      5     ..