Lexus LX600 (2022 year). Manual in english - page 7
 

  Index      Manuals     Lexus LX600 (2022 year). Manual in english


Search            copyright infringement  


Content      ..     5      6      7      8     ..


Lexus LX600 (2022 year). Manual in english - page 7


123

3-3. Adjusting the seats

3

Be

fore
 d

riv

in

g

passenger mode is selected.

2

Using the seat adjustment switches 
on the driver’s seat, adjust the front 
passenger’s seat.

To cancel front passenger mode, press the 

mode change button again.
Front passenger mode will be canceled 

automatically if the driver’s seat adjustment 

switches are not operated for approxi-

mately 30 seconds.

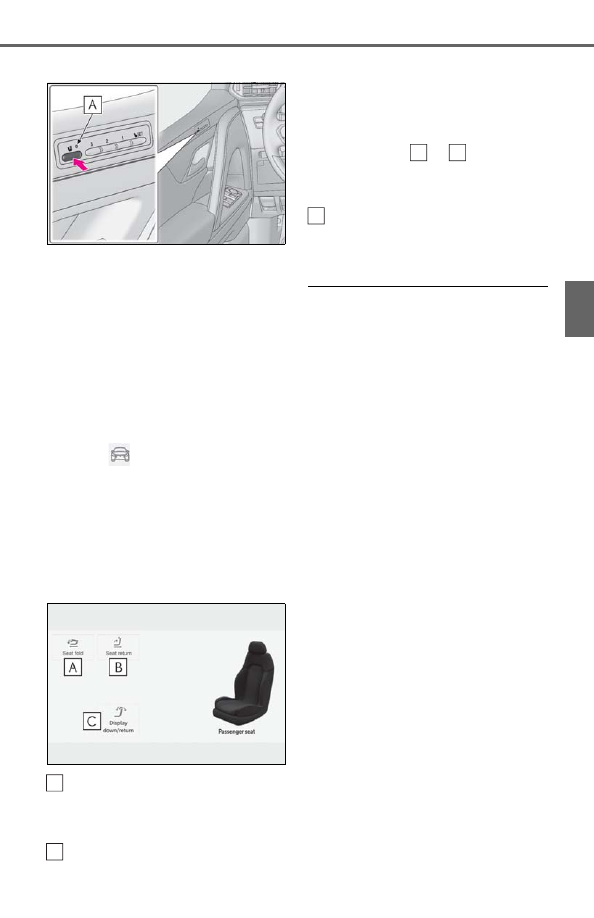
Using the Multimedia Display

1

Select 

 on the Main menu.

2

Select “Seat controls”.

3

Select “Arrangement”.

4

Select the passenger’s seat.

5

Select the button for the desired 
operation.

Move the front passenger’s seat 
forward and fold the seatback and 
head restraint. (extra front)

Move the front passenger’s seat 

rearward and the seatback and 
head restraint to the upright posi-
tion.

To stop the front passenger’s seat while it is 
moving, select the 

 or 

 passenger’s 

seat operation button or press the seat 
switch.

Folds the rear display

Press it again to extend them to the original 
position.

Operating the foldable head restraint 

using the front passenger’s seat adjust-

ment switches

When the front passenger’s head restraint 

is folded forward and the front passenger’s 

door is open, if the front passenger’s seat 

adjustment switches are used to move the 

seat backward or recline the seatback, the 

head restraint will move to the upright posi-

tion automatically when the switch is 

released.
To stop the operation of the front passen-

ger’s head restraint part-way, perform any 

of the following operations:

Operate any front passenger’s seat 

adjustment switch.

Press the “SET” button.

Press the “1”, “2” or “3” button.

Press the seat switch.

Operation of the front passenger’s seat 

using the Multimedia Display will be 

canceled when

In the following situations, the front passen-

ger’s seat cannot be operated using the 

Multimedia Display:

The engine switch is in ACC or OFF.

The weight of an occupant or heavy 

object, etc. is detected on the front pas-

senger’s seat.

Once weight is detected on the seat, the 
seat will be judged as occupied until the 
front passenger’s door is opened then 
closed or the engine switch is turned off.

A

B

A

B

C

124

3-3. Adjusting the seats

The front passenger’s seat belt is fas-

tened.

The front passenger’s door is open. (The 

front seat will not move forward.)

1

Display the home screen on the 
Rear Multi Operation Panel 
(

P.381) and then select “Seat”.

2

Select “Passenger”.

3

Select the button for the desired 
operation.

When the operating conditions are not 

met, the buttons will be grayed out.

Adjust the angle of the front pas-
senger’s seat seatback

The seatback will move while a button is 
touched and held.

Move the front passenger’s seat 
forward or backward

The seat will move while a button is 
touched and held.

Folds the rear display

Press it again to extend them to the original 
position.

Move the front passenger’s seat 
forward and fold the seatback for-

ward.

The head restraint will also fold forward.
To stop the front passenger seat while it is 
moving, touch “STOP”.

Move the front passenger’s seat 
backward and the seatback to the 
upright position.

The head restraint will also move to the 
upright position.

Operating the front passenger’s seat 

from the rear seat

In the following situations, the front pas-

senger’s seat cannot be operated using 

the Rear Multi Operation Panel:

• The engine switch is in ACC or OFF.

• The weight of an occupant or heavy 

object, etc. is detected on the front pas-

senger’s seat.

Once weight is detected on the seat, the 
seat will be judged as occupied until the 
front passenger’s door is opened then 
closed or the engine switch is turned off.
• The  front  passenger’s seat belt is fas-

tened.

• The front passenger’s door is open. (The 

front seat will not move forward.)

Operating the front passenger’s 
seat from the rear seat (4-pas-
senger models)

A

B

C

D

E

125

3-3. Adjusting the seats

3

Be

fore
 d

riv

in

g

Second seat

Pull the lever and adjust the seatback

Third seat (if equipped)

Press the switch and adjust the seat-
back

Folding down second center seatback

Pull the center seatback lock release lever 

behind the seatback and fold it down.
To return the center seatback to its original 

position, lift it up until it locks.

Rear seats (5-passenger and 
7-passenger models)

The reclining angle can be adjusted 
and the seatback can be folded by 
operating the lever or switch.

Adjustment procedure

WARNING

When folding the seatbacks down

Observe the following precautions.
Failure to do so may result in death or 

serious injury.

Do not fold the seatbacks down while 

driving.

Stop the vehicle on level ground, set 

the parking brake and shift the shift 

lever to P.

Do not allow anyone to sit on a folded 

seatback or in the luggage compart-

ment while driving.

Do not allow children to enter the lug-

gage compartment.

Adjusting the reclining angle

Do not fold the seatback more than 

required. During a collision, your body 

could slip beneath the seat belt resulting 

in extreme pressure being applied to 

your abdomen, or the shoulder belt 

could wrap around your neck, which may 

result in death or serious injury.

NOTICE

When operating the rear seat

Be careful that your hands and legs do 

not get caught in moving parts or con-

nection areas.

Do not arrange seats while they are 

occupied.

126

3-3. Adjusting the seats

For easy access to the third seat, per-
form 

1

 in “Tumbling the second seats”. 

(

P.126, 127)

Before tumbling the second seats

1

Stow the seat belt buckles and 
lower the head restraints to the 
lowest position.

Use the band to secure the center seat 

buckle.

2

Pass the outer seat belts through 
the seat belt hangers and secure 
the seat belt plates.

This prevents the shoulder belt from being 

damaged.
Make sure that the seat belts are removed 

from the hangers before using them.

Tumbling the second seats (manual 
type)

1

Pull the lever

The seatback is folded forward and the 

seat springs up.

2

Left-hand side seat only: Open the 
cover and then attach the hook to 
the assist grip to prevent the seat 
from moving

When entering and exiting the 
third seat (if equipped)

When tumbling the second seats

127

3-3. Adjusting the seats

3

Be

fore
 d

riv

in

g

3

Remove the seat hook covers from 
the back of the seat cushion, and 
install them on the seat hooks.

Tumbling the second seats (power 
type)

1

Press and hold the switch

The front seat will move forward and stop. 

When the operation has been stopped, 

release the switch.

2

After the front seat has stopped, 
release the switch.

The seatback is folded forward and the 

seat springs up.

3

Left-hand side seat only: Open the 
cover and then attach the hook to 
the assist grip to prevent the seat 
from moving

4

Remove the seat hook covers from 
the back of the seat cushion, and 
install them on the seat hooks.

128

3-3. Adjusting the seats

The second seats (power type) can be 

operated when

When the engine switch is OFF, or ON 

with the shift lever in P.

When tumbling the second seat (power 

type)

In the following situations, the second 

seat does not tumble properly and oper-

ation stops.

• The seatback is folded forward

• The center seat is folded forward

• The armrest is being used

If an object is placed on the seat cushion, 

the tumbling operation may stop.

1

Left-hand side seat only: Detach 
the hook from the assist grip

If detaching from the assist grip is difficult, 

loosen the belt.

WARNING

When stowing the second seat

Observe the following precautions.

Failure to do so may result in death or 

serious injury.

Check that there is no luggage and 

that there are no other people around 

the seat before stowing operation.

Do not insert hands or feet into the 

moving parts of the seat.

Do not allow children to operate the 

seat.

When tumbling the second seat

Do not sit on or place anything on the 

seatback while driving.

Be sure to install the seat hook covers 

on the seat hooks, or you may get 

burned when they become hot.

Do not tumble the second seat with 

any electrical devices left connected 

to the accessory outlet or charging 

USB port on the rear of the console 

box. The second seat could strike the 

electrical device and damage it.

Left-hand side seat only: Be sure to 

secure the seat using the hook after 

tumbling the second seat. If the seat is 

not secured, the seat may return while 

driving, resulting in serious injury.

Right-hand side seat only: Do not drive 

the vehicle with the seat tumbled. If the 

second seat interferes with the front 

seat, the SRS airbag may not deploy 

properly or may incorrectly deploy, 

resulting in death or serious injury.

Returning the second seat to its 
original position

129

3-3. Adjusting the seats

3

Be

fore
 d

riv

in

g

2

Left-hand side seat only: Stow the 
hook and tumble band, and then 
close the cover

3

Return the seat to its original posi-
tion.

Push the seat until it is locked.

4

Lift the seatback.

Lift it until it is locked.
Power type: return the front seat to the 

original position. When a front seat is close 

to a second seat, the operation of the front 

seat may be restricted.

If you cannot raise the seatback

1

Pushing on the lower front edge of the 
seatback to slacken the seat belt.

2

Let the seat belt retract a little.

WARNING

When returning the seat to its origi-

nal position

Make sure the seat legs are securely 

latched to the floor when putting back 

the seats.

130

3-3. Adjusting the seats

Left seat return switch

Left seat stow switch

Right seat return switch

Right seat stow switch

Operation can also performed using both 
the seat and back door switches.

The third power seats can be operated 

when

When the engine switch is OFF, or ON 

with the shift lever in P

Switch operation

Do not release the switch while the third 

seat is operating. Releasing the switch 

will cause the seat to stop operating and 

will sound a (continuous) buzzer. Press 

the switch again to stop the buzzer.

If the third seat is close to the second seat 

or other surrounding parts, third seat 

movement may be restricted.

If the warning buzzer sounds continu-

ously

If a system malfunction occurs, the warning 

buzzer may continue to sound while the 

engine switch is on. In this case, perform the 

following.

1

Press and hold the return switch on the 

back door

2

Press the stow switch on the seat 5 

times within 10 seconds, and check that 

the buzzer sounds 3 times (do not 

release the return switch on the back 

door until the buzzer sounds 3 times)

3

Press and hold the return switch on the 

seat or back door

After the seat is stowed, the warning buzzer 

will stop.
If the malfunction does not disappear even 

after performing this procedure above, 

have the vehicle inspected by your Lexus 

dealer.

Before stowing the third seats

1

Pass the seat belts through the seat 
belt hangers and secure the seat 
belt plates.

This prevents the shoulder belt from being 

damaged.
Make sure that the seat belts are removed 

WARNING

When returning the second seat to the 

original position, be careful not to get 

your hand or foot of the third seat pas-

sengers caught between the second 

seat and the floor.

After returning the seat to its original 

position

After returning the seat to its original 

position, gently shake it to the front 

and rear and check that it is secure

Do not pinch the seat belt

Make sure that the seat belt is 

removed from the hanger as before

Third power seat control 
switches (if equipped)

A

B

C

D

When stowing the third seat (if 
equipped)

131

3-3. Adjusting the seats

3

Be

fore
 d

riv

in

g

from the hangers before using them.

2

Adjust the seatback of the second 
seat so that it does not interfere 
with the third seat. (

P.125)

Stowing the third seat

Press and hold the stow switch to stow 
the third seat

After the buzzer sounds twice, the seat-
back will be folded down and the head 
restraint and seat cushion will be automati-
cally stowed in the floor.
When the seat has been stowed, the 
buzzer will sound twice and operation will 
be automatically stopped. When the oper-
ation has been stopped, release the switch.

1

Push and hold the return switch to 
return the third seats.

After the buzzer sounds twice, the seat-

back and seat cushion will be started to 

move. Make sure not to release the switch 

before the operation has completed.
When the seat has been returned, the 

buzzer will sound twice and operation will 

be automatically stopped. When the oper-

WARNING

When stowing the third seats

Observe the following precautions.
Failure to do so may result in death or 

serious injury.

Check that there is no luggage and 

that there are no other people around 

the seat before stowing operation.

Do not insert hands or feet into the 

moving parts of the seat.

Do not allow children to operate the 

seat.

Do not use the seat if only the seat 

cushion has been stowed.

NOTICE

When stowing the third seats

If there is the luggage cover attached to 

the vehicle, remove the luggage cover. 

(

P.416) The third seat could strike the 

luggage cover and damage it.

Returning the third seat (if 
equipped) to its original position

132

3-3. Adjusting the seats

ation has been stopped, release the switch.

2

Lift the head restraint

Auto arrangement switch

Third seat return switch (left side)

Third seat stow switch (left side)

Second seat switch (left side)

Third seat return switch (right side)

Third seat stow switch (right side)

Second seat switch (right side)

The switches equipped differ depend-
ing on the model or options.

Operating the second seat

Press and hold the second seat switch

The seatback is folded forward.
When returning the second seat to the 
original position: 

P.128

WARNING

After returning the seat to its original 

position

Do not pinch the seat belt

Make sure that the seat belt is 

removed from the hanger as before

Lift the head restraint to its original 

position

Luggage compartment control 
switches (if equipped)

A

B

C

D

E

F

G

133

3-3. Adjusting the seats

3

Be

fore
 d

riv

in

g

Operating the third seat

P.130

Stowing the second and third seat

Press and hold the auto arrangement 
switch

Stowing the second and third seat.
When returning the seat to the original 
position: 

P.128, 131

The third power seats can be operated 

when

P.130

Switch operation

P.130

If the warning buzzer sounds continu-

ously

P.130

134

3-3. Adjusting the seats

Automatic operation

The seat can be moved to preset posi-
tions.

1

Display the home screen on the 
Rear Multi Operation Panel 
(

P.381) and then select “Seat”.

2

Select “Left” or “Right”.

3

Select the desired preset button.

When the operating conditions are not 

met, the preset buttons will be grayed out.

Fold forward the seatback of the 

Rear seat (4-passenger 
models)

WARNING

When adjusting the seat position

Take care when adjusting the seat 

position to ensure that other passen-

gers are not injured by the moving 

seat.

When adjusting the rear seat with an 

ottoman, make sure there is sufficient 

space so that a foot does not get 

caught between the ottoman and front 

passenger seat.

Seat adjustment

To reduce the risk of sliding under the lap 

belt during a collision, do not recline the 

seat more than necessary.

If the seat is too reclined, the lap belt may 

slide past the hips and apply restraint 

forces directly to the abdomen, or your 

neck may contact the shoulder belt, 

increasing the risk of death or serious 

injury in the event of an accident.

Adjustments should not be made while 

driving as the seat may unexpectedly 

move and cause the driver to lose con-

trol of the vehicle.

Using the ottoman

Do not sit on the ottoman.

If someone sits on the ottoman, the seat 
belt cannot be fitted properly, and they 
may be thrown from the seat, resulting in 
death or serious injury in the event of a 
sudden stop, sudden swerve or accident.

When getting in or out of the vehicle, 

retract the ottoman. If the ottoman is 

not retracted, it may cause a fall, 

resulting in injury.

Do not operate the ottoman when the 

vehicle is moving.

Do not allow anyone to put their hands 

or feet under the rear seat when stow-

ing the ottoman.

NOTICE

To prevent an ottoman malfunction

Do not place any objects in the rear 

seat footwell that could prevent the 

operation of the ottoman.

Do not place heavy luggage on the 

ottoman.

Do not place any objects under the 

ottoman while it is raised for use. These 

objects may interfere with the ottoman 

being folded, causing damage to the 

ottoman or the objects themselves.

To prevent a rear display malfunction 

(rear seat with ottoman)

Do not attempt to move the rear display 

by hand, as doing so may damage the 

rear display.

Adjustment procedure

A

135

3-3. Adjusting the seats

3

Be

fore
 d

riv

in

g

seat with ottoman, and then fold the 
seatback of the rear seat (relax 
mode)

The seat with ottoman moves forward, and 
the head restraint also folds forward. 
To stop the front passenger seat while it is 
moving, touch “STOP”.

Moves the rear seat to the upright 
position (Business Mode)

Folds the rear display (rear seat 
with ottoman)

Press it again to extend them to the original 
position.

Manual operation

1

Display the home screen on the 
Rear Multi Operation Panel 
(

P.381) and then select “Seat”.

2

Select “Left” or “Right”.

3

Select the button for the desired 
adjustment.

Seatback angle adjustment

Seat cushion (front) angle adjust-
ment

Ottoman angle adjustment (if 
equipped)

Seat position adjustment (front pas-
senger’s seat)

Seat position adjustment (rear seat) 
(if equipped)

The part will move while a button is 
touched.

Operating conditions of Business Mode

When the rear seat belt is fastened, Busi-

ness Mode cannot be selected.

The rear seat with an ottoman cannot be 

moved to Relaxation Mode when

In the following situations, Relaxation Mode 

cannot be selected:

The engine switch is in ACC or OFF.

The weight of an occupant or heavy 

object, etc. is detected on the front pas-

senger’s seat.

Once weight is detected on the seat, the 
seat will be judged as occupied until the 
front passenger’s door is opened then 
closed or the engine switch is turned off.

The front passenger’s seat belt is fas-

tened.

The front passenger’s door is open.

Pre-collision seatbacks for the passen-

ger seats

P.220

1

Select 

 on the Main menu.

2

Select “Seat controls”.

3

Select “Arrangement”.

4

Select the rear seat.

5

Select “Return”.

The rear seat will move to the upright posi-

B

C

A
B

C

D

Returning the rear seat from the 
front seats

E

136

3-3. Adjusting the seats

tion.

Operation of the rear seats from the 

front seats

In the following situations, the rear seats 

cannot be operated from the front seats.

When the weight of an occupant, heavy 

object, etc. is detected on a rear seat

Once weight is detected on the seat, the 
seat will be judged as occupied until a rear 
door is opened then closed or the engine 
switch is turned off and the doors are 
locked.

When the rear seat belt is fastened.

The rear seat relaxation system utilizes 
pneumatic chambers, and applies 
pressure to the occupant’s body at dif-
ferent modes and intensities.
To display the rear seat relaxation sys-
tem screen, display the home screen 
on the Rear Multi Operation Panel 
(

P.381) and then select “Relax-

ation”.

Touch to select the desired rear 
seat.

Touch to select the desired mode.

When a button is touched, operation will 
begin.

Touch to adjust the intensity.

The intensity can be adjusted in 5 steps.

Touch to stop the operation.

If a seat is not occupied, do not operate the 
rear seat relaxation system for that seat.

Relaxation system

Operating conditions

• The engine switch is in ON.

• The temperature in the cabin is not 

extremely high.

• The weight of an occupant is detected on 

the rear seat or the rear seat belt is fas-

tened.

Once weight is detected on the seat, the 
seat will be judged as occupied until a rear 
door is opened then closed or the engine 
switch is turned off and the doors are 
locked.

Automatic stop function

• The operation will be canceled automati-

cally after approximately 15 minutes.

WARNING

When returning the rear seats to the 

neutral position

To avoid injuring the rear passengers, 

wait until they have gotten out of the 

vehicle before operating the switch.

Rear seat relaxation system

A

B

C

D

137

3-3. Adjusting the seats

3

Be

fore
 d

riv

in

g

Front seats (manual head 
restraints) and outer second seats

1

Up

2

Down

Push the head restraint down while press-

WARNING

Using the relaxation system

Those who are pregnant, have 

recently given birth, or suffer from ail-

ments requiring rest (heart disease 

etc.) should consult a doctor before 

use.

Do not allow children to use the relax-

ation function.

Do not use immediately after consum-

ing a meal or alcohol, or for an 

extended period of time.

If you feel sick while using the relax-

ation function, immediately discon-

tinue use.

Head restraints

Head restraints are provided for all 
seats.

WARNING

Head restraint precautions

Observe the following precautions 

regarding the head restraints.

Failure to do so may result in death or 

serious injury.

Use the head restraints designed for 

each respective seat.

Adjust the head restraints to the cor-

rect position at all times.

Manual head restraints: After adjust-

ing the head restraints, push down on 

them and make sure they are locked in 

position.

Do not drive with the head restraints 

removed.

Vehicles with third seat: When sitting 

on the third seat, make sure that the 

head restraint is not folded.

Vertical adjustment

138

3-3. Adjusting the seats

ing the lock release button 

.

Front seats (power head restraints)

1

Up

2

Down

Second center seat (if equipped)

1

Up

2

Down

Push the head restraint down while press-
ing the lock release button 

.

Adjusting the height of the head 

restraints (front and second seats)

Make sure that the head restraints are 

adjusted so that the center of the head 

restraint is closest to the top of your ears.

Manual head restraints

The position of the head restraint can 
be adjusted forward in 4 stages.

If the head restraint is pulled forward from 
the foremost position, it will return to the 
rearmost position.

Power head restraints

1

Forward

2

Backward

Folding the head restraint

Fold the head restraint while pulling the 
strap.
To return the head restraint, pull it up.

A

A

Horizontal adjustment (if 
equipped)

Folding the head restraint (third 
seats) (if equipped)


Content      ..     5      6      7      8     ..