Lexus ES (2022 year). Manual in english - page 9
 

  Index      Manuals     Lexus ES (2022 year). Manual in english


Search            copyright infringement  


Content      ..     7      8      9      10     ..


Lexus ES (2022 year). Manual in english - page 9


163

3

3-4. Adjusting the steering wheel and mirrors

Before drivi

ng

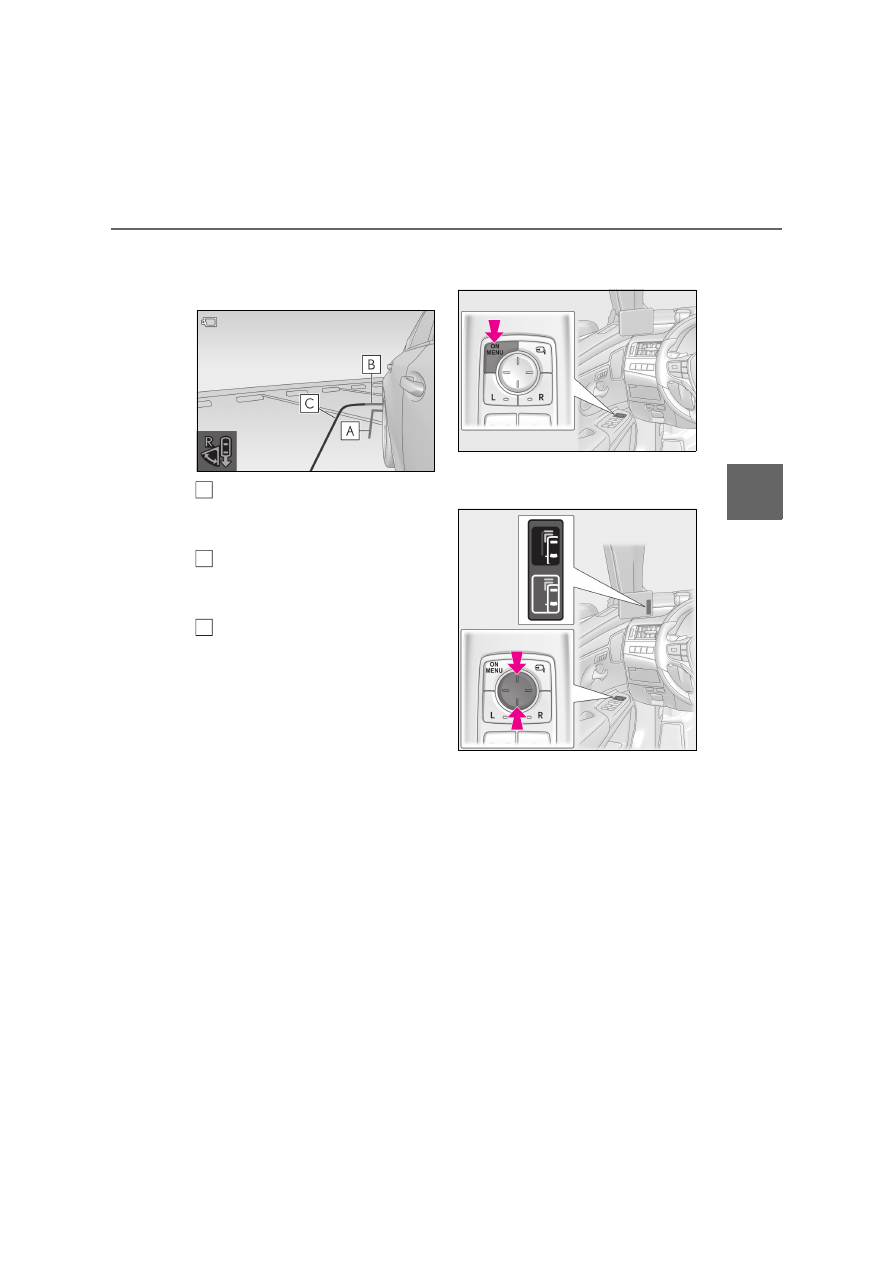
when the system is in reverse-linked 
wide range image mode. They are not 
shown when a door is open.

This line (red) indicates a distance 
approximately 0.2 m (0.7 ft.) from 
the end of the bumper.

This line (red) indicates a distance 
approximately 0.5 m (1.6 ft.) from 
the end of the bumper.

This line (blue) indicates a distance 
approximately 0.5 m (1.6 ft.) from 
the end of the bumper/both sides 
of the vehicle.

*

*

: The distance guidelines can be turned 

off.

Q

Switching distance guidelines

These lines can be switched when in 
reverse-linked wide range image 
mode. Perform the following while 
firmly depressing the brake pedal.

1

Press the switch to display the dis-
tance guideline switching menu.

2

Press the switch to change the dis-
play of the distance guidelines.

Q

Location of the distance guidelines

The distance guidelines are for use on 
flat road surfaces. In the following situ-
ations, the distance guidelines will be 
shown on the display at a different 
location than the actual location.
• In locations with steep slopes
• When the vehicle is tilted due to the 

number of passengers and the load-
ing condition of the vehicle

• When there is a three dimensional 

object such as the cargo bed of a 
truck

A

B

C

164

3-4. Adjusting the steering wheel and mirrors

Q

Operation conditions of reverse-linked 

wide range image mode

Reverse-linked wide range image mode 

operates when all of the following condi-

tions are met.

O

The 

 adjustment menu icon is on

O

The shift lever is in R

Reverse-linked wide range image mode 

will be canceled if any of the operation con-

ditions above is no longer met.

Manual wide range image mode can 
be used to check for obstacles near the 
rear wheels when moving the vehicle 

to the side. Without 

 or 


selected, press up, down, left or right 

on 

 to expand the display range 

on both displays.

Normal display range

Expanded display range

When the display range is expanded, 

 or 

 will illuminate on the dis-

play.

Display range of 

Q

Cancellation conditions of manual wide 

range image mode

When any of the following conditions is 

met, manual wide range image mode is 

canceled.

O

When 

 or 

 is selected

O

When up, down, left or right on 

 is 

pressed again

O

When the vehicle is driven at approxi-

mately 30 km/h (19mph) or more for 15 

seconds or more

O

When the shift lever is shifted to R while 
the 

 adjustment menu icon is on 

(reverse-linked wide range image mode)

Q

When the mode is switched from man-

ual wide range image mode to reverse-

linked wide range image mode

The mode returns to manual wide range 

image mode when the shift lever is shifted 

from R (when reverse-linked wide range 

image mode is operating) back to a position 

other than R.

When a front door is opened, this func-
tion widens the display range of the 
display so that the user can check a 
wider range behind the vehicle.
The display range is widened only on 
the display on the side of the vehicle in 

Manual wide range image mode

A

Front door open-linked wide 
range image mode

B

C

A

165

3

3-4. Adjusting the steering wheel and mirrors

Before drivi

ng

which the door was opened.

Display range when a door is 
closed

Expanded display range when a 
door is open

When a door is open, 

 or 

 will illuminate on the display.

When the display range is expanded, 

 or 

 will illuminate on the dis-

play.

Display range of 

Q

Operation conditions of front door 

open-linked wide range image mode

This function operates when all of the fol-

lowing conditions are met.

O

The vehicle is stopped

O

A front door is opened

O

The 

 adjustment menu icon is on and 

the shift lever is in a position other than R

*

O

Manual wide range image mode is not 

operating

*

: If the 

 adjustment menu icon is off, 

this mode will operate even if the shift 
lever is in R.

When the turn signal lever is operated 
(such as when making a turn or chang-
ing lanes) and the turn signal flashes, 
this mode expands the display range of 
the display on the selected side, reduc-
ing the blind spot. When the turn signal 
lever is returned to its original position, 
the display range returns to normal 
after several seconds. The image on 
the display changes as shown below.

When the turn signal lever is not 
operated (normal display range)

A

B

C

A

Turn signal-linked wide range 
image mode

A

166

3-4. Adjusting the steering wheel and mirrors

When the turn signal lever is oper-
ated (expanded display range)

When the display range is expanded, 

 or 

 illuminates.

Display range of 

Q

Operation conditions of turn signal-

linked wide range image mode

Turn signal-linked wide range image mode 

operates when all of the following condi-

tions are met.

O

The 

 adjustment menu icon is on

O

The 

 adjustment menu icon is on and 

the shift lever is in a position other than R

*

O

Manual wide range image mode is not 

operating

O

Front door open-linked wide range 

image mode is not operating

Turn signal-linked wide range image mode 

will be canceled if any of the operation con-

ditions above is no longer met.

*

: If the 

 adjustment menu icon is off, 

this mode will operate even if the shift 
lever is in R.

Q

Turn signal-linked wide range image 

mode

Use turn signal-linked wide range image 

mode when making a right/left turn or 

changing lanes. Use manual wide range 

image mode to expand the display range 

when not using the turn signal lever to make 

a right/left turn or change lanes. (

P.164)

Distance guidelines will be displayed 
when the vehicle is moving forward, 
the turn signal lever is operated, or the 
manual wide range image mode is dis-
played while the vehicle is stopped.

Q

Display

Normal display range

Distance guidelines (light blue)

• Three distance guidelines will be dis-

played when the vehicle is moving for-
ward at approximately 5 km/h (3 mph) 
or more, the turn signal lever is oper-
ated, or manual wide range image mode 
is operating.

• If the speed drops to approximately 3 

km/h (2 mph) or less and the turn signal 
lever is not being operated, the distance 
guideline will not be displayed.
Four distance guidelines will be dis-
played while the vehicle speed is 
approximately 70 km/h (44 mph) or 
more.
If the speed drops to approximately 60 
km/h (37 mph) or lower, only three dis-
tance guidelines will be displayed.

Expanded display range

The display range is expanded during turn 
signal-linked wide range image mode or 

Distance guideline display

B

C

A

A
B

C

167

3

3-4. Adjusting the steering wheel and mirrors

Before drivi

ng

manual wide range image mode

Display range of 

Q

Distance guideline display positions

From a distance of approximately 0.2 m (0.7 ft.) from the sides of the vehicle to 
a distance of approximately 0.5 m (1.6 ft.)

Approximately 5 m (16 ft.) from the end of the bumper

Approximately 10 m (33 ft.) from the end of the bumper

Approximately 15 m (49 ft.) from the end of the bumper

Approximately 30 m (98 ft.) from the end of the bumper

Q

Location of the distance guidelines

The distance guidelines are for use on 
flat road surfaces. In the following situ-
ations, the distance guidelines will be 
shown on the display at a different 
location than the actual location.
• In locations with steep slopes
• When the vehicle is tilted due to the 

number of passengers and the load-
ing condition of the vehicle

• When there is a three dimensional 

object such as the cargo bed of a 
truck

Q

Distance guideline display conditions

The guidelines are displayed when all of the 

following conditions are met.

O

The power switch is in ON mode

O

The 

 adjustment menu icon is on

O

The shift lever is in a position other than R

O

The front doors are closed

O

The turn signal lever is operated, or man-

ual wide range image mode is displayed 

while the vehicle is stopped

D

A

A

B
C
D

E

168

3-4. Adjusting the steering wheel and mirrors

Q

Cleaning the displays

If the display is dirty, the image may be 
difficult to see. Clean it gently using a 
soft dry cloth.

Q

Cleaning the cameras

If the camera lenses are dirty or cov-
ered with foreign matter such as water 
droplets, snow, mud, etc., the displayed 
image may not be clear. If the cameras 
are covered with frost or snow, oper-
ate the camera heaters. (

P.321) 

If the cameras are covered in mud, dirt 
or other foreign matter, rinse the cam-
eras with a large quantity of water and 
then wipe the camera lenses clean with 
a soft cloth dampened with water.

Cleaning the Digital Side-view 
Monitor

NOTICE

Q

To prevent the displays from malfunc-

tioning or operating improperly

O

Do not use detergents such as alcohol, 

thinner or benzene to the display unit. 

Doing so may cause discoloration, 

deterioration or a malfunction.

O

Do not bring open flames, such as cig-

arette lighters, near the display unit. 

Doing so may result in damage or a 

vehicle fire.

O

Do not remove, disassemble or modify 

the display unit.

O

When the system is used while in an 

abnormal state, such as when giving 

off smoke or a strange odor, a fire may 

occur. Immediately stop using the sys-

tem and have it inspected by any 

authorized Lexus retailer or Lexus 

authorized repairer, or any reliable 

repairer.

O

Do not subject the displays to a strong 

impact or place your hand on them. 

Doing so may damage them.

Q

To prevent the cameras from mal-

functioning or operating improperly

O

Observe the following precautions. 

Otherwise, the Digital Side-view Mon-

itor may not operate properly.

• Do not strike or hit the camera or sub-

ject it to a strong impact. The camera 

installation position and angle may be 

changed.

• Do not remove, disassemble or modify 

the cameras.

• When washing the camera lenses, 

rinse the cameras with a large quantity 

of water, and then wipe the camera 

lenses clean with a soft cloth damp-

ened with water. Do not strongly rub 

the camera lenses, as them may be 

scratched and will not be able to trans-

mit a clear image.

• Do not allow organic solvent, car wax, 

window cleaner or glass coat to 

adhere, as the surrounding area of the 

cameras is made of resin. If this hap-

pens, wipe it off as soon as possible.

• Do not apply hot water to the cameras 

in cold weather, as the sudden change 

of temperature may cause the cam-

eras to not operate properly.

• When using a high pressure washer to 

wash the vehicle, do not directly spray 

the cameras and their surrounding 

area. Doing so may cause the camera 

to not operate properly.

O

Do not subject the cameras to a strong 

impact, as this could cause them to 

malfunction. If this happens, have the 

vehicle inspected by any authorized 

Lexus retailer or Lexus authorized 

repairer, or any reliable repairer as 

soon as possible.

169

3

3-4. Adjusting the steering wheel and mirrors

Before drivi

ng

If you notice any of the following symptoms, refer to the following table for the likely 
cause and the solution. If the symptom is not resolved by the solution, have the 
vehicle inspected by any authorized Lexus retailer or Lexus authorized repairer, or 
any reliable repairer.

If you notice any symptoms

170

3-4. Adjusting the steering wheel and mirrors

Symptom

Likely cause

Solution

The displays are diffi-
cult to see

The displays are dirty.

Clean the displays gently 
using a soft dry cloth.

• The vehicle is in a dark area.
• The vehicle is near a TV tower, 

broadcasting station, electric 
power plant or other location 
where strong radio waves or 
electrical noise may be present.

• There are portable radios, cellu-

lar phones, cordless phones or 
other wireless communication 
devices near the display.

• The temperature around the 

cameras is extremely high/low.

• The ambient temperature is low.
• Sunlight or headlights are shining 

directly into the camera lens.

• The vehicle is under fluorescent 

lights, sodium lights, mercury 
lights, etc.

Drive the vehicle while pay 
attention to the vehicle’s sur-
roundings.
(The image may be difficult to 
see for a moment, however, 
this is not a malfunction.)

The display darkens in high tem-
peratures.

Use the air conditioning sys-
tem to decrease the tempera-
ture around the displays.

At extremely low temperatures, the 
display may respond slowly.

Use the air conditioning sys-
tem to increase the tempera-
ture around the displays.

The camera lens is covered with 
frost or snow and is fogged up.

Operate the camera heaters. 
(

P.321)

Mud or other foreign matter is on 
the camera lens.

Rinse the camera with a large 
quantity of water, and then 
wipe the camera lens clean 
with a soft cloth dampened 
with water.

The display range is not adjusted.

Adjust the display range. 
(

P.158)

171

3

3-4. Adjusting the steering wheel and mirrors

Before drivi

ng

Q

Free/Open Source Software Information

This product contains Free/Open Source Software (FOSS).
The license information of such FOSS can be found at the following URL.
https://www.denso.com/global/en/opensource/cms/toyota/

The image on the dis-
play is out of align-
ment.

The front doors are not fully closed. Close the front doors.

The camera is retracted or tilted 
forward.

Move the camera to a posi-
tion where the image can be 
displayed properly.

The camera or its surrounding area 
has received a strong impact.

Have the vehicle inspected 
by any authorized Lexus 
retailer or Lexus authorized 
repairer, or any reliable 
repairer.

Images shown on the 
display are blue.

A system malfunction has occurred.

Have the vehicle inspected 
by any authorized Lexus 
retailer or Lexus authorized 
repairer, or any reliable 
repairer.

“Digital Side-View 
Monitor Malfunction 
Visit Your Dealer” is 
displayed on the 
multi-information dis-
play.

The display range 
cannot be changed 
and the adjustment 
icons cannot be oper-
ated.

The camera indica-
tors are not displayed.

Symptom

Likely cause

Solution

172

3-5. Opening, closing the windows and moon roof

3-5.Opening, closing the windows and moon roof

The power windows can be opened 
and closed by one-touch operation of 
the switches.

1

Closing

2

One-touch closing

*

3

Opening

4

One-touch opening

*

*

: To stop the window partway, operate 

the switch in the opposite direction.

Q

The power windows can be operated 

when

The power switch is in ON mode.

Q

Operating the power windows after 

turning the hybrid system off

The power windows can be operated for 

approximately 45 seconds after the power 

switch is turned to ACCESSORY mode or 

turned off. They cannot, however, be oper-

ated once the either front door is opened.

Q

Jam protection function

If an object becomes jammed between the 

window and the window frame while the 

window is closing, window movement is 

stopped and the window is opened slightly.

Q

Catch protection function

If an object becomes caught between the 

door and window while the window is open-

ing, window movement is stopped.

Q

When the power window cannot be 

opened or closed

When the jam protection function or catch 

protection function operates unusually and 

the door window cannot be opened or 

closed, perform the following operations 

with the power window switch of that door.

O

Stop the vehicle. With the power switch 

in ON mode, within 4 seconds of the jam 

protection function or catch protection 

function activating, continuously operate 

the power window switch in the one-

touch closing direction or one-touch 

opening direction so that the door win-

dow can be opened and closed.

O

If the side window cannot be opened and 

closed even when performing the above 

operations, perform the following proce-

dure for function initialization.

1

Turn the power switch to ON mode.

2

Pull and hold the power window switch 

in the one-touch closing direction and 

completely close the side window.

3

Release the power window switch for a 

moment, resume pulling the switch in 

the one-touch closing direction, and 

hold it there for approximately 6 sec-

onds or more.

4

Press and hold the power window 

switch in the one-touch opening direc-

tion. After the side window is com-

pletely opened, continue holding the 

switch for an additional 1 second or 

more.

5

Release the power window switch for a 

moment, resume pushing the switch in 

the one-touch opening direction, and 

hold it there for approximately 4 sec-

onds or more.

6

Pull and hold the power window switch 

in the one-touch closing direction 

again. After the door window is com-

pletely closed, continue holding the 

switch for a further 1 second or more.

If you release the switch while the side win-

Power windows

Opening and closing the power 
windows

173

3

3-5. Opening, closing the windows and moon roof

Before drivi

ng

dow is moving, start again from the begin-

ning. 

If the side window reverses and cannot be 

fully closed or opened, have the vehicle 

inspected by any authorized Lexus retailer 

or Lexus authorized repairer, or any reli-

able repairer.

Q

Door lock linked window operation

O

The power windows can be opened and 
closed using the mechanical key.

*


(

P.442)

O

The power windows can be opened and 

closed using the wireless remote con-
trol.

*

 (

P.128)

O

Vehicles with alarm: The alarm may be 

triggered if the alarm is set and the power 

window is closed using the door lock 

linked power window operation function. 

(

P.87)

*

: These settings must be customized at any 

authorized Lexus retailer or Lexus autho-
rized repairer, or any reliable repairer.

Q

Power windows open warning buzzer

The buzzer sounds and “Window Open” is 

shown on the multi-information display 

when the power switch is turned off and the 

driver’s door is opened with the power win-

dows open.

Q

Customization

Settings (e.g. linked door lock operation) 

can be changed. 

(Customizable features: 

P.463)

WARNING

Observe the following precautions. 

Failure to do so may result in death or 

serious injury.

Q

Closing the windows

O

The driver is responsible for all the 

power window operations, including 

the operation for the passengers. In 

order to prevent accidental operation, 

especially by a child, do not let a child 

operate the power windows. It is possi-

ble for children and other passengers 

to have body parts caught in the power 

window. Also, when riding with a child, 

it is recommended to use the window 

lock switch. (

P.174)

O

Check to make sure that all passen-

gers do not have any part of their body 

in a position where it could be caught 

when a window is being operated.

O

When using the wireless remote con-

trol or mechanical key and operating 

the power windows, operate the 

power window after checking to make 

sure that there is no possibility of any 

passenger having any of their body 

parts caught in the window. Also do 

not let a child operate window by the 

wireless remote control or mechanical 

key. It is possible for children and other 

passengers to get caught in the power 

window.

O

When exiting the vehicle, turn the 

power switch off, carry the key and exit 

the vehicle along with the child. There 

may be accidental operation, due to 

mischief, etc., that may possibly lead to 

an accident.

Q

Jam protection function

O

Never use any part of your body to 

intentionally activate the jam protec-

tion function.

O

The jam protection function may not 

work if something gets jammed just 

before the window is fully closed. Be 

careful not to get any part of your body 

jammed in the window.

174

3-5. Opening, closing the windows and moon roof

This function can be used to prevent 
children from accidentally opening or 
closing a passenger window.
Press the switch.

The indicator 

 will come on and the 

passenger windows will be locked.

Q

The power windows can be operated 

when

The power switch is in ON mode.

Q

When the 12-volt battery is discon-

nected

The window lock switch is disabled. If nec-

essary, press the window lock switch after 

reconnecting the 12-volt battery.

Q

Opening and closing

1

Opens the moon roof

*

The moon roof stops slightly before the 
fully open position to reduce wind noise.
Press the switch again to fully open the 
moon roof.

2

Closes the moon roof

*

*

: Lightly press either way of the moon roof 

switch to stop the moon roof partway.

Q

Tilting up and down

1

Tilts the moon roof up

*

WARNING

Q

Catch protection function

O

Never use any part of your body or 

clothing to intentionally activate the 

catch protection function.

O

The catch protection function may not 

work if something gets caught just 

before the window is fully opened. Be 

careful not to get any part of your body 

or clothing caught in the window.

Preventing accidental opera-
tion (window lock switch)

A

Moon roof

Use the overhead switches to open 
and close the moon roof and tilt it 
up and down.

Operating the moon roof

175

3

3-5. Opening, closing the windows and moon roof

Before drivi

ng

2

Tilts the moon roof down

*

*

: Lightly press either way of the moon roof 

switch to stop the moon roof partway.

Q

The moon roof can be operated when

The power switch is in ON mode.

Q

Operating the moon roof after turning 

the hybrid system off

The moon roof can be operated for approx-

imately 45 seconds after the power switch 

is turned to ACCESSORY mode or turned 

off. It cannot, however, be operated once 

either front door is opened.

Q

Jam protection function

If an object is detected between the moon 

roof and the frame while the moon roof is 

closing or tilting down, travel is stopped and 

the moon roof opens slightly.

Q

Sunshade

The sunshade can be opened and closed 

manually. However, the sunshade will open 

automatically when the moon roof is 

opened.

Q

Door lock linked moon roof operation

O

The moon roof can be opened and 
closed using the mechanical key.

*


(

P.442)

O

The moon roof can be opened and 

closed using the wireless remote con-
trol.

*

 (

P.128)

O

Vehicles with alarm: The alarm may be 

triggered if the alarm is set and the moon 

roof is closed using the door lock linked 

moon roof operation function. (

P.87)

*

: These settings must be customized at any 

authorized Lexus retailer or Lexus autho-
rized repairer, or any reliable repairer.

Q

When the moon roof does not close nor-

mally

Perform the following procedure:

1

Stop the vehicle.

2

Press and hold the “CLOSE” switch.

*

The moon roof will close, reopen and pause 

for approximately 10 seconds. Then it will 

close again and stop at the completely 

closed position.

3

Check to make sure that the moon roof 

is completely closed and then release 

the switch.

*

: If the switch is released at the incorrect 

time, the procedure will have to be per-
formed again from the beginning.

If the moon roof does not fully close even 

after performing the above procedure cor-

rectly, have the vehicle inspected by any 

authorized Lexus retailer or Lexus autho-

rized repairer, or any reliable repairer.

Q

If the moon roof does not move normally

If the moon roof does not open or close 

normally or the automatic opening function 

does not operate, perform the following ini-

tialization procedure.

1

Stop the vehicle.

2

Press and hold the “DOWN” switch.

*

The moon roof will stop at the tilt-up posi-

tion. After that, it will open, close, tilt up, tilt 

down, and stop at the fully closed position.

3

Confirm that the moon roof has com-

pletely stopped and release the switch.

*

: If you release the switch while the moon 

roof is moving, perform the procedure 
again from the beginning.

If, after performing the above procedures 
correctly, the moon roof still does not open 
or close normally or the automatic opening 
function does not operate, have the vehicle 
inspected by any authorized Lexus retailer 
or Lexus authorized repairer, or any reli-
able repairer.

Q

Moon roof open warning buzzer

A buzzer sounds and a message is shown 

on the multi-information display when the 

power switch is turned off and the driver’s 

door is opened with the moon roof open.

Q

Customization

Settings (e.g. linked door lock operation) 

176

3-5. Opening, closing the windows and moon roof

can be changed. (Customizable features: 

P.463)

WARNING

Observe the following precautions.

Failure to do so may cause death or seri-

ous injury.

Q

Opening the moon roof

O

Do not allow any passengers to put 

their hands or heads outside the vehi-

cle while it is moving.

O

Do not sit on top of the moon roof.

Q

Opening and closing the moon roof

O

The driver is responsible for moon roof 

opening and closing operations.

In order to prevent accidental opera-

tion, especially by a child, do not let a 

child operate the moon roof. It is possi-

ble for children and other passengers 

to have body parts caught in the moon 

roof.

O

Check to make sure that all passen-

gers do not have any part of their body 

in a position where it could be caught 

when the moon roof is being operated.

O

When using the wireless remote con-

trol or mechanical key and operating 

the moon roof, operate the moon roof 

after checking to make sure that there 

is no possibility of any passenger hav-

ing any of their body parts caught in 

the moon roof. Also, do not let a child 

operate moon roof by the wireless 

remote control or mechanical key. It is 

possible for children and other pas-

sengers to get caught in the moon 

roof.

O

When exiting the vehicle, turn the 

power switch off, carry the key and exit 

the vehicle along with the child. There 

may be accidental operation, due to 

mischief, etc., that may possibly lead to 

an accident.

Q

Jam protection function

O

Never use any part of your body to 

intentionally activate the jam protec-

tion function.

O

The jam protection function may not 

work if something gets caught just 

before the moon roof fully closes.

Also, the jam protection function is not 

designed to operate while the moon 

roof switch is being pressed. Take care 

so that your fingers, etc. do not get 

caught.

4

177

4

Dr

ivin
g

Driving

4-1. Before driving

Driving the vehicle.....................

178

Cargo and luggage...................

183

Trailer towing...............................

184

4-2. Driving procedures

Power (ignition) switch............

185

EV drive mode ............................

189

Hybrid transmission ...................

191

Turn signal lever .........................

195

Parking brake ..............................

196

Brake Hold....................................

198

4-3. Operating the lights and wipers

Headlight switch.........................

201

AHS (Adaptive High-beam Sys-

tem)..............................................

203

AHB (Automatic High Beam)

........................................................

207

Multi Weather Lights ...............

210

Rear fog lights...............................

211

Windshield wipers and washer

.........................................................

212

4-4. Refueling

Opening the fuel tank cap......

217

4-5. Using the driving support sys-

tems

Lexus Safety System + .............

219

PCS (Pre-Collision System)

224

LTA (Lane Tracing Assist).....

234

RSA (Road Sign Assist)..........

244

Dynamic radar cruise control with 

full-speed range .....................

248

Cruise control ............................

260

BSM (Blind Spot Monitor).....

262

Driving Mode Select switch..

267

PKSA (Parking Support Alert)

.......................................................

270

Lexus parking assist-sensor ...

271

RCTA (Rear Crossing Traffic 

Alert) function ..........................

279

RCD (Rear Camera Detection) 

function ......................................

285

PKSB (Parking Support Brake)

.......................................................

288

Parking Support Brake function 

(static objects).........................

295

Parking Support Brake function 

(rear-crossing vehicles) ......

298

Parking Support Brake function 

(rear pedestrians) ..................

300

GPF (Gasoline Particulate Filter) 

system.........................................

302

Driving assist systems .............

303

4-6. Driving tips

Hybrid vehicle driving tips ....

308

Winter driving tips.....................

310

178

4-1. Before driving

4-1.Before driving

Q

Starting the hybrid system

P.185

Q

Driving

1

With the brake pedal depressed, 
shift the shift lever to D. (

P.192)

2

If the parking brake is in manual 
mode, release the parking brake. 
(

P.196)

3

Gradually release the brake pedal 
and gently depress the accelerator 
pedal to accelerate the vehicle.

Q

Stopping

1

With the shift lever in D, depress 
the brake pedal.

2

If necessary, set the parking brake. 
(

P.196)

If the vehicle is to be stopped for an 

extended period of time, shift the shift lever 

to P. (

P.192)

Q

Parking the vehicle

1

With the shift lever in D, depress 
the brake pedal.

2

Set the parking brake (

P.196), 

and shift the shift lever to P 
(

P.192).

3

Press the power switch to stop the 
hybrid system.

4

Lock the door, making sure that 
you have the electronic key on your 
person.

If parking on a hill, block the wheels as 

needed.

Q

Starting off on a steep uphill

1

Make sure that the parking brake is 
set with the brake pedal depressed, 
and then shift the shift lever to D.

2

Release the brake pedal and gently 
depress the accelerator pedal.

3

Release the parking brake.

Q

When starting off on a uphill

The hill-start assist control will activate. 

(

P.303)

Q

For fuel-efficient driving

Keep in mind that hybrid vehicles are simi-

lar to conventional vehicles, and it is neces-

sary to refrain from activities such as 

sudden acceleration. (

P.308)

Q

Coasting (Auto Glide Control)

When Eco drive mode is selected, under 

certain conditions, Auto Glide Control will 

operate automatically and allow the vehicle 

coast, enhancing fuel economy. (

P.269)

Q

Driving in the rain

O

Drive carefully when it is raining, because 

visibility will be reduced, the windows 

may become fogged-up, and the road 

will be slippery.

O

Drive carefully when it starts to rain, 

because the road surface will be espe-

cially slippery.

O

Refrain from high speeds when driving on 

an expressway in the rain, because there 

may be a layer of water between the tires 

and the road surface, preventing the 

steering and brakes from operating 

properly.

Driving the vehicle

The following procedures should be 
observed to ensure safe driving:

Driving procedure


Content      ..     7      8      9      10     ..